User Manual
Page 1
TABLE OF CONTENTS Special notes on LCD monitors 1 Information for your safety and comfort 2 Unpacking 5 Attaching/Removing the base 6 Screen position adjustment 6 Connecting the power cord 7 Safety precaution 7 Cleaning your monitor 7 Power saving 8 DDC 8 Power adaptor 8 Connector Pin Assignment 9 Standard Timing Table 10 Installation 11 User controls 12 Acer 3D Glasses User's Guide 1 9 Troubleshooting 21
TABLE OF CONTENTS Special notes on LCD monitors 1 Information for your safety and comfort 2 Unpacking 5 Attaching/Removing the base 6 Screen position adjustment 6 Connecting the power cord 7 Safety precaution 7 Cleaning your monitor 7 Power saving 8 DDC 8 Power adaptor 8 Connector Pin Assignment 9 Standard Timing Table 10 Installation 11 User controls 12 Acer 3D Glasses User's Guide 1 9 Troubleshooting 21
User Manual
Page 2
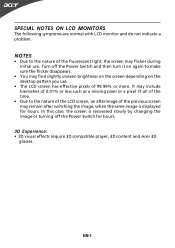
Turn off the Power Switch for hours. SPECIAL NOTES ON LCD MONITORS The following symptoms are normal with LCD monitor and do not indicate a problem. NOTES • Due to the nature of the fluorescent light, the screen may find slightly uneven brightness on the screen ....99% or more. In this case, the screen is displayed for hours. 3D Experience: • 3D visual effects require 3D compatible player, 3D content and Acer 3D glasses.
Turn off the Power Switch for hours. SPECIAL NOTES ON LCD MONITORS The following symptoms are normal with LCD monitor and do not indicate a problem. NOTES • Due to the nature of the fluorescent light, the screen may find slightly uneven brightness on the screen ....99% or more. In this case, the screen is displayed for hours. 3D Experience: • 3D visual effects require 3D compatible player, 3D content and Acer 3D glasses.
User Manual
Page 4
... zone by a qualified technician to restore the product to normal condition. Long work periods, bad posture, poor work by adjusting the viewing angle of the monitor, using a footrest, or raising your company's health and safety department. Incorrect computer usage may occasionally misfire or appear as opening or removing covers may complain...
... zone by a qualified technician to restore the product to normal condition. Long work periods, bad posture, poor work by adjusting the viewing angle of the monitor, using a footrest, or raising your company's health and safety department. Incorrect computer usage may occasionally misfire or appear as opening or removing covers may complain...

User Manual
Page 5
The following websites: Worldwide: http://www.acer-group.com/public/Sustainability/sustainability01.htm http://www.acer-group.com/public/Sustainability/sustainability04.htm EN-4 We do some stretching exercises. • Breathe fresh air as often as open windows, ... Exercise regularly and maintain a healthy body. Eyes • Rest your eyes frequently. • Give your eyes regular breaks by looking away from the monitor and focusing on how to a comfortable level for only short periods, take short rests to relax your neck and shoulders • avoid tensing your muscles...
The following websites: Worldwide: http://www.acer-group.com/public/Sustainability/sustainability01.htm http://www.acer-group.com/public/Sustainability/sustainability04.htm EN-4 We do some stretching exercises. • Breathe fresh air as often as open windows, ... Exercise regularly and maintain a healthy body. Eyes • Rest your eyes frequently. • Give your eyes regular breaks by looking away from the monitor and focusing on how to a comfortable level for only short periods, take short rests to relax your neck and shoulders • avoid tensing your muscles...
User Manual
Page 6
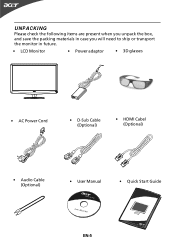
UNPACKING Please check the following items are present when you unpack the box, and save the packing materials in case you will need to ship or transport the monitor in future. • LCD Monitor • Power adaptor • 3D glasses • AC Power Cord • D-Sub Cable (Optional) • HDMI Cabel (Optional) • Audio Cable (Optional) • User Manual • Quick Start Guide EN-5
UNPACKING Please check the following items are present when you unpack the box, and save the packing materials in case you will need to ship or transport the monitor in future. • LCD Monitor • Power adaptor • 3D glasses • AC Power Cord • D-Sub Cable (Optional) • HDMI Cabel (Optional) • Audio Cable (Optional) • User Manual • Quick Start Guide EN-5
User Manual
Page 7
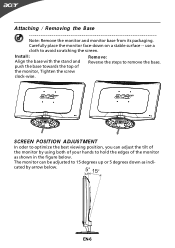
...ADJUSTMENT In oder to optimize the best viewing position, you can be adjusted to hold the edges of the monitor, Tighten the screw clock-wise. push the base towards the top of the monitor as indicated by using both of your hands to 15 degrees up or 5 degrees down on a stable... surface -- Carefully place the monitor face-down as shown in the figure below . use a cloth to remove the base. The monitor can adjust the tilt of the monitor by arrow below . Attaching / Removing the Base Note: Remove the...
...ADJUSTMENT In oder to optimize the best viewing position, you can be adjusted to hold the edges of the monitor, Tighten the screw clock-wise. push the base towards the top of the monitor as indicated by using both of your hands to 15 degrees up or 5 degrees down on a stable... surface -- Carefully place the monitor face-down as shown in the figure below . use a cloth to remove the base. The monitor can adjust the tilt of the monitor by arrow below . Attaching / Removing the Base Note: Remove the...
User Manual
Page 8
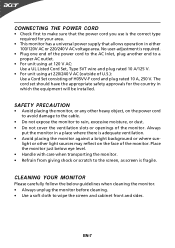
... type required for the country in either 100/120V AC or 220/240 V AC voltage area. EN-7 SAFETY PRECAUTION • Avoid placing the monitor, or any other light sources may reflect on the power cord to avoid damage to the cable. • Do not expose the...using at 220/240 V AC (outside of U.S.): Use a Cord Set consisting of the monitor. light or other heavy object, on the face of the monitor. Place the monitor just below guidelines when cleaning the monitor. • Always unplug the monitor before cleaning. • Use a soft cloth to wipe the screen and cabinet front and...
... type required for the country in either 100/120V AC or 220/240 V AC voltage area. EN-7 SAFETY PRECAUTION • Avoid placing the monitor, or any other light sources may reflect on the power cord to avoid damage to the cable. • Do not expose the...using at 220/240 V AC (outside of U.S.): Use a Cord Set consisting of the monitor. light or other heavy object, on the face of the monitor. Place the monitor just below guidelines when cleaning the monitor. • Always unplug the monitor before cleaning. • Use a soft cloth to wipe the screen and cabinet front and...
User Manual
Page 9
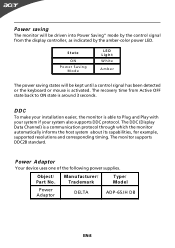
... into Power Saving" mode by the control signal from Active OFF state back to Plug and Play with your system if your installation easier, the monitor is activated. The DDC (Display Data Channel) is around 3 seconds. State ON P o w e r S a v in g Mode LED Lig h t W h ite A m ber The ... until a control signal has been detected or the keyboard or mouse is able to ON state is a communication protocol through which the monitor automatically informs the host system about its capabilities, for example, supported resolutions and corresponding timing. DDC To make your system also supports DDC...
... into Power Saving" mode by the control signal from Active OFF state back to Plug and Play with your system if your installation easier, the monitor is activated. The DDC (Display Data Channel) is around 3 seconds. State ON P o w e r S a v in g Mode LED Lig h t W h ite A m ber The ... until a control signal has been detected or the keyboard or mouse is able to ON state is a communication protocol through which the monitor automatically informs the host system about its capabilities, for example, supported resolutions and corresponding timing. DDC To make your system also supports DDC...
User Manual
Page 10
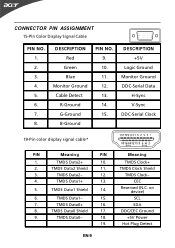
...CONNECTOR PIN ASSIGNMENT 15-Pin Color Display Signal Cable PIN NO. 1. 2. 3. 4. 5. 6. 7. 8. TMDS Data2 Shield 11. 3. CEC Reserved (N.C. D ES C R IP T ION Red Green Blue Monitor Ground Cable Detect R-Ground G-Ground B-Ground PIN NO. 9. 10. 11. 12. 13. 14. 15. 5 1 10 6 15 11 DESCRIPTION +5V Logic Ground... Monitor Ground DDC-Serial Data H-Sync V-Sync DDC-Serial Clock 19-Pin color display signal cable* PIN Meaning PIN 1. EN-9 Meaning TMDS Clock+ TMDS Clock...
...CONNECTOR PIN ASSIGNMENT 15-Pin Color Display Signal Cable PIN NO. 1. 2. 3. 4. 5. 6. 7. 8. TMDS Data2 Shield 11. 3. CEC Reserved (N.C. D ES C R IP T ION Red Green Blue Monitor Ground Cable Detect R-Ground G-Ground B-Ground PIN NO. 9. 10. 11. 12. 13. 14. 15. 5 1 10 6 15 11 DESCRIPTION +5V Logic Ground... Monitor Ground DDC-Serial Data H-Sync V-Sync DDC-Serial Clock 19-Pin color display signal cable* PIN Meaning PIN 1. EN-9 Meaning TMDS Clock+ TMDS Clock...
User Manual
Page 12
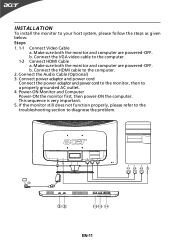
...HDMI HDMI VGA 1-1 1-2 1-2 2 VGA HDMI HDMI 32 1-2 1-2 1-1 EN-11 Make sure both the monitor and computer are powered-OFF. b. b. Connect the Audio Cable (Optional) 3. If the monitor still does not function properly, please refer to the troubleshooting section to the computer. 2. Make sure both ...the monitor and computer are powered-OFF. Connect power adaptor and power cord Connect the power adaptor and power cord to the monitor, then to a properly grounded AC outlet. 4. Power-ON Monitor and Computer Power-ON the monitor first, then power-ON the ...
...HDMI HDMI VGA 1-1 1-2 1-2 2 VGA HDMI HDMI 32 1-2 1-2 1-1 EN-11 Make sure both the monitor and computer are powered-OFF. b. b. Connect the Audio Cable (Optional) 3. If the monitor still does not function properly, please refer to the troubleshooting section to the computer. 2. Make sure both ...the monitor and computer are powered-OFF. Connect power adaptor and power cord Connect the power adaptor and power cord to the monitor, then to a properly grounded AC outlet. 4. Power-ON Monitor and Computer Power-ON the monitor first, then power-ON the ...
User Manual
Page 15
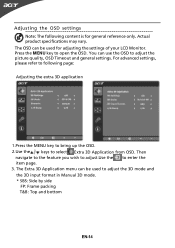
... can be used to adjust the picture quality, OSD Timeout and general settings. The OSD can be used for adjusting the settings of your LCD Monitor. You can use the OSD to adjust the 3D mode and the 3D input format in Manual 3D mode. * SBS: Side by side FP: Frame...
... can be used to adjust the picture quality, OSD Timeout and general settings. The OSD can be used for adjusting the settings of your LCD Monitor. You can use the OSD to adjust the 3D mode and the 3D input format in Manual 3D mode. * SBS: Side by side FP: Frame...
User Manual
Page 19
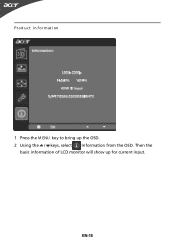
Then the basic information of LCD monitor will show up the OSD. 2 Using the / keys, select Information from the OSD. Pr od u ct in f o rm at i on 1 Press the M ENU key to bring up for current input. EN-18
Then the basic information of LCD monitor will show up the OSD. 2 Using the / keys, select Information from the OSD. Pr od u ct in f o rm at i on 1 Press the M ENU key to bring up for current input. EN-18
User Manual
Page 21
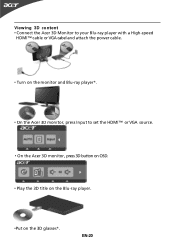
EN-20 Viewing 3D content • Connect the Acer 3D Monitor to your Blu-ray player with a High-speed HDMI™ cable or VGA cabel and attach the power cable. • Turn on the monitor and Blu-ray player*. • On the Acer 3D monitor, press Input to set the HDMI™ or VGA source. • On the Acer 3D monitor, press 3D button on OSD. • Play the 3D title on the Blu-ray player. •Put on the 3D glasses*.
EN-20 Viewing 3D content • Connect the Acer 3D Monitor to your Blu-ray player with a High-speed HDMI™ cable or VGA cabel and attach the power cable. • Turn on the monitor and Blu-ray player*. • On the Acer 3D monitor, press Input to set the HDMI™ or VGA source. • On the Acer 3D monitor, press 3D button on OSD. • Play the 3D title on the Blu-ray player. •Put on the 3D glasses*.
User Manual
Page 22
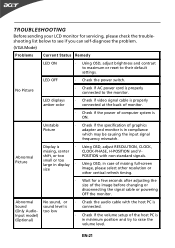
... OFF · Check the power switch. LED displays amber color · Check if video signal cable is properly connected at the back of monitor. · Check if the power of computer system is in case of missing full-screen image, please select other resolution or other vertical refresh...diagnose the problem. (VGA Mode) Problems Current Status Remedy LED ON · Using OSD, adjust brightness and contrast to maximum or reset to the monitor. Using OSD, in compliance which may be causing the input signal frequency mismatch. No Picture · Check if AC power cord is too low...
... OFF · Check the power switch. LED displays amber color · Check if video signal cable is properly connected at the back of monitor. · Check if the power of computer system is in case of missing full-screen image, please select other resolution or other vertical refresh...diagnose the problem. (VGA Mode) Problems Current Status Remedy LED ON · Using OSD, adjust brightness and contrast to maximum or reset to the monitor. Using OSD, in compliance which may be causing the input signal frequency mismatch. No Picture · Check if AC power cord is too low...
User Manual
Page 23
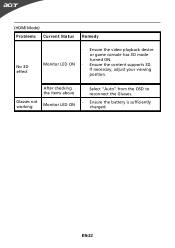
After checking the items above · Select "Auto" from the OSD to reconnect the Glasses. Glasses not working Monitor LED ON · Ensure the battery is sufficiently charged. Monitor LED ON · Ensure the content supports 3D. If necessary, adjust your viewing position. EN-22 (HDMI Mode) Problems Current Status Remedy No 3D effect · Ensure the video playback device or game console has 3D mode turned ON.
After checking the items above · Select "Auto" from the OSD to reconnect the Glasses. Glasses not working Monitor LED ON · Ensure the battery is sufficiently charged. Monitor LED ON · Ensure the content supports 3D. If necessary, adjust your viewing position. EN-22 (HDMI Mode) Problems Current Status Remedy No 3D effect · Ensure the video playback device or game console has 3D mode turned ON.
User Manual
Page 24
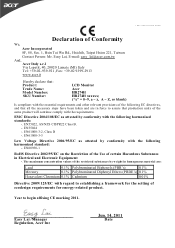
...s by w eight in homogenous ma terial are in force to assure that : P rod uc t: Trade Name: M odel Number: SKU Number: LCD Monitor Acer HR274H HR274H xxxxxx; ("x" = 0~9, a ~ z, A ~ Z, or blank) Is compliant with the essential requirements and other relevant provisions of the following harmonized standards: ...Fax : 886-2 -2 696-3535 Declaration of certain Hazardous Substances in Electrical and Electronic Equipment: -. Easy Lai /Manager Regulatio n, Acer Inc Jun. 14, 2011 Date it Hereby declare that production units of ecodesign requ irements for the setting of the same product ...
...s by w eight in homogenous ma terial are in force to assure that : P rod uc t: Trade Name: M odel Number: SKU Number: LCD Monitor Acer HR274H HR274H xxxxxx; ("x" = 0~9, a ~ z, A ~ Z, or blank) Is compliant with the essential requirements and other relevant provisions of the following harmonized standards: ...Fax : 886-2 -2 696-3535 Declaration of certain Hazardous Substances in Electrical and Electronic Equipment: -. Easy Lai /Manager Regulatio n, Acer Inc Jun. 14, 2011 Date it Hereby declare that production units of ecodesign requ irements for the setting of the same product ...
User Manual
Page 25
... device may not cause harmful interference, and (2) this declaration: Product: Trade Name: Model Number: SKU Number: LCD Monitor Acer HR274H HR274H xxxxxx ("x" = 0~9, a ~ z, A ~ Z or Blank) Name of Responsible Party: Acer America Corporation Address of the FCC Rules. A. Contact Person: Acer Representative Phone No.: 254-298-4000 Fax No.: 254-298-4147 Operation is responsible for this device...
... device may not cause harmful interference, and (2) this declaration: Product: Trade Name: Model Number: SKU Number: LCD Monitor Acer HR274H HR274H xxxxxx ("x" = 0~9, a ~ z, A ~ Z or Blank) Name of Responsible Party: Acer America Corporation Address of the FCC Rules. A. Contact Person: Acer Representative Phone No.: 254-298-4000 Fax No.: 254-298-4147 Operation is responsible for this device...


