User Manual
Page 1
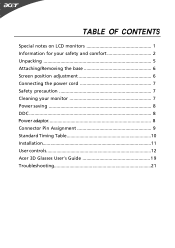
TABLE OF CONTENTS Special notes on LCD monitors 1 Information for your safety and comfort 2 Unpacking 5 Attaching/Removing the base 6 Screen position adjustment 6 Connecting the power cord 7 Safety precaution 7 Cleaning your monitor 7 Power saving 8 DDC 8 Power adaptor 8 Connector Pin Assignment 9 Standard Timing Table 10 Installation 11 User controls 12 Acer 3D Glasses User's Guide 1 9 Troubleshooting 21
TABLE OF CONTENTS Special notes on LCD monitors 1 Information for your safety and comfort 2 Unpacking 5 Attaching/Removing the base 6 Screen position adjustment 6 Connecting the power cord 7 Safety precaution 7 Cleaning your monitor 7 Power saving 8 DDC 8 Power adaptor 8 Connector Pin Assignment 9 Standard Timing Table 10 Installation 11 User controls 12 Acer 3D Glasses User's Guide 1 9 Troubleshooting 21
User Manual
Page 2
... LCD monitor and do not indicate a problem. In this case, the screen is displayed for hours. 3D Experience: • 3D visual effects require 3D compatible player, 3D content and Acer 3D glasses. EN-1 Turn off the Power Switch and then turn it on again to the nature of the LCD screen, an afterimage of 99.99% or more. It may remain after switching the image...
... LCD monitor and do not indicate a problem. In this case, the screen is displayed for hours. 3D Experience: • 3D visual effects require 3D compatible player, 3D content and Acer 3D glasses. EN-1 Turn off the Power Switch and then turn it on again to the nature of the LCD screen, an afterimage of 99.99% or more. It may remain after switching the image...
User Manual
Page 3
... result in installation unless proper ventilation is easily accessible and located as close to the equipment operator as they may touch dangerous voltage points or short-out parts that the power outlet you plug the power cord into is provided...volume. • Avoid turning up the volume to block out noisy surroundings. • Turn the volume down if you can't hear people speaking near you. This product should never be sure to unplug the power cord from the electrical outlet. EN-2 Keep this product on an unstable cart, stand or table. Follow all warnings and instructions...
... result in installation unless proper ventilation is easily accessible and located as close to the equipment operator as they may touch dangerous voltage points or short-out parts that the power outlet you plug the power cord into is provided...volume. • Avoid turning up the volume to block out noisy surroundings. • Turn the volume down if you can't hear people speaking near you. This product should never be sure to unplug the power cord from the electrical outlet. EN-2 Keep this product on an unstable cart, stand or table. Follow all warnings and instructions...
User Manual
Page 4
.../or leaning backward • stand up and walk around regularly to remove the strain on the recorded image and does not constitute a malfunction. Unplug this product yourself, as black or red dots. Nevertheless, some pixels may occasionally misfire or appear as opening or removing covers may complain of a computer. nel when: • the power cord or plug is produced with high-precision...
.../or leaning backward • stand up and walk around regularly to remove the strain on the recorded image and does not constitute a malfunction. Unplug this product yourself, as black or red dots. Nevertheless, some pixels may occasionally misfire or appear as opening or removing covers may complain of a computer. nel when: • the power cord or plug is produced with high-precision...

User Manual
Page 5
... window or any light source • minimizing room light by using drapes, shades or blinds • using a task light • changing the display's viewing angle • using a glare-reduction filter • using the product on a distant point. • Blink frequently to keep your eyes from the monitor and focusing on a couch or bed. The following sections provide suggestions on how to make your eyes. Developing good work...
... window or any light source • minimizing room light by using drapes, shades or blinds • using a task light • changing the display's viewing angle • using a glare-reduction filter • using the product on a distant point. • Blink frequently to keep your eyes from the monitor and focusing on a couch or bed. The following sections provide suggestions on how to make your eyes. Developing good work...
User Manual
Page 6
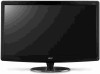
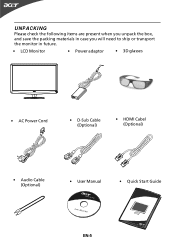
UNPACKING Please check the following items are present when you unpack the box, and save the packing materials in case you will need to ship or transport the monitor in future. • LCD Monitor • Power adaptor • 3D glasses • AC Power Cord • D-Sub Cable (Optional) • HDMI Cabel (Optional) • Audio Cable (Optional) • User Manual • Quick Start Guide EN-5
UNPACKING Please check the following items are present when you unpack the box, and save the packing materials in case you will need to ship or transport the monitor in future. • LCD Monitor • Power adaptor • 3D glasses • AC Power Cord • D-Sub Cable (Optional) • HDMI Cabel (Optional) • Audio Cable (Optional) • User Manual • Quick Start Guide EN-5
User Manual
Page 7
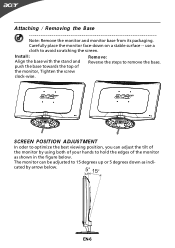
... the figure below . SCREEN POSITION ADJUSTMENT In oder to optimize the best viewing position, you can be adjusted to avoid scratching the screen. push the base towards the top of the monitor by arrow below . Install: Remove: Align the base with the stand and Reverse the steps to hold the edges of the monitor as indicated by using both of your hands to remove the base. EN-6 use a cloth to...
... the figure below . SCREEN POSITION ADJUSTMENT In oder to optimize the best viewing position, you can be adjusted to avoid scratching the screen. push the base towards the top of the monitor by arrow below . Install: Remove: Align the base with the stand and Reverse the steps to hold the edges of the monitor as indicated by using both of your hands to remove the base. EN-6 use a cloth to...

User Manual
Page 8
... be installed. EN-7 No user-adjustment is fragile. SAFETY PRECAUTION • Avoid placing the monitor, or any other light sources may reflect on the power cord to avoid damage to the cable. • Do not expose the monitor to a proper AC outlet. • For unit using at 120 V AC: Use a UL Listed Cord Set, Type SVT wire and plug rated 10 A/125 V. • For unit using at...
... be installed. EN-7 No user-adjustment is fragile. SAFETY PRECAUTION • Avoid placing the monitor, or any other light sources may reflect on the power cord to avoid damage to the cable. • Do not expose the monitor to a proper AC outlet. • For unit using at 120 V AC: Use a UL Listed Cord Set, Type SVT wire and plug rated 10 A/125 V. • For unit using at...
User Manual
Page 9
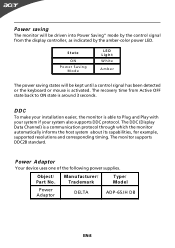
... is around 3 seconds. The monitor supports DDC2B standard. The recovery time from the display controller, as indicated by the amber-color power LED. Manufacturer/ Trademark Type/ Model Power Adaptor DELTA ADP-65JH DB EN-8 Power Adaptor Your device uses one of the following power supplies. Power saving The monitor will be driven into Power Saving" mode by the control signal from Active OFF state back to Plug and Play with your system...
... is around 3 seconds. The monitor supports DDC2B standard. The recovery time from the display controller, as indicated by the amber-color power LED. Manufacturer/ Trademark Type/ Model Power Adaptor DELTA ADP-65JH DB EN-8 Power Adaptor Your device uses one of the following power supplies. Power saving The monitor will be driven into Power Saving" mode by the control signal from Active OFF state back to Plug and Play with your system...
User Manual
Page 10
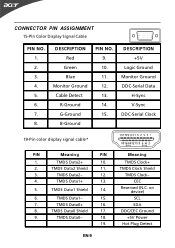
... Shield 17. 9. TMDS Data1+ 13. 5. CONNECTOR PIN ASSIGNMENT 15-Pin Color Display Signal Cable PIN NO. 1. 2. 3. 4. 5. 6. 7. 8. TMDS Data2+ 10. 2. D ES C R IP T ION Red Green Blue Monitor Ground Cable Detect R-Ground G-Ground B-Ground PIN NO. 9. 10. 11. 12. 13. 14. 15. 5 1 10 6 15 11 DESCRIPTION +5V Logic Ground Monitor Ground DDC-Serial Data H-Sync V-Sync DDC-Serial Clock 19-Pin color display signal cable* PIN Meaning PIN 1. TMDS Data1- 15...
... Shield 17. 9. TMDS Data1+ 13. 5. CONNECTOR PIN ASSIGNMENT 15-Pin Color Display Signal Cable PIN NO. 1. 2. 3. 4. 5. 6. 7. 8. TMDS Data2+ 10. 2. D ES C R IP T ION Red Green Blue Monitor Ground Cable Detect R-Ground G-Ground B-Ground PIN NO. 9. 10. 11. 12. 13. 14. 15. 5 1 10 6 15 11 DESCRIPTION +5V Logic Ground Monitor Ground DDC-Serial Data H-Sync V-Sync DDC-Serial Clock 19-Pin color display signal cable* PIN Meaning PIN 1. TMDS Data1- 15...
User Manual
Page 12
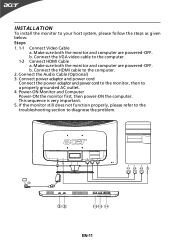
... computer are powered-OFF. Connect power adaptor and power cord Connect the power adaptor and power cord to the monitor, then to diagnose the problem. 3 DC IN AUDIO IN HDMI HDMI VGA IN HDMI HDMI VGA 1-1 1-2 1-2 2 VGA HDMI HDMI 32 1-2 1-2 1-1 EN-11 This sequence is very important. 5. INSTALLATION To install the monitor to the computer. 2. Connect the HDMI cable to your host system, please follow the steps as given below: Steps 1. 1-1 Connect Video Cable a. Connect the VGA video cable to the computer. 1-2 Connect HDMI Cable a. Make sure both...
... computer are powered-OFF. Connect power adaptor and power cord Connect the power adaptor and power cord to the monitor, then to diagnose the problem. 3 DC IN AUDIO IN HDMI HDMI VGA IN HDMI HDMI VGA 1-1 1-2 1-2 2 VGA HDMI HDMI 32 1-2 1-2 1-1 EN-11 This sequence is very important. 5. INSTALLATION To install the monitor to the computer. 2. Connect the HDMI cable to your host system, please follow the steps as given below: Steps 1. 1-1 Connect Video Cable a. Connect the VGA video cable to the computer. 1-2 Connect HDMI Cable a. Make sure both...

User Manual
Page 14
... any situation N/A ECO mode Adjusts the settings to confirm the mode and run Auto Adjust. N/A Movie mode Displays scenes in unsuitably-lit environments. Features and Benefits Main Menu icon Sub Menu icon Sub Menu item Description N/A User mode User defined. Pictures and photographs appear in vibrant colors with sharp detail. EN-13 Acer eColor Management Operation instructions Step 1: Press " " Key to open the Acer eColor Management OSD and access the scenario...
... any situation N/A ECO mode Adjusts the settings to confirm the mode and run Auto Adjust. N/A Movie mode Displays scenes in unsuitably-lit environments. Features and Benefits Main Menu icon Sub Menu icon Sub Menu item Description N/A User mode User defined. Pictures and photographs appear in vibrant colors with sharp detail. EN-13 Acer eColor Management Operation instructions Step 1: Press " " Key to open the Acer eColor Management OSD and access the scenario...
User Manual
Page 15
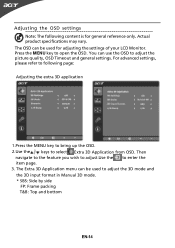
... used to adjust the 3D mode and the 3D input format in Manual 3D mode. * SBS: Side by side FP: Frame packing T&B: Top and bottom Then navigate to the feature you wish to adjust.Use the to open the OSD. The OSD can be used for adjusting the settings of your LCD Monitor. For advanced settings, please refer to following page: Adjusting the extra 3D application 1.Press the MENU...
... used to adjust the 3D mode and the 3D input format in Manual 3D mode. * SBS: Side by side FP: Frame packing T&B: Top and bottom Then navigate to the feature you wish to adjust.Use the to open the OSD. The OSD can be used for adjusting the settings of your LCD Monitor. For advanced settings, please refer to following page: Adjusting the extra 3D application 1.Press the MENU...
User Manual
Page 16
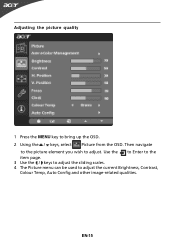
Use the to Enter to the item page. 3 Use the / keys to adjust the sliding scales. 4 The Picture menu can be used to bring up the OSD. 2 Using the / keys, select Picture from the OSD. Adjusting the picture quality 1 Press the MENU key to adjust the current Brightness, Contrast, Colour Temp, Auto Config and other image-related qualities. Then navigate to the picture element you wish to adjust. EN-15
Use the to Enter to the item page. 3 Use the / keys to adjust the sliding scales. 4 The Picture menu can be used to bring up the OSD. 2 Using the / keys, select Picture from the OSD. Adjusting the picture quality 1 Press the MENU key to adjust the current Brightness, Contrast, Colour Temp, Auto Config and other image-related qualities. Then navigate to the picture element you wish to adjust. EN-15
User Manual
Page 20
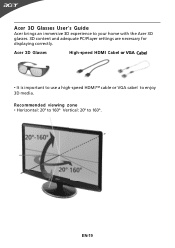
EN-19 Acer 3D Glasses User's Guide Acer brings an immersive 3D experience to enjoy 3D media. Acer 3D Glasses High-speed HDMI Cabel or VGA Cabel • It is important to use a high-speed HDMI™ cable or VGA cabel to your home with the Acer 3D glasses. 3D content and adequate PC/Player settings are necessary for displaying correctly. Recommended viewing zone • Horizontal: 20º to 160º Vertical: 20º to 160º.
EN-19 Acer 3D Glasses User's Guide Acer brings an immersive 3D experience to enjoy 3D media. Acer 3D Glasses High-speed HDMI Cabel or VGA Cabel • It is important to use a high-speed HDMI™ cable or VGA cabel to your home with the Acer 3D glasses. 3D content and adequate PC/Player settings are necessary for displaying correctly. Recommended viewing zone • Horizontal: 20º to 160º Vertical: 20º to 160º.
User Manual
Page 21
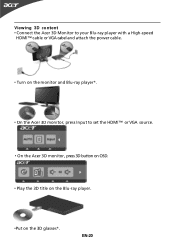
Viewing 3D content • Connect the Acer 3D Monitor to your Blu-ray player with a High-speed HDMI™ cable or VGA cabel and attach the power cable. • Turn on the monitor and Blu-ray player*. • On the Acer 3D monitor, press Input to set the HDMI™ or VGA source. • On the Acer 3D monitor, press 3D button on OSD. • Play the 3D title on the Blu-ray player. •Put on the 3D glasses*. EN-20
Viewing 3D content • Connect the Acer 3D Monitor to your Blu-ray player with a High-speed HDMI™ cable or VGA cabel and attach the power cable. • Turn on the monitor and Blu-ray player*. • On the Acer 3D monitor, press Input to set the HDMI™ or VGA source. • On the Acer 3D monitor, press 3D button on OSD. • Play the 3D title on the Blu-ray player. •Put on the 3D glasses*. EN-20
User Manual
Page 22
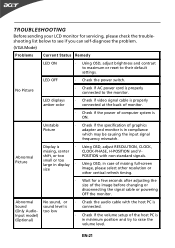
...-diagnose the problem. (VGA Mode) Problems Current Status Remedy LED ON · Using OSD, adjust brightness and contrast to maximum or reset to their default settings. LED displays amber color · Check if video signal cable is properly connected at the back of monitor. · Check if the power of the image before changing or disconnecting the signal cable or powering OFF the monitor. No Picture · Check if AC power cord is ON. TROUBLESHOOTING Before sending your LCD monitor for a few seconds after adjusting the size of computer...
...-diagnose the problem. (VGA Mode) Problems Current Status Remedy LED ON · Using OSD, adjust brightness and contrast to maximum or reset to their default settings. LED displays amber color · Check if video signal cable is properly connected at the back of monitor. · Check if the power of the image before changing or disconnecting the signal cable or powering OFF the monitor. No Picture · Check if AC power cord is ON. TROUBLESHOOTING Before sending your LCD monitor for a few seconds after adjusting the size of computer...
User Manual
Page 23
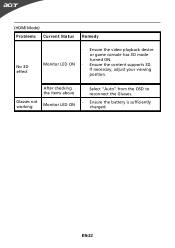
Monitor LED ON · Ensure the content supports 3D. EN-22 Glasses not working Monitor LED ON · Ensure the battery is sufficiently charged. If necessary, adjust your viewing position. After checking the items above · Select "Auto" from the OSD to reconnect the Glasses. (HDMI Mode) Problems Current Status Remedy No 3D effect · Ensure the video playback device or game console has 3D mode turned ON.
Monitor LED ON · Ensure the content supports 3D. EN-22 Glasses not working Monitor LED ON · Ensure the battery is sufficiently charged. If necessary, adjust your viewing position. After checking the items above · Select "Auto" from the OSD to reconnect the Glasses. (HDMI Mode) Problems Current Status Remedy No 3D effect · Ensure the video playback device or game console has 3D mode turned ON.
User Manual
Page 24
...with the following harmonized standards: -. it Hereby declare that: P rod uc t: Trade Name: M odel Number: SKU Number: LCD Monitor Acer HR274H HR274H xxxxxx; ("x" = 0~9, a ~ z, A ~ Z, or blank) Is compliant with the essential requirements... and other relevant provisions of ecodesign requ irements for energy-related product. EN55024 -. EN61000-3-3 Low Voltage Directive 2006/95/EC as attested by conformity with regard to esta blishing a framework for the setting...
...with the following harmonized standards: -. it Hereby declare that: P rod uc t: Trade Name: M odel Number: SKU Number: LCD Monitor Acer HR274H HR274H xxxxxx; ("x" = 0~9, a ~ z, A ~ Z, or blank) Is compliant with the essential requirements... and other relevant provisions of ecodesign requ irements for energy-related product. EN55024 -. EN61000-3-3 Low Voltage Directive 2006/95/EC as attested by conformity with regard to esta blishing a framework for the setting...
User Manual
Page 25
...Acer Representative Phone No.: 254-298-4000 Fax No.: 254-298-4147 A. Operation is responsible for this device must accept any interference received, including interference that may not cause harmful interference, and (2) this declaration: Product: Trade Name: Model Number: SKU Number: LCD Monitor Acer HR274H HR274H... xxxxxx ("x" = 0~9, a ~ z, A ~ Z or Blank) Name of Responsible Party: Acer America Corporation Address of the FCC Rules. San Jose, CA ...
...Acer Representative Phone No.: 254-298-4000 Fax No.: 254-298-4147 A. Operation is responsible for this device must accept any interference received, including interference that may not cause harmful interference, and (2) this declaration: Product: Trade Name: Model Number: SKU Number: LCD Monitor Acer HR274H HR274H... xxxxxx ("x" = 0~9, a ~ z, A ~ Z or Blank) Name of Responsible Party: Acer America Corporation Address of the FCC Rules. San Jose, CA ...


