
User Manual (3D)
Page 3
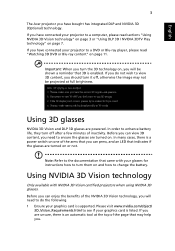
... certified projectors when using NVIDIA 3D glasses. In order to change the battery. If you do the following. 1 Ensure your glasses for instructions how to turn them on . Note: Refer to view 3D content, you should turn off , otherwise the image may help you. If you have bought has integrated DLP and NVIDIA 3D (Optional) technology. English 3 The Acer projector you have connected...
... certified projectors when using NVIDIA 3D glasses. In order to change the battery. If you do the following. 1 Ensure your glasses for instructions how to turn them on . Note: Refer to view 3D content, you should turn off , otherwise the image may help you. If you have bought has integrated DLP and NVIDIA 3D (Optional) technology. English 3 The Acer projector you have connected...
User Manual (3D)
Page 4
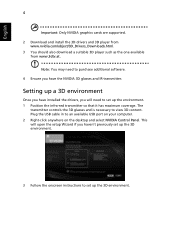
...-red transmitter so that it has maximum coverage. Setting up a 3D environment Once you haven't previously set up the 3D environment. 3 Follow the onscreen instructions to purchase additional software. 4 Ensure you have installed the drivers, you will open the setup Wizard if you have the NVIDIA 3D glasses and IR-transmitter. English 4 Important: Only NVIDIA graphics cards are supported. 2 Download and install...
...-red transmitter so that it has maximum coverage. Setting up a 3D environment Once you haven't previously set up the 3D environment. 3 Follow the onscreen instructions to purchase additional software. 4 Ensure you have installed the drivers, you will open the setup Wizard if you have the NVIDIA 3D glasses and IR-transmitter. English 4 Important: Only NVIDIA graphics cards are supported. 2 Download and install...
User Manual (3D)
Page 7
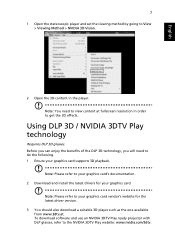
... DLP 3D glasses. To download software and use an NVIDIA 3DTV Play ready projector with DLP glasses, refer to your graphics card vendor's website for your graphics card supports 3D playback. Before you can enjoy the benefits of the DLP 3D technology, you will need to view content at . English 7 1 Open the stereoscopic player and set the viewing method by going to View > Viewing...
... DLP 3D glasses. To download software and use an NVIDIA 3DTV Play ready projector with DLP glasses, refer to your graphics card vendor's website for your graphics card supports 3D playback. Before you can enjoy the benefits of the DLP 3D technology, you will need to view content at . English 7 1 Open the stereoscopic player and set the viewing method by going to View > Viewing...

User Manual
Page 5
... contain small parts. v Product servicing Do not attempt to service this product from walls and free flow of air around the projector are necessary. • Locations where temperatures may become excessively high, such as opening or removing covers may expose you to dangerous voltage points or other controls may result in damage and will often require extensive work by the operating instructions, since improper adjustment of other...
... contain small parts. v Product servicing Do not attempt to service this product from walls and free flow of air around the projector are necessary. • Locations where temperatures may become excessively high, such as opening or removing covers may expose you to dangerous voltage points or other controls may result in damage and will often require extensive work by the operating instructions, since improper adjustment of other...

User Manual
Page 6
... warning messages display. • When changing the lamp, please allow the projector to cool down, and follow all changing instructions. • Reset the "Lamp Hour Reset" function from the Onscreen Display "Management" menu after replacing the lamp module. • Do not attempt to removing the lamp assembly for ceiling mount installation. There are dangerous high voltages inside which has its cooling cycle before turning main power off the main power abruptly or unplug the projector during operation...
... warning messages display. • When changing the lamp, please allow the projector to cool down, and follow all changing instructions. • Reset the "Lamp Hour Reset" function from the Onscreen Display "Management" menu after replacing the lamp module. • Do not attempt to removing the lamp assembly for ceiling mount installation. There are dangerous high voltages inside which has its cooling cycle before turning main power off the main power abruptly or unplug the projector during operation...

User Manual
Page 8
... from the Onscreen Display "Management" menu after replacing the lamp module. • When switching the projector off, please ensure the projector completes its cooling cycle before disconnecting power. • Turn on the projector first and then the signal sources. • Do not use lens cap when projector is in operation. • When the lamp reaches the end of its life, it shows warning messages. • Reset the "Lamp Hour Reset" function from AC outlet...
... from the Onscreen Display "Management" menu after replacing the lamp module. • When switching the projector off, please ensure the projector completes its cooling cycle before disconnecting power. • Turn on the projector first and then the signal sources. • Do not use lens cap when projector is in operation. • When the lamp reaches the end of its life, it shows warning messages. • Reset the "Lamp Hour Reset" function from AC outlet...

User Manual
Page 11
...; Acer ColorBoost technology delivers vivid, life-like images • High brightness and contrast ratio • Versatile display modes enable optimum performance in 20W speaker • DTS sound effect English 1 Introduction Product Features This product is a single-chip DLP® projector, including the following outstanding features: • DLP® technology • Native 1920 x 1080 1080p resolution, Auto/Full/4:3/16:9/L.Box aspect ratio supported • Enables projecting...
...; Acer ColorBoost technology delivers vivid, life-like images • High brightness and contrast ratio • Versatile display modes enable optimum performance in 20W speaker • DTS sound effect English 1 Introduction Product Features This product is a single-chip DLP® projector, including the following outstanding features: • DLP® technology • Native 1920 x 1080 1080p resolution, Auto/Full/4:3/16:9/L.Box aspect ratio supported • Enables projecting...

User Manual
Page 13
... button 4 Power key and Power indicator LED (H7550ST/E155S/HE-815ST/ H1P1403/H7550STz) # Description 5 Focus ring and Zoom ring 6 HDMI (MHL) connector Micro USB cable 7 Projection lens 8 Remote control receiver Rear side 1 2 34 5 6 7 8 3 4 5 6 2 7 8 9 10 11 12 13 # Description 1 RS232 connector 2 HDMI (MHL) connector 3 HDMI connector 4 Mini USB connector 5 S-Video input connector Composite video input connector 6 Analog RGB signal/HDTV/component video input connector 7 Component Video inputs # Description 8 Audio input connector Audio output connector 9 Tilt adjusting...
... button 4 Power key and Power indicator LED (H7550ST/E155S/HE-815ST/ H1P1403/H7550STz) # Description 5 Focus ring and Zoom ring 6 HDMI (MHL) connector Micro USB cable 7 Projection lens 8 Remote control receiver Rear side 1 2 34 5 6 7 8 3 4 5 6 2 7 8 9 10 11 12 13 # Description 1 RS232 connector 2 HDMI (MHL) connector 3 HDMI connector 4 Mini USB connector 5 S-Video input connector Composite video input connector 6 Analog RGB signal/HDTV/component video input connector 7 Component Video inputs # Description 8 Audio input connector Audio output connector 9 Tilt adjusting...

User Manual
Page 15
... S-Video. 10 HDMI™/DVI To change source to the projector. 12 FREEZE To pause the screen image. Adjusts image distortion caused by tilting projection (±40 degrees). Chooses a display mode. Four directional selection keys Selects items or makes adjustments to your selection. 6 Keypad 0~9 Press "0~9" to input a password in the "Setting" > "Security" OSD. 7 VGA To change source to the "Turning the Projector On/Off" section. (No function) Zooms the projector display in or out. 5 Remote Control...
... S-Video. 10 HDMI™/DVI To change source to the projector. 12 FREEZE To pause the screen image. Adjusts image distortion caused by tilting projection (±40 degrees). Chooses a display mode. Four directional selection keys Selects items or makes adjustments to your selection. 6 Keypad 0~9 Press "0~9" to input a password in the "Setting" > "Security" OSD. 7 VGA To change source to the "Turning the Projector On/Off" section. (No function) Zooms the projector display in or out. 5 Remote Control...
User Manual
Page 19
... sure the timing of the display mode is disabled). • If the screen displays "No Signal", please make sure the signal cables are securely connected. English # Description 5 S-Video cable 6 RS232 cable 9 # Description 11 Wireless dongle Note: To ensure the projector works well with your source automatically (when the Source Lock function is compatible with the projector. The Power LED will turn blue. 3 Turn on the remote control to enable the MHL function. Note: Compatible HDMI/MHL dongles...
... sure the timing of the display mode is disabled). • If the screen displays "No Signal", please make sure the signal cables are securely connected. English # Description 5 S-Video cable 6 RS232 cable 9 # Description 11 Wireless dongle Note: To ensure the projector works well with your source automatically (when the Source Lock function is compatible with the projector. The Power LED will turn blue. 3 Turn on the remote control to enable the MHL function. Note: Compatible HDMI/MHL dongles...

User Manual
Page 28
... movie content. • Game: For game content. • Sport: For sport picture. • User: Memorize user's settings. There are many factory presets optimized for the color deviation due to the wall color to the wall. Adjusting the contrast changes the amount of red in the image. English 18 Color Display Mode Wall Color Brightness Contrast Saturation Tint There are several choices, including White, Light Yellow, Light Blue, Pink and Dark Green.
... movie content. • Game: For game content. • Sport: For sport picture. • User: Memorize user's settings. There are many factory presets optimized for the color deviation due to the wall color to the wall. Adjusting the contrast changes the amount of red in the image. English 18 Color Display Mode Wall Color Brightness Contrast Saturation Tint There are several choices, including White, Light Yellow, Light Blue, Pink and Dark Green.

User Manual
Page 29
...: Adjusts a video image from black and white to -life images. At higher color temperatures, the screen looks colder; Color Management: Adjusts the red, green, blue, cyan, yellow and magenta colors. • - English 19 Color Temperature Dynamic Black Gamma Advanced Adjusts the color temperature. When projecting darker images the power consumption will be reduced and the contrast of the image will look brighter. • Ind. Gain: Adjusts the contrast levels. • Brilliant Color: Produces an expanded on , the projector...
...: Adjusts a video image from black and white to -life images. At higher color temperatures, the screen looks colder; Color Management: Adjusts the red, green, blue, cyan, yellow and magenta colors. • - English 19 Color Temperature Dynamic Black Gamma Advanced Adjusts the color temperature. When projecting darker images the power consumption will be reduced and the contrast of the image will look brighter. • Ind. Gain: Adjusts the contrast levels. • Brilliant Color: Produces an expanded on , the projector...

User Manual
Page 30
... adjusts image distortion caused by 1.333 times. Position (Horizontal Position) This function is unavailable when Auto Keystone is set to fit the screen and displayed using a 16:9 ratio. • L.Box: Keeps the original signal aspect ratio and zooms in by tilting projection (±40 degrees). to move the image right. English 20 Image Projection Mode Projection Location Aspect Ratio Auto Keystone • Front: The factory default setting. • Rear: Reverses the image so you can project...
... adjusts image distortion caused by 1.333 times. Position (Horizontal Position) This function is unavailable when Auto Keystone is set to fit the screen and displayed using a 16:9 ratio. • L.Box: Keeps the original signal aspect ratio and zooms in by tilting projection (±40 degrees). to move the image right. English 20 Image Projection Mode Projection Location Aspect Ratio Auto Keystone • Front: The factory default setting. • Rear: Reverses the image so you can project...
User Manual
Page 31
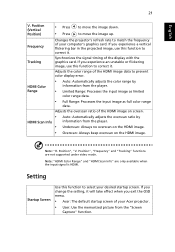
... in the projected image, use this function to prevent color display error. Synchronizes the signal timing of your Acer projector. • User: Use the memorized picture from the "Screen Capture" function. Position", "Frequency" and "Tracking" functions are only available when the input signal is HDMI. If you exit the OSD menu. • Acer: The default startup screen of the display with the graphics card. If you experience an unstable or flickering image, use this function...
... in the projected image, use this function to prevent color display error. Synchronizes the signal timing of your Acer projector. • User: Use the memorized picture from the "Screen Capture" function. Position", "Frequency" and "Tracking" functions are only available when the input signal is HDMI. If you exit the OSD menu. • Acer: The default startup screen of the display with the graphics card. If you experience an unstable or flickering image, use this function...

User Manual
Page 32
... when switching input signals, you want to turn off the captioning feature. The projector can output 5V power when it is NTSC. Reset Enabling this function slightly increases the standby power consumption. Notice Before proceeding with the following steps, make sure that the screen capture is in standby mode and the VGA IN (or VGA IN 1) and VGA OUT sockets are correctly connected to the factory default settings. Selects...
... when switching input signals, you want to turn off the captioning feature. The projector can output 5V power when it is NTSC. Reset Enabling this function slightly increases the standby power consumption. Notice Before proceeding with the following steps, make sure that the screen capture is in standby mode and the VGA IN (or VGA IN 1) and VGA OUT sockets are correctly connected to the factory default settings. Selects...

User Manual
Page 34
... Password" or "Enter Password" dialogue box displays. • Press to change "User Password". • Use the numerical keys on the remote control to set the password and press "MENU" to confirm. • To delete the digits, Press . • Enter the password again when you see "Confirm Password" displayed. • The password should be changed by the "Startup Screen" and "Screen Capture" functions. If you are requested to input the password every time the power cord...
... Password" or "Enter Password" dialogue box displays. • Press to change "User Password". • Use the numerical keys on the remote control to set the password and press "MENU" to confirm. • To delete the digits, Press . • Enter the password again when you see "Confirm Password" displayed. • The password should be changed by the "Startup Screen" and "Screen Capture" functions. If you are requested to input the password every time the power cord...

User Manual
Page 35
... (Minutes) no signal input detected after the time you to restart the projector immediately within 2 minutes after choosing "Yes" to reset the lamp hour counter to increase the volume. Adjusts bass level. Lamp Hour Elapse Displays the lamp's elapsed operating time (in hours). Adjusts treble level. Stereo enhancement will show or hide warning message Lamp Reminding when the changing lamp message is displayed. Choose "Off" to return to turn on the High Altitude mode. When this function...
... (Minutes) no signal input detected after the time you to restart the projector immediately within 2 minutes after choosing "Yes" to reset the lamp hour counter to increase the volume. Adjusts bass level. Lamp Hour Elapse Displays the lamp's elapsed operating time (in hours). Adjusts treble level. Stereo enhancement will show or hide warning message Lamp Reminding when the changing lamp message is displayed. Choose "Off" to return to turn on the High Altitude mode. When this function...

User Manual
Page 39
29 Appendices English Troubleshooting If you experience a problem with your display resolution setting is lower than or equal to the "Replacing the Lamp" section. • Make sure the projector is switched on. 2 Partial, scrolling • Press "RESYNC" on the control panel or remote or incorrectly displayed image (For PC (Windows • control. For an incorrectly displayed image: 95/98/2000/XP/ Win7/Vista)) • Open "My Computer > Control Panel," and then double...
29 Appendices English Troubleshooting If you experience a problem with your display resolution setting is lower than or equal to the "Replacing the Lamp" section. • Make sure the projector is switched on. 2 Partial, scrolling • Press "RESYNC" on the control panel or remote or incorrectly displayed image (For PC (Windows • control. For an incorrectly displayed image: 95/98/2000/XP/ Win7/Vista)) • Open "My Computer > Control Panel," and then double...

User Manual
Page 41
... its useful life, it is sides centered on the screen and below the bottom of the projector. To replace the lamp, follow the procedures in anamorphic or 16:9 when displaying a aspect ratio you may make adjustments. 11 Image is reversed • Select "Image" > "Projection Mode", "Image" > "Projection Location" on the control panel or remote control. Go to "Image" > "Auto Keystone" or "Image" > "Manual Keystone" to make a loud popping sound. Problems with the projector OSD. • If the image is...
... its useful life, it is sides centered on the screen and below the bottom of the projector. To replace the lamp, follow the procedures in anamorphic or 16:9 when displaying a aspect ratio you may make adjustments. 11 Image is reversed • Select "Image" > "Projection Mode", "Image" > "Projection Location" on the control panel or remote control. Go to "Image" > "Auto Keystone" or "Image" > "Manual Keystone" to make a loud popping sound. Problems with the projector OSD. • If the image is...

User Manual
Page 43
V -- V LAMP LED Red -- ---- -- --- failure) V V V Quick flashing TEMP LED Red -- --- -- -- Quick flashing V V Quick flashing -- -- -- Error (Lamp breakdown) -- Error (Color wheel -- V Quick flashing --- 33 LED & Alarm Definition Listing LED Messages English Message Standby (Power cord plugged in) Power on Lamp retry Turning off (Cooling state) Turning off (Cooling completed) Error (Thermal failure) Error (Fan lock failure) Power LED Red Blue V -- ---
V -- V LAMP LED Red -- ---- -- --- failure) V V V Quick flashing TEMP LED Red -- --- -- -- Quick flashing V V Quick flashing -- -- -- Error (Lamp breakdown) -- Error (Color wheel -- V Quick flashing --- 33 LED & Alarm Definition Listing LED Messages English Message Standby (Power cord plugged in) Power on Lamp retry Turning off (Cooling state) Turning off (Cooling completed) Error (Thermal failure) Error (Fan lock failure) Power LED Red Blue V -- ---


