
User Manual (3D)
Page 1
Acer Projectors with 3D Technology Quick Guide
Acer Projectors with 3D Technology Quick Guide

User Manual (3D)
Page 2
Acer Projector Series Quick Guide Original Issue: 8/2012 Model number Serial number Date of purchase Place of purchase © 2012 All Rights Reserved.
Acer Projector Series Quick Guide Original Issue: 8/2012 Model number Serial number Date of purchase Place of purchase © 2012 All Rights Reserved.
User Manual (3D)
Page 3
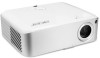
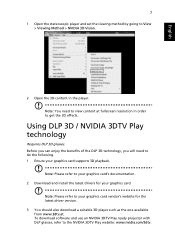
...Using DLP 3D / NVIDIA 3DTV Play technology" on or not. If you do the following. 1 Ensure your projector to view 3D content, you should turn them on and how to change the battery. Please visit www.nvidia.com.../object/ 3D_Vision_Requirements.html to see if your projector to ensure the glasses are turned on page 7. Before you can press, and an LED that may...NVIDIA 3D (Optional) technology. If you are powered. English 3 The Acer projector you have connected your graphics card is an automatic tool at full brightness.
...Using DLP 3D / NVIDIA 3DTV Play technology" on or not. If you do the following. 1 Ensure your projector to view 3D content, you should turn them on and how to change the battery. Please visit www.nvidia.com.../object/ 3D_Vision_Requirements.html to see if your projector to ensure the glasses are turned on page 7. Before you can press, and an LED that may...NVIDIA 3D (Optional) technology. If you are powered. English 3 The Acer projector you have connected your graphics card is an automatic tool at full brightness.
User Manual (3D)
Page 5
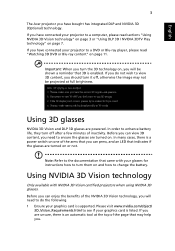
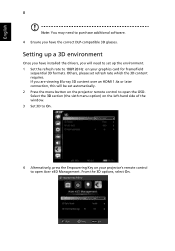
list, select Change Resolution. Select the 3D section (the sixth menu option) on the left-hand side of the display has been set automatically. 6 Press the menu button on the projector remote control to 100/120 Hz (from the appropriate dropdown menu). Make sure the refresh rate of the window. If you are viewing Blu-ray 3D content over an HDMI 1.4a or later connection, this will be set to open the OSD. English 5 4 Check the Enable Stereoscopic 3D option and select the correct display type. 5 In the Select a task...
list, select Change Resolution. Select the 3D section (the sixth menu option) on the left-hand side of the display has been set automatically. 6 Press the menu button on the projector remote control to 100/120 Hz (from the appropriate dropdown menu). Make sure the refresh rate of the window. If you are viewing Blu-ray 3D content over an HDMI 1.4a or later connection, this will be set to open the OSD. English 5 4 Check the Enable Stereoscopic 3D option and select the correct display type. 5 In the Select a task...
User Manual (3D)
Page 6
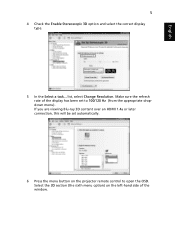
English 6 7 Set 3D to Nvidia 3D Vision. 8 Alternatively, press the Empowering Key on your projector's remote control to view 3D content. Using the stereoscopic player You need to have different procedures. The instructions below explain how to view 3D content using the Stereoscopic player that is available at www.3dtv.at. From the 3D options, select Nvidia 3D Vision. Other players may have a stereoscopic player in order to open Acer e3D Management.
English 6 7 Set 3D to Nvidia 3D Vision. 8 Alternatively, press the Empowering Key on your projector's remote control to view 3D content. Using the stereoscopic player You need to have different procedures. The instructions below explain how to view 3D content using the Stereoscopic player that is available at www.3dtv.at. From the 3D options, select Nvidia 3D Vision. Other players may have a stereoscopic player in order to open Acer e3D Management.
User Manual (3D)
Page 7
... need to view content at . Note: Please refer to your graphics card supports 3D playback. To download software and use an NVIDIA 3DTV Play ready projector with DLP glasses, refer to do the following. 1 Ensure your graphics card's documentation. 2 Download and install the latest drivers for the latest driver version. 3 You...
... need to view content at . Note: Please refer to your graphics card supports 3D playback. To download software and use an NVIDIA 3DTV Play ready projector with DLP glasses, refer to do the following. 1 Ensure your graphics card's documentation. 2 Download and install the latest drivers for the latest driver version. 3 You...
User Manual (3D)
Page 8
...section (the sixth menu option) on the left-hand side of the window. 3 Set 3D to On. 4 Alternatively, press the Empowering Key on your projector's remote control to purchase additional software. 4 Ensure you have installed the drivers, you have the correct DLP-compatible 3D glasses. English 8 Note: You ...may need to set refresh rate which the 3D content requires. Others, please set up the environment. 1 Set the refresh rate to open Acer e3D Management. If you are viewing Blu-ray 3D content over an HDMI 1.4a or later connection, this will be set automatically. 2 Press the...
...section (the sixth menu option) on the left-hand side of the window. 3 Set 3D to On. 4 Alternatively, press the Empowering Key on your projector's remote control to purchase additional software. 4 Ensure you have installed the drivers, you have the correct DLP-compatible 3D glasses. English 8 Note: You ...may need to set refresh rate which the 3D content requires. Others, please set up the environment. 1 Set the refresh rate to open Acer e3D Management. If you are viewing Blu-ray 3D content over an HDMI 1.4a or later connection, this will be set automatically. 2 Press the...
User Manual (3D)
Page 9
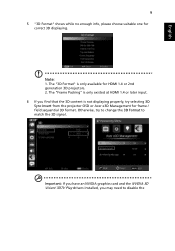
Otherwise, try selecting 3D Sync Invert from the projector OSD or Acer e3D Management for frame / field sequential 3D format. The "3D Format" is not displaying properly, try to change the 3D Format to disable the Note: 1. ... may need to match the 3D signal. English 9 5 "3D Format" shows while no enough info, please choose suitable one for HDMI 1.4 or 2nd generation 3D projectors. 2.
Otherwise, try selecting 3D Sync Invert from the projector OSD or Acer e3D Management for frame / field sequential 3D format. The "3D Format" is not displaying properly, try to change the 3D Format to disable the Note: 1. ... may need to match the 3D signal. English 9 5 "3D Format" shows while no enough info, please choose suitable one for HDMI 1.4 or 2nd generation 3D projectors. 2.
User Manual (3D)
Page 11
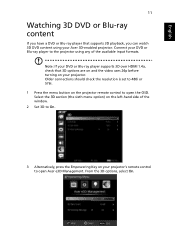
... your projector. Note: If your DVD or Blu-ray player supports 3D over HDMI 1.4a, check that supports 3D playback, you can watch 3D DVD content using any of the available input formats. Older connections should check the resolution is set to 480i or 576i. 1 Press the menu button on your Acer... 3D-enabled projector. English 11 Watching 3D DVD or Blu-ray content If you have a DVD or Blu-ray player that 3D options are on and the...
... your projector. Note: If your DVD or Blu-ray player supports 3D over HDMI 1.4a, check that supports 3D playback, you can watch 3D DVD content using any of the available input formats. Older connections should check the resolution is set to 480i or 576i. 1 Press the menu button on your Acer... 3D-enabled projector. English 11 Watching 3D DVD or Blu-ray content If you have a DVD or Blu-ray player that 3D options are on and the...
User Manual (3D)
Page 12
The "Frame Packing" is only existed at HDMI 1.4 or later input. 5 If you find that the 3D content is only available for correct 3D displaying. Note: 1. The "3D Format" is not displaying properly, try selecting 3D Sync Invert from the projector OSD or Acer e3D Management. English 12 4 "3D Format" shows while no enough info, please choose suitable one for HDMI 1.4 or 2nd generation 3D projectors. 2.
The "Frame Packing" is only existed at HDMI 1.4 or later input. 5 If you find that the 3D content is only available for correct 3D displaying. Note: 1. The "3D Format" is not displaying properly, try selecting 3D Sync Invert from the projector OSD or Acer e3D Management. English 12 4 "3D Format" shows while no enough info, please choose suitable one for HDMI 1.4 or 2nd generation 3D projectors. 2.
User Manual (3D)
Page 13
Note: The "3D Format" is only available for HDMI 1.4 or 2nd generation 3D projectors. English 13 6 If this does not improve the image, change the 3D Format to match the signal sent by your player.
Note: The "3D Format" is only available for HDMI 1.4 or 2nd generation 3D projectors. English 13 6 If this does not improve the image, change the 3D Format to match the signal sent by your player.
User Manual
Page 1
Acer Projector H7532BD/E152D/HE-812 Series User's Guide
Acer Projector H7532BD/E152D/HE-812 Series User's Guide
User Manual
Page 2
..., recording or otherwise, without the prior written permission of this manual or supplementary documents and publications. Acer Projector H7532BD/E152D/HE-812 Series Model number Serial number Date of purchase Place of Acer Incorporated. All correspondence concerning your projector. "HDMITM, the HDMI logo and High-Definition Multimedia Interface are used herein for a particular purpose. Record...
..., recording or otherwise, without the prior written permission of this manual or supplementary documents and publications. Acer Projector H7532BD/E152D/HE-812 Series Model number Serial number Date of purchase Place of Acer Incorporated. All correspondence concerning your projector. "HDMITM, the HDMI logo and High-Definition Multimedia Interface are used herein for a particular purpose. Record...
User Manual
Page 3
... power cord from overheating. Caution for plug as possible. Follow all power cords from the wall outlet before removing the power supply unit from the projector. • If the system has multiple sources of power, disconnect power from the system by placing the product on a bed, sofa, rug or other similar...
... power cord from overheating. Caution for plug as possible. Follow all power cords from the wall outlet before removing the power supply unit from the projector. • If the system has multiple sources of power, disconnect power from the system by placing the product on a bed, sofa, rug or other similar...
User Manual
Page 5
...not operate normally after following environments: • Space that are higher than 10000 feet. • Unplug immediately if there is on the projector first and then signal sources • Do not place the product in performance, indicating a need for purchase options. Additional safety information •...become excessively high, such as opening or removing covers may expose you to dangerous voltage points or other controls may hurt your projector. The bright may result in damage and will often require extensive work by a qualified technician to restore the product to qualified ...
...not operate normally after following environments: • Space that are higher than 10000 feet. • Unplug immediately if there is on the projector first and then signal sources • Do not place the product in performance, indicating a need for purchase options. Additional safety information •...become excessively high, such as opening or removing covers may expose you to dangerous voltage points or other controls may hurt your projector. The bright may result in damage and will often require extensive work by a qualified technician to restore the product to qualified ...
User Manual
Page 6
...the lens shutter or remove the lens cap when the projector is on. • Do not block the projector lens with dirt or dust. • Do not look into the air outlet grille when projector is capable of the lamp itself. Only use acer ceiling mount kit for inspection. • Do not ...face the projector lens to break on rare occasions. • Never replace the lamp assembly or any object when the projector is to turn off before disconnecting ...
...the lens shutter or remove the lens cap when the projector is on. • Do not block the projector lens with dirt or dust. • Do not look into the air outlet grille when projector is capable of the lamp itself. Only use acer ceiling mount kit for inspection. • Do not ...face the projector lens to break on rare occasions. • Never replace the lamp assembly or any object when the projector is to turn off before disconnecting ...
User Manual
Page 7
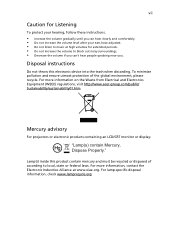
... the volume gradually until you . For more information on the Waste from Electrical and Electronics Equipment (WEEE) regulations, visit http://www.acer-group.com/public/ Sustainability/sustainability01.htm Mercury advisory For projectors or electronic products containing an LCD/CRT monitor or display: "Lamp(s) contain Mercury, Dispose Properly." For more information, contact the...
... the volume gradually until you . For more information on the Waste from Electrical and Electronics Equipment (WEEE) regulations, visit http://www.acer-group.com/public/ Sustainability/sustainability01.htm Mercury advisory For projectors or electronic products containing an LCD/CRT monitor or display: "Lamp(s) contain Mercury, Dispose Properly." For more information, contact the...
User Manual
Page 8
...display "Management" menu after replacing the lamp module. • When switching the projector off the product before disconnecting power. • Turn on the projector first and then the signal sources. • Do not use lens cap when projector is in this user's guide to maximize the life of your eyes. •...Reset" function from AC outlet if the product is on until the lamp module has been replaced. Warning: • Do not look into the projector's lens when the lamp is not being used for ventilation. • Use abrasive cleaners, waxes or solvents to change the lamp when it ...
...display "Management" menu after replacing the lamp module. • When switching the projector off the product before disconnecting power. • Turn on the projector first and then the signal sources. • Do not use lens cap when projector is in this user's guide to maximize the life of your eyes. •...Reset" function from AC outlet if the product is on until the lamp module has been replaced. Warning: • Do not look into the projector's lens when the lamp is not being used for ventilation. • Use abrasive cleaners, waxes or solvents to change the lamp when it ...
User Manual
Page 9
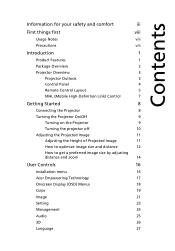
.../Off 9 Turning on the Projector 9 Turning the projector off 10 Adjusting the Projected Image 11 Adjusting the Height of Projected Image 11 How to optimize image size and distance 12 How to get a preferred image size by adjusting distance and zoom 14 User Controls 16 Installation menu 16 Acer Empowering Technology 17 Onscreen...
.../Off 9 Turning on the Projector 9 Turning the projector off 10 Adjusting the Projected Image 11 Adjusting the Height of Projected Image 11 How to optimize image size and distance 12 How to get a preferred image size by adjusting distance and zoom 14 User Controls 16 Installation menu 16 Acer Empowering Technology 17 Onscreen...
User Manual
Page 11
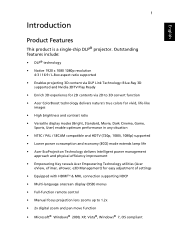
... Link Technology: Blue-Ray 3D supported and Nvidia 3DTV Play Ready • Enrich 3D experience for 2D contents via 2D to 3D convert function • Acer ColorBoost technology delivers nature's true colors for vivid, life-like images • High brightness and contrast ratio • Versatile display modes (Bright, Standard, Movie, Dark... function • Microsoft® Windows® 2000, XP, Vista®, Windows® 7, OS compliant English 1 Introduction Product Features This product is a single-chip DLP® projector.
... Link Technology: Blue-Ray 3D supported and Nvidia 3DTV Play Ready • Enrich 3D experience for 2D contents via 2D to 3D convert function • Acer ColorBoost technology delivers nature's true colors for vivid, life-like images • High brightness and contrast ratio • Versatile display modes (Bright, Standard, Movie, Dark... function • Microsoft® Windows® 2000, XP, Vista®, Windows® 7, OS compliant English 1 Introduction Product Features This product is a single-chip DLP® projector.


