
User Manual
Page 4
... on a vibrating surface. • Never use it under sporting, exercising, or any vibrating environment which will probably cause unexpected short current or damage rotor devices, lamp. The plug only fits in a grounded power outlet. Do not insert the plug into the wall outlet does not exceed the fuse rating. • Do...
... on a vibrating surface. • Never use it under sporting, exercising, or any vibrating environment which will probably cause unexpected short current or damage rotor devices, lamp. The plug only fits in a grounded power outlet. Do not insert the plug into the wall outlet does not exceed the fuse rating. • Do...
User Manual
Page 5
... qualified service personnel when: • the power cord or plug is damaged, cut or frayed • liquid was spilled into the projector's lens when the lamp is something wrong with your projector. Additional safety information • Do not look into the product • the product was exposed to normal condition. It...
... qualified service personnel when: • the power cord or plug is damaged, cut or frayed • liquid was spilled into the projector's lens when the lamp is something wrong with your projector. Additional safety information • Do not look into the product • the product was exposed to normal condition. It...
User Manual
Page 6
... off the main power abruptly or unplug the projector during operation. Please be sure to change the lamp when is securely installed. There are dangerous high voltages inside may hurt you. Only use acer ceiling mount kit for approximately 45 minutes prior to disassemble this product to break on end vertically. The...
... off the main power abruptly or unplug the projector during operation. Please be sure to change the lamp when is securely installed. There are dangerous high voltages inside may hurt you. Only use acer ceiling mount kit for approximately 45 minutes prior to disassemble this product to break on end vertically. The...

User Manual
Page 7
Lamp(s) inside this electronic device into the trash when discarding. For more information, contact the Electronic Industries Alliance at high volumes for Listening To protect your ... the Waste from Electrical and Electronics Equipment (WEEE) regulations, visit http://www.acer-group.com/public/ Sustainability/sustainability01.htm Mercury advisory For projectors or electronic products containing an LCD/CRT monitor or display: "Lamp(s) contain Mercury, Dispose Properly." For lamp-specific disposal information, check www.lamprecycle.org vii Caution for extended periods. •...
Lamp(s) inside this electronic device into the trash when discarding. For more information, contact the Electronic Industries Alliance at high volumes for Listening To protect your ... the Waste from Electrical and Electronics Equipment (WEEE) regulations, visit http://www.acer-group.com/public/ Sustainability/sustainability01.htm Mercury advisory For projectors or electronic products containing an LCD/CRT monitor or display: "Lamp(s) contain Mercury, Dispose Properly." For lamp-specific disposal information, check www.lamprecycle.org vii Caution for extended periods. •...

User Manual
Page 8
.... Please be sure to clean the display housing. • Disconnect the power plug from the Onscreen display "Management" menu after replacing the lamp module. • When switching the projector off the product before disconnecting power. • Turn on the projector first and then the signal sources.... • Do not use lens cap when projector is in this happens, the projector will not turn back on until the lamp module has been replaced. Precautions Follow all changing instructions. • This product will detect the life of its cooling cycle before cleaning. &#...
.... Please be sure to clean the display housing. • Disconnect the power plug from the Onscreen display "Management" menu after replacing the lamp module. • When switching the projector off the product before disconnecting power. • Turn on the projector first and then the signal sources.... • Do not use lens cap when projector is in this happens, the projector will not turn back on until the lamp module has been replaced. Precautions Follow all changing instructions. • This product will detect the life of its cooling cycle before cleaning. &#...
User Manual
Page 10
How to login in 33 Home 34 Control Panel 34 Network Setting 35 Alert Setting 35 Logout 36 Appendices 37 Troubleshooting 37 LED & Alarm Definition Listing 41 Cleaning and replacing the dust filters 42 Replacing the Lamp 43 Ceiling Mount Installation 44 Specifications 47 Compatibility modes 51 Regulations and safety notices 56
How to login in 33 Home 34 Control Panel 34 Network Setting 35 Alert Setting 35 Logout 36 Appendices 37 Troubleshooting 37 LED & Alarm Definition Listing 41 Cleaning and replacing the dust filters 42 Replacing the Lamp 43 Ceiling Mount Installation 44 Specifications 47 Compatibility modes 51 Regulations and safety notices 56
User Manual
Page 11
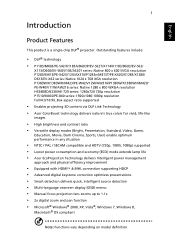
... 1920x1080 1080p resolution Full/4:3/16:9/L.Box aspect ratio supported • Enables projecting 3D content via DLP Link Technology • Acer ColorBoost technology delivers nature's true colors for vivid, life-like images • High brightness and contrast ratio • .../ SECAM compatible and HDTV (720p, 1080i, 1080p) supported • Lower power consumption and economy (ECO) mode extends lamp life • Acer EcoProjeciton Technology delivers Intelligent power management approach and physical efficiency improvement • Equipped with HDMI™ & MHL connection supporting HDCP...
... 1920x1080 1080p resolution Full/4:3/16:9/L.Box aspect ratio supported • Enables projecting 3D content via DLP Link Technology • Acer ColorBoost technology delivers nature's true colors for vivid, life-like images • High brightness and contrast ratio • .../ SECAM compatible and HDTV (720p, 1080i, 1080p) supported • Lower power consumption and economy (ECO) mode extends lamp life • Acer EcoProjeciton Technology delivers Intelligent power management approach and physical efficiency improvement • Equipped with HDMI™ & MHL connection supporting HDCP...
User Manual
Page 13
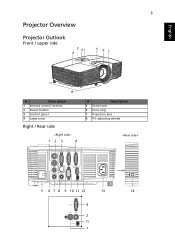
English 3 Projector Overview Projector Outlook Front / upper side 4 3 21 5 67 8 # Description 1 Remote control receiver 2 Power button 3 Control panel 4 Lamp cover Right / Rear side 12 3 4 # Description 5 Zoom lever 6 Focus ring 7 Projection lens 8 Tilt adjusting wheels VGA OUT VGA IN 2 VGA IN 1 S-VIDEO VIDEO AUDIO IN / MHL AUDIO OUT AUDIO IN RS232 USB CTRL 5 6 7 8 9 10 11 12 13 14 VGA IN VIDEO S-VIDEO USB CTRL 4 2 11 1
English 3 Projector Overview Projector Outlook Front / upper side 4 3 21 5 67 8 # Description 1 Remote control receiver 2 Power button 3 Control panel 4 Lamp cover Right / Rear side 12 3 4 # Description 5 Zoom lever 6 Focus ring 7 Projection lens 8 Tilt adjusting wheels VGA OUT VGA IN 2 VGA IN 1 S-VIDEO VIDEO AUDIO IN / MHL AUDIO OUT AUDIO IN RS232 USB CTRL 5 6 7 8 9 10 11 12 13 14 VGA IN VIDEO S-VIDEO USB CTRL 4 2 11 1
User Manual
Page 14
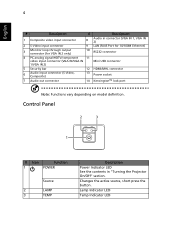
English 4 # Description # Description 1 Composite video input connector 8 Audio in "Turning the Projector On/Off" section. Control Panel 2 3 LAMP TEMP 1 # Icon Function 1 POWER Source 2 LAMP 3 TEMP Description Power Indicator LED See the contents in connector (VGA IN 1, VGA IN 2) 2 S-Video input connector 9 LAN (RJ45 Port for...connector (S-Video, Composite) 13 Power socket 7 Audio out connector 14 KensingtonTM lock port Note: Functions vary depending on model definition. Lamp Indicator LED Temp Indicator LED Changes the active source, short press the button.
English 4 # Description # Description 1 Composite video input connector 8 Audio in "Turning the Projector On/Off" section. Control Panel 2 3 LAMP TEMP 1 # Icon Function 1 POWER Source 2 LAMP 3 TEMP Description Power Indicator LED See the contents in connector (VGA IN 1, VGA IN 2) 2 S-Video input connector 9 LAN (RJ45 Port for...connector (S-Video, Composite) 13 Power socket 7 Audio out connector 14 KensingtonTM lock port Note: Functions vary depending on model definition. Lamp Indicator LED Temp Indicator LED Changes the active source, short press the button.
User Manual
Page 21
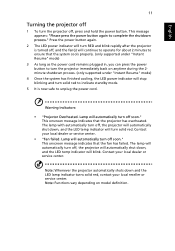
...soon." Press the power button again. 2 The LED power indicator will continue to operate for about 2 minutes to complete the shutdown process." Lamp will automatically turn solid red to indicate standby mode. 5 It is turned off, and the fan(s) will turn RED and blink rapidly after... back on model definition. Contact your local dealer or service center. • "Fan failed. Warning indicators: • "Projector Overheated. The lamp with automatically turn off, the projector will turn the projector off, press and hold the power button. This onscreen message indicates that the fan ...
...soon." Press the power button again. 2 The LED power indicator will continue to operate for about 2 minutes to complete the shutdown process." Lamp will automatically turn solid red to indicate standby mode. 5 It is turned off, and the fan(s) will turn RED and blink rapidly after... back on model definition. Contact your local dealer or service center. • "Fan failed. Warning indicators: • "Projector Overheated. The lamp with automatically turn off, the projector will turn the projector off, press and hold the power button. This onscreen message indicates that the fan ...
User Manual
Page 40
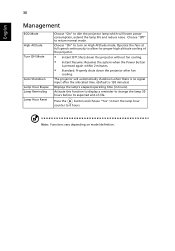
...High Altitude mode. Choose "Off" to allow for proper high altitude cooling of -life. Activate this function to display a reminder to change the lamp 30 hours before its expected end-of the projector. • Instant Off: Shuts down the projector after the allocated time. (default is pressed...without fan cooling. • Instant Resume: Resumes the system when the Power button is 120 minutes) Displays the lamp's elapsed operating time (in hours). Choose "On" to turn the lamp hour counter to 0 hours. Press the button and choose "Yes" to turn on model definition. English 30 ...
...High Altitude mode. Choose "Off" to allow for proper high altitude cooling of -life. Activate this function to display a reminder to change the lamp 30 hours before its expected end-of the projector. • Instant Off: Shuts down the projector after the allocated time. (default is pressed...without fan cooling. • Instant Resume: Resumes the system when the Power button is 120 minutes) Displays the lamp's elapsed operating time (in hours). Choose "On" to turn the lamp hour counter to 0 hours. Press the button and choose "Yes" to turn on model definition. English 30 ...
User Manual
Page 47
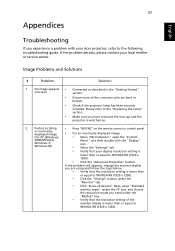
Please refer to the "Replacing the Lamp" section. • Make sure you have removed the lens cap and the projector is lower than or equal to WUXGA-...: • Verify that the resolution setting is lower than or equal to the following troubleshooting guide. If the problem persists, please contact your Acer projector, refer to WUXGA-RB (1920 x 1200). • Click the "Change" button under the "Models" box. • Verify that...the problem still appears, change the monitor display you are bent or broken. • Check if the projector lamp has been securely installed.
Please refer to the "Replacing the Lamp" section. • Make sure you have removed the lens cap and the projector is lower than or equal to WUXGA-...: • Verify that the resolution setting is lower than or equal to the following troubleshooting guide. If the problem persists, please contact your Acer projector, refer to WUXGA-RB (1920 x 1200). • Click the "Change" button under the "Models" box. • Verify that...the problem still appears, change the monitor display you are bent or broken. • Check if the projector lamp has been securely installed.
User Manual
Page 50
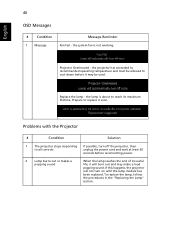
Problems with the Projector # Condition Solution 1 The projector stops responding If possible, turn on until the lamp module has been replaced. If this happens, the projector will burn out and may be used. English 40 OSD Messages # Condition 1 Message Message Reminder ...at least 30 seconds before it will not turn off the projector, then to replace it soon. To replace the lamp, follow the procedures in the "Replacing the Lamp" section. Replace the lamp - the projector has exceeded its recommended operating temperature and must be allowed to reach its useful life, it may ...
Problems with the Projector # Condition Solution 1 The projector stops responding If possible, turn on until the lamp module has been replaced. If this happens, the projector will burn out and may be used. English 40 OSD Messages # Condition 1 Message Message Reminder ...at least 30 seconds before it will not turn off the projector, then to replace it soon. To replace the lamp, follow the procedures in the "Replacing the Lamp" section. Replace the lamp - the projector has exceeded its recommended operating temperature and must be allowed to reach its useful life, it may ...
User Manual
Page 51
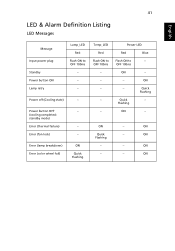
standby mode) Error (thermal failure) -- Error (lamp breakdown) Error (color wheel fail) ON Quick Flashing Temp_LED Red Flash ON to -- OFF 100ms ON -- -- Quick Flashing Quick -- ON -- Error (fan lock) -- ON Flashing ... -- Power LED Red Blue Flash ON to OFF 100ms ---- -- -- 41 English LED & Alarm Definition Listing LED Messages Message Input power plug Standby Power button ON Lamp retry Lamp_LED Red Flash ON to OFF 100ms ---- Power off (Cooling state) -- ON -- Power button OFF -- (cooling completed; ON Quick Flashing ---
standby mode) Error (thermal failure) -- Error (lamp breakdown) Error (color wheel fail) ON Quick Flashing Temp_LED Red Flash ON to -- OFF 100ms ON -- -- Quick Flashing Quick -- ON -- Error (fan lock) -- ON Flashing ... -- Power LED Red Blue Flash ON to OFF 100ms ---- -- -- 41 English LED & Alarm Definition Listing LED Messages Message Input power plug Standby Power button ON Lamp retry Lamp_LED Red Flash ON to OFF 100ms ---- Power off (Cooling state) -- ON -- Power button OFF -- (cooling completed; ON Quick Flashing ---
User Manual
Page 53
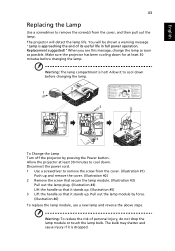
... a screwdriver to remove the screw(s) from the cover. (Illustration #1) Push up and remove the cover. (Illustration #2) 2 Remove the screw that secure the lamp module. (Illustration #3) Pull out the lamp plug. (Illustration #4) Lift the handle so that it stands up. (Illustration #5) 3 Lift the handle so that it stands up. Replacement suggested!" Make sure...
... a screwdriver to remove the screw(s) from the cover. (Illustration #1) Push up and remove the cover. (Illustration #2) 2 Remove the screw that secure the lamp module. (Illustration #3) Pull out the lamp plug. (Illustration #4) Lift the handle so that it stands up. (Illustration #5) 3 Lift the handle so that it stands up. Replacement suggested!" Make sure...
User Manual
Page 58
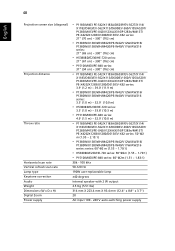
48 English Projection screen size (diagonal) Projection distance Throw ratio Horizontal scan rate Vertical refresh scan rate Lamp type Keystone correction Audio Weight Dimensions (W x D x H) Digital Zoom Power supply • P1183/M403 PE-S42/X1183A/D603P/EV-S62T/X114/ X1183/D603/EV-S62/X113...-720 series: 58"@2m (1.55 ~ 1.70:1) • P1510/M450/PE-840 series: 60"@2m (1.51 ~ 1.83:1) 30k - 100 kHz 50-120 Hz 190W user-replaceable lamp ±40 degrees Internal speaker with 2 W output 2.5 Kg (5.51 Ibs) 314 mm X 223.4 mm X 93.4 mm (12.4" x 8.8" x 3.7") 2X AC input 100 - 240 V auto-switching ...
48 English Projection screen size (diagonal) Projection distance Throw ratio Horizontal scan rate Vertical refresh scan rate Lamp type Keystone correction Audio Weight Dimensions (W x D x H) Digital Zoom Power supply • P1183/M403 PE-S42/X1183A/D603P/EV-S62T/X114/ X1183/D603/EV-S62/X113...-720 series: 58"@2m (1.55 ~ 1.70:1) • P1510/M450/PE-840 series: 60"@2m (1.51 ~ 1.83:1) 30k - 100 kHz 50-120 Hz 190W user-replaceable lamp ±40 degrees Internal speaker with 2 W output 2.5 Kg (5.51 Ibs) 314 mm X 223.4 mm X 93.4 mm (12.4" x 8.8" x 3.7") 2X AC input 100 - 240 V auto-switching ...


