

Quick Start Guide
Page 1
...create the danger of electric shock. • To avoid electric shock, never touch the inside of the cabinet. Make sure both the monitor and computer are any unusual sounds or smells coming from it carefully. Connect the HDMI cable to a Computer 1. 1-1 1-2 1-3 Connect Video Cable a....clean the exterior of dust. • Never use it near an easily accessible electrical outlet. • Place the monitor on a solid surface and treat it -unplug the monitor immediately and contact an authorized dealer or service center. Ensure that the video connector is fully inserted in CD-ROM packaged...
...create the danger of electric shock. • To avoid electric shock, never touch the inside of the cabinet. Make sure both the monitor and computer are any unusual sounds or smells coming from it carefully. Connect the HDMI cable to a Computer 1. 1-1 1-2 1-3 Connect Video Cable a....clean the exterior of dust. • Never use it near an easily accessible electrical outlet. • Place the monitor on a solid surface and treat it -unplug the monitor immediately and contact an authorized dealer or service center. Ensure that the video connector is fully inserted in CD-ROM packaged...
Quick Start Guide
Page 2
...Class B limits may cause harmful interference to radio communications. Operation conditions This device complies with Part 15 of Conformity Hereby, Acer Inc., declares that protects human health and the environment. Remarque à l'intention des utilisateurs canadiens Cet appareil numé...must accept any interference received, including interference that this equipment. Operation is likely to result in a residential installation. LCD Monitor Quick Setup Guide Notice: Shielded cables All connections to other relevant provisions of EMC Directive 2004/108/EC, Low Voltage ...
...Class B limits may cause harmful interference to radio communications. Operation conditions This device complies with Part 15 of Conformity Hereby, Acer Inc., declares that protects human health and the environment. Remarque à l'intention des utilisateurs canadiens Cet appareil numé...must accept any interference received, including interference that this equipment. Operation is likely to result in a residential installation. LCD Monitor Quick Setup Guide Notice: Shielded cables All connections to other relevant provisions of EMC Directive 2004/108/EC, Low Voltage ...

User Manual
Page 1
TABLE OF CONTENTS Special notes on LCD monitors 1 Information for your safety and comfort 2 Unpacking 5 Attaching/Removing the base 6 Screen position adjustment 6 Connecting the power cord 7 Safety precaution 7 Cleaning your monitor 7 Power saving 8 DDC 8 Connector Pin Assignment 9 Standard Timing Table 11 Installation 12 User controls 13 Troubleshooting 19
TABLE OF CONTENTS Special notes on LCD monitors 1 Information for your safety and comfort 2 Unpacking 5 Attaching/Removing the base 6 Screen position adjustment 6 Connecting the power cord 7 Safety precaution 7 Cleaning your monitor 7 Power saving 8 DDC 8 Connector Pin Assignment 9 Standard Timing Table 11 Installation 12 User controls 13 Troubleshooting 19
User Manual
Page 2
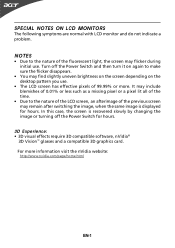
... visual effects require 3D compatible software, nVidia® 3D Vision™ glasses and a compatible 3D graphics card. SPECIAL NOTES ON LCD MONITORS The following symptoms are normal with LCD monitor and do not indicate a problem. It may find slightly uneven brightness on the screen depending on the desktop pattern you use . For...
... visual effects require 3D compatible software, nVidia® 3D Vision™ glasses and a compatible 3D graphics card. SPECIAL NOTES ON LCD MONITORS The following symptoms are normal with LCD monitor and do not indicate a problem. It may find slightly uneven brightness on the screen depending on the desktop pattern you use . For...

User Manual
Page 4
.... Finding your comfort zone Find your company's health and safety department. Long work periods, bad posture, poor work by adjusting the viewing angle of the monitor, using a footrest, or raising your sitting height to computer use . Nevertheless, some pixels may complain of eyestrain and headaches after long hours of working conditions...
.... Finding your comfort zone Find your company's health and safety department. Long work periods, bad posture, poor work by adjusting the viewing angle of the monitor, using a footrest, or raising your sitting height to computer use . Nevertheless, some pixels may complain of eyestrain and headaches after long hours of working conditions...

User Manual
Page 5
...breaks regularly and often. • Perform some stretching exercises. The following websites: Worldwide: http://www.acer-group.com/public/Sustainability/sustainability01.htm http://www.acer-group.com/public/Sustainability/sustainability04.htm EN-4 Developing good work habits Develop the following work for enhanced ...more information and help in recycling, please visit the following sections provide suggestions on how to make your eyes from the monitor and focusing on a distant point. • Blink frequently to minimize neck strain Taking care of your vision Long viewing...
...breaks regularly and often. • Perform some stretching exercises. The following websites: Worldwide: http://www.acer-group.com/public/Sustainability/sustainability01.htm http://www.acer-group.com/public/Sustainability/sustainability04.htm EN-4 Developing good work habits Develop the following work for enhanced ...more information and help in recycling, please visit the following sections provide suggestions on how to make your eyes from the monitor and focusing on a distant point. • Blink frequently to minimize neck strain Taking care of your vision Long viewing...
User Manual
Page 6
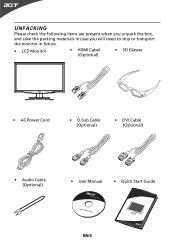
UNPACKING Please check the following items are present when you unpack the box, and save the packing materials in case you will need to ship or transport the monitor in future. • LCD Monitor • HDMI Cabel (Optional) • 3D Glasses • AC Power Cord • D-Sub Cable (Optional) • DVI Cable (Optional) • Audio Cable (Optional) • User Manual • Quick Start Guide EN-5
UNPACKING Please check the following items are present when you unpack the box, and save the packing materials in case you will need to ship or transport the monitor in future. • LCD Monitor • HDMI Cabel (Optional) • 3D Glasses • AC Power Cord • D-Sub Cable (Optional) • DVI Cable (Optional) • Audio Cable (Optional) • User Manual • Quick Start Guide EN-5

User Manual
Page 7
... scratching the screen. SCREEN POSITION ADJUSTMENT In oder to optimize the best viewing position, you can be adjusted to hold the edges of the monitor as bottom of the base. Install: Remove: Align the release button on the Depress the release button as shown in the figure below .... Carefully place the monitor face-down as indicated by arrow below . Attaching / Removing the Base Note: Remove the monitor and monitor base from its packaging. The monitor can adjust the tilt of the monitor by using both of your hands to 15 degrees up or ...
... scratching the screen. SCREEN POSITION ADJUSTMENT In oder to optimize the best viewing position, you can be adjusted to hold the edges of the monitor as bottom of the base. Install: Remove: Align the release button on the Depress the release button as shown in the figure below .... Carefully place the monitor face-down as indicated by arrow below . Attaching / Removing the Base Note: Remove the monitor and monitor base from its packaging. The monitor can adjust the tilt of the monitor by using both of your hands to 15 degrees up or ...

User Manual
Page 8
... cord to the AC Inlet, plug another end to rain, excessive moisture, or dust. • Do not cover the ventilation slots or openings of the monitor. CONNECTING THE POWER CORD • Check first to make sure that the power cord you use is the correct type required for the country in... any other light sources may reflect on the power cord to avoid damage to the cable. • Do not expose the monitor to a proper AC outlet. • For unit using at 120 V AC: Use a UL Listed Cord Set, Type SVT wire and plug rated 10 A/125 V. • ...
... cord to the AC Inlet, plug another end to rain, excessive moisture, or dust. • Do not cover the ventilation slots or openings of the monitor. CONNECTING THE POWER CORD • Check first to make sure that the power cord you use is the correct type required for the country in... any other light sources may reflect on the power cord to avoid damage to the cable. • Do not expose the monitor to a proper AC outlet. • For unit using at 120 V AC: Use a UL Listed Cord Set, Type SVT wire and plug rated 10 A/125 V. • ...
User Manual
Page 9
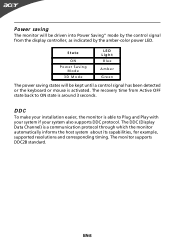
... display controller, as indicated by the control signal from Active OFF state back to Plug and Play with your system if your installation easier, the monitor is activated. The DDC (Display Data Channel) is around 3 seconds. State ON P o w e r S a v in g Mode 3D Mode LED Lig h t B lu e A m...or mouse is able to ON state is a communication protocol through which the monitor automatically informs the host system about its capabilities, for example, supported resolutions and corresponding timing. Power saving The monitor will be driven into Power Saving" mode by the amber-color power LED...
... display controller, as indicated by the control signal from Active OFF state back to Plug and Play with your system if your installation easier, the monitor is activated. The DDC (Display Data Channel) is around 3 seconds. State ON P o w e r S a v in g Mode 3D Mode LED Lig h t B lu e A m...or mouse is able to ON state is a communication protocol through which the monitor automatically informs the host system about its capabilities, for example, supported resolutions and corresponding timing. Power saving The monitor will be driven into Power Saving" mode by the amber-color power LED...

User Manual
Page 10
DESCRIPTION Red Green Blue Monitor Ground Self Test R-Ground G-Ground B-Ground PIN NO. 9. 10. 11. 12. 13. 14. 15. DESCRIPTION +5V Logic Ground Monitor Ground DDC-Serial Data H-Sync V-Sync DDC-Serial Clock EN-9 CONNECTOR PIN ASSIGNMENT 5 1 10 6 15 11 15-Pin Color Display Signal Cable PIN NO. 1. 2. 3. 4. 5. 6. 7. 8.
DESCRIPTION Red Green Blue Monitor Ground Self Test R-Ground G-Ground B-Ground PIN NO. 9. 10. 11. 12. 13. 14. 15. DESCRIPTION +5V Logic Ground Monitor Ground DDC-Serial Data H-Sync V-Sync DDC-Serial Clock EN-9 CONNECTOR PIN ASSIGNMENT 5 1 10 6 15 11 15-Pin Color Display Signal Cable PIN NO. 1. 2. 3. 4. 5. 6. 7. 8.

User Manual
Page 13
..., then power-ON the computer. Connect one end of the 24-pin DVI cable to the back of the monitor and connect the other end to a properly grounded AC outlet. 4. b. Connect the VGA video cable to your host system, please follow ... Audio-Input Model)(Optional) 3. This sequence is very important. 5. INSTALLATION To install the monitor to the computer. 1-2 Connect Digital Cable (Only Dual-Input Model) a. Make sure both the monitor and computer are powered-OFF. Make sure both the monitor and computer are powered-OFF. Connect the HDMI cable to diagnose the problem. 1-1 1-2...
..., then power-ON the computer. Connect one end of the 24-pin DVI cable to the back of the monitor and connect the other end to a properly grounded AC outlet. 4. b. Connect the VGA video cable to your host system, please follow ... Audio-Input Model)(Optional) 3. This sequence is very important. 5. INSTALLATION To install the monitor to the computer. 1-2 Connect Digital Cable (Only Dual-Input Model) a. Make sure both the monitor and computer are powered-OFF. Make sure both the monitor and computer are powered-OFF. Connect the HDMI cable to diagnose the problem. 1-1 1-2...
User Manual
Page 14
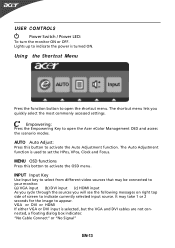
...Empowering: Press the Empowering Key to activate the Auto Adjustment function. AUTO Auto Adjust: Press this botton to appear. It may be connected to your monitor. (a) VGA input (b) DVI input (c) HDMI input As you cycle through the sources you quickly select the most commonly accessed settings. The Auto Adjustment...will see the following messages on right top side of screen to set the HPos, VPos, Clock and Focus. Lights up to open the Acer eColor Management OSD and access the scenario modes. INPUT Input Key Use Input key to select from different video sources that may take 1 or...
...Empowering: Press the Empowering Key to activate the Auto Adjustment function. AUTO Auto Adjust: Press this botton to appear. It may be connected to your monitor. (a) VGA input (b) DVI input (c) HDMI input As you cycle through the sources you quickly select the most commonly accessed settings. The Auto Adjustment...will see the following messages on right top side of screen to set the HPos, VPos, Clock and Focus. Lights up to open the Acer eColor Management OSD and access the scenario modes. INPUT Input Key Use Input key to select from different video sources that may take 1 or...

User Manual
Page 16
... OSD. 2 Using the / keys, select Picture from the OSD. For advanced settings, please refer to following content is for adjusting the settings of your LCD Monitor. Use the to Enter to the item page. 3 Use the / keys to adjust the current Brightness, Contrast, Colour Temp, Auto Config and other image-related...
... OSD. 2 Using the / keys, select Picture from the OSD. For advanced settings, please refer to following content is for adjusting the settings of your LCD Monitor. Use the to Enter to the item page. 3 Use the / keys to adjust the current Brightness, Contrast, Colour Temp, Auto Config and other image-related...

User Manual
Page 19
EN-18 Then the basic information of LCD monitor will show up the OSD. 2 Using the / keys, select Information from the OSD. Product information 1920 x 2205p H: 54KHz V: 24Hz HDMI 3D Input 1920 x 1080 H: 129KHz V: 120Hz Output S/N: ETL53091326350380B3472 1 Press the MENU key to bring up for current input.
EN-18 Then the basic information of LCD monitor will show up the OSD. 2 Using the / keys, select Information from the OSD. Product information 1920 x 2205p H: 54KHz V: 24Hz HDMI 3D Input 1920 x 1080 H: 129KHz V: 120Hz Output S/N: ETL53091326350380B3472 1 Press the MENU key to bring up for current input.
User Manual
Page 20
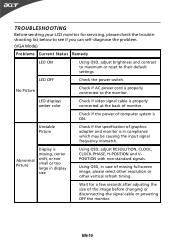
...; Check if the power of the image before changing or disconnecting the signal cable or powering OFF the monitor. No Picture · Check if AC power cord is ON. Abnormal shift, or too POSITION with non-standard signals. Display is in case of missing ... self-diagnose the problem. (VGA Mode) Problems Current Status Remedy LED ON · Using OSD, adjust brightness and contrast to maximum or reset to the monitor. Picture small or too large in display · Using OSD, in compliance which may be causing the input signal frequency mismatch. TROUBLESHOOTING Before sending your...
...; Check if the power of the image before changing or disconnecting the signal cable or powering OFF the monitor. No Picture · Check if AC power cord is ON. Abnormal shift, or too POSITION with non-standard signals. Display is in case of missing ... self-diagnose the problem. (VGA Mode) Problems Current Status Remedy LED ON · Using OSD, adjust brightness and contrast to maximum or reset to the monitor. Picture small or too large in display · Using OSD, in compliance which may be causing the input signal frequency mismatch. TROUBLESHOOTING Before sending your...
User Manual
Page 21
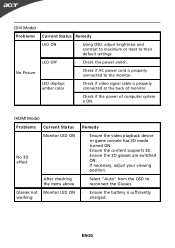
...-20 LED OFF · Check the power switch. LED displays amber color · Check if video signal cable is properly connected at the back of monitor. · Check if the power of computer system is sufficiently charged. (DVI Mode) P ro b le ms Current Status Remedy LED ON · ...Using OSD, adjust brightness and contrast to maximum or reset to the monitor. If necessary, adjust your viewing position. · Select "Auto" from the OSD to reconnect the Glasses. · Ensure the battery is ON. (HDMI Mode...
...-20 LED OFF · Check the power switch. LED displays amber color · Check if video signal cable is properly connected at the back of monitor. · Check if the power of computer system is sufficiently charged. (DVI Mode) P ro b le ms Current Status Remedy LED ON · ...Using OSD, adjust brightness and contrast to maximum or reset to the monitor. If necessary, adjust your viewing position. · Select "Auto" from the OSD to reconnect the Glasses. · Ensure the battery is ON. (HDMI Mode...
User Manual
Page 22
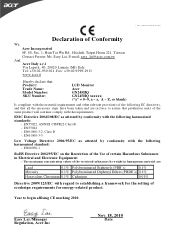
...-. it Hereby declare that: P rod uc t: Trade Name: M odel Number: SKU Number: LCD Monitor Acer GN245HQ GN245HQ xxxxxx; ("x" = 0~9, a ~ z, A ~ Z, or blank) Is compliant with the essential requirements and other relevant provisions of Conformity We, Acer Incorporated 8F, 88, Sec. 1, Hsin Tai Wu Rd., Hsichih, Taipei Hsien 221, Taiwan Contact Person:... Mr. Easy Lai, E-mail: easy_lai@acer.com.tw And, Acer Italy s.r.l Via Lepetit, 40, 20020 Lainate (MI) Italy Tel: +39-02-939-921 ,Fax: +39-02 9399-2913 ww w.a cer. ...
...-. it Hereby declare that: P rod uc t: Trade Name: M odel Number: SKU Number: LCD Monitor Acer GN245HQ GN245HQ xxxxxx; ("x" = 0~9, a ~ z, A ~ Z, or blank) Is compliant with the essential requirements and other relevant provisions of Conformity We, Acer Incorporated 8F, 88, Sec. 1, Hsin Tai Wu Rd., Hsichih, Taipei Hsien 221, Taiwan Contact Person:... Mr. Easy Lai, E-mail: easy_lai@acer.com.tw And, Acer Italy s.r.l Via Lepetit, 40, 20020 Lainate (MI) Italy Tel: +39-02-939-921 ,Fax: +39-02 9399-2913 ww w.a cer. ...
User Manual
Page 23
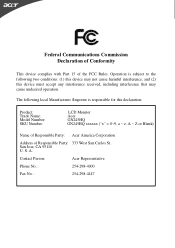
... following two conditions: (1) this device may not cause harmful interference, and (2) this declaration: Product: Trade Name: Model Number: SKU Number: LCD Monitor Acer GN245HQ GN245HQ xxxxxx ("x" = 0~9, a ~ z, A ~ Z or Blank) Name of Responsible Party: Acer America Corporation Address of the FCC Rules. Federal Communications Commission Declaration of Conformity This device complies with Part 15 of Responsible Party...
... following two conditions: (1) this device may not cause harmful interference, and (2) this declaration: Product: Trade Name: Model Number: SKU Number: LCD Monitor Acer GN245HQ GN245HQ xxxxxx ("x" = 0~9, a ~ z, A ~ Z or Blank) Name of Responsible Party: Acer America Corporation Address of the FCC Rules. Federal Communications Commission Declaration of Conformity This device complies with Part 15 of Responsible Party...
User Manual
Page 25
... warranties, either expressed or implied, with respect to the contents hereof and specifically disclaims the implied warranties of purchase © 2010 All Rights Reserved. 3D Monitor User Guide Original Issue: 11/2010 Changes may be reproduced, stored in a retrieval system, or transmitted, in any form or by photocopy, recording or otherwise...
... warranties, either expressed or implied, with respect to the contents hereof and specifically disclaims the implied warranties of purchase © 2010 All Rights Reserved. 3D Monitor User Guide Original Issue: 11/2010 Changes may be reproduced, stored in a retrieval system, or transmitted, in any form or by photocopy, recording or otherwise...


