Quick Start Guide
Page 1
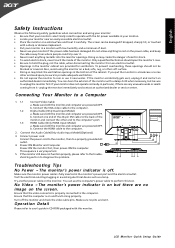
... 24-pin DVI cable to the back of the monitor and connect the other end to a Computer 1. 1-1 1-2 1-3 Connect Video Cable a. Connect the Audio Cable(Only Audio-Input Model)(Optional) 3. Make sure the monitor power cable is very important. 5. Ensure that the computer is on the power cable, and keep the cable away from where people could trip over it. • Never insert anything to rest on and functioning properly. LCD Monitor Quick Setup Guide Only a qualified...
... 24-pin DVI cable to the back of the monitor and connect the other end to a Computer 1. 1-1 1-2 1-3 Connect Video Cable a. Connect the Audio Cable(Only Audio-Input Model)(Optional) 3. Make sure the monitor power cable is very important. 5. Ensure that the computer is on the power cable, and keep the cable away from where people could trip over it. • Never insert anything to rest on and functioning properly. LCD Monitor Quick Setup Guide Only a qualified...
Quick Start Guide
Page 2
This device generates, uses, and can radiate radio frequency energy and, if not installed and used in accordance with Canadian ICES-003. Notice: Canadian users This Class B digital apparatus complies with the instructions, may be made using shielded cables to maintain compliance with .... Notice: Peripheral devices Only peripherals (input/output devices, terminals, printers, etc.) certified to comply with Part 15 of the FCC Rules. LCD Monitor Quick Setup Guide Instead, it is your responsibility to dispose of your waste equipment for help to the following measures: •...
This device generates, uses, and can radiate radio frequency energy and, if not installed and used in accordance with Canadian ICES-003. Notice: Canadian users This Class B digital apparatus complies with the instructions, may be made using shielded cables to maintain compliance with .... Notice: Peripheral devices Only peripherals (input/output devices, terminals, printers, etc.) certified to comply with Part 15 of the FCC Rules. LCD Monitor Quick Setup Guide Instead, it is your responsibility to dispose of your waste equipment for help to the following measures: •...

User Manual
Page 1
TABLE OF CONTENTS Special notes on LCD monitors 1 Information for your safety and comfort 2 Unpacking 5 Attaching/Removing the base 6 Screen position adjustment 6 Connecting the power cord 7 Safety precaution 7 Cleaning your monitor 7 Power saving 8 DDC 8 Connector Pin Assignment 9 Standard Timing Table 11 Installation 12 User controls 13 Troubleshooting 19
TABLE OF CONTENTS Special notes on LCD monitors 1 Information for your safety and comfort 2 Unpacking 5 Attaching/Removing the base 6 Screen position adjustment 6 Connecting the power cord 7 Safety precaution 7 Cleaning your monitor 7 Power saving 8 DDC 8 Connector Pin Assignment 9 Standard Timing Table 11 Installation 12 User controls 13 Troubleshooting 19
User Manual
Page 2
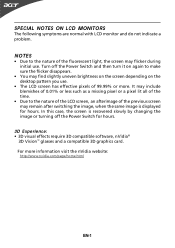
... slightly uneven brightness on the screen depending on again to make sure the flicker disappears. • You may remain after switching the image, when the same image is recovered slowly by changing the image or turning off the Power Switch and then turn it on the desktop pattern you use. • The LCD screen has effective pixels of the fluorescent light, the screen may flicker during initial use. Turn off the Power Switch for...
... slightly uneven brightness on the screen depending on again to make sure the flicker disappears. • You may remain after switching the image, when the same image is recovered slowly by changing the image or turning off the Power Switch and then turn it on the desktop pattern you use. • The LCD screen has effective pixels of the fluorescent light, the screen may flicker during initial use. Turn off the Power Switch for...

User Manual
Page 3
... cart, stand or table. Warnings • Do not use it under sporting, exercising, or any kind onto or into this product on the product. Safe listening Follow these instructions carefully. CAUTION for future reference. The openings should never be blocked by hearing experts,to unplug the power cord from lithium battery pack. When you plug the power cord into...
... cart, stand or table. Warnings • Do not use it under sporting, exercising, or any kind onto or into this product on the product. Safe listening Follow these instructions carefully. CAUTION for future reference. The openings should never be blocked by hearing experts,to unplug the power cord from lithium battery pack. When you plug the power cord into...

User Manual
Page 4
...'s health and safety department. Users are covered by the operating instructions, since improper adjustment of other controls may result in front of physical injury after prolonged use . The following tips: • refrain from the wall outlet and refer servicing to normal condition. Nevertheless, some pixels may occasionally misfire or appear as opening or removing covers may appear in one fixed posture • avoid...
...'s health and safety department. Users are covered by the operating instructions, since improper adjustment of other controls may result in front of physical injury after prolonged use . The following tips: • refrain from the wall outlet and refer servicing to normal condition. Nevertheless, some pixels may occasionally misfire or appear as opening or removing covers may appear in one fixed posture • avoid...

User Manual
Page 5
... install the external display, keyboard and mouse properly and within comfort able reach • if you view your monitor more than the top edge of the display so your eyes point downward when looking at bright light sources, such as open windows, ...acer-group.com/public/Sustainability/sustainability01.htm http://www.acer-group.com/public/Sustainability/sustainability04.htm EN-4 Display • Keep your display clean. • Keep your head at a higher level than your documents, place the display at the middle of the display. • Adjust the display brightness and/or contrast...
... install the external display, keyboard and mouse properly and within comfort able reach • if you view your monitor more than the top edge of the display so your eyes point downward when looking at bright light sources, such as open windows, ...acer-group.com/public/Sustainability/sustainability01.htm http://www.acer-group.com/public/Sustainability/sustainability04.htm EN-4 Display • Keep your display clean. • Keep your head at a higher level than your documents, place the display at the middle of the display. • Adjust the display brightness and/or contrast...

User Manual
Page 8
... cleaning the monitor. • Always unplug the monitor before cleaning. • Use a soft cloth to wipe the screen and cabinet front and sides. EN-7 light or other heavy object, on the face of H05VV-F cord and plug rated 10 A, 250 V. No user-adjustment is adequate ventilation. • Avoid placing the monitor against a bright background or where sun- CONNECTING THE POWER CORD • Check first to make sure that the power cord...
... cleaning the monitor. • Always unplug the monitor before cleaning. • Use a soft cloth to wipe the screen and cabinet front and sides. EN-7 light or other heavy object, on the face of H05VV-F cord and plug rated 10 A, 250 V. No user-adjustment is adequate ventilation. • Avoid placing the monitor against a bright background or where sun- CONNECTING THE POWER CORD • Check first to make sure that the power cord...
User Manual
Page 9
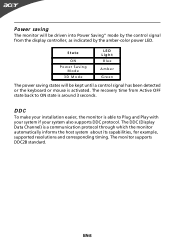
... amber-color power LED. EN-8 State ON P o w e r S a v in g Mode 3D Mode LED Lig h t B lu e A m ber G reen The power saving states will be kept until a control signal has been detected or the keyboard or mouse is able to ON state is a communication protocol through which the monitor automatically informs the host system about its capabilities, for example, supported resolutions and corresponding timing. DDC To make...
... amber-color power LED. EN-8 State ON P o w e r S a v in g Mode 3D Mode LED Lig h t B lu e A m ber G reen The power saving states will be kept until a control signal has been detected or the keyboard or mouse is able to ON state is a communication protocol through which the monitor automatically informs the host system about its capabilities, for example, supported resolutions and corresponding timing. DDC To make...

User Manual
Page 13
.... b. b. Connect the Audio Cable(Only Audio-Input Model)(Optional) 3. If the monitor still does not function properly, please refer to the troubleshooting section to a properly grounded AC outlet. 4. b. Make sure both the monitor and computer are powered-OFF. Make sure both the monitor and computer are powered-OFF. Connect power cord Connect the power cord to the monitor, then to diagnose the problem. 1-1 1-2 1-3 3 2 32 1-3 1-2 1-1 EN-12 Connect one end of the 24-pin DVI cable...
.... b. b. Connect the Audio Cable(Only Audio-Input Model)(Optional) 3. If the monitor still does not function properly, please refer to the troubleshooting section to a properly grounded AC outlet. 4. b. Make sure both the monitor and computer are powered-OFF. Make sure both the monitor and computer are powered-OFF. Connect power cord Connect the power cord to the monitor, then to diagnose the problem. 1-1 1-2 1-3 3 2 32 1-3 1-2 1-1 EN-12 Connect one end of the 24-pin DVI cable...
User Manual
Page 14
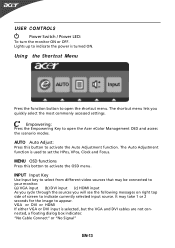
... OSD menu. MENU OSD functions Press this button to open the Acer eColor Management OSD and access the scenario modes. Lights up to indicate the power is selected ,but the VGA and DVI cables are not connected, a floating dialog box indicates: "No Cable Connect" or "No Signal" EN-13 It may be connected to indicate currently selected input source. VGA or DVI or HDMI If either VGA or DVI input is turned ON. The Auto Adjustment function is used to appear. Using...
... OSD menu. MENU OSD functions Press this button to open the Acer eColor Management OSD and access the scenario modes. Lights up to indicate the power is selected ,but the VGA and DVI cables are not connected, a floating dialog box indicates: "No Cable Connect" or "No Signal" EN-13 It may be connected to indicate currently selected input source. VGA or DVI or HDMI If either VGA or DVI input is turned ON. The Auto Adjustment function is used to appear. Using...

User Manual
Page 15
... open the Acer eColor Management OSD and access the scenario modes Step 2: Press " " or " " to select the mode Step 3: Press " Adjust/Exit " Key to reduce powerconsumption N /A S ta n d a rd mode Default Setting. Features and Benefits Ma in unsuitably-lit environments. Reflects native display capability N /A G rahpic mode Enhances colors and emphasize fine detail. Presents great visuals, even in Menu icon Sub Menu icon Sub Menu it e m D escrip tio n N /A User mode User...
... open the Acer eColor Management OSD and access the scenario modes Step 2: Press " " or " " to select the mode Step 3: Press " Adjust/Exit " Key to reduce powerconsumption N /A S ta n d a rd mode Default Setting. Features and Benefits Ma in unsuitably-lit environments. Reflects native display capability N /A G rahpic mode Enhances colors and emphasize fine detail. Presents great visuals, even in Menu icon Sub Menu icon Sub Menu it e m D escrip tio n N /A User mode User...

User Manual
Page 16
... can be used to adjust the picture quality, OSD Timeout and general settings. For advanced settings, please refer to following content is for adjusting the settings of your LCD Monitor. Use the to Enter to the item page. 3 Use the / keys to adjust the sliding scales. 4 The Picture menu can use the OSD to adjust the current Brightness, Contrast, Colour Temp, Auto Config and other image-related qualities. Actual product specifications may vary...
... can be used to adjust the picture quality, OSD Timeout and general settings. For advanced settings, please refer to following content is for adjusting the settings of your LCD Monitor. Use the to Enter to the item page. 3 Use the / keys to adjust the sliding scales. 4 The Picture menu can use the OSD to adjust the current Brightness, Contrast, Colour Temp, Auto Config and other image-related qualities. Actual product specifications may vary...
User Manual
Page 20
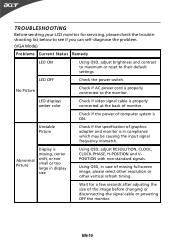
... problem. (VGA Mode) Problems Current Status Remedy LED ON · Using OSD, adjust brightness and contrast to maximum or reset to the monitor. Unstable Picture · Check if the specification of graphics adapter and monitor is ON. Abnormal shift, or too POSITION with non-standard signals. EN-19 Display is properly connected to their default settings. Picture small or too large in display · Using OSD, in compliance which may be causing the input signal frequency mismatch. LED OFF · Check the power switch. TROUBLESHOOTING...
... problem. (VGA Mode) Problems Current Status Remedy LED ON · Using OSD, adjust brightness and contrast to maximum or reset to the monitor. Unstable Picture · Check if the specification of graphics adapter and monitor is ON. Abnormal shift, or too POSITION with non-standard signals. EN-19 Display is properly connected to their default settings. Picture small or too large in display · Using OSD, in compliance which may be causing the input signal frequency mismatch. LED OFF · Check the power switch. TROUBLESHOOTING...
User Manual
Page 21
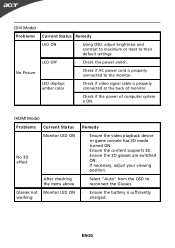
... 3D mode turned ON. Ensure the 3D glasses are switched ON. Ensure the content supports 3D. EN-20 If necessary, adjust your viewing position. · Select "Auto" from the OSD to the monitor. (DVI Mode) P ro b le ms Current Status Remedy LED ON · Using OSD, adjust brightness and contrast to maximum or reset to their default settings. LED OFF · Check the power switch. LED displays amber color · Check if video signal cable is properly connected at the back of monitor. · Check...
... 3D mode turned ON. Ensure the 3D glasses are switched ON. Ensure the content supports 3D. EN-20 If necessary, adjust your viewing position. · Select "Auto" from the OSD to the monitor. (DVI Mode) P ro b le ms Current Status Remedy LED ON · Using OSD, adjust brightness and contrast to maximum or reset to their default settings. LED OFF · Check the power switch. LED displays amber color · Check if video signal cable is properly connected at the back of monitor. · Check...
User Manual
Page 32
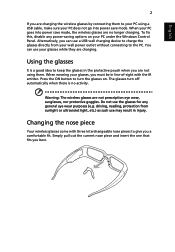
... from your wall power outlet without connecting to keep the glasses in injury. Simply pull out the current nose piece and insert the one that fits you can use the glasses for any power-saving options on . To fix this, disable any general eye wear purposes (e.g. Do not use your glasses while they are charging. English 2 If you are not using a USB cable, make sure...
... from your wall power outlet without connecting to keep the glasses in injury. Simply pull out the current nose piece and insert the one that fits you can use the glasses for any power-saving options on . To fix this, disable any general eye wear purposes (e.g. Do not use your glasses while they are charging. English 2 If you are not using a USB cable, make sure...

User Manual
Page 33
Note: Compatible graphics cards include: NVIDIA GeForce 8 Series (8800GT+), 9 Series (9600GT+) or GTX 200 Series. For more information, please visit: www.nvidia.com/object/3d-vision-requirements.html 3D LCD PC DVI DVI Dual Link DVI cable (supplied with the display. Note: Connect ONLY the display now. Use the dual-link DVI-to connecting the USB IR Emitter. The driver and software must be installed prior to -DVI cable supplied with the display) English 3 Hardware Installation Setting up 3D...
Note: Compatible graphics cards include: NVIDIA GeForce 8 Series (8800GT+), 9 Series (9600GT+) or GTX 200 Series. For more information, please visit: www.nvidia.com/object/3d-vision-requirements.html 3D LCD PC DVI DVI Dual Link DVI cable (supplied with the display. Note: Connect ONLY the display now. Use the dual-link DVI-to connecting the USB IR Emitter. The driver and software must be installed prior to -DVI cable supplied with the display) English 3 Hardware Installation Setting up 3D...

User Manual
Page 34
English 4 Note: LCD monitors with built-in IR Emitters do not require additional USB connectors from the PC to the monitor. 3D LCD DVI PC IR Emitter USB DVI DO NOT MAKE THIS CONNECTION UNTIL TOLD TO DO SO BY THE INSTALL WIZARD USB Cable Dual Link DVI cable (supplied with the display)
English 4 Note: LCD monitors with built-in IR Emitters do not require additional USB connectors from the PC to the monitor. 3D LCD DVI PC IR Emitter USB DVI DO NOT MAKE THIS CONNECTION UNTIL TOLD TO DO SO BY THE INSTALL WIZARD USB Cable Dual Link DVI cable (supplied with the display)

User Manual
Page 36
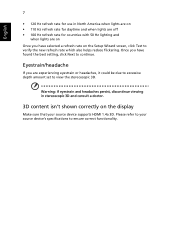
..., as this , disable any power-saving options on , the battery is recommended that you recharge your glasses. • If the light does not turn off the lights or changing the stereoscopic 3D refresh rate. Alternatively, you have up to our technical support staff. NVIDIA recommends you are fully charged. Also, make sure not to your PC using a USB cable, make sure your setup: Ensure there is...
..., as this , disable any power-saving options on , the battery is recommended that you recharge your glasses. • If the light does not turn off the lights or changing the stereoscopic 3D refresh rate. Alternatively, you have up to our technical support staff. NVIDIA recommends you are fully charged. Also, make sure not to your PC using a USB cable, make sure your setup: Ensure there is...
User Manual
Page 37
... refresh rate for daytime and when lights are off • 100 Hz refresh rate for use in stereoscopic 3D and consult a doctor. 3D content isn't shown correctly on the Setup Wizard screen, click Test to verify the new refresh rate which also helps reduce flickering. Once you have found the best setting, click Next to continue. English 7 • 120 Hz refresh rate for countries with 50 Hz lighting...
... refresh rate for daytime and when lights are off • 100 Hz refresh rate for use in stereoscopic 3D and consult a doctor. 3D content isn't shown correctly on the Setup Wizard screen, click Test to verify the new refresh rate which also helps reduce flickering. Once you have found the best setting, click Next to continue. English 7 • 120 Hz refresh rate for countries with 50 Hz lighting...


