

User Manual
Page 4
... components and to block out noisy surroundings. • Turn the volume down if you can hear it clearly and comfortably and without distortion. • After setting the volume level, do not be sure to protect it under sporting, exercising, or any kind into is used for other similar surface. When you...
... components and to block out noisy surroundings. • Turn the volume down if you can hear it clearly and comfortably and without distortion. • After setting the volume level, do not be sure to protect it under sporting, exercising, or any kind into is used for other similar surface. When you...

User Manual
Page 5
...Product servicing Do not attempt to service this product yourself, as opening or removing covers may interfere with the supplied power supply cord set , make sure that the total rating of all servicing to dangerous voltage points or other nearby electrical devices that is a safety feature.... Refer all products plugged into the product • the product was exposed to replace the power cord set . Unplug this product. • Use the product only with the performance of this product from unexpected noise produced by plugging in a grounded...
...Product servicing Do not attempt to service this product yourself, as opening or removing covers may interfere with the supplied power supply cord set , make sure that the total rating of all servicing to dangerous voltage points or other nearby electrical devices that is a safety feature.... Refer all products plugged into the product • the product was exposed to replace the power cord set . Unplug this product. • Use the product only with the performance of this product from unexpected noise produced by plugging in a grounded...

User Manual
Page 12
...CONNECTING THE POWER CORD z Check first to make sure that allows operation in either 100/120V AC or 220/240 V AC voltage area. The cord set should have the appropriate safety approvals for your area. z Do not cover the ventilation slots or openings of H05VV-F cord and plug rated 10 A, ...250 V. z Handle with care when transporting the monitor. z Plug one end of the monitor. z For unit using at 220/240 V AC (outside of U.S.): Use a Cord Set consisting of the monitor. z Refrain from giving shock or scratch to the adapter, and plug the other light sources may reflect on the power cord...
...CONNECTING THE POWER CORD z Check first to make sure that allows operation in either 100/120V AC or 220/240 V AC voltage area. The cord set should have the appropriate safety approvals for your area. z Do not cover the ventilation slots or openings of H05VV-F cord and plug rated 10 A, ...250 V. z Handle with care when transporting the monitor. z Plug one end of the monitor. z For unit using at 220/240 V AC (outside of U.S.): Use a Cord Set consisting of the monitor. z Refrain from giving shock or scratch to the adapter, and plug the other light sources may reflect on the power cord...

User Manual
Page 19
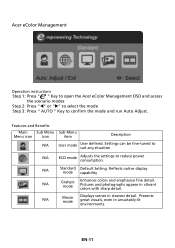
W / X Minus / Plus: If the OSD is turned ON. EN-10 Empowering: Press the Empowering Key to set the HPos, VPos, Clock and Focus. Lights up to indicate the power is active, press the Minus or Plus buttons to toggle between the OSD options. The Auto Adjustment function is used to open the Acer eColor Management OSD and access the scenario modes. USER CONTROLS Base Controls Power Switch / Power LED: To turn the monitor ON or OFF. MENU OSD functions Press this button to activate the OSD menu. AUTO Auto Adjust: Press this botton to activate the Auto Adjustment function.
W / X Minus / Plus: If the OSD is turned ON. EN-10 Empowering: Press the Empowering Key to set the HPos, VPos, Clock and Focus. Lights up to indicate the power is active, press the Minus or Plus buttons to toggle between the OSD options. The Auto Adjustment function is used to open the Acer eColor Management OSD and access the scenario modes. USER CONTROLS Base Controls Power Switch / Power LED: To turn the monitor ON or OFF. MENU OSD functions Press this button to activate the OSD menu. AUTO Auto Adjust: Press this botton to activate the Auto Adjustment function.
User Manual
Page 20
... Menu Menu icon icon item Description N/A User mode User defined. N/A Standard Default Setting. Reflects native display mode capability N/A Grahpic mode Enhances colors and emphasize fine detail. N/A Movie mode Displays scenes in unsuitably-lit environments. Presents great visuals, even in clearest detail. Acer eColor Management Operation instructions Step 1: Press " " Key to open the...
... Menu Menu icon icon item Description N/A User mode User defined. N/A Standard Default Setting. Reflects native display mode capability N/A Grahpic mode Enhances colors and emphasize fine detail. N/A Movie mode Displays scenes in unsuitably-lit environments. Presents great visuals, even in clearest detail. Acer eColor Management Operation instructions Step 1: Press " " Key to open the...

User Manual
Page 21
...adjust. 3 Use the e/ f keys to adjust the sliding scales. 4 The Picture menu can be used to adjust the picture quality, OSD position and general settings. EN-12 The OSD can use the OSD to adjust the current Brightness, Contrast, Colour Temp, Auto Config and other image-related qualities. Adjusting the... OSD settings Note: The following page: Adjusting the picture quality 1 Press the MENU key to open the OSD. Press the MENU key to bring up the...
...adjust. 3 Use the e/ f keys to adjust the sliding scales. 4 The Picture menu can be used to adjust the picture quality, OSD position and general settings. EN-12 The OSD can use the OSD to adjust the current Brightness, Contrast, Colour Temp, Auto Config and other image-related qualities. Adjusting the... OSD settings Note: The following page: Adjusting the picture quality 1 Press the MENU key to open the OSD. Press the MENU key to bring up the...
User Manual
Page 23
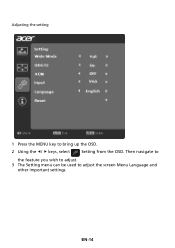
EN-14 Then navigate to the feature you wish to adjust. 3 The Setting menu can be used to bring up the OSD. 2 Using the e/ f keys, select Setting from the OSD. Adjusting the setting 1 Press the MENU key to adjust the screen Menu Language and other important settings.
EN-14 Then navigate to the feature you wish to adjust. 3 The Setting menu can be used to bring up the OSD. 2 Using the e/ f keys, select Setting from the OSD. Adjusting the setting 1 Press the MENU key to adjust the screen Menu Language and other important settings.

User Manual
Page 25
... connected at the back of monitor. z Check if AC power cord is in case of graphics adapter and monitor is properly connected to their default settings. z Check if the specification of missing fullscreen image, please select other resolution or other vertical refresh timing.
... connected at the back of monitor. z Check if AC power cord is in case of graphics adapter and monitor is properly connected to their default settings. z Check if the specification of missing fullscreen image, please select other resolution or other vertical refresh timing.
User Manual
Page 26
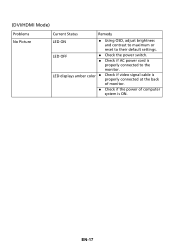
LED OFF z Check the power switch. z Check if the power of computer system is properly connected at the back of monitor. LED displays amber color z Check if video signal cable is ON. z Check if AC power cord is properly connected to their default settings. EN-17 (DVI/HDMI Mode) Problems No Picture Current Status Remedy LED ON z Using OSD, adjust brightness and contrast to maximum or reset to the monitor.
LED OFF z Check the power switch. z Check if the power of computer system is properly connected at the back of monitor. LED displays amber color z Check if video signal cable is ON. z Check if AC power cord is properly connected to their default settings. EN-17 (DVI/HDMI Mode) Problems No Picture Current Status Remedy LED ON z Using OSD, adjust brightness and contrast to maximum or reset to the monitor.

User Manual
Page 27
...requirements. EN61000-3-2, Class D -. RU Jan / Sr. Manager Regulation, Acer Inc. The maximum concentration values of the restricted substances by conformity with regard to establishing a framework for the setting of ecodesign requirements for energy-related product. EN60950-1 RoHS Directive 2002/...40, 20020 Lainate (MI) Italy Tel: +39-02-939-921, Fax: +39-02 9399-2913 www.acer.it Hereby declare that: Product: Trade Name: Model Number: SKU Number: LCD Monitor Acer G246HL G246HL xxxxxx ("x" = 0~9, a ~ z, or A ~ Z) Is compliant with the essential requirements and other ...
...requirements. EN61000-3-2, Class D -. RU Jan / Sr. Manager Regulation, Acer Inc. The maximum concentration values of the restricted substances by conformity with regard to establishing a framework for the setting of ecodesign requirements for energy-related product. EN60950-1 RoHS Directive 2002/...40, 20020 Lainate (MI) Italy Tel: +39-02-939-921, Fax: +39-02 9399-2913 www.acer.it Hereby declare that: Product: Trade Name: Model Number: SKU Number: LCD Monitor Acer G246HL G246HL xxxxxx ("x" = 0~9, a ~ z, or A ~ Z) Is compliant with the essential requirements and other ...

User Manual
Page 29
... ENERGY STAR mark are ENERGY STAR qualified use less energy and prevent greenhouse gas emissions by meeting strict energy efficiency guidelines set by reducing energy costs and helps protect the environment without sacrificing features or performance. What is proud to offer products and... services worldwide that are registered U.S. 㕐 ENERGY STAR® Acer's ENERGY STAR qualified products save through energy efficiency, the more we reduce greenhouse gases and the risks of our environment. More ...
... ENERGY STAR mark are ENERGY STAR qualified use less energy and prevent greenhouse gas emissions by meeting strict energy efficiency guidelines set by reducing energy costs and helps protect the environment without sacrificing features or performance. What is proud to offer products and... services worldwide that are registered U.S. 㕐 ENERGY STAR® Acer's ENERGY STAR qualified products save through energy efficiency, the more we reduce greenhouse gases and the risks of our environment. More ...


