

User Manual
Page 2
...particular purpose. The serial number and model number are registered trademarks of Acer Incorporated. Record the model number, serial number, purchase date and place of such revisions or changes. Acer LCD Monitor User Guide Original Issue: 12/2013 Changes may be incorporated in any ... any means, electronically, mechanically, by any person of purchase information in this manual or supplementary documents and publications. Acer LCD Monitor User Guide Model number Serial number Date of purchase Place of merchantability or fitness for identification purposes only and belong to...
...particular purpose. The serial number and model number are registered trademarks of Acer Incorporated. Record the model number, serial number, purchase date and place of such revisions or changes. Acer LCD Monitor User Guide Original Issue: 12/2013 Changes may be incorporated in any ... any means, electronically, mechanically, by any person of purchase information in this manual or supplementary documents and publications. Acer LCD Monitor User Guide Model number Serial number Date of purchase Place of merchantability or fitness for identification purposes only and belong to...

User Manual
Page 3
... brightness on the screen depending on again to wipe the screen and cabinet front and sides. iii Special notes on LCD monitors The following are normal with the LCD monitor and do not indicate a problem. • Due to the nature of 0.01% or less such as a missing ... pixel lit all warnings and instructions marked on the product. Cleaning your safety and comfort Safety instructions Read these guidelines when cleaning the monitor: • Always unplug the monitor before cleaning. • Use a soft cloth to make sure the flicker disappears. • You may flicker during initial use . ...
... brightness on the screen depending on again to wipe the screen and cabinet front and sides. iii Special notes on LCD monitors The following are normal with the LCD monitor and do not indicate a problem. • Due to the nature of 0.01% or less such as a missing ... pixel lit all warnings and instructions marked on the product. Cleaning your safety and comfort Safety instructions Read these guidelines when cleaning the monitor: • Always unplug the monitor before cleaning. • Use a soft cloth to make sure the flicker disappears. • You may flicker during initial use . ...

User Manual
Page 4
..., stand or table. This product should never be sure to the equipment operator as possible. When you . These openings must not be used for this monitor, do not be blocked or covered. Never spill liquid of any kind onto or into this product through cabinet slots as they may touch dangerous...
..., stand or table. This product should never be sure to the equipment operator as possible. When you . These openings must not be used for this monitor, do not be blocked or covered. Never spill liquid of any kind onto or into this product through cabinet slots as they may touch dangerous...

User Manual
Page 7
... not constitute a malfunction. Incorrect computer usage may complain of user inactivity. • Wake the computer from Sleep mode by adjusting the viewing angle of the monitor, using a footrest, or raising your leg muscles vii The following symptoms may occasionally misfire or appear as black or red dots. This has no effect...
... not constitute a malfunction. Incorrect computer usage may complain of user inactivity. • Wake the computer from Sleep mode by adjusting the viewing angle of the monitor, using a footrest, or raising your leg muscles vii The following symptoms may occasionally misfire or appear as black or red dots. This has no effect...

User Manual
Page 8
...; placing your display in such a way that the side faces the window or any light source • minimizing room light by looking away from the monitor and focusing on how to an awkward viewing angle. • Avoid looking at the middle of the display. • Adjust the display brightness and/or...
...; placing your display in such a way that the side faces the window or any light source • minimizing room light by looking away from the monitor and focusing on how to an awkward viewing angle. • Avoid looking at the middle of the display. • Adjust the display brightness and/or...

User Manual
Page 9
... the essential requirements and other standardizing documents: EN55022:2006/A1:2007 Class B; RU Jan / Sr. Manager Regulation, Acer Inc. English Acer Incorporated 8F, 88, Sec. 1, Xintai 5th Rd., Xizhi New Taipei City 221, Taiwan Declaration of ecodesign requirements for the... 20020 Lainate (MI) Italy Tel: +39-02-939-921 ,Fax: +39-02 9399-2913 www.acer.it Declare under our own responsibility that the product: Product: LCD Monitor Trade Name: Acer Model Number: G227HQL SKU Number: G227HQL xxxxxx; ("x" = 0~9, a ~ z, A ~ Z, or blank) To which this declaration refers conforms ...
... the essential requirements and other standardizing documents: EN55022:2006/A1:2007 Class B; RU Jan / Sr. Manager Regulation, Acer Inc. English Acer Incorporated 8F, 88, Sec. 1, Xintai 5th Rd., Xizhi New Taipei City 221, Taiwan Declaration of ecodesign requirements for the... 20020 Lainate (MI) Italy Tel: +39-02-939-921 ,Fax: +39-02 9399-2913 www.acer.it Declare under our own responsibility that the product: Product: LCD Monitor Trade Name: Acer Model Number: G227HQL SKU Number: G227HQL xxxxxx; ("x" = 0~9, a ~ z, A ~ Z, or blank) To which this declaration refers conforms ...

User Manual
Page 10
... essential requirements and other standardizing documents: EN55022:2006/A1:2007 Class B; English Acer Incorporated 8F, 88, Sec. 1, Xintai 5th Rd., Xizhi New Taipei City 221, Taiwan Declaration of Conformity We, Acer Incorporated 8F, 88, Sec. 1, Xintai 5th Rd., Xizhi, New Taipei City 221,... Via Lepetit, 40, 20020 Lainate (MI) Italy Tel: +39-02-939-921 ,Fax: +39-02 9399-2913 www.acer.it Declare under our own responsibility that the product: Product: LCD Monitor Trade Name: Acer Model Number: G237HL SKU Number: G237HL xxxxxx; ("x" = 0~9, a ~ z, A ~ Z, or blank) To which this ...
... essential requirements and other standardizing documents: EN55022:2006/A1:2007 Class B; English Acer Incorporated 8F, 88, Sec. 1, Xintai 5th Rd., Xizhi New Taipei City 221, Taiwan Declaration of Conformity We, Acer Incorporated 8F, 88, Sec. 1, Xintai 5th Rd., Xizhi, New Taipei City 221,... Via Lepetit, 40, 20020 Lainate (MI) Italy Tel: +39-02-939-921 ,Fax: +39-02 9399-2913 www.acer.it Declare under our own responsibility that the product: Product: LCD Monitor Trade Name: Acer Model Number: G237HL SKU Number: G237HL xxxxxx; ("x" = 0~9, a ~ z, A ~ Z, or blank) To which this ...

User Manual
Page 11
...Communications Commission Declaration of Conformity This device complies with Part 15 of Responsible Party: Contact Person: Phone No.: Fax No.: LCD Monitor G227HQL G227HQL xxxxxx ("x" = 0~9, a ~ z, A ~ Z or Blank) Acer America Corporation 333 West San Carlos Street Suite 1500 San Jose, CA 95110, U.S.A. Operation is responsible for this device must accept...is subject to the following two conditions: (1) this device may cause undesired operation. English Federal Communications Commission Declaration of Conformity Acer America Corporation 333 West San Carlos St.,Suite 1500 San Jose,CA 95110...
...Communications Commission Declaration of Conformity This device complies with Part 15 of Responsible Party: Contact Person: Phone No.: Fax No.: LCD Monitor G227HQL G227HQL xxxxxx ("x" = 0~9, a ~ z, A ~ Z or Blank) Acer America Corporation 333 West San Carlos Street Suite 1500 San Jose, CA 95110, U.S.A. Operation is responsible for this device must accept...is subject to the following two conditions: (1) this device may cause undesired operation. English Federal Communications Commission Declaration of Conformity Acer America Corporation 333 West San Carlos St.,Suite 1500 San Jose,CA 95110...

User Manual
Page 12
... This device complies with Part 15 of Responsible Party: Contact Person: Phone No.: Fax No.: LCD Monitor G237HL G237HL xxxxxx ("x" = 0~9, a ~ z, A ~ Z or Blank) Acer America Corporation 333 West San Carlos Street Suite 1500 San Jose, CA 95110, U.S.A. Acer Representative 254-298-4000 254-298-4147 xii The following local Manufacturer /Importer is subject to...
... This device complies with Part 15 of Responsible Party: Contact Person: Phone No.: Fax No.: LCD Monitor G237HL G237HL xxxxxx ("x" = 0~9, a ~ z, A ~ Z or Blank) Acer America Corporation 333 West San Carlos Street Suite 1500 San Jose, CA 95110, U.S.A. Acer Representative 254-298-4000 254-298-4147 xii The following local Manufacturer /Importer is subject to...
User Manual
Page 13
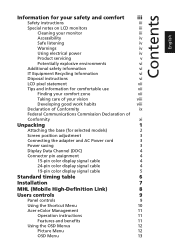
Contents English Information for your safety and comfort iii Safety instructions iii Special notes on LCD monitors iii Cleaning your monitor iii Accessibility iv Safe listening iv Warnings iv Using electrical power iv Product servicing v Potentially explosive environments vi ... cable 5 Standard timing table 6 Installation 7 MHL (Mobile High-Definition Link) 8 Users controls 9 Panel controls 9 Using the Shortcut Menu 10 Acer eColor Management 11 Operation instructions 11 Features and benefits 11 Using the OSD Menus 12 Picture Menu 12 OSD Menu 13
Contents English Information for your safety and comfort iii Safety instructions iii Special notes on LCD monitors iii Cleaning your monitor iii Accessibility iv Safe listening iv Warnings iv Using electrical power iv Product servicing v Potentially explosive environments vi ... cable 5 Standard timing table 6 Installation 7 MHL (Mobile High-Definition Link) 8 Users controls 9 Panel controls 9 Using the Shortcut Menu 10 Acer eColor Management 11 Operation instructions 11 Features and benefits 11 Using the OSD Menus 12 Picture Menu 12 OSD Menu 13

User Manual
Page 15
LCD monitor Quick start guide MHL cable (Optional) D-sub cable HDMI cable (Optional) AC Power cord DVI cable (Optional) AC Adapter Audio cable (Optional) 1 English Unpacking Please check that the following items are present when you unpack the box, and save the packing materials in case you need to ship or transport the monitor in the future.
LCD monitor Quick start guide MHL cable (Optional) D-sub cable HDMI cable (Optional) AC Power cord DVI cable (Optional) AC Adapter Audio cable (Optional) 1 English Unpacking Please check that the following items are present when you unpack the box, and save the packing materials in case you need to ship or transport the monitor in the future.

User Manual
Page 16
English Attaching the base (for selected models) Note: Take care when performing the installation to the monitor stand arm by turning the white screw using the integrated tab or a suitable coin. (for selected models) Note: Remove the monitor and monitor base from its packaging. use a cloth to avoid scratching the screen. 1 Attach the monitor stand arm to the base. 2 Ensure that the base is locked onto the monitor stand arm. • Secure the base to avoid injuring yourself. 2 Carefully place the monitor face-down on a stable surface --
English Attaching the base (for selected models) Note: Take care when performing the installation to the monitor stand arm by turning the white screw using the integrated tab or a suitable coin. (for selected models) Note: Remove the monitor and monitor base from its packaging. use a cloth to avoid scratching the screen. 1 Attach the monitor stand arm to the base. 2 Ensure that the base is locked onto the monitor stand arm. • Secure the base to avoid injuring yourself. 2 Carefully place the monitor face-down on a stable surface --

User Manual
Page 17
... you use is the correct type required for the country in either 100/120 V AC or 220/240 V AC voltage area. Power saving The monitor will be installed. Screen position adjustment To optimize the viewing position, you can be adjusted to 15 degrees up or 5 degrees down. 5 15... The recovery time from the display controller, as indicated by the blinking blue light. LED indicator 3 The cord set consisting of the monitor. The monitor can adjust the monitor tilt, using 220/240 V AC: Use a cord set should have the appropriate safety approvals for your hands to hold the edges ...
... you use is the correct type required for the country in either 100/120 V AC or 220/240 V AC voltage area. Power saving The monitor will be installed. Screen position adjustment To optimize the viewing position, you can be adjusted to 15 degrees up or 5 degrees down. 5 15... The recovery time from the display controller, as indicated by the blinking blue light. LED indicator 3 The cord set consisting of the monitor. The monitor can adjust the monitor tilt, using 220/240 V AC: Use a cord set should have the appropriate safety approvals for your hands to hold the edges ...
User Manual
Page 18
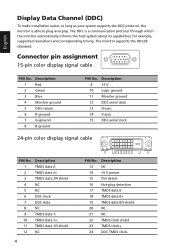
...1+ 11 TMDS data 1/3 shield 12 NC 4 PIN No. Description 1 Red 2 Green 3 Blue 4 Monitor ground 5 DDC-return 6 R-ground 7 G-ground 8 B-ground PIN No. Description 9 +5 V 10 Logic ground 11 Monitor ground 12 DDC-serial data 13 H-sync 14 V-sync 15 DDC-serial clock 24-pin color display signal ...pin color display signal cable 1 5 6 10 11 15 PIN No. for example, supported resolutions and corresponding timing. The monitor supports the DDC2B standard. English Display Data Channel (DDC) To make installation easier, so long as your system supports the DDC protocol...
...1+ 11 TMDS data 1/3 shield 12 NC 4 PIN No. Description 1 Red 2 Green 3 Blue 4 Monitor ground 5 DDC-return 6 R-ground 7 G-ground 8 B-ground PIN No. Description 9 +5 V 10 Logic ground 11 Monitor ground 12 DDC-serial data 13 H-sync 14 V-sync 15 DDC-serial clock 24-pin color display signal ...pin color display signal cable 1 5 6 10 11 15 PIN No. for example, supported resolutions and corresponding timing. The monitor supports the DDC2B standard. English Display Data Channel (DDC) To make installation easier, so long as your system supports the DDC protocol...
User Manual
Page 21
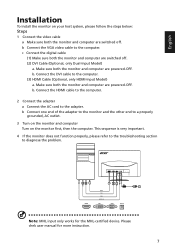
... refer to the troubleshooting section to the computer. (3) HDMI Cable (Optional, only HDMI-Input Model) a. b. c Connect the digital cable (1) Make sure both the monitor and computer are powered-OFF. Connect the HDMI cable to the computer. 2 Connect the adapter a Connect the AC cord to the computer. b Connect one end... HDMI HDMI DVI VGA AUDIO IN DVI VGA DC IN Note: MHL input only works for more instruction. 7 Make sure both the monitor and computer are switched off . Please chek user manual for the MHL-certified device. b Connect the VGA video cable to the adapter.
... refer to the troubleshooting section to the computer. (3) HDMI Cable (Optional, only HDMI-Input Model) a. b. c Connect the digital cable (1) Make sure both the monitor and computer are powered-OFF. Connect the HDMI cable to the computer. 2 Connect the adapter a Connect the AC cord to the computer. b Connect one end... HDMI HDMI DVI VGA AUDIO IN DVI VGA DC IN Note: MHL input only works for more instruction. 7 Make sure both the monitor and computer are switched off . Please chek user manual for the MHL-certified device. b Connect the VGA video cable to the adapter.

User Manual
Page 22
...Definition Link) (Only for transmitting video and audio from the portable device. This may be due to the difference in standby mode, the monitor will automatically display content on the portable device's output signal. When the portable device is a digital interface for MHL-input Models) Mobile ...VGA IN AUDIO IN MHL Using MHL MHL-certified portable devices will show a black screen or turn to standby mode, depending on the monitor, provided the output display and audio formats are supported by the portable device. It is also capable of controlling the portable device. 8...
...Definition Link) (Only for transmitting video and audio from the portable device. This may be due to the difference in standby mode, the monitor will automatically display content on the portable device's output signal. When the portable device is a digital interface for MHL-input Models) Mobile ...VGA IN AUDIO IN MHL Using MHL MHL-certified portable devices will show a black screen or turn to standby mode, depending on the monitor, provided the output display and audio formats are supported by the portable device. It is also capable of controlling the portable device. 8...

User Manual
Page 23
...power saving mode. 2 < / > button Press the < / > button to navigate to the desired function, and press the Menu button to open the Acer eColor Management OSD and access the scenario modes. 9 Press the < / > button to change the settings of your display. 5 Empowering Key Press this button... for two seconds to activate the Auto Adjustment function and the monitor will automatically optimize the display position, focus, and clock of the current function. 3 Menu/Enter button Press to view the OSD menu. ...
...power saving mode. 2 < / > button Press the < / > button to navigate to the desired function, and press the Menu button to open the Acer eColor Management OSD and access the scenario modes. 9 Press the < / > button to change the settings of your display. 5 Empowering Key Press this button... for two seconds to activate the Auto Adjustment function and the monitor will automatically optimize the display position, focus, and clock of the current function. 3 Menu/Enter button Press to view the OSD menu. ...

User Manual
Page 24
...Auto button to open the Acer eColor Management and access the scenario modes. English Using the Shortcut Menu AUTO Input Press any of the function buttons (Empowering Key, Auto button, or Menu button) to activate the Auto Adjustment function and the monitor will automatically optimize the display... position, focus, and clock of your monitor. (Optional, only Dual-Input Model or HDMI-Input Model) 10 Volume Input Input Press the Volume...
...Auto button to open the Acer eColor Management and access the scenario modes. English Using the Shortcut Menu AUTO Input Press any of the function buttons (Empowering Key, Auto button, or Menu button) to activate the Auto Adjustment function and the monitor will automatically optimize the display... position, focus, and clock of your monitor. (Optional, only Dual-Input Model or HDMI-Input Model) 10 Volume Input Input Press the Volume...
User Manual
Page 26
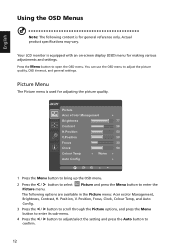
... content is for general reference only. Your LCD monitor is used for making various adjustments and settings. Position, V. You can use the OSD menu to open the OSD menu. Press the Menu button to adjust the picture quality, OSD timeout, and general settings. Picture Acer eColor Management Brightness 77 Contrast 56 H.Position... and press the Auto button to enter the Picture menu. English Using the OSD Menus Note: The following options are available in the Picture menu: Acer ecolor Management, Brightness, Contrast, H.
... content is for general reference only. Your LCD monitor is used for making various adjustments and settings. Position, V. You can use the OSD menu to open the OSD menu. Press the Menu button to adjust the picture quality, OSD timeout, and general settings. Picture Acer eColor Management Brightness 77 Contrast 56 H.Position... and press the Auto button to enter the Picture menu. English Using the OSD Menus Note: The following options are available in the Picture menu: Acer ecolor Management, Brightness, Contrast, H.
User Manual
Page 29
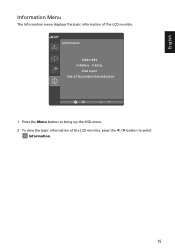
Information 1920x1080 H:68KHz V:60Hz VGA Input S/N: ETRLA00803104000502400 1 Press the Menu button to bring up the OSD menu. 2 To view the basic information of the LCD monitor. English Information Menu The Information menu displays the basic information of the LCD monitor, press the < / > button to select Information. 15
Information 1920x1080 H:68KHz V:60Hz VGA Input S/N: ETRLA00803104000502400 1 Press the Menu button to bring up the OSD menu. 2 To view the basic information of the LCD monitor. English Information Menu The Information menu displays the basic information of the LCD monitor, press the < / > button to select Information. 15


