
Quick Start Guide
Page 1
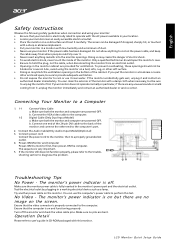
Digital Cable (Only Dual-Input Model) a. Connect one end of the 24-pin DVI cable to the back of the monitor and connect the other soft surface. • Doing so may create the danger of electric shock. • To avoid electric shock, never touch the inside of the monitor with this test. Make sure the monitor power cable is fully inserted in a working electrical device such as a lamp. Ensure that the computer is on but be sure to unplug the monitor first. LCD Monitor Quick Setup Guide To prevent overheating, these openings should open the monitor's case. • Be ...
Digital Cable (Only Dual-Input Model) a. Connect one end of the 24-pin DVI cable to the back of the monitor and connect the other soft surface. • Doing so may create the danger of electric shock. • To avoid electric shock, never touch the inside of the monitor with this test. Make sure the monitor power cable is fully inserted in a working electrical device such as a lamp. Ensure that the computer is on but be sure to unplug the monitor first. LCD Monitor Quick Setup Guide To prevent overheating, these openings should open the monitor's case. • Be ...
Quick Start Guide
Page 2
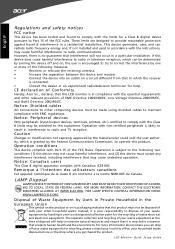
... by Users in Private Household in accordance with EMC regulations. CE declaration of your other household waste. The separate collection and recycling of Conformity Hereby, Acer Inc., declares that this product must accept any interference received, including interference that protects human health and the environment. Notice: Peripheral devices Only peripherals (input...
... by Users in Private Household in accordance with EMC regulations. CE declaration of your other household waste. The separate collection and recycling of Conformity Hereby, Acer Inc., declares that this product must accept any interference received, including interference that protects human health and the environment. Notice: Peripheral devices Only peripherals (input...
Quick Start Guide
Page 3
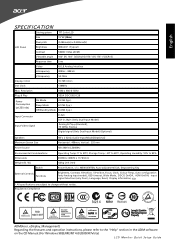
Regulatory Compliance R43346 ADM(Acer_eDisplay_Management) Regarding the features and operation instructions, please refer to change without notice. English SPECIFICATION Driving system TFT Color LCD Size Pixel pitch 19"W (48cm) 0.283mm(H) x 0.283mm(V) LCD Panel Brightness 300cd/m2 (Typical) Contrast 50000:1 Max (ACM) Viewable angle 1600 (H) 1600 (V)(CR 10) /176 0 (H) 1760 (V)(CR 5) Response time 5 ms Video R,G,B Analog Interface H-Frequency 30KHz - 80KHz V-Frequency 55-75Hz Display Colors 16.7M Colors Dot Clock 138MHz Max. W.) Switch External Controls: Functions...
Regulatory Compliance R43346 ADM(Acer_eDisplay_Management) Regarding the features and operation instructions, please refer to change without notice. English SPECIFICATION Driving system TFT Color LCD Size Pixel pitch 19"W (48cm) 0.283mm(H) x 0.283mm(V) LCD Panel Brightness 300cd/m2 (Typical) Contrast 50000:1 Max (ACM) Viewable angle 1600 (H) 1600 (V)(CR 10) /176 0 (H) 1760 (V)(CR 5) Response time 5 ms Video R,G,B Analog Interface H-Frequency 30KHz - 80KHz V-Frequency 55-75Hz Display Colors 16.7M Colors Dot Clock 138MHz Max. W.) Switch External Controls: Functions...

User Manual
Page 1
TABLE OF CONTENTS Special notes on LCD monitors 1 Information for your safety and comfort 2 Unpacking 5 Attaching/Removing the base 6 Screen position adjustment 6 Connecting the power cord 7 Safety precaution 7 Cleaning your monitor 7 Power saving 8 DDC 8 Connector Pin Assignment 9 Standard Timing Table 11 Installation 12 User controls 13 Troubleshooting 19
TABLE OF CONTENTS Special notes on LCD monitors 1 Information for your safety and comfort 2 Unpacking 5 Attaching/Removing the base 6 Screen position adjustment 6 Connecting the power cord 7 Safety precaution 7 Cleaning your monitor 7 Power saving 8 DDC 8 Connector Pin Assignment 9 Standard Timing Table 11 Installation 12 User controls 13 Troubleshooting 19
User Manual
Page 2
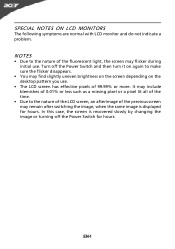
NOTES • Due to the nature of the LCD screen, an afterimage of the previous screen may remain after switching the image, when the same image is recovered slowly by changing the image or turning off the Power Switch and then turn it on again to make sure the flicker disappears. • You may flicker during initial use . • The LCD screen has effective pixels of the fluorescent light, the screen may find slightly uneven brightness on the screen depending on the desktop pattern you use . In this case, the screen is displayed for hours. SPECIAL NOTES ON LCD MONITORS The ...
NOTES • Due to the nature of the LCD screen, an afterimage of the previous screen may remain after switching the image, when the same image is recovered slowly by changing the image or turning off the Power Switch and then turn it on again to make sure the flicker disappears. • You may flicker during initial use . • The LCD screen has effective pixels of the fluorescent light, the screen may find slightly uneven brightness on the screen depending on the desktop pattern you use . In this case, the screen is displayed for hours. SPECIAL NOTES ON LCD MONITORS The ...

User Manual
Page 3
Information for future reference. Keep this document for your safety and comfort Safety instructions Read these instructions, suggested by hearing experts,to protect your earing. • Gradually increase the volume until you need to disconnect power to unplug the power cord from lithium battery pack. This product should never be sure to the equipment, be blocked by placing the product on the product. When you can 't hear people speaking near you plug the power cord into this product on a vibrating surface. • Never use this product near or over a radiator ...
Information for future reference. Keep this document for your safety and comfort Safety instructions Read these instructions, suggested by hearing experts,to protect your earing. • Gradually increase the volume until you need to disconnect power to unplug the power cord from lithium battery pack. This product should never be sure to the equipment, be blocked by placing the product on the product. When you can 't hear people speaking near you plug the power cord into this product on a vibrating surface. • Never use this product near or over a radiator ...
User Manual
Page 4
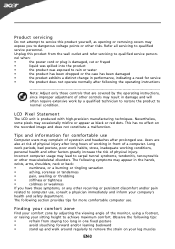
LCD Pixel Statement The LCD unit is damaged, cut or frayed • liquid was spilled into the product • the product was exposed to rain or water • the product has been dropped or the case has been damaged • the product exhibits a distinct change in one fixed posture • avoid slouching forward and/or leaning backward • stand up and walk around regularly to normal condition. Long work periods, bad posture, poor work by the operating instructions, since improper adjustment of other controls may complain of eyestrain and headaches after long ...
LCD Pixel Statement The LCD unit is damaged, cut or frayed • liquid was spilled into the product • the product was exposed to rain or water • the product has been dropped or the case has been damaged • the product exhibits a distinct change in one fixed posture • avoid slouching forward and/or leaning backward • stand up and walk around regularly to normal condition. Long work periods, bad posture, poor work by the operating instructions, since improper adjustment of other controls may complain of eyestrain and headaches after long ...
User Manual
Page 5
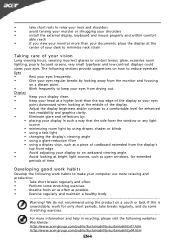
... clarity. • Eliminate glare and reflections by: • placing your display in recycling, please visit the following websites: Worldwide: http://www.acer-group.com/public/Sustainability/sustainability01.htm http://www.acer-group.com/public/Sustainability/sustainability04.htm EN-4 We do some stretching exercises. • Breathe fresh air as often as a piece of...
... clarity. • Eliminate glare and reflections by: • placing your display in recycling, please visit the following websites: Worldwide: http://www.acer-group.com/public/Sustainability/sustainability01.htm http://www.acer-group.com/public/Sustainability/sustainability04.htm EN-4 We do some stretching exercises. • Breathe fresh air as often as a piece of...
User Manual
Page 6
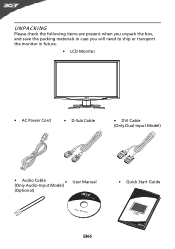
UNPACKING Please check the following items are present when you unpack the box, and save the packing materials in case you will need to ship or transport the monitor in future. • LCD Monitor • AC Power Cord • D-Sub Cable • DVI Cable (Only Dual-Input Model) • Audio Cable (Only Audio-Input Model) • (Optional) User Manual • Quick Start Guide EN-5
UNPACKING Please check the following items are present when you unpack the box, and save the packing materials in case you will need to ship or transport the monitor in future. • LCD Monitor • AC Power Cord • D-Sub Cable • DVI Cable (Only Dual-Input Model) • Audio Cable (Only Audio-Input Model) • (Optional) User Manual • Quick Start Guide EN-5
User Manual
Page 7
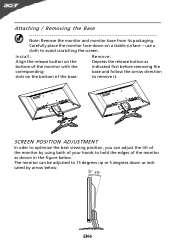
Carefully place the monitor face-down as indicated by using both of your hands to hold the edges of the monitor as bottom of the monitor with the indicated first before removing the corresponding base and follow the arrow direction slots on the bottom of the monitor by arrow below . SCREEN POSITION ADJUSTMENT In oder to 15 degrees up or 5 degrees down on the Depress the release button as shown in the figure below . EN-6 Install: Remove: Align the release button on a stable surface -- to avoid scratching the screen. Attaching / Removing the Base Note: ...
Carefully place the monitor face-down as indicated by using both of your hands to hold the edges of the monitor as bottom of the monitor with the indicated first before removing the corresponding base and follow the arrow direction slots on the bottom of the monitor by arrow below . SCREEN POSITION ADJUSTMENT In oder to 15 degrees up or 5 degrees down on the Depress the release button as shown in the figure below . EN-6 Install: Remove: Align the release button on a stable surface -- to avoid scratching the screen. Attaching / Removing the Base Note: ...

User Manual
Page 8
light or other heavy object, on the face of H05VV-F cord and plug rated 10 A, 250 V. Always put the monitor in a place where there is fragile. CONNECTING THE POWER CORD • Check first to make sure that allows operation in either 100/120V AC or 220/240 V AC voltage area. EN-7 Place the monitor just below guidelines when cleaning the monitor. • Always unplug the monitor before cleaning. • Use a soft cloth to wipe the screen and cabinet front and sides. No user-adjustment is required. • Plug one end of the power cord to the AC Inlet, plug another end to...
light or other heavy object, on the face of H05VV-F cord and plug rated 10 A, 250 V. Always put the monitor in a place where there is fragile. CONNECTING THE POWER CORD • Check first to make sure that allows operation in either 100/120V AC or 220/240 V AC voltage area. EN-7 Place the monitor just below guidelines when cleaning the monitor. • Always unplug the monitor before cleaning. • Use a soft cloth to wipe the screen and cabinet front and sides. No user-adjustment is required. • Plug one end of the power cord to the AC Inlet, plug another end to...
User Manual
Page 9
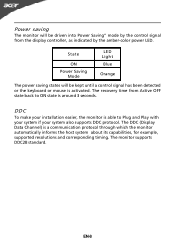
DDC To make your system also supports DDC protocol. EN-8 The monitor supports DDC2B standard. The DDC (Display Data Channel) is able to ON state is around 3 seconds. Power saving The monitor will be driven into Power Saving" mode by the amber-color power LED. State ON Power Saving Mode LED Light Blue Orange The power saving states will be kept until a control signal has been detected or the keyboard or mouse is activated. The recovery time from the display controller, as indicated by the control signal from Active OFF state back to Plug and Play with your system if...
DDC To make your system also supports DDC protocol. EN-8 The monitor supports DDC2B standard. The DDC (Display Data Channel) is able to ON state is around 3 seconds. Power saving The monitor will be driven into Power Saving" mode by the amber-color power LED. State ON Power Saving Mode LED Light Blue Orange The power saving states will be kept until a control signal has been detected or the keyboard or mouse is activated. The recovery time from the display controller, as indicated by the control signal from Active OFF state back to Plug and Play with your system if...
User Manual
Page 10
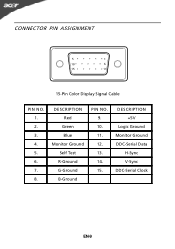
DESCRIPTION Red Green Blue Monitor Ground Self Test R-Ground G-Ground B-Ground PIN NO. 9. 10. 11. 12. 13. 14. 15. CONNECTOR PIN ASSIGNMENT 5 1 10 6 15 11 15-Pin Color Display Signal Cable PIN NO. 1. 2. 3. 4. 5. 6. 7. 8. DESCRIPTION +5V Logic Ground Monitor Ground DDC-Serial Data H-Sync V-Sync DDC-Serial Clock EN-9
DESCRIPTION Red Green Blue Monitor Ground Self Test R-Ground G-Ground B-Ground PIN NO. 9. 10. 11. 12. 13. 14. 15. CONNECTOR PIN ASSIGNMENT 5 1 10 6 15 11 15-Pin Color Display Signal Cable PIN NO. 1. 2. 3. 4. 5. 6. 7. 8. DESCRIPTION +5V Logic Ground Monitor Ground DDC-Serial Data H-Sync V-Sync DDC-Serial Clock EN-9
User Manual
Page 11
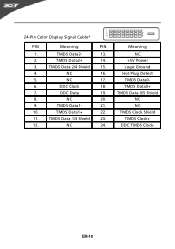
TMDS Data 2/4 Shield 15. 4. DDC Clock 18. 7. TMDS Data1+ 22. 11. EN-10 NC 16. 5. NC 20. 9. NC 24. TMDS Data2+ 14. 3. NC 17. 6. DDC Data 19. 8. TMDS Data1- 21. 10. TMDS Data 1/3 Shield 23. 12. TMDS Data2- 13. 2. Meaning NC +5V Power Logic Ground Hot Plug Detect TMDS Data0TMDS Data0+ TMDS Data 0/5 Shield NC NC TMDS Clock Shield TMDS Clock+ DDC TMDS Clock- 24-Pin Color Display Signal Cable* PIN Meaning PIN 1.
TMDS Data 2/4 Shield 15. 4. DDC Clock 18. 7. TMDS Data1+ 22. 11. EN-10 NC 16. 5. NC 20. 9. NC 24. TMDS Data2+ 14. 3. NC 17. 6. DDC Data 19. 8. TMDS Data1- 21. 10. TMDS Data 1/3 Shield 23. 12. TMDS Data2- 13. 2. Meaning NC +5V Power Logic Ground Hot Plug Detect TMDS Data0TMDS Data0+ TMDS Data 0/5 Shield NC NC TMDS Clock Shield TMDS Clock+ DDC TMDS Clock- 24-Pin Color Display Signal Cable* PIN Meaning PIN 1.
User Manual
Page 12
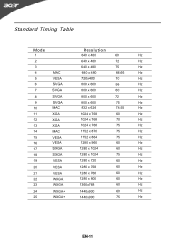
Standard Timing Table Mode 1 Resolution 640 x 480 60 Hz 2 640 x 480 72 Hz 3 4 MAC 5 VESA 6 SVGA 7 SVGA 640 x 480 640 x 480 720x400 800 x 600 800 x 600 75 Hz 66.66 Hz 70 Hz 56 Hz 60 Hz 8 SVGA 9 SVGA 10 MAC 800 x 600 800 x 600 832 x 624 72 Hz 75 Hz 74.55 Hz 11 XGA 12 XGA 13 XGA 14 MAC 1024 x 768 1024 x 768 1024 x 768 1152 x 870 60 Hz 70 Hz 75 Hz 75 Hz 15 VESA 1152 x 864 75 Hz 16 VESA 1280 x 960 60 Hz 17 SXGA 1280 x 1024 60 Hz 18 SXGA 1280 x 1024 75 Hz 19 VESA 1280 x 720 60 Hz 20 VESA 1280 x 768 60 Hz 21 ...
Standard Timing Table Mode 1 Resolution 640 x 480 60 Hz 2 640 x 480 72 Hz 3 4 MAC 5 VESA 6 SVGA 7 SVGA 640 x 480 640 x 480 720x400 800 x 600 800 x 600 75 Hz 66.66 Hz 70 Hz 56 Hz 60 Hz 8 SVGA 9 SVGA 10 MAC 800 x 600 800 x 600 832 x 624 72 Hz 75 Hz 74.55 Hz 11 XGA 12 XGA 13 XGA 14 MAC 1024 x 768 1024 x 768 1024 x 768 1152 x 870 60 Hz 70 Hz 75 Hz 75 Hz 15 VESA 1152 x 864 75 Hz 16 VESA 1280 x 960 60 Hz 17 SXGA 1280 x 1024 60 Hz 18 SXGA 1280 x 1024 75 Hz 19 VESA 1280 x 720 60 Hz 20 VESA 1280 x 768 60 Hz 21 ...
User Manual
Page 13
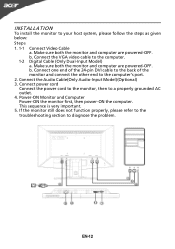
Connect the Audio Cable(Only Audio-Input Model)(Optional) 3. If the monitor still does not function properly, please refer to the troubleshooting section to your host system, please follow the steps as given below: Steps 1. 1-1 Connect Video Cable a. Make sure both the monitor and computer are powered-OFF. INSTALLATION To install the monitor to diagnose the problem. Connect the VGA video cable to a properly grounded AC outlet. 4. Connect power cord Connect the power cord to the monitor, then to the computer. 1-2 Digital Cable (Only Dual-Input Model) a. Connect one end of ...
Connect the Audio Cable(Only Audio-Input Model)(Optional) 3. If the monitor still does not function properly, please refer to the troubleshooting section to your host system, please follow the steps as given below: Steps 1. 1-1 Connect Video Cable a. Make sure both the monitor and computer are powered-OFF. INSTALLATION To install the monitor to diagnose the problem. Connect the VGA video cable to a properly grounded AC outlet. 4. Connect power cord Connect the power cord to the monitor, then to the computer. 1-2 Digital Cable (Only Dual-Input Model) a. Connect one end of ...

User Manual
Page 14
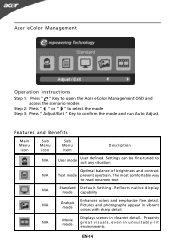
... select the most commonly accessed settings. The shortcut menu lets you will see the following messages on right top side of screen to open the Acer eColor Management OSD and access the scenario modes. Using the Shortcut Menu Press the function button to indicate currently selected input source. AUTO Auto Adjust...
... select the most commonly accessed settings. The shortcut menu lets you will see the following messages on right top side of screen to open the Acer eColor Management OSD and access the scenario modes. Using the Shortcut Menu Press the function button to indicate currently selected input source. AUTO Auto Adjust...
User Manual
Page 15
... comfortable way to confirm the mode and run Auto Adjust. Presents great visuals, even in vibrant colors with sharp detail. Acer eColor Management Operation instructions Step 1: Press " " Key to open the Acer eColor Management OSD and access the scenario modes Step 2: Press " " or " " to select the mode Step 3: Press " Adjust/Exit " Key...
... comfortable way to confirm the mode and run Auto Adjust. Presents great visuals, even in vibrant colors with sharp detail. Acer eColor Management Operation instructions Step 1: Press " " Key to open the Acer eColor Management OSD and access the scenario modes Step 2: Press " " or " " to select the mode Step 3: Press " Adjust/Exit " Key...
User Manual
Page 16
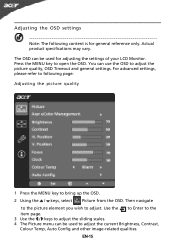
For advanced settings, please refer to following content is for adjusting the settings of your LCD Monitor. Then navigate to the picture element you wish to open the OSD. Use the to Enter to the item page. 3 Use the / keys to adjust the sliding scales. 4 The Picture menu can be used to adjust the current Brightness, Contrast, Colour Temp, Auto Config and other image-related qualities. Actual product specifications may vary. You can be used for general reference only. EN-15 Adjusting the OSD settings Note: The following page: Adjusting the picture quality 1 Press the MENU key ...
For advanced settings, please refer to following content is for adjusting the settings of your LCD Monitor. Then navigate to the picture element you wish to open the OSD. Use the to Enter to the item page. 3 Use the / keys to adjust the sliding scales. 4 The Picture menu can be used to adjust the current Brightness, Contrast, Colour Temp, Auto Config and other image-related qualities. Actual product specifications may vary. You can be used for general reference only. EN-15 Adjusting the OSD settings Note: The following page: Adjusting the picture quality 1 Press the MENU key ...
User Manual
Page 17
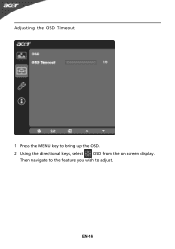
Then navigate to the feature you wish to bring up the OSD. 2 Using the directional keys, select OSD from the on screen display. EN-16 Adjusting the OSD Timeout 1 Press the MENU key to adjust.
Then navigate to the feature you wish to bring up the OSD. 2 Using the directional keys, select OSD from the on screen display. EN-16 Adjusting the OSD Timeout 1 Press the MENU key to adjust.