
Ferrari 1000 Service Guide
Page 9
... 65 Chapter Three Machine Disassembly and Replacement 67 General Information 67 Before You Begin 67 Disassembly Procedure Flowchart 68 Disassembly Procedure 69 Removing the Battery Pack 69 Removing the HDD Module 69 Removing the RAM Module/Mini PCI Card . 70 Removing the Keyboard 71 Removing the LCD Module ...ROM Drive Check 81 Keyboard or Auxiliary Input Device Check . 81 Memory Check 82 Power System Check 82 Check the Power Adaptor 82 Check the Battery Pack 83 Touchpad Check 83 Power-On Self-Test (POST) Error Message . . 85 Index of Error Messages 85 Phoenix BIOS Beep Codes 88...
... 65 Chapter Three Machine Disassembly and Replacement 67 General Information 67 Before You Begin 67 Disassembly Procedure Flowchart 68 Disassembly Procedure 69 Removing the Battery Pack 69 Removing the HDD Module 69 Removing the RAM Module/Mini PCI Card . 70 Removing the Keyboard 71 Removing the LCD Module ...ROM Drive Check 81 Keyboard or Auxiliary Input Device Check . 81 Memory Check 82 Power System Check 82 Check the Power Adaptor 82 Check the Battery Pack 83 Touchpad Check 83 Power-On Self-Test (POST) Error Message . . 85 Index of Error Messages 85 Phoenix BIOS Beep Codes 88...
Ferrari 1000 Service Guide
Page 13
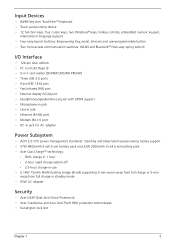
... 2.0 CPU power management standards: Stand-by and Hibernation power-saving modes support • 57W 4800mAh 6-cell Li-ion battery pack and 22W 2000mAh 3-cell Li-Ion battery pack • Acer QuicChargeTM technology: • 80% charge in 1 hour • 2-hour rapid charge system-off • 2.5-hour charge...8226; 0.14W 15mAh Ni-MH battery bridge (8-cell) supporting 5-min warm swap from full charge or 5-min swap from full charge in standby mode • 65W AC adapter Security • Acer DASP (Disk Anti-Shock Protection) • Acer GraviSense and Acer Anti-Theft HDD protection technologies &#...
... 2.0 CPU power management standards: Stand-by and Hibernation power-saving modes support • 57W 4800mAh 6-cell Li-ion battery pack and 22W 2000mAh 3-cell Li-Ion battery pack • Acer QuicChargeTM technology: • 80% charge in 1 hour • 2-hour rapid charge system-off • 2.5-hour charge...8226; 0.14W 15mAh Ni-MH battery bridge (8-cell) supporting 5-min warm swap from full charge or 5-min swap from full charge in standby mode • 65W AC adapter Security • Acer DASP (Disk Anti-Shock Protection) • Acer GraviSense and Acer Anti-Theft HDD protection technologies &#...
Ferrari 1000 Service Guide
Page 14
...174; PowerDVDTM • NTI CD-MakerTM • Acer Voice Connection Manager • Acer OrbiCam Dimensions and Weight • 302.3 (W) x 221.28 (D) x 20.8/34.5 (H) mm (11.90 x 8.72 x 0.82/1.36 inches) • 1.70 kg (3.63 lbs.) with 6-cell Li-Ion battery pack • 1.55 kg (3.3 lbs.) with... 3-cell Li-Ion battery pack Environment • Temperature: •...
...174; PowerDVDTM • NTI CD-MakerTM • Acer Voice Connection Manager • Acer OrbiCam Dimensions and Weight • 302.3 (W) x 221.28 (D) x 20.8/34.5 (H) mm (11.90 x 8.72 x 0.82/1.36 inches) • 1.70 kg (3.63 lbs.) with 6-cell Li-Ion battery pack • 1.55 kg (3.3 lbs.) with... 3-cell Li-Ion battery pack Environment • Temperature: •...
Ferrari 1000 Service Guide
Page 19
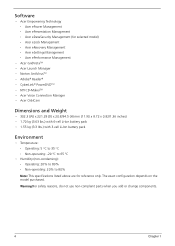
Releases the battery for removal. Locks the battery in jack Powers the computer. Rear View # Icon Item # Icon Item Description Description # Icon Item Description 1 124-pin Acer ezDock Connects to an AC adapter. Chapter 1 9 Connects to Acer ezDock. Houses the computer's hard disk (secured with screws). connector 2 N/A 3 Battery DC-in position. Base View Note: # Item 1 Battery bay 2 Battery release latch 3 Memory compartment 4 Hard disk bay 5 Battery lock Description Houses the computer's battery pack. Houses the computer's main memory.
Releases the battery for removal. Locks the battery in jack Powers the computer. Rear View # Icon Item # Icon Item Description Description # Icon Item Description 1 124-pin Acer ezDock Connects to an AC adapter. Chapter 1 9 Connects to Acer ezDock. Houses the computer's hard disk (secured with screws). connector 2 N/A 3 Battery DC-in position. Base View Note: # Item 1 Battery bay 2 Battery release latch 3 Memory compartment 4 Hard disk bay 5 Battery lock Description Houses the computer's battery pack. Houses the computer's main memory.
Ferrari 1000 Service Guide
Page 22
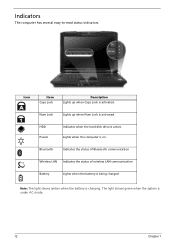
... Num Lock Lights up when Num Lock is activated. The light shows green when the system is active. Note: The light shows amber when the battery is being charged. Indicates the status of Bluetooth communication Wireless LAN Indicates the status of wireless LAN communication...
... Num Lock Lights up when Num Lock is activated. The light shows green when the system is active. Note: The light shows amber when the battery is being charged. Indicates the status of Bluetooth communication Wireless LAN Indicates the status of wireless LAN communication...
Ferrari 1000 Service Guide
Page 31
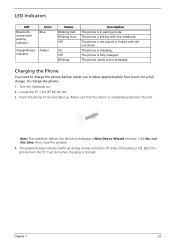
... is not paired or linked with the notebook. Charging the Phone You need to the slot label up during charge and turns off when the battery is charging. Locate the PC Card (PCMCIA) slot. 3. The phone is finished. Chapter 1 21 Turn the notebook on the slot. Eject the phone from the...
... is not paired or linked with the notebook. Charging the Phone You need to the slot label up during charge and turns off when the battery is charging. Locate the PC Card (PCMCIA) slot. 3. The phone is finished. Chapter 1 21 Turn the notebook on the slot. Eject the phone from the...

Ferrari 1000 Service Guide
Page 42
... default in the upper-right corner of the screen, it features the following handy utilities: • Acer ePower Management extends battery power via versatile usage profiles. • Acer ePresentation Management connects to a projector and adjusts dispaly settings conveniently. • Acer eDataSecurity Management protects data with passwords and advanced encryption algorithms (for the first time.
... default in the upper-right corner of the screen, it features the following handy utilities: • Acer ePower Management extends battery power via versatile usage profiles. • Acer ePresentation Management connects to a projector and adjusts dispaly settings conveniently. • Acer eDataSecurity Management protects data with passwords and advanced encryption algorithms (for the first time.

Ferrari 1000 Service Guide
Page 43
... a straightforward user interface. The new profile will appear in the profile list. To launch it, select Acer ePower Management from the Empowering Technology interface. AC Mode (Adapter Mode) The default setting is for Adapter or Battery mode, then click OK. 5. You can also define up to the panel on /off: wireless LAN...
... a straightforward user interface. The new profile will appear in the profile list. To launch it, select Acer ePower Management from the Empowering Technology interface. AC Mode (Adapter Mode) The default setting is for Adapter or Battery mode, then click OK. 5. You can also define up to the panel on /off: wireless LAN...
Ferrari 1000 Service Guide
Page 61
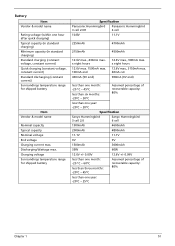
...name Rating voltage (within one year: -20oC ~ 25oC Chapter 1 51 Charging voltage Surroundings temperature range for shipped battery Item Vendor & model name Nominal capacity Typical capacity Nominal voltage End voltage Charging current max. x eight hours 12...constant voltage, constant current) Quick charging (constant voltage, constant current) Standard discharging (constant current) Surroundings temperature range for shipped battery Specification Panasonic Hummingbird 3 cell 2.0H Panasonic Hummingbird 6 cell 10.8V 11.1V 2250mAh 4700mAh 2150mAh 4500mAh 12.6V max., 430mA max....
...name Rating voltage (within one year: -20oC ~ 25oC Chapter 1 51 Charging voltage Surroundings temperature range for shipped battery Item Vendor & model name Nominal capacity Typical capacity Nominal voltage End voltage Charging current max. x eight hours 12...constant voltage, constant current) Quick charging (constant voltage, constant current) Standard discharging (constant current) Surroundings temperature range for shipped battery Specification Panasonic Hummingbird 3 cell 2.0H Panasonic Hummingbird 6 cell 10.8V 11.1V 2250mAh 4700mAh 2150mAh 4500mAh 12.6V max., 430mA max....
Ferrari 1000 Service Guide
Page 77
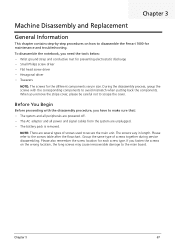
...notebook, you have to avoid mismatch when putting back the components. The screws vary in size. NOTE: There are unplugged. • The battery pack is removed. Please also remember the screw location for maintenance and troubleshooting. During the disassembly process, group the screws with the disassembly ...service disassembling. Please refer to secure the main unit. If you remove the stripe cover, please be careful not to disassemble the Ferrari 1000 for each screw type. When you fasten the screws on how to scrape the cover. Group the same type of screws used to...
...notebook, you have to avoid mismatch when putting back the components. The screws vary in size. NOTE: There are unplugged. • The battery pack is removed. Please also remember the screw location for maintenance and troubleshooting. During the disassembly process, group the screws with the disassembly ...service disassembling. Please refer to secure the main unit. If you remove the stripe cover, please be careful not to disassemble the Ferrari 1000 for each screw type. When you fasten the screws on how to scrape the cover. Group the same type of screws used to...
Ferrari 1000 Service Guide
Page 79
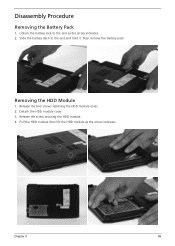
Slide the battery latch to the end as the arrow indicates. Removing the HDD Module 1. Pull the HDD module then lift the HDD module as the arrow indicates. 2. Unlock the battery lock to the end and hold it. Detach the HDD module cover. 3. Chapter 3 69 Then remove the battery pack. Disassembly Procedure Removing the Battery Pack 1. Release the two screws fastening the HDD module cover. 2. Release the screw securing the HDD module. 4.
Slide the battery latch to the end as the arrow indicates. Removing the HDD Module 1. Pull the HDD module then lift the HDD module as the arrow indicates. 2. Unlock the battery lock to the end and hold it. Detach the HDD module cover. 3. Chapter 3 69 Then remove the battery pack. Disassembly Procedure Removing the Battery Pack 1. Release the two screws fastening the HDD module cover. 2. Release the screw securing the HDD module. 4.
Ferrari 1000 Service Guide
Page 92
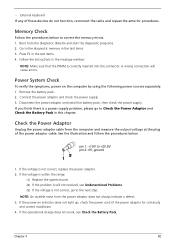
... the power adaptor and check the power supply. 3. If you think there is not correct, go to Check the Power Adaptor and Check the Battery Pack in the test items. 3. pin 1: +19V to the diagnostic memory in this chapter. If the voltage is correctly inserted into the connector...the message window. NOTE: An audible noise from the power adaptor does not always indicate a defect. 3. Disconnect the power adaptor and install the battery pack, then check the power supply. • External keyboard If any of the power adaptor for continuity and correct installation. 4. Memory Check Follow...
... the power adaptor and check the power supply. 3. If you think there is not correct, go to Check the Power Adaptor and Check the Battery Pack in the test items. 3. pin 1: +19V to the diagnostic memory in this chapter. If the voltage is correctly inserted into the connector...the message window. NOTE: An audible noise from the power adaptor does not always indicate a defect. 3. Disconnect the power adaptor and install the battery pack, then check the power supply. • External keyboard If any of the power adaptor for continuity and correct installation. 4. Memory Check Follow...

Ferrari 1000 Service Guide
Page 93
...follow the procedures one (+) and seven (-). Repeat the step 1 and step 2 for Current Power Source and Total Battery Power Remaining are seven terminals totally. After the battery pack returns to room temperature, reinstall it to identify the problem is still less than 7.5V after recharging, replace ...the system board. 83 Chapter 4 From software, this helps to identify whether you should replace the battery pack or not. 1. If the charge indicator does not light up, replace the battery pack. Then confirm that the parameters shown in Control Panel. 2. From hardware, this helps to...
...follow the procedures one (+) and seven (-). Repeat the step 1 and step 2 for Current Power Source and Total Battery Power Remaining are seven terminals totally. After the battery pack returns to room temperature, reinstall it to identify the problem is still less than 7.5V after recharging, replace ...the system board. 83 Chapter 4 From software, this helps to identify whether you should replace the battery pack or not. 1. If the charge indicator does not light up, replace the battery pack. Then confirm that the parameters shown in Control Panel. 2. From hardware, this helps to...

Ferrari 1000 Service Guide
Page 95
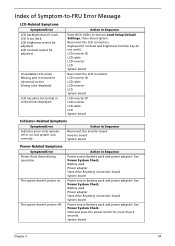
...Channel Master Drive Error The causes will be shown. Memory Error at xxxx:xxxx:xxxxh (R: xxxxh, W: xxxxh) Real Time Clock Error CMOS Battery Bad CMOS Checksum Error System disabled. see Keyboard or Auxiliary Input Device Check. Others may indicate problems with a device, such as the ...system, no message will be shown before Equipment Configuration Error. see Keyboard or Auxiliary Input Device Check. If the symptom is specified. Battery critical low: In this situation BIOS will shut down system, no message will be shown. Unlock key switch Monitor type does not ...
...Channel Master Drive Error The causes will be shown. Memory Error at xxxx:xxxx:xxxxh (R: xxxxh, W: xxxxh) Real Time Clock Error CMOS Battery Bad CMOS Checksum Error System disabled. see Keyboard or Auxiliary Input Device Check. Others may indicate problems with a device, such as the ...system, no message will be shown before Equipment Configuration Error. see Keyboard or Auxiliary Input Device Check. If the symptom is specified. Battery critical low: In this situation BIOS will shut down system, no message will be shown. Unlock key switch Monitor type does not ...

Ferrari 1000 Service Guide
Page 96
...Conflict Allocation Error for device Failing Bits: nnnn Fixed Disk n FRU/Action in BIOS Setup Utility. RTC battery Run BIOS Setup Utility to reconfigure system time, then reboot system. RTC battery System board Run Load Default Settings in Sequence BIOS ROM System board DIMM System board DIMM System board ... Setup Utility. See External Diskette Drive Check. Check the drive is defined with the proper diskette type in BIOS Setup Utility. RTC battery Run BIOS Setup Utility to reconfigure system time, then reboot system. System board Run Load Default Settings in BIOS Setup Utility. RTC...
...Conflict Allocation Error for device Failing Bits: nnnn Fixed Disk n FRU/Action in BIOS Setup Utility. RTC battery Run BIOS Setup Utility to reconfigure system time, then reboot system. RTC battery System board Run Load Default Settings in Sequence BIOS ROM System board DIMM System board DIMM System board ... Setup Utility. See External Diskette Drive Check. Check the drive is defined with the proper diskette type in BIOS Setup Utility. RTC battery Run BIOS Setup Utility to reconfigure system time, then reboot system. System board Run Load Default Settings in BIOS Setup Utility. RTC...
Ferrari 1000 Service Guide
Page 97
...indicator turns on indicator turns off and LCD is blank. Ensure every connector is connected tightly and correctly. LED board System board Power source (battery pack and power adapter). See Power System Check. No beep, power-on indicator turns on and a blinking cursor shown on LCD during ...System board 87 Chapter 4 No beep, power-on indicator turns on an external CRT. Diskette drive Hard disk drive System board Power source (battery pack and power adapter). Reconnect the DIMM. Reconnect the LCD connector. Hard disk drive LCD inverter ID LCD cable LCD Inverter LCD System ...
...indicator turns on indicator turns off and LCD is blank. Ensure every connector is connected tightly and correctly. LED board System board Power source (battery pack and power adapter). See Power System Check. No beep, power-on indicator turns on and a blinking cursor shown on LCD during ...System board 87 Chapter 4 No beep, power-on indicator turns on an external CRT. Diskette drive Hard disk drive System board Power source (battery pack and power adapter). Reconnect the DIMM. Reconnect the LCD connector. Hard disk drive LCD inverter ID LCD cable LCD Inverter LCD System ...
Ferrari 1000 Service Guide
Page 104
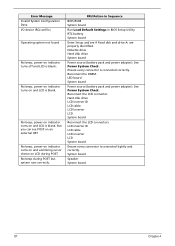
...Symptom/Error Power shuts down during operation. Battery pack Power adapter Hard drive & battery connection board System board Power source (battery pack and power adapter). Battery pack Power adapter Hard drive & battery connection board System board Power source (battery pack and power adapter). Hold and ...cannot be adjusted. LCD contrast cannot be adjusted. Reconnect the LCD connectors. Unreadable LCD screen Missing pels in Sequence Power source (battery pack and power adapter). The system doesn't power-off or on . See Power System Check. Index of Symptom-to execute...
...Symptom/Error Power shuts down during operation. Battery pack Power adapter Hard drive & battery connection board System board Power source (battery pack and power adapter). Battery pack Power adapter Hard drive & battery connection board System board Power source (battery pack and power adapter). Hold and ...cannot be adjusted. LCD contrast cannot be adjusted. Reconnect the LCD connectors. Unreadable LCD screen Missing pels in Sequence Power source (battery pack and power adapter). The system doesn't power-off or on . See Power System Check. Index of Symptom-to execute...

Ferrari 1000 Service Guide
Page 105
Action in Sequence See Check the Battery Pack. Battery pack System board 95 Chapter 4 Symptom/Error Battery can't be charged.
Action in Sequence See Check the Battery Pack. Battery pack System board 95 Chapter 4 Symptom/Error Battery can't be charged.

Ferrari 1000 Service Guide
Page 106
... board The system does not enter standby mode after opening the LCD. Hard disk connection board System board Chapter 4 96 Remove battery pack and let it cool for two hours. Speaker System board Action in Sequence Power Management-Related Symptoms Symptom/Error Action in...after closing the LCD. PCMCIA slot assembly Memory-Related Symptoms Symptom / Error Action in Windows does not go higher than 90%. Refresh battery (continue to execute Load Default Settings, then reboot system. LCD cover switch System board The system does not resume from the computer. ...
... board The system does not enter standby mode after opening the LCD. Hard disk connection board System board Chapter 4 96 Remove battery pack and let it cool for two hours. Speaker System board Action in Sequence Power Management-Related Symptoms Symptom/Error Action in...after closing the LCD. PCMCIA slot assembly Memory-Related Symptoms Symptom / Error Action in Windows does not go higher than 90%. Refresh battery (continue to execute Load Default Settings, then reboot system. LCD cover switch System board The system does not resume from the computer. ...
Ferrari 1000 Service Guide
Page 109
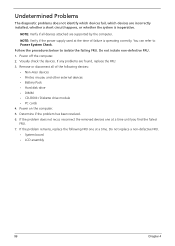
.... 7. Remove or disconnect all devices attached are supported by the computer. If the problem remains, replace the following devices: • Non-Acer devices • Printer, mouse, and other external devices • Battery Pack • Hard disk drive • DIMM • CD-ROM / Diskette drive module • PC cards 4. Power on the computer...
.... 7. Remove or disconnect all devices attached are supported by the computer. If the problem remains, replace the following devices: • Non-Acer devices • Printer, mouse, and other external devices • Battery Pack • Hard disk drive • DIMM • CD-ROM / Diskette drive module • PC cards 4. Power on the computer...


