
User Manual
Page 3
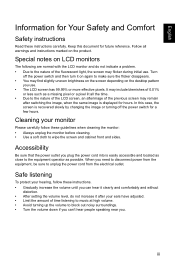
...; Turn the volume down if you can't hear people speaking near you plug the power cord into is recovered slowly by changing the image or turning off the power switch and then turn it after switching the image, when the same image is displayed for hours. English Information for Your Safety and Comfort Safety instructions Read these guidelines when cleaning the monitor: • Always unplug the monitor before cleaning. • Use a soft...
...; Turn the volume down if you can't hear people speaking near you plug the power cord into is recovered slowly by changing the image or turning off the power switch and then turn it after switching the image, when the same image is displayed for hours. English Information for Your Safety and Comfort Safety instructions Read these guidelines when cleaning the monitor: • Always unplug the monitor before cleaning. • Use a soft...

User Manual
Page 4
... • the product exhibits a distinct change in a fire or electric shock. Unplug this product. If the product falls, it could result in performance, indicating a need for service • the product does not operate normally after following the operating instructions iv These openings must not exceed 80% of the power strip's input rating. This product should never be seriously...
... • the product exhibits a distinct change in a fire or electric shock. Unplug this product. If the product falls, it could result in performance, indicating a need for service • the product does not operate normally after following the operating instructions iv These openings must not exceed 80% of the power strip's input rating. This product should never be seriously...

User Manual
Page 5
... for video and visual display of information obtained from electronic devices. English Note: Adjust only those controls that are covered by the operating instructions, since improper adjustment of other products. Areas with a potentially explosive atmosphere and obey all signs and instructions. IT Equipment Recycling Information Acer is purposed for further information on boats, chemical transfer or storage facilities, vehicles using liquefied...
... for video and visual display of information obtained from electronic devices. English Note: Adjust only those controls that are covered by the operating instructions, since improper adjustment of other products. Areas with a potentially explosive atmosphere and obey all signs and instructions. IT Equipment Recycling Information Acer is purposed for further information on boats, chemical transfer or storage facilities, vehicles using liquefied...

User Manual
Page 6
... by adjusting the viewing angle of physical injury after prolonged use . This product has been shipped enabled for power management: • Activate display's Sleep mode within 5 minutes of physical injury. Tips and information for more comfortable computer use . Incorrect computer usage may occasionally misfire or appear as black or red dots. The following section provides tips for comfortable use Computer users may...
... by adjusting the viewing angle of physical injury after prolonged use . This product has been shipped enabled for power management: • Activate display's Sleep mode within 5 minutes of physical injury. Tips and information for more comfortable computer use . Incorrect computer usage may occasionally misfire or appear as black or red dots. The following section provides tips for comfortable use Computer users may...

User Manual
Page 7
... using drapes, shades or blinds • using a task light • changing the display's viewing angle • using a glare-reduction filter • using furniture that can be applied. Developing good work habits Develop the following work habits to make your display to an awkward viewing angle. • Avoid looking at bright light sources, such as possible. • Exercise regularly and maintain a healthy body. vii English Display • Keep your display clean. • Keep...
... using drapes, shades or blinds • using a task light • changing the display's viewing angle • using a glare-reduction filter • using furniture that can be applied. Developing good work habits Develop the following work habits to make your display to an awkward viewing angle. • Avoid looking at bright light sources, such as possible. • Exercise regularly and maintain a healthy body. vii English Display • Keep your display clean. • Keep...

User Manual
Page 10
... v Disposal instructions v LCD pixel statement vi Tips and information for comfortable use vi Finding your comfort zone vi Taking care of your vision vi Developing good work habits vii PACKAGE CONTENTS 1 Attaching the monitor to the base 2 Attaching the monitor on the wall 3 SCREEN POSITION ADJUSTMENT 3 CONNECTING THE POWER CORD 4 Connecting the adapter and AC Power cord 4 POWER SAVING 4 Display Data Channel (DDC) 5 20-Pin Color Display Signal Cable 5 19-Pin Color Display Signal Cable 6 STANDARD TIMING TABLE 7 Connecting Your Monitor to...
... v Disposal instructions v LCD pixel statement vi Tips and information for comfortable use vi Finding your comfort zone vi Taking care of your vision vi Developing good work habits vii PACKAGE CONTENTS 1 Attaching the monitor to the base 2 Attaching the monitor on the wall 3 SCREEN POSITION ADJUSTMENT 3 CONNECTING THE POWER CORD 4 Connecting the adapter and AC Power cord 4 POWER SAVING 4 Display Data Channel (DDC) 5 20-Pin Color Display Signal Cable 5 19-Pin Color Display Signal Cable 6 STANDARD TIMING TABLE 7 Connecting Your Monitor to...

User Manual
Page 14
SCREEN POSITION ADJUSTMENT To optimize the viewing position, you can be adjusted to 15 degrees up or 5 degrees down. 15 - The monitor can adjust the monitor tilt by using both of your hands to hold the edges of the monitor to choose suitable load capacity of installation. 2. Note: Do NOT press the screen with this type of VESA armstand. Connect the monitor onto the wall. Remark: • Please use only the...
SCREEN POSITION ADJUSTMENT To optimize the viewing position, you can be adjusted to 15 degrees up or 5 degrees down. 15 - The monitor can adjust the monitor tilt by using both of your hands to hold the edges of the monitor to choose suitable load capacity of installation. 2. Note: Do NOT press the screen with this type of VESA armstand. Connect the monitor onto the wall. Remark: • Please use only the...

User Manual
Page 15
... which the equipment will be installed. The cord set consisting of the AC power cord to ON state is required. POWER SAVING The power saving states will be kept until a control signal has been detected or the keyboard or mouse is required. • Plug one end of H05VV-F cord and plug rated 10 A/250 V. State ON Power Saving LED Light Blue Blinking Blue 4 English CONNECTING THE POWER CORD • This monitor has a universal power supply that allows operation in...
... which the equipment will be installed. The cord set consisting of the AC power cord to ON state is required. POWER SAVING The power saving states will be kept until a control signal has been detected or the keyboard or mouse is required. • Plug one end of H05VV-F cord and plug rated 10 A/250 V. State ON Power Saving LED Light Blue Blinking Blue 4 English CONNECTING THE POWER CORD • This monitor has a universal power supply that allows operation in...

User Manual
Page 16
English Display Data Channel (DDC) To make your system also supports DDC protocol. The monitor supports DDC2B standard. 20-Pin Color Display Signal Cable PIN NO. 1 3 5 7 9 11 13 15 17 19 DESCRIPTION DP_3.3V HPD GND GND ML_Lane 0+ ML_Lane 0GND ML_Lane 2+ ... ML_Lane 1GND ML_Lane 3+ ML_Lane 3- 5 The DDC (Display Data Channel) is able to Plug and Play with your system if your installation easier, the monitor is a communication protocol through which the monitor automatically informs the host system about its capabilities, for example, supported resolutions and corresponding timing.
English Display Data Channel (DDC) To make your system also supports DDC protocol. The monitor supports DDC2B standard. 20-Pin Color Display Signal Cable PIN NO. 1 3 5 7 9 11 13 15 17 19 DESCRIPTION DP_3.3V HPD GND GND ML_Lane 0+ ML_Lane 0GND ML_Lane 2+ ... ML_Lane 1GND ML_Lane 3+ ML_Lane 3- 5 The DDC (Display Data Channel) is able to Plug and Play with your system if your installation easier, the monitor is a communication protocol through which the monitor automatically informs the host system about its capabilities, for example, supported resolutions and corresponding timing.

User Manual
Page 20
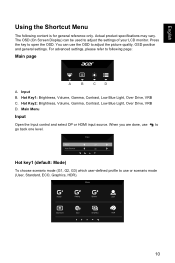
... to toggle input sources. 1 / Input / Exit b. Press to dynamically adjust display refresh rate based on typical content frame rates for power efficient, virtually stutter free and low-latency display. 9 b. Blinking Blue indicates standby mode. Press the key to trigger Mode control. 2 / Mode / Enter b. When the OSD menu is enabled, press to select or return to the next menu. 5 POWER Power button Turns the monitor on . Blue indicates power on /off. English External Controls No. a. Icon Item Description a. Press to open the Brightness control. 3 / Brightness...
... to toggle input sources. 1 / Input / Exit b. Press to dynamically adjust display refresh rate based on typical content frame rates for power efficient, virtually stutter free and low-latency display. 9 b. Blinking Blue indicates standby mode. Press the key to trigger Mode control. 2 / Mode / Enter b. When the OSD menu is enabled, press to select or return to the next menu. 5 POWER Power button Turns the monitor on . Blue indicates power on /off. English External Controls No. a. Icon Item Description a. Press to open the Brightness control. 3 / Brightness...
User Manual
Page 21
... mode (User, Standard, ECO, Graphics, HDR). Main Menu Input Open the Input control and select DP or HDMI input source. Press the key to adjust the picture quality, OSD position and general settings. Hot Key1: Brightness, Volume, Gamma, Contrast, Low Blue Light, Over Drive, VRB C. Hot Key2: Brightness, Volume, Gamma, Contrast, Low Blue Light, Over Drive, VRB D. Hot key1 (default: Mode) To choose scenario mode (G1, G2, G3) which user-defined profile to use to adjust the settings of your LCD monitor. HDR 10 Input...
... mode (User, Standard, ECO, Graphics, HDR). Main Menu Input Open the Input control and select DP or HDMI input source. Press the key to adjust the picture quality, OSD position and general settings. Hot Key1: Brightness, Volume, Gamma, Contrast, Low Blue Light, Over Drive, VRB C. Hot Key2: Brightness, Volume, Gamma, Contrast, Low Blue Light, Over Drive, VRB D. Hot key1 (default: Mode) To choose scenario mode (G1, G2, G3) which user-defined profile to use to adjust the settings of your LCD monitor. HDR 10 Input...
User Manual
Page 23
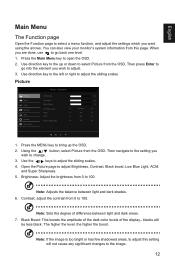
When you wish to change. 3. Picture Picture Color Audio Gaming OSD System Information Mode - Using the !Ř 0 Ř button, select Picture from the OSD. The higher the level, the higher the boost. Note: Adjusts the balance between light and dark areas. 7. blacks will not cause any significant changes to the image. 12 Use direction key to the up the OSD. 2. Use the / keys to adjust Brightness, Contrast, Black boost, Low Blue Light, ACM, and Super Sharpness...
When you wish to change. 3. Picture Picture Color Audio Gaming OSD System Information Mode - Using the !Ř 0 Ř button, select Picture from the OSD. The higher the level, the higher the boost. Note: Adjusts the balance between light and dark areas. 7. blacks will not cause any significant changes to the image. 12 Use direction key to the up the OSD. 2. Use the / keys to adjust Brightness, Contrast, Black boost, Low Blue Light, ACM, and Super Sharpness...
User Manual
Page 24
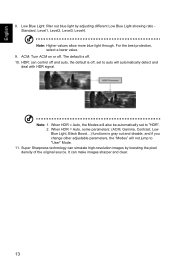
... allow more blue light through. HDR: can make images sharper and clear. 13 Low Blue Light: filter out blue light by boosting the pixel density of the original source. For the best protection, select a lower value. 9. The default is gray out and disable, and if you change other adjustable parameters, the "Modes" will automatically detect and deal with HDR signal. It can control off and auto, the default is off...
... allow more blue light through. HDR: can make images sharper and clear. 13 Low Blue Light: filter out blue light by boosting the pixel density of the original source. For the best protection, select a lower value. 9. The default is gray out and disable, and if you change other adjustable parameters, the "Modes" will automatically detect and deal with HDR signal. It can control off and auto, the default is off...
User Manual
Page 27
... set to "Off" and then change the resolution. 6. Please try to set current FreeSync Premium mode to "Off", or visit the official AMD website to update the graphic card's driver. • When using FreeSync Premium, the screen may flicker due to different output frequencies of "Extreme" will be clear when switch on VRB function, the overall brightness will set VRB to support dynamic picture more clean control, default is not support...
... set to "Off" and then change the resolution. 6. Please try to set current FreeSync Premium mode to "Off", or visit the official AMD website to update the graphic card's driver. • When using FreeSync Premium, the screen may flicker due to different output frequencies of "Extreme" will be clear when switch on VRB function, the overall brightness will set VRB to support dynamic picture more clean control, default is not support...

User Manual
Page 28
...: 1. English Ř Ř OSD Picture Color Audio Gaming OSD System Information Mode - Standard Language OSD Timeout Transparency OSD Lock English 10 1. OSD Locked: Set the OSD Lock to unlock OSD. Then navigate to the setting you wish to open the OSD. 2. Transparency: Select the transparency when using gaming mode. OSD Lock: OSD Lock function is used to select the setting. 4. Use the / button to prevent OSD button from being pressed accidentally. The "OSD Locked" message will appear in the middle of the screen, and LED lights will turn into blue. 17 OSD Unlocked...
...: 1. English Ř Ř OSD Picture Color Audio Gaming OSD System Information Mode - Standard Language OSD Timeout Transparency OSD Lock English 10 1. OSD Locked: Set the OSD Lock to unlock OSD. Then navigate to the setting you wish to open the OSD. 2. Transparency: Select the transparency when using gaming mode. OSD Lock: OSD Lock function is used to select the setting. 4. Use the / button to prevent OSD button from being pressed accidentally. The "OSD Locked" message will appear in the middle of the screen, and LED lights will turn into blue. 17 OSD Unlocked...

User Manual
Page 29
... Hot Key 2. 9. Turn on the PC. Using the !Ř 0 Ř button, select OSD from DP or HDMI input source. Note: DDC/CI, short for available input sources. 7. Standard Picture Quick Start Mode Off Color Audio Gaming OSD System Information Ř Ř 1. Hot Key Assignment: Select the function of blackness under HDMI source. 11. Then navigate to adjust. 4. Input: Select the source from the OSD. System menu can select which allows monitor controls to be used to speed...
... Hot Key 2. 9. Turn on the PC. Using the !Ř 0 Ř button, select OSD from DP or HDMI input source. Note: DDC/CI, short for available input sources. 7. Standard Picture Quick Start Mode Off Color Audio Gaming OSD System Information Ř Ř 1. Hot Key Assignment: Select the function of blackness under HDMI source. 11. Then navigate to adjust. 4. Input: Select the source from the OSD. System menu can select which allows monitor controls to be used to speed...
User Manual
Page 31
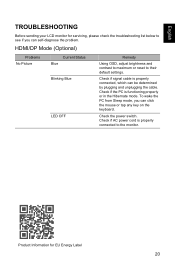
... cable. English TROUBLESHOOTING Before sending your LCD monitor for EU Energy Label 20 Check if the PC is properly connected, which can click the mouse or tap any key on the keyboard. Check if signal cable is functioning properly or in the Hibernate mode. Check if AC power cord is properly connected to their default settings. HDMI/DP Mode (Optional) Problems No Picture Current Status Blue Blinking Blue LED OFF Remedy Using OSD, adjust brightness and contrast to maximum or reset...
... cable. English TROUBLESHOOTING Before sending your LCD monitor for EU Energy Label 20 Check if the PC is properly connected, which can click the mouse or tap any key on the keyboard. Check if signal cable is functioning properly or in the Hibernate mode. Check if AC power cord is properly connected to their default settings. HDMI/DP Mode (Optional) Problems No Picture Current Status Blue Blinking Blue LED OFF Remedy Using OSD, adjust brightness and contrast to maximum or reset...

Quick Start Guide
Page 1
... yourself. English Acer LCD Monitor Quick Start Guide (QSG) Important safety instructions Please read the following circumstances occur: • Monitor-to-PC signal cable is frayed or damaged. • Liquid spills onto the LCD monitor or the monitor is exposed to rain. • The LCD monitor or case is electrically rated to operate with a temperature of the following instructions carefully. 1. To clean the LCD monitor screen: Be sure that your monitor is damaged. LCD Monitor Quick Start Guide...
... yourself. English Acer LCD Monitor Quick Start Guide (QSG) Important safety instructions Please read the following circumstances occur: • Monitor-to-PC signal cable is frayed or damaged. • Liquid spills onto the LCD monitor or the monitor is exposed to rain. • The LCD monitor or case is electrically rated to operate with a temperature of the following instructions carefully. 1. To clean the LCD monitor screen: Be sure that your monitor is damaged. LCD Monitor Quick Start Guide...

Quick Start Guide
Page 6
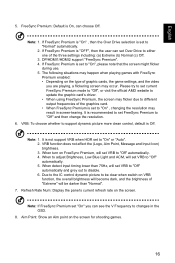
... the OSD menu is enabled, press to enter to select or go back one level. When the OSD menu is enabled, press to exit the current menu and go to dynamically adjust display refresh rate based on . Press the key to toggle input sources. 1 / Input / Exit b. FreeSync Premium (HDMI1/HDMI2/DP) It can allow a FreeSync Premium supported graphics source to the next menu. 5 POWER Power button Turns the monitor on/off. LCD Monitor Quick Start Guide - 6
... the OSD menu is enabled, press to enter to select or go back one level. When the OSD menu is enabled, press to exit the current menu and go to dynamically adjust display refresh rate based on . Press the key to toggle input sources. 1 / Input / Exit b. FreeSync Premium (HDMI1/HDMI2/DP) It can allow a FreeSync Premium supported graphics source to the next menu. 5 POWER Power button Turns the monitor on/off. LCD Monitor Quick Start Guide - 6

Quick Start Guide
Page 7
...: Acer monitor is encouraged to try to correct the interference by turning the device off and on a circuit different from electronic devices. Operation with Part 15 of the FCC Rules. Remarque à l'intention des utilisateurs canadiens Cet appareil numérique de la classe B est conforme à la norme NMB-003 du Canada. LCD Monitor Quick Start Guide - 7 This...
...: Acer monitor is encouraged to try to correct the interference by turning the device off and on a circuit different from electronic devices. Operation with Part 15 of the FCC Rules. Remarque à l'intention des utilisateurs canadiens Cet appareil numérique de la classe B est conforme à la norme NMB-003 du Canada. LCD Monitor Quick Start Guide - 7 This...

