Acer Desktop User's Guide
Page 3
... from the computer. Turning the product off before cleaning Unplug this document for your safety and comfort Safety instructions Read these instructions carefully. CAUTION for cleaning. Use a damp cloth for plug as disconnecting device Observe the following guidelines when connecting and disconnecting power to the power supply unit: Install the power supply unit before cleaning. Unplug the power cord before removing the power supply unit from the...
... from the computer. Turning the product off before cleaning Unplug this document for your safety and comfort Safety instructions Read these instructions carefully. CAUTION for cleaning. Use a damp cloth for plug as disconnecting device Observe the following guidelines when connecting and disconnecting power to the power supply unit: Install the power supply unit before cleaning. Unplug the power cord before removing the power supply unit from the...
Acer Desktop User's Guide
Page 4
... speaking near you. Using electrical power • This product should not exceed 80% of the power strip's input rating. • This product's power supply is equipped with a three-wire grounded plug. Do not locate this product where people will probably cause unexpected short current or damage rotor devices, HDD, Optical drive, and even exposure risk from lithium battery pack. The plug only fits in...
... speaking near you. Using electrical power • This product should not exceed 80% of the power strip's input rating. • This product's power supply is equipped with a three-wire grounded plug. Do not locate this product where people will probably cause unexpected short current or damage rotor devices, HDD, Optical drive, and even exposure risk from lithium battery pack. The plug only fits in...
Acer Desktop User's Guide
Page 5
... to restore the product to normal condition. Replace only with the supplied power supply cord set , make sure that are covered by the operating instructions, since improper adjustment of other risks. Consult your reseller for service • the product does not operate normally after following the operating instructions Note: Adjust only those controls that the new power cord meets the following requirements: detachable type, UL listed/CSA certified, type SPT...
... to restore the product to normal condition. Replace only with the supplied power supply cord set , make sure that are covered by the operating instructions, since improper adjustment of other risks. Consult your reseller for service • the product does not operate normally after following the operating instructions Note: Adjust only those controls that the new power cord meets the following requirements: detachable type, UL listed/CSA certified, type SPT...

Acer Desktop User's Guide
Page 8
... maintain a healthy body. viii • install the external display, keyboard and mouse properly and within comfortable reach • if you view your monitor more relaxing and productive: • Take short breaks regularly and often. • Perform some stretching exercises. • Breathe fresh air as often as open windows, for enhanced text readability and graphics clarity. • Eliminate glare and...
... maintain a healthy body. viii • install the external display, keyboard and mouse properly and within comfortable reach • if you view your monitor more relaxing and productive: • Take short breaks regularly and often. • Perform some stretching exercises. • Breathe fresh air as often as open windows, for enhanced text readability and graphics clarity. • Eliminate glare and...
Acer Desktop User's Guide
Page 11
... information v Disposal instructions vi Tips and information for comfortable use vii System tour 1 Setting up your computer 2 Necessary to know before setup 2 Selecting a location 2 Opening the package 2 Connecting peripherals 3 Starting your computer 3 Shutting down your monitor 8 When to contact a service technician 8 Asking for technical assistance 8 Regulations and safety notices 9 FCC notice 9 Modem notices 10 Laser compliance statement 13 Digital audio output statement...
... information v Disposal instructions vi Tips and information for comfortable use vii System tour 1 Setting up your computer 2 Necessary to know before setup 2 Selecting a location 2 Opening the package 2 Connecting peripherals 3 Starting your computer 3 Shutting down your monitor 8 When to contact a service technician 8 Asking for technical assistance 8 Regulations and safety notices 9 FCC notice 9 Modem notices 10 Laser compliance statement 13 Digital audio output statement...
Acer Desktop User's Guide
Page 13
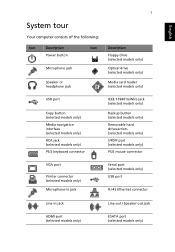
... models only) Optical drive (selected models only) Media card reader (selected models only) USB port Copy button (selected models only) Media navigation interface (selected models only) RCA jack (selected models only) PS/2 keyboard connector IEEE 1394/FireWire jack (selected models only) Backup button (selected models only) Removable hard drivecarriers (selected models only) S/PDIF port (selected models only) PS/2 mouse connector VGA port Printer connector (selected models only) Microphone-in jack Serial port (selected models only) USB port RJ-45 Ethernet connector Line-in jack HDMI port...
... models only) Optical drive (selected models only) Media card reader (selected models only) USB port Copy button (selected models only) Media navigation interface (selected models only) RCA jack (selected models only) PS/2 keyboard connector IEEE 1394/FireWire jack (selected models only) Backup button (selected models only) Removable hard drivecarriers (selected models only) S/PDIF port (selected models only) PS/2 mouse connector VGA port Printer connector (selected models only) Microphone-in jack Serial port (selected models only) USB port RJ-45 Ethernet connector Line-in jack HDMI port...
Acer Desktop User's Guide
Page 14
... I /O ports. The exact configuration of -the-art bus architecture, which improves system efficiency and helps the system support varied multimedia and software applications. The computer uses a state-of your computer English Note: The specifications listed above are for reference only. Your system can accommodate extra peripheral equipment through these I /O (input/output) interfaces such as a parallel port, PS/2 keyboard and mouse ports, USB 2.0 ports...
... I /O ports. The exact configuration of -the-art bus architecture, which improves system efficiency and helps the system support varied multimedia and software applications. The computer uses a state-of your computer English Note: The specifications listed above are for reference only. Your system can accommodate extra peripheral equipment through these I /O (input/output) interfaces such as a parallel port, PS/2 keyboard and mouse ports, USB 2.0 ports...
Acer Desktop User's Guide
Page 15
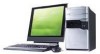
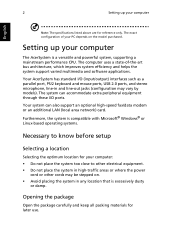
... damaged, contact your dealer immediately: • AcerSystem • Mouse (PS/2 or USB) • Keyboard (PS/2 or USB) • Wireless keyboard with pointing function • Remote control for Microsoft® Windows® Vista / Microsoft® Windows® XP Media Center Edition Note: Mouse, keyboard, wireless keyboard or remote control configuration may vary by selected models • User's Guide and Starter poster Other user documentation and third-party software. Connecting peripherals After everything is complete, you can begin...
... damaged, contact your dealer immediately: • AcerSystem • Mouse (PS/2 or USB) • Keyboard (PS/2 or USB) • Wireless keyboard with pointing function • Remote control for Microsoft® Windows® Vista / Microsoft® Windows® XP Media Center Edition Note: Mouse, keyboard, wireless keyboard or remote control configuration may vary by selected models • User's Guide and Starter poster Other user documentation and third-party software. Connecting peripherals After everything is complete, you can begin...
Acer Desktop User's Guide
Page 16
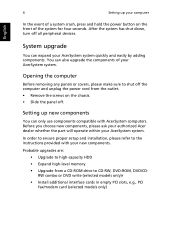
... upgrades are: • Upgrade to shut off all peripheral devices. Before you choose new components, please ask your authorized Acer dealer whether the part will operate within your AcerSystem system quickly and easily by adding components. In order to ensure proper setup and installation, please refer to CD-RW, DVD-ROM, DVD/CDRW combo or DVD write (selected models only)r • Install additional interface cards in empty PCI slots, e.g., PCI...
... upgrades are: • Upgrade to shut off all peripheral devices. Before you choose new components, please ask your authorized Acer dealer whether the part will operate within your AcerSystem system quickly and easily by adding components. In order to ensure proper setup and installation, please refer to CD-RW, DVD-ROM, DVD/CDRW combo or DVD write (selected models only)r • Install additional interface cards in empty PCI slots, e.g., PCI...

Acer Desktop User's Guide
Page 17
... appears on the rear panel of your computer. This will automatically diagnose your dealer or the technical support center for assistance. Just press any of the following: • Check if the voltage selector switch located on the screen. Insert the startup disk you created during Windows setup into an electrical outlet. • If you plugged the power cable properly into the floppy drive and press Ctrl...
... appears on the rear panel of your computer. This will automatically diagnose your dealer or the technical support center for assistance. Just press any of the following: • Check if the voltage selector switch located on the screen. Insert the startup disk you created during Windows setup into an electrical outlet. • If you plugged the power cable properly into the floppy drive and press Ctrl...
Acer Desktop User's Guide
Page 18
A: Check the following: • Make sure the diskette or hard disk is clean and not scratched. • Check your drive by using the correct type of your dealer or technical support center for the Volume icon on the good disc there may be a problem with the drive. EEnngglilisshh English 6 A: Do the following: • Make sure that the printer is connected to a power outlet and that it...
A: Check the following: • Make sure the diskette or hard disk is clean and not scratched. • Check your drive by using the correct type of your dealer or technical support center for the Volume icon on the good disc there may be a problem with the drive. EEnngglilisshh English 6 A: Do the following: • Make sure that the printer is connected to a power outlet and that it...
Acer Desktop User's Guide
Page 20
... 5 • If your problem is not listed in your screen clean. To clean an optical mouse For users of an optical mouse, refer to replace or upgrade any of your local dealer or distributor. EEnngglilisshh English 8 3 Put the ball back and replace the cover. To clean your monitor Make sure that came with your mouse for technical assistance For technical assistance, contact your computer's internal components Asking for maintenance instructions.
... 5 • If your problem is not listed in your screen clean. To clean an optical mouse For users of an optical mouse, refer to replace or upgrade any of your local dealer or distributor. EEnngglilisshh English 8 3 Put the ball back and replace the cover. To clean your monitor Make sure that came with your mouse for technical assistance For technical assistance, contact your computer's internal components Asking for maintenance instructions.
Acer Desktop User's Guide
Page 24
... Telecom's Specifications: a There shall be set to operate within the limits for compliance with Telecom's specifications, the associated equipment shall be set up to make or model, nor does it imply that a separate telephone, not dependent on the equipment (PC) associated with minimum conditions for connection to the same number within any 30 minute period for any single manual call...
... Telecom's Specifications: a There shall be set to operate within the limits for compliance with Telecom's specifications, the associated equipment shall be set up to make or model, nor does it imply that a separate telephone, not dependent on the equipment (PC) associated with minimum conditions for connection to the same number within any 30 minute period for any single manual call...
User Manual
Page 8
... statement v Lithium battery statement v Macrovision® statement v Year 2000 compliance statement vi Welcome 1 Major benefits 1 Before You Start 2 Safety instructions 2 Setting up the system 3 Placement tips 3 System Overview 5 Computer rear view 5 Computer front view 6 Installing new components 8 Opening The Case 8 Frequently asked questions 9 Taking care of your computer 11 Important tips 11 Cleaning and servicing 11 Asking for technical assistance 12
... statement v Lithium battery statement v Macrovision® statement v Year 2000 compliance statement vi Welcome 1 Major benefits 1 Before You Start 2 Safety instructions 2 Setting up the system 3 Placement tips 3 System Overview 5 Computer rear view 5 Computer front view 6 Installing new components 8 Opening The Case 8 Frequently asked questions 9 Taking care of your computer 11 Important tips 11 Cleaning and servicing 11 Asking for technical assistance 12
User Manual
Page 10
Safety instructions • Follow all times. If you are unsure of the type of power available, consult your dealer or local power company. • Your computer is used, make sure that you can use your computer near water. Do not disable this user guide carefully before opening the case. • Clean your computer case and monitor with surge protection. • If your computer to a heat...
Safety instructions • Follow all times. If you are unsure of the type of power available, consult your dealer or local power company. • Your computer is used, make sure that you can use your computer near water. Do not disable this user guide carefully before opening the case. • Clean your computer case and monitor with surge protection. • If your computer to a heat...
User Manual
Page 13
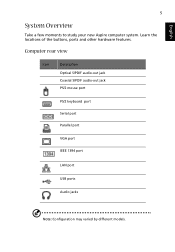
English 5 System Overview Take a few moments to study your new Aspire computer system. Computer rear view Icon Description Optical S/PDIF audio-out jack Coaxial S/PDIF audio-out jack PS/2 mouse port PS/2 keyboard port Serial port Parallel port VGA port IEEE 1394 port LAN port USB ports Audio jacks Note: Configuration may varied by different models. Learn the locations of the buttons, ports and other hardware features.
English 5 System Overview Take a few moments to study your new Aspire computer system. Computer rear view Icon Description Optical S/PDIF audio-out jack Coaxial S/PDIF audio-out jack PS/2 mouse port PS/2 keyboard port Serial port Parallel port VGA port IEEE 1394 port LAN port USB ports Audio jacks Note: Configuration may varied by different models. Learn the locations of the buttons, ports and other hardware features.
User Manual
Page 16
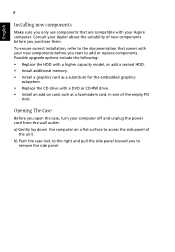
... only use components that comes with your Aspire computer. Opening The Case Before you to add or replace components. a) Gently lay down the computer on card, such as a substitute for the embedded graphics subsystem. • Replace the CD drive with a DVD or CD-RW drive. • Install an add-on a flat surface to access the side panel of new components before you start to remove the side panel. Possible upgrade options include...
... only use components that comes with your Aspire computer. Opening The Case Before you to add or replace components. a) Gently lay down the computer on card, such as a substitute for the embedded graphics subsystem. • Replace the CD drive with a DVD or CD-RW drive. • Install an add-on a flat surface to access the side panel of new components before you start to remove the side panel. Possible upgrade options include...
User Manual
Page 17
... the diagnostic utility still reports a problem, then you can restart your computer and each is being applied to its original default factory settings. Just press any of the following: • Check if the voltage selector switch located on the rear panel of your computer. If pressing a key does not work . Q: I pressed the power switch but the system did not boot up. Insert the startup disk you are...
... the diagnostic utility still reports a problem, then you can restart your computer and each is being applied to its original default factory settings. Just press any of the following: • Check if the voltage selector switch located on the rear panel of your computer. If pressing a key does not work . Q: I pressed the power switch but the system did not boot up. Insert the startup disk you are...
User Manual
Page 18
... scratched. • Check your drive by using the correct type of your USB keyboard to toggle from the computer. Look for assistance. Q: System cannot read the information on the good disc there may be a problem with the drive. A: Check the following: • Make sure that you are using a good (i.e., undamaged) disk. Contact your drive cannot read diskette, hard disk, CD or DVD information. A: Check the...
... scratched. • Check your drive by using the correct type of your USB keyboard to toggle from the computer. Look for assistance. Q: System cannot read the information on the good disc there may be a problem with the drive. A: Check the following: • Make sure that you are using a good (i.e., undamaged) disk. Contact your drive cannot read diskette, hard disk, CD or DVD information. A: Check the...
User Manual
Page 20
... "Frequently asked questions" section on page 9 • If your problem is not listed in the "Frequently asked questions" section on how and where to replace or upgrade any of an optical mouse, refer to the documentation that you want to contact the service centers available in your screen clean. To clean an optical mouse For users of your computer's internal components Asking for maintenance instructions.
... "Frequently asked questions" section on page 9 • If your problem is not listed in the "Frequently asked questions" section on how and where to replace or upgrade any of an optical mouse, refer to the documentation that you want to contact the service centers available in your screen clean. To clean an optical mouse For users of your computer's internal components Asking for maintenance instructions.


