Acer Aspire X3950 Support Question
Acer Aspire X3950 Support Question
Find answers below for this question about Acer Aspire X3950.Need a Acer Aspire X3950 manual? We have 1 online manual for this item!
Question posted by tunisiana on April 25th, 2013
Manual Service X3950
The person who posted this question about this Acer product did not include a detailed explanation. Please use the "Request More Information" button to the right if more details would help you to answer this question.
Current Answers
Answer #1: Posted by TommyKervz on April 25th, 2013 11:15 AM
TommyKervz

Member since:
January 10th, 2013 Points: 17,776,833

Member since:
January 10th, 2013 Points: 17,776,833
Greetings - Please download the service guide on the link below -
http://www.manualslib.com/manual/445231/Acer-Aspire-X3950.html?page=79
Related Acer Aspire X3950 Manual Pages
Service Guide - Page 1
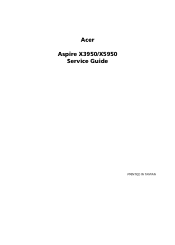
Acer Aspire X3950/X5950
Service Guide
PRINTED IN TAIWAN
Service Guide - Page 2

Date
Chapter
Updates
ii Revision History
Please refer to the table below for the updates made on this service guide.
Service Guide - Page 4
...the buyer (and not Acer Incorporated, its distributor, or its dealer) assumes the entire cost of all necessary servicing, repair, and any incidental or consequential damages resulting from any particular purpose. Other brand and product names are ... any defect in the software.
Disclaimer
The information in this manual is sold or licensed "as is a registered trademark of Acer Corporation.
Service Guide - Page 10
... Works Nero 9 Essentials
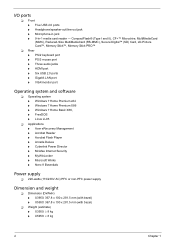
Power supply
220-watts (115/230V AC) PFC or non-PFC power supply
Dimension and weight
Dimension (DxWxH) X3950: 367.8 x 100 x 281.5 mm (with bezel) X5950: 367.8 x 100 x 281.5 mm (with bezel)
Weight (estimate) ...
Service Guide - Page 11
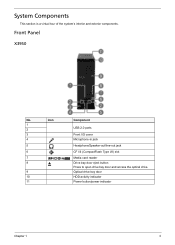
... (CompactFlash Type I/II) slot
Media card reader Drive bay door eject button Press to open drive bay door and access the optical drive. Front Panel
X3950
No.
Service Guide - Page 35
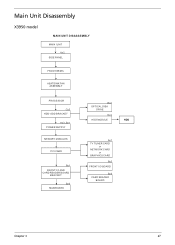
Main Unit Disassembly
X3950 model
MAIN UNIT DISASSEMBLY
MAIN UNIT Ax2
SIDE PANEL
FRONT BEZEL
HEATSINK FAN ASSEMBLY
PROCESSOR
Cx2 HDD-ODD BRACKET
Ax3, Bx1 POWER SUPPLY
MEMORY MODULES
...
Service Guide - Page 37

X3950
X5950
Screw (Quantity) #6-32 L5 BZN (2)
Color Black
Torque 5.5 to 6.5 kgf-cm
Part No. 86.00J07.B60
3. Remove the two screws (A) located on the unit. 4. ... tabs on the cover disengage with the slots on the rear edge of the side panel. Perform the pre-disassembly procedure described on page 26. 2.
X3950 Chapter 3
X5950 29
Service Guide - Page 38
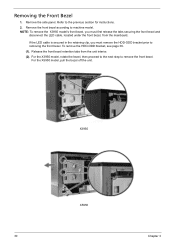
NOTE: To remove the X3950 model's front bezel, you must first release the tabs securing the front bezel and
disconnect the...retention tabs from the mainboard.
Removing the Front Bezel
1. To remove the HDD-ODD bracket, see page 36. (1).
X3950
X5950
30
Chapter 3 For the X3950 model, rotate the bezel, then proceed to the next step to the previous section for instructions. 2. If the LED...
Service Guide - Page 39
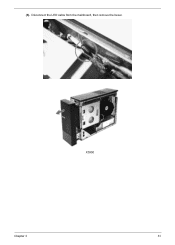
(3). X3950
Chapter 3
31 Disconnect the LED cable from the mainboard, then remove the bezel.
Service Guide - Page 40
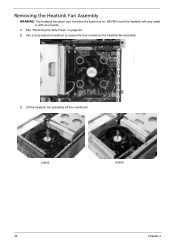
NEVER touch the heatsink with any metal or with your hands.
1. Lift the heatsink fan assembly off the mainboard. X3950
X5950
32
Chapter 3 See "Removing the Side Panel" on the heatsink fan assembly.
3. Use a long-nosed screwdriver to loosen the four screws on page 29.
2.
Removing the Heatsink Fan Assembly
WARNING: The heatsink becomes very hot when the system is on.
Service Guide - Page 41

X3950
X5950
5. Do not let the thermal patch on top of the optical drive then disconnect the heatsink fan cable from both the heatsink and the processor. Chapter 3
33 Use an alcohol pad to wipe off the thermal grease from its mainboard connector. 4. Lay it down in an upright position-with the thermal patch facing upward, on the heatsink fan assembly touch the work surface.
Service Guide - Page 44
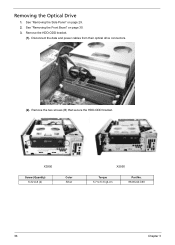
... drive connectors.
(2). Remove the two screws (B) that secure the HDD-ODD bracket.
See "Removing the Side Panel" on page 30. 3. Remove the HDD-ODD bracket.
(1). X3950
Screw (Quantity) 6-32 xL6 (2)
Color Silver
X5950
Torque 5.7 to 6.3 kgf-cm
Part No. 86.00J44.C60
36
Chapter 3 See "Removing the Front Bezel" on page...
Service Guide - Page 45
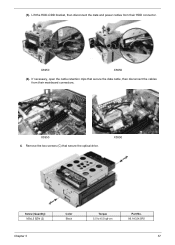
Lift the HDD-ODD bracket, then disconnect the data and power cables from their HDD connector. (3). X3950
X5950
(4). X5950
Screw (Quantity) M3xL5 BZN (2)
Chapter 3
Color Black
Torque 5.5 to 6.5 kgf-cm
Part No. 86.1A324.5R0
37 X3950 4.
If necessary, open the cable retention clips that secure the optical drive. Remove the two screws...
Service Guide - Page 49
X5950
Torque 5.5 to 6.5 kgf-cm
Part No. 86.00J07.B60
X3950
X5950
Chapter 3
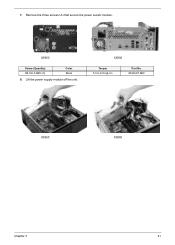
41 Remove the three screws (A) that secure the power supply module.
X3950
Screw (Quantity) #6-32 L5 BZN (3)
Color Black
8. Lift the power supply module off the unit. 7.
Service Guide - Page 54
... L6 NI (1)
Color Silver
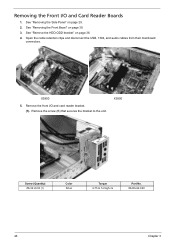
Torque 4.75 to the unit. See "Remove the HDD-ODD bracket" on page 29. 2. Remove the front I /O and Card Reader Boards
1. X3950
5. Remove the screw (B) that secures the bracket to 5.2 kgf-cm
Part No. 86.00J44.C60
46
Chapter 3 See "Removing the Side Panel" on page 36...
Service Guide - Page 57
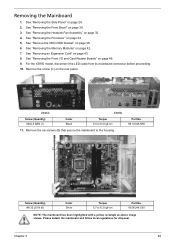
... "Removing the Front I/O and Card Reader Boards" on page 34. 5. See "Removing an Expansion Card" on the rear panel. Remove the screw (C) on page 43. 8. X3950
X5950
Screw (Quantity) M3xL5 BZN (1)
Color Black
Torque 5.5 to 6.3 kgf-cm
Part No. 86.00J44.C60
NOTE: The mainboard has been highlighted with a yellow rectangle...
Service Guide - Page 79
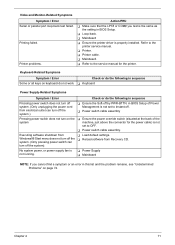
Refer to the printer service manual.
Printer. Printer cable. Mainboard.
Refer to OFF.
Power switch... system
Ensure the power override switch (situated at the back of Power Management is not set to the service manual for the printer.
Windows98 Start menu does not turn off the Reload software from
Load default settings...
Service Guide - Page 87
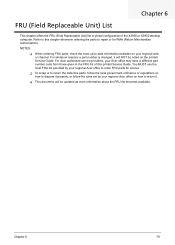
...6
This chapter offers the FRU (Field Replaceable Unit) list in the FRU list of the X3950 or X5950 desktop computer. Chapter 6
79 For whatever reasons a part number is changed, it .
...Authorization).
NOTES:
When ordering FRU parts, check the most up-to repair or for service.
To scrap or to return the defective parts, follow the local government ordinance or ...
Service Guide - Page 88
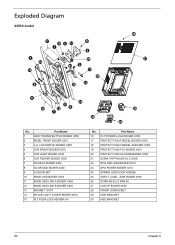
Exploded Diagram
X3950 model
No. 1 2 3 4 5 6 7 8 9 10 11 12 13 14 15
Part Name ASSY POWER BUTTON BOXER X350 BEZEL FRONT BOXER X351 C.A. ASM BOXER X550 SCRW #6-32 L5 ...
Service Guide - Page 90
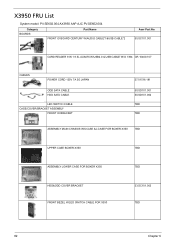
X3950 FRU List
System model: PV.SE602.004 AX3950 AAP AJC PV.SE602.004
Category BOARDS
Part Name FRONT IO BOARD CENTURY W/AUDIO CABLE*1&USB CABLE*2
...
Similar Questions

Why Does My Pc Shut Down Suddenly?
The 2 fans in Lite-on PS-5221-06 (A1-ROHS) power supply module rotate very slowly and somtimes they ...
The 2 fans in Lite-on PS-5221-06 (A1-ROHS) power supply module rotate very slowly and somtimes they ...
(Posted by hsoonong419 11 years ago)
Can You Please Help Me To Access A Manual For My Acer Aspire M3641. Thanku.
(Posted by rockailey1 11 years ago)

Is The Acer Aspire X3950 Able To Connect To Wireless Internet?
(Posted by karen93884 11 years ago)

I Am Trying To Find A Manual For An Acer Aspire X1930
(Posted by Anonymous-51943 12 years ago)

Where Can I Get The Users Manual For My Acer Aspire M3970
(Posted by borstell 12 years ago)