
User Manual
Page 2
...; 2011. This company makes no representations or warranties, either expressed or implied, with respect to your unit should include the serial number, model number and purchase information. The serial number and model number are recorded on the label affixed to the contents hereof and specifically disclaims the implied warranties of such revisions or changes. Acer LCD Monitor User's Guide Original Issue: 11/2011 Changes may be incorporated...
...; 2011. This company makes no representations or warranties, either expressed or implied, with respect to your unit should include the serial number, model number and purchase information. The serial number and model number are recorded on the label affixed to the contents hereof and specifically disclaims the implied warranties of such revisions or changes. Acer LCD Monitor User's Guide Original Issue: 11/2011 Changes may be incorporated...

User Manual
Page 3
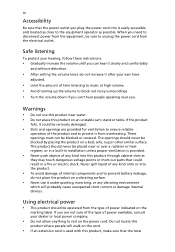
... and instructions marked on the product. Follow all power cords from the system by changing the image or turning off before connecting the power cord to the AC power outlet. • Make sure both the LCD monitor and the computer are normal with the LCD monitor and do not indicate a problem. • Due to the nature of the fluorescent light, the screen may flicker during initial use . • The LCD screen has...
... and instructions marked on the product. Follow all power cords from the system by changing the image or turning off before connecting the power cord to the AC power outlet. • Make sure both the LCD monitor and the computer are normal with the LCD monitor and do not indicate a problem. • Due to the nature of the fluorescent light, the screen may flicker during initial use . • The LCD screen has...
User Manual
Page 4
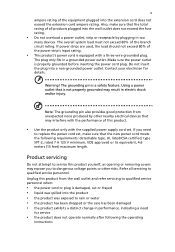
... power available, consult your ears have adjusted. • Limit the amount of power indicated on a bed, sofa, rug or other similar surface. When you plug the power cord into is provided. • Never push objects of any kind onto or into this product, make sure that the power outlet you need to disconnect power from the equipment, be blocked or covered...
... power available, consult your ears have adjusted. • Limit the amount of power indicated on a bed, sofa, rug or other similar surface. When you plug the power cord into is provided. • Never push objects of any kind onto or into this product, make sure that the power outlet you need to disconnect power from the equipment, be blocked or covered...
User Manual
Page 5
.... Warning! If you to service this product yourself, as opening or removing covers may interfere with the performance of this product from unexpected noise produced by plugging in performance, indicating a need to qualified service personnel. Make sure the power outlet is equipped with the supplied power supply cord set , make sure that the total rating of all servicing to replace the power cord set . Refer all products plugged into the product •...
.... Warning! If you to service this product yourself, as opening or removing covers may interfere with the performance of this product from unexpected noise produced by plugging in performance, indicating a need to qualified service personnel. Make sure the power outlet is equipped with the supplied power supply cord set , make sure that the total rating of all servicing to replace the power cord set . Refer all products plugged into the product •...

User Manual
Page 6
...the best working procedures to normal condition. Areas with a potentially explosive atmosphere and obey all signs and instructions. Keep them out of the reach of the company's top priorities in minimizing the burden placed on the features and benefits of our other controls may contain small parts.... often, but not always, marked. For more information and help when recycling, please go to turn off your vehicle engine. Potentially explosive environments Switch off your device in damage and will often require extensive work by a qualified technician to restore the product to reduce the...
...the best working procedures to normal condition. Areas with a potentially explosive atmosphere and obey all signs and instructions. Keep them out of the reach of the company's top priorities in minimizing the burden placed on the features and benefits of our other controls may contain small parts.... often, but not always, marked. For more information and help when recycling, please go to turn off your vehicle engine. Potentially explosive environments Switch off your device in damage and will often require extensive work by a qualified technician to restore the product to reduce the...
User Manual
Page 8
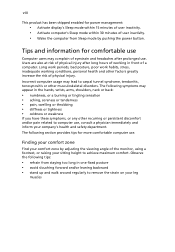
... prolonged use , consult a physician immediately and inform your company's health and safety department. Observe the following tips: • refrain from Sleep mode by adjusting the viewing angle of working conditions, personal health and other musculoskeletal disorders. viii This product has been shipped enabled for power management: • Activate display's Sleep mode within 15 minutes of user inactivity. • Activate computer's Sleep mode within...
... prolonged use , consult a physician immediately and inform your company's health and safety department. Observe the following tips: • refrain from Sleep mode by adjusting the viewing angle of working conditions, personal health and other musculoskeletal disorders. viii This product has been shipped enabled for power management: • Activate display's Sleep mode within 15 minutes of user inactivity. • Activate computer's Sleep mode within...

User Manual
Page 9
... using drapes, shades or blinds • using a task light • changing the display's viewing angle • using a glare-reduction filter • using a display visor, such as a piece of cardboard extended from the display's top front edge • Avoid adjusting your display to an awkward viewing angle. • Avoid looking at bright light sources, such as possible. • Exercise regularly and maintain a healthy body. Display • Keep your display clean. • Keep...
... using drapes, shades or blinds • using a task light • changing the display's viewing angle • using a glare-reduction filter • using a display visor, such as a piece of cardboard extended from the display's top front edge • Avoid adjusting your display to an awkward viewing angle. • Avoid looking at bright light sources, such as possible. • Exercise regularly and maintain a healthy body. Display • Keep your display clean. • Keep...
User Manual
Page 12
... Accessibility Safe listening Warnings Using electrical power Product servicing Additional safety information IT equipment recycling information Disposal instructions LCD pixel statement Tips and information for comfortable use Federal Communications Commission Declaration of Conformity Unpacking Attaching/removing the base Screen position adjustment Connecting the power cord Power saving Display Data Channel (DDC) Connector pin assignment Standard timing table Installation User controls How to adjust a setting Acer eColor Management User Troubleshooting VGA mode DVI mode 1 iii iii iii iii...
... Accessibility Safe listening Warnings Using electrical power Product servicing Additional safety information IT equipment recycling information Disposal instructions LCD pixel statement Tips and information for comfortable use Federal Communications Commission Declaration of Conformity Unpacking Attaching/removing the base Screen position adjustment Connecting the power cord Power saving Display Data Channel (DDC) Connector pin assignment Standard timing table Installation User controls How to adjust a setting Acer eColor Management User Troubleshooting VGA mode DVI mode 1 iii iii iii iii...

User Manual
Page 13
English 1 Unpacking Please check that the following items are present when you unpack the box, and save the packing materials in case you need to ship or transport the monitor in the future. LCD monitor User's guide Quick start guide LCD Monitor D-sub cable (Option) DVI cable (Option) AC power cord Audio Cable (Option) DP cable (Option)
English 1 Unpacking Please check that the following items are present when you unpack the box, and save the packing materials in case you need to ship or transport the monitor in the future. LCD monitor User's guide Quick start guide LCD Monitor D-sub cable (Option) DVI cable (Option) AC power cord Audio Cable (Option) DP cable (Option)
User Manual
Page 14
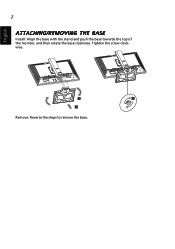
Tighten the screw clockwise. Remove: Reverse the steps to remove the base. English 2 ATTACHING/REMOVING THE BASE Install: Align the base with the stand and push the base towards the top of the monitor, and then rotate the base clockwise.
Tighten the screw clockwise. Remove: Reverse the steps to remove the base. English 2 ATTACHING/REMOVING THE BASE Install: Align the base with the stand and push the base towards the top of the monitor, and then rotate the base clockwise.
User Manual
Page 15
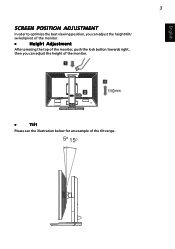
English 3 SCREEN POSITION ADJUSTMENT In oder to optimize the best viewing position, you can adjust the height/tilt/ swivel/pivot of the monitor. • Height Adjustment After pressing the top of the monitor, push the lock button towards right, then you can adjust the height of the monitor. • Tilt Please see the illustration below for an example of the tilt range. 5o 15o
English 3 SCREEN POSITION ADJUSTMENT In oder to optimize the best viewing position, you can adjust the height/tilt/ swivel/pivot of the monitor. • Height Adjustment After pressing the top of the monitor, push the lock button towards right, then you can adjust the height of the monitor. • Tilt Please see the illustration below for an example of the tilt range. 5o 15o

User Manual
Page 17
... using 220/240 V AC: Use a cord set should have the appropriate safety approvals for example, supported resolutions and corresponding timing. 5 English Connecting the power cord • Check first to make installation easier, so long as indicated by the control signal from "power saving" mode back to "on" is required. • Plug one end of H05VV-F cord and plug rated 10 A/250 V. The DDC is activated. Mode On Power saving LED light Blue Amber The power saving mode will be kept until a control signal...
... using 220/240 V AC: Use a cord set should have the appropriate safety approvals for example, supported resolutions and corresponding timing. 5 English Connecting the power cord • Check first to make installation easier, so long as indicated by the control signal from "power saving" mode back to "on" is required. • Plug one end of H05VV-F cord and plug rated 10 A/250 V. The DDC is activated. Mode On Power saving LED light Blue Amber The power saving mode will be kept until a control signal...

User Manual
Page 21
... models). (1) Make sure both the monitor and computer are switched off. (2) Connect one end of the 24-pin DVI cable to the back of the monitor and the other end to the computer's port. 2 Connect the power cord Connect the power cord to the monitor, then to a properly grounded AC outlet. 3 Optional:Connect the audio input socket(AUDIO IN) of the LCD monitor and the line-out port on the computer with the audio cable. 4 Turn...
... models). (1) Make sure both the monitor and computer are switched off. (2) Connect one end of the 24-pin DVI cable to the back of the monitor and the other end to the computer's port. 2 Connect the power cord Connect the power cord to the monitor, then to a properly grounded AC outlet. 3 Optional:Connect the audio input socket(AUDIO IN) of the LCD monitor and the line-out port on the computer with the audio cable. 4 Turn...

User Manual
Page 22
10 User controls English Front panel controls 1 Power LED: Lights up to indicate the power is turned on. 2 Power Switch: Turn the power on or off or activate / deactivate the adjustment function when the OSD is on. 6 Auto adjust button/Exit: a. b. The Auto Adjustment function is inactive, press this button will act as the exit key (exit OSD menu). When the OSD menu is active, this button to select scenario mode. When the OSD menu is used to activate the Auto Adjustment function. When...
10 User controls English Front panel controls 1 Power LED: Lights up to indicate the power is turned on. 2 Power Switch: Turn the power on or off or activate / deactivate the adjustment function when the OSD is on. 6 Auto adjust button/Exit: a. b. The Auto Adjustment function is inactive, press this button will act as the exit key (exit OSD menu). When the OSD menu is active, this button to select scenario mode. When the OSD menu is used to activate the Auto Adjustment function. When...

User Manual
Page 23
If you want to adjust any other function, repeat steps 2 to change the settings of the current function. 5 To exit and save, select the exit function. A. User: If "User" is selected, the Acer eColor Management OSD will appear. English 11 How to adjust a setting 1 Press the Menu button to activate the OSD window. 2 Press < or > to select the desired function. 3 Press the Menu button again to select the function that you want to adjust. 4 Press < or > to 4. Acer eColor Management: If "Acer eColor Management" is selected, the standard OSD will appear. B.
If you want to adjust any other function, repeat steps 2 to change the settings of the current function. 5 To exit and save, select the exit function. A. User: If "User" is selected, the Acer eColor Management OSD will appear. English 11 How to adjust a setting 1 Press the Menu button to activate the OSD window. 2 Press < or > to select the desired function. 3 Press the Menu button again to select the function that you want to adjust. 4 Press < or > to 4. Acer eColor Management: If "Acer eColor Management" is selected, the standard OSD will appear. B.

User Manual
Page 24
... Movie mode mode mode mode mode • Features Main menu icon Sub menu item User mode ECO mode Description User-defined. Presents great visuals, even in vibrant colors with sharp detail. English 12 Acer eColor Management • Operation instructions 1 Press the Empowering Key to open the Acer eColor Management OSD and access the scenario modes. 2 Press "" to select the mode. 3 Press the Auto-adjust button to suit any situation. Adjusts the settings to reduce power consumption. Pictures...
... Movie mode mode mode mode mode • Features Main menu icon Sub menu item User mode ECO mode Description User-defined. Presents great visuals, even in vibrant colors with sharp detail. English 12 Acer eColor Management • Operation instructions 1 Press the Empowering Key to open the Acer eColor Management OSD and access the scenario modes. 2 Press "" to select the mode. 3 Press the Auto-adjust button to suit any situation. Adjusts the settings to reduce power consumption. Pictures...
User Manual
Page 25
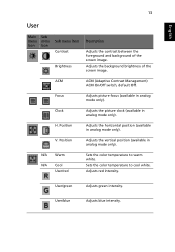
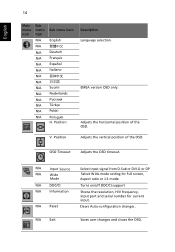
... image. ACM ACM (Adaptive Contrast Management) ACM On/Off switch, default Off. N/A Warm N/A Cool User/red Sets the color temperature to cool white. Clock Adjusts the picture clock (available in analog mode only). Position Adjusts the vertical position (available in analog mode only). User/green Adjusts green intensity. User/blue Adjusts blue intensity. Adjusts the background brightness of the screen image. Sets the color temperature to warm white. V. H. Position Adjusts the horizontal position (available in analog mode only). Focus Adjusts picture...
... image. ACM ACM (Adaptive Contrast Management) ACM On/Off switch, default Off. N/A Warm N/A Cool User/red Sets the color temperature to cool white. Clock Adjusts the picture clock (available in analog mode only). Position Adjusts the vertical position (available in analog mode only). User/green Adjusts green intensity. User/blue Adjusts blue intensity. Adjusts the background brightness of the screen image. Sets the color temperature to warm white. V. H. Position Adjusts the horizontal position (available in analog mode only). Focus Adjusts picture...
User Manual
Page 26
... Saves user changes and closes the OSD. English 14 Main menu icon Sub menu icon N/A N/A N/A N/A N/A N/A N/A N/A N/A N/A N/A N/A N/A N/A Sub menu item English Deutsch Français Español Italiano Suomi Nederlands Türkçe Polski Português H. N/A Input Source N/A Wide Mode N/A DDC/CI N/A Information N/A Reset Select input signal from D‐Sub or DVI‐D or DP Selcet Wide mode setting for Full screen, Aspect ratio or 1:1 mode Turns on/off DDC/CI support Shows the resolution, H/V frequency, input port and serial number...
... Saves user changes and closes the OSD. English 14 Main menu icon Sub menu icon N/A N/A N/A N/A N/A N/A N/A N/A N/A N/A N/A N/A N/A N/A Sub menu item English Deutsch Français Español Italiano Suomi Nederlands Türkçe Polski Português H. N/A Input Source N/A Wide Mode N/A DDC/CI N/A Information N/A Reset Select input signal from D‐Sub or DVI‐D or DP Selcet Wide mode setting for Full screen, Aspect ratio or 1:1 mode Turns on/off DDC/CI support Shows the resolution, H/V frequency, input port and serial number...

User Manual
Page 27
... resolution or vertical refresh rate. Check the display setting on your LCD monitor for a few seconds after adjusting the size of the image before changing or disconnecting the signal cable or switching off -center, too large or too small on and in compliance which may be causing the input signal frequency mismatch. In case of monitor. VGA mode Problem No picture visible LED status Blue Off Remedy Using the OSD, adjust brightness and contrast to maximum or reset to the monitor. Check if the specification...
... resolution or vertical refresh rate. Check the display setting on your LCD monitor for a few seconds after adjusting the size of the image before changing or disconnecting the signal cable or switching off -center, too large or too small on and in compliance which may be causing the input signal frequency mismatch. In case of monitor. VGA mode Problem No picture visible LED status Blue Off Remedy Using the OSD, adjust brightness and contrast to maximum or reset to the monitor. Check if the specification...

User Manual
Page 28
...mode Problem No picture visible LED status Blue Off Remedy Using the OSD, adjust brightness and contrast to maximum or reset to their default settings. Amber Check if the AC power cord is switched on and in power saving/ standby mode. Check if the video signal cable is switched on and in power saving/ standby mode. Check that the computer system is properly connected to the monitor. Check the power switch. English 16 DVI mode Problem No picture visible LED status Blue Off Remedy Using the OSD, adjust brightness and contrast to maximum or reset to their default settings...
...mode Problem No picture visible LED status Blue Off Remedy Using the OSD, adjust brightness and contrast to maximum or reset to their default settings. Amber Check if the AC power cord is switched on and in power saving/ standby mode. Check if the video signal cable is switched on and in power saving/ standby mode. Check that the computer system is properly connected to the monitor. Check the power switch. English 16 DVI mode Problem No picture visible LED status Blue Off Remedy Using the OSD, adjust brightness and contrast to maximum or reset to their default settings...

