Aspire T650/E500 and Power F5 Service Guide
Page 17
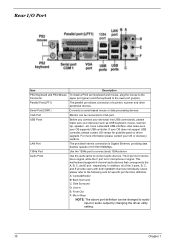
... Port Use the 1394a port to connect andy 1394a device Audio Ports Use the audio jacks to audio input or audio output by changing the driver utility setting. 10 Chapter 1 A: Center&Woofer B: Back Surround C: Side Surround D: Line-in E: Front Out F: Mic-in signal. If your OS ...of the 3 ports, B, C, and E provide users with both right&left channels individually. LAN Port The provided Internet connection is for possible patch or driver upgrade. Rear I/O Port Item Description PS/2 Keyboard and PS/2 Mouse To install a PS/2 port keyboard and mouse, plug the mouse to the Connector...
... Port Use the 1394a port to connect andy 1394a device Audio Ports Use the audio jacks to audio input or audio output by changing the driver utility setting. 10 Chapter 1 A: Center&Woofer B: Back Surround C: Side Surround D: Line-in E: Front Out F: Mic-in signal. If your OS ...of the 3 ports, B, C, and E provide users with both right&left channels individually. LAN Port The provided Internet connection is for possible patch or driver upgrade. Rear I/O Port Item Description PS/2 Keyboard and PS/2 Mouse To install a PS/2 port keyboard and mouse, plug the mouse to the Connector...
Aspire T650/E500 and Power F5 Service Guide
Page 25
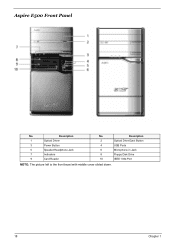
Aspire E500 Front Panel No. Description 2 Optical Drive Eject Button 4 USB Ports 6 Microphone-in Jack 8 Floppy Disk Drive 10 IEEE 1394 Port NOTE: The picture left is the front bezel with middle cover slided down. 18 Chapter 1 Description 1 Optical Driver 3 Power Button 5 Speaker/Headphone Jack 7 Indicators 9 Card Reader No.
Aspire E500 Front Panel No. Description 2 Optical Drive Eject Button 4 USB Ports 6 Microphone-in Jack 8 Floppy Disk Drive 10 IEEE 1394 Port NOTE: The picture left is the front bezel with middle cover slided down. 18 Chapter 1 Description 1 Optical Driver 3 Power Button 5 Speaker/Headphone Jack 7 Indicators 9 Card Reader No.
Aspire T650/E500 and Power F5 Service Guide
Page 31
... window, select Recovery settings and click Next. 5. In the Recovery settings window, select Reinstall applications/drivers and click Next. 6. At first launch, Acer eRecovery prepares all the needed software and may take few seconds to -disc recovery are protected by... 1. Press + to complete the process. 24 Chapter 1 Select the desired driver/application and follow the instructions on screen to open the Acer eRecovery utility. 3. In the Recovery settings window, select Password: Change Acer eRecovery password and click Next. 6. Follow the instructions on screen to proceed....
... window, select Recovery settings and click Next. 5. In the Recovery settings window, select Reinstall applications/drivers and click Next. 6. At first launch, Acer eRecovery prepares all the needed software and may take few seconds to -disc recovery are protected by... 1. Press + to complete the process. 24 Chapter 1 Select the desired driver/application and follow the instructions on screen to open the Acer eRecovery utility. 3. In the Recovery settings window, select Password: Change Acer eRecovery password and click Next. 6. Follow the instructions on screen to proceed....
Aspire T650/E500 and Power F5 Service Guide
Page 50
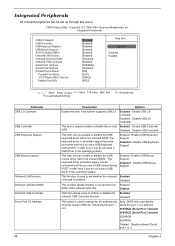
... Enable USB Controller USB Disabled : Disable USB Controller This item lets you enable or disable the USB keyboard driver within the onboard BIOS. CMOS Setup Utility - The keyboard driver is simulates legacy keyboard command and lets you use a USB mouse during POST or after boot if you ...system Enabled : Enable USB Keyboard Support Disabled : Disable USB Keyboard Support This item lets you do not have a USB driver in the operating system. The keyboard driver simulates legacy mouse command and lets you use a USB keyboard during POST or after boot if you enable or disable ...
... Enable USB Controller USB Disabled : Disable USB Controller This item lets you enable or disable the USB keyboard driver within the onboard BIOS. CMOS Setup Utility - The keyboard driver is simulates legacy keyboard command and lets you use a USB mouse during POST or after boot if you ...system Enabled : Enable USB Keyboard Support Disabled : Disable USB Keyboard Support This item lets you do not have a USB driver in the operating system. The keyboard driver simulates legacy mouse command and lets you use a USB keyboard during POST or after boot if you enable or disable ...
Aspire T650 User's Guide EN
Page 13
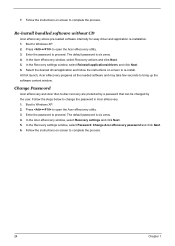
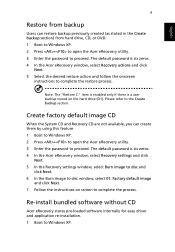
...Re-install bundled software without CD Acer eRecovery stores pre-loaded software internally for easy driver and application re-installation. 1 Boot to complete the restore process. Note: The "Restore C:" item is enabled only if there is six zeros. 4 In the Acer eRecovery window, select Recovery settings ...Create backup section) from backup Users can create them by using this feature. 1 Boot to Windows XP. 2 Press + to open the Acer eRecovery utility. 3 Enter the password to proceed. Factory default image and click Next. 7 Follow the instructions on the hard drive (D:\). English ...
...Re-install bundled software without CD Acer eRecovery stores pre-loaded software internally for easy driver and application re-installation. 1 Boot to complete the restore process. Note: The "Restore C:" item is enabled only if there is six zeros. 4 In the Acer eRecovery window, select Recovery settings ...Create backup section) from backup Users can create them by using this feature. 1 Boot to Windows XP. 2 Press + to open the Acer eRecovery utility. 3 Enter the password to proceed. Factory default image and click Next. 7 Follow the instructions on the hard drive (D:\). English ...

Aspire T650 User's Guide EN
Page 14
... bring up the software content window. The default password is six zeros. 4 In the Acer eRecovery window, select Recovery actions and click Next. 5 In the Recovery settings window, select Reinstall applications/ drivers and click Next. 6 Select the desired driver/application and follow the instructions on screen to proceed. English 10 2 Press + to open...
... bring up the software content window. The default password is six zeros. 4 In the Acer eRecovery window, select Recovery actions and click Next. 5 In the Recovery settings window, select Reinstall applications/ drivers and click Next. 6 Select the desired driver/application and follow the instructions on screen to proceed. English 10 2 Press + to open...


