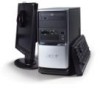
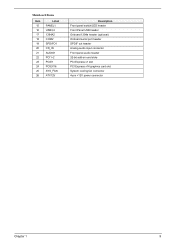
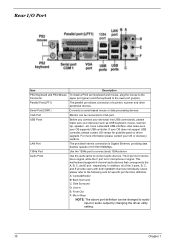
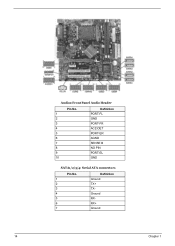
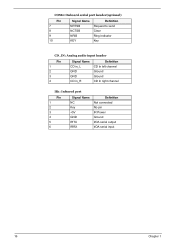
Aspire T650 Audio - Acer
Aspire T650 Audio
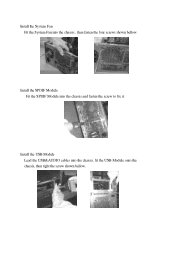
Related Manual Pages


Similar Questions


Help With Audio
have recently moved computer, satellite and all wiring. everything is finally working exccept my aud...
have recently moved computer, satellite and all wiring. everything is finally working exccept my aud...
(Posted by cathyhedge 12 years ago)

Related Terms
The following terms were also used when searching for Aspire T650 Audio - Acer:- acer aspire t650
- aspire t650
- aspire t650 driver
- acer aspire t650 drivers
- acer aspire t650 memory
- aspire t650 drivers
- aspire t650 memory
- acer aspire t650 ram
- acer aspire t650 recovery
- aspire t650 motherboard
- acer aspire t650 audio
- acer aspire t650 sata driver
- acer aspire t650 motherboard
- aspire t650 audio
- aspire t650 bios
- aspire t650 sata driver
- aspire t650 windows 7
- acer aspire t650 desktop
- acer aspire t650 windows 7
- aspire t650 recovery
- aspire t650 specs
- acer aspire t650 driver download
- aspire t650 desktop
- aspire t650 driver download
- aspire t650 manual
- aspire t650 memory upgrade
- aspire t650 specifications
- acer aspire t650 audio driver
- acer aspire t650 audio driver for windows 7
- acer aspire t650 bios
- acer aspire t650 bios update
- acer aspire t650 card reader
- acer aspire t650 card reader driver
- acer aspire t650 driver vista
- acer aspire t650 drivers download
- acer aspire t650 drivers windows 7
- acer aspire t650 drivers windows xp
- acer aspire t650 e500 ap f5
- acer aspire t650 ethernet driver
- acer aspire t650 lan driver
- acer aspire t650 manual
- acer aspire t650 memory upgrade
- acer aspire t650 memory upgrade problem
- acer aspire t650 on/off button
- acer aspire t650 picture
- acer aspire t650 ram upgrade
- acer aspire t650 recovery cd
- acer aspire t650 recovery disk
- acer aspire t650 recovery partition
- acer aspire t650 sata
- acer aspire t650 sata drivers
- acer aspire t650 seven
- acer aspire t650 sound driver
- acer aspire t650 specifications
- acer aspire t650 specs
- acer aspire t650 troubleshooting
- acer aspire t650 vga drivers download
- acer aspire t650 windows 7 drivers
- acer aspire t650/e500/ap f5
- aspire t650 audio driver
- aspire t650 audio driver for windows 7
- aspire t650 bios update
- aspire t650 bios upgrade
- aspire t650 card reader
- aspire t650 card reader driver
- aspire t650 cpu support
- aspire t650 driver for windows 7
- aspire t650 driver vista
- aspire t650 drivers download
- aspire t650 drivers windows 7
- aspire t650 drivers windows xp
- aspire t650 drivers xp
- aspire t650 e500
- aspire t650 e500 ap f5
- aspire t650 ethernet driver
- aspire t650 ethernet drivers
- aspire t650 hdd not found
- aspire t650 lan driver
- aspire t650 lan driver download
- aspire t650 memory upgrade problem
- aspire t650 on/off button
- aspire t650 operating system
- aspire t650 picture
- aspire t650 ram
- aspire t650 ram upgrade
- aspire t650 recovery cd
- aspire t650 recovery disk
- aspire t650 recovery partition
- aspire t650 restore
- aspire t650 sata
- aspire t650 sata drivers
- aspire t650 seven
- aspire t650 sound driver
- aspire t650 support
- aspire t650 troubleshooting
- aspire t650 vga drivers download
- aspire t650 windows 7 drivers
- aspire t650/e500
- aspire t650/e500/ap f5
- aspire t650a
- how to format acer aspire t650
- how to format aspire t650