Acer Aspire 5538 On Off Not Working

Related Manual Pages

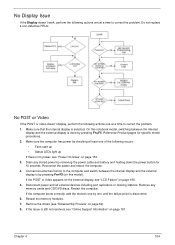
Similar Questions

Hello, My Acer Extensa 4120 Did Not Work Anymore.
When switching on, display is dark but for a half minute you can hear the cooler and the hdd working...
When switching on, display is dark but for a half minute you can hear the cooler and the hdd working...
(Posted by wmuli 10 years ago)

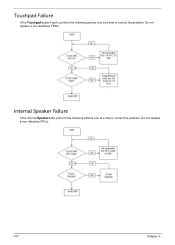
In My Laptop Acer Aspire E1-571 Scrolling Function Is Working In Touchpad Please
last 2 days back i purchased this new laptop but in this scrolling function is not working in touch-...
last 2 days back i purchased this new laptop but in this scrolling function is not working in touch-...
(Posted by muraliimissu 11 years ago)

Acer Aspire 4739z, Touchpad Tapping Not Working
only reight and left keys are working, through touchpad I'm unable to select or clik by tapping
only reight and left keys are working, through touchpad I'm unable to select or clik by tapping
(Posted by venkatasundaramurthy 11 years ago)

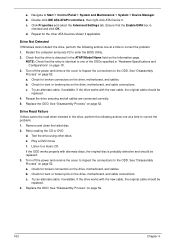
How Do I Check Battery Status
My battery no longer holds a charge but before I replave it I want to make sure that something else ...
My battery no longer holds a charge but before I replave it I want to make sure that something else ...
(Posted by tishmcalpin 11 years ago)