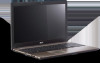
Acer Aspire 5538 Notebook Series Start Guide
Page 3
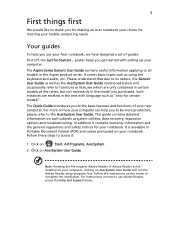
... Reader setup program first. Please understand that due to its nature, the Generic User Guide as well as system utilities, data recovery, expansion options and troubleshooting. This guide contains detailed information on AcerSystem User Guide will occasionally refer to use your Acer notebook, we have designed a set of your notebook. poster helps you to the AcerSystem User Guide. The Quick Guide introduces you get started with language such as using the keyboard and audio...
... Reader setup program first. Please understand that due to its nature, the Generic User Guide as well as system utilities, data recovery, expansion options and troubleshooting. This guide contains detailed information on AcerSystem User Guide will occasionally refer to use your Acer notebook, we have designed a set of your notebook. poster helps you to the AcerSystem User Guide. The Quick Guide introduces you get started with language such as using the keyboard and audio...
Acer Aspire 5538 Notebook Series Start Guide
Page 8
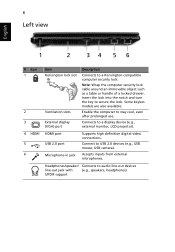
... prolonged use. 8 Left view English # Icon 1 2 3 4 HDMI 5 6 Item Kensington lock slot Ventilation slots External display (VGA) port Description Connects to USB 2.0 devices (e.g., USB mouse, USB camera). Some keyless models are also available. Note: Wrap the computer security lock cable around an immovable object such as a table or handle of a locked drawer. HDMI port USB 2.0 port Microphone-in jack Supports high definition digital video connections. Connect to a Kensington-compatible computer security lock. S/PDIF support Connects to audio line-out devices line-out jack with...
... prolonged use. 8 Left view English # Icon 1 2 3 4 HDMI 5 6 Item Kensington lock slot Ventilation slots External display (VGA) port Description Connects to USB 2.0 devices (e.g., USB mouse, USB camera). Some keyless models are also available. Note: Wrap the computer security lock cable around an immovable object such as a table or handle of a locked drawer. HDMI port USB 2.0 port Microphone-in jack Supports high definition digital video connections. Connect to a Kensington-compatible computer security lock. S/PDIF support Connects to audio line-out devices line-out jack with...

Acer Aspire 5538 Notebook Series Start Guide
Page 12
... 12 Power subsystem Special keys and controls I/O interface Environment • ACPI 3.0 • 48.84 W 4400 mAh • 3-pin 65 W AC adapter • ENERGY STAR®* • 103-/104-/107-key keyboard • Touchpad pointing device • 5-in-1 card reader (SD/MMC/MS/MS PRO/xD) • USB 2.0 port • HDMI™ port with HDCP support • External display (VGA) port • Headphones/speaker/line-out jack with S/PDIF support • Microphone-in jack...
... 12 Power subsystem Special keys and controls I/O interface Environment • ACPI 3.0 • 48.84 W 4400 mAh • 3-pin 65 W AC adapter • ENERGY STAR®* • 103-/104-/107-key keyboard • Touchpad pointing device • 5-in-1 card reader (SD/MMC/MS/MS PRO/xD) • USB 2.0 port • HDMI™ port with HDCP support • External display (VGA) port • Headphones/speaker/line-out jack with S/PDIF support • Microphone-in jack...
Acer Aspire 5538 Series Service Guide
Page 7
... 8 Rear View 8 Indicators 9 TouchPad Basics 10 Using the Keyboard 11 Lock Keys and embedded numeric keypad 11 Windows Keys 12 Hot Keys 13 Special Keys 14 Hardware Specifications and Configurations 15 System Utilities 23 BIOS Setup Utility 23 Navigating the BIOS Utility 23 Information 24 Main 25 Advanced 26 Security 28 Power 31 Boot 32 Exit 33 BIOS Flash Utility 34 DOS Flash Utility 35 WinFlash Utility 36 Remove HDD/BIOS Password Utilities 37 Removing BIOS Passwords 38 Miscellaneous Utilities 39 Machine Disassembly and Replacement 42 Disassembly Requirements 42...
... 8 Rear View 8 Indicators 9 TouchPad Basics 10 Using the Keyboard 11 Lock Keys and embedded numeric keypad 11 Windows Keys 12 Hot Keys 13 Special Keys 14 Hardware Specifications and Configurations 15 System Utilities 23 BIOS Setup Utility 23 Navigating the BIOS Utility 23 Information 24 Main 25 Advanced 26 Security 28 Power 31 Boot 32 Exit 33 BIOS Flash Utility 34 DOS Flash Utility 35 WinFlash Utility 36 Remove HDD/BIOS Password Utilities 37 Removing BIOS Passwords 38 Miscellaneous Utilities 39 Machine Disassembly and Replacement 42 Disassembly Requirements 42...
Acer Aspire 5538 Series Service Guide
Page 8
...the Fan 117 Replacing the Mainboard 119 Replacing the I/O Board 122 Replacing the Bluetooth Module 124 Replacing the Media Board 125 Replacing the Speaker Modules 127 Replacing the Power Board 129 Replacing the Touchpad Bracket 130 Replacing the Button Board 132 Replacing the Upper Cover 134 Replacing the Keyboard 138 External Module Reassembly Process 140 Replacing the WLAN Board 140 Replacing the DIMM Modules 141 Replacing the Hard Disk Drive Module 143 Replacing the ODD 145 Replacing the Lower Covers 147 Replacing the Battery 149 Troubleshooting 152 Common Problems 152...
...the Fan 117 Replacing the Mainboard 119 Replacing the I/O Board 122 Replacing the Bluetooth Module 124 Replacing the Media Board 125 Replacing the Speaker Modules 127 Replacing the Power Board 129 Replacing the Touchpad Bracket 130 Replacing the Button Board 132 Replacing the Upper Cover 134 Replacing the Keyboard 138 External Module Reassembly Process 140 Replacing the WLAN Board 140 Replacing the DIMM Modules 141 Replacing the Hard Disk Drive Module 143 Replacing the ODD 145 Replacing the Lower Covers 147 Replacing the Battery 149 Troubleshooting 152 Common Problems 152...
Acer Aspire 5538 Series Service Guide
Page 9
... 168 Intermittent Problems 168 Undetermined Problems 169 POST Code Tables 170 Sec 170 Memory 170 DLL Timing Control Registers, RCOMP settings 171 BDS & Specific action 172 Each PEIM entry point used in 80_PORT 172 Jumper and Connector Locations 177 Top View 177 Bottom View 178 Clearing Password Check and BIOS Recovery 179 Clearing Password Check 179 BIOS Recovery by Crisis Disk 180 FRU (Field Replaceable Unit) List 181 Aspire 5538 Exploded Diagrams 182...
... 168 Intermittent Problems 168 Undetermined Problems 169 POST Code Tables 170 Sec 170 Memory 170 DLL Timing Control Registers, RCOMP settings 171 BDS & Specific action 172 Each PEIM entry point used in 80_PORT 172 Jumper and Connector Locations 177 Top View 177 Bottom View 178 Clearing Password Check and BIOS Recovery 179 Clearing Password Check 179 BIOS Recovery by Crisis Disk 180 FRU (Field Replaceable Unit) List 181 Aspire 5538 Exploded Diagrams 182...
Acer Aspire 5538 Series Service Guide
Page 16
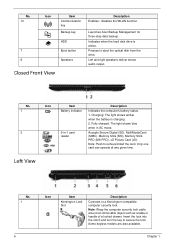
... Lock Slot Description Connects to secure the lock. Note: Push to eject the optical disk from the drive. Presses to remove/install the card. Only one card can operate at any given time. Launches Acer Backup Management for three-step data backup. No. 10 7 8 Icon Item Communication key Backup key HDD Eject button Speakers Closed Front View Description Enables / disables the WLAN function. Left and right speakers deliver stereo audio output. Indicates when the hard disk drive is charging...
... Lock Slot Description Connects to secure the lock. Note: Push to eject the optical disk from the drive. Presses to remove/install the card. Only one card can operate at any given time. Launches Acer Backup Management for three-step data backup. No. 10 7 8 Icon Item Communication key Backup key HDD Eject button Speakers Closed Front View Description Enables / disables the WLAN function. Left and right speakers deliver stereo audio output. Indicates when the hard disk drive is charging...
Acer Aspire 5538 Series Service Guide
Page 39
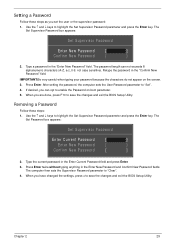
... changes and exit the BIOS Setup Utility. The password length can opt to highlight the Set Supervisor Password parameter and press the Enter key. Press Enter. Removing a Password Follow these steps as you can not exceeds 8 alphanumeric characters (A-Z, a-z, 0-9, not case sensitive). Use the ↑ and ↓ keys to enable the Password on the screen. 3. Type a password in the Enter New Password and Confirm New Password fields. If desired, you set the user or the supervisor password: 1. The Set...
... changes and exit the BIOS Setup Utility. The password length can opt to highlight the Set Supervisor Password parameter and press the Enter key. Press Enter. Removing a Password Follow these steps as you can not exceeds 8 alphanumeric characters (A-Z, a-z, 0-9, not case sensitive). Use the ↑ and ↓ keys to enable the Password on the screen. 3. Type a password in the Enter New Password and Confirm New Password fields. If desired, you set the user or the supervisor password: 1. The Set...

Acer Aspire 5538 Series Service Guide
Page 40
... changes and exit the BIOS Setup Utility. If the verification is complete after the user presses Enter. Setup Warning Passwords do not match, the screen displays the following . Type the current password in the Enter New Password field. Retype the password in the Confirm New Password field. 4. Setup Warning Invalid Password. [Continue] If the new password and confirm new password strings do not match. Re-enter password. [Continue] 30 Chapter 2 Set Supervisor Password Enter Current Password [ ] Enter New Password [ ] Confirm New Password [ ] 2. When you can enable...
... changes and exit the BIOS Setup Utility. If the verification is complete after the user presses Enter. Setup Warning Passwords do not match, the screen displays the following . Type the current password in the Enter New Password field. Retype the password in the Confirm New Password field. 4. Setup Warning Invalid Password. [Continue] If the new password and confirm new password strings do not match. Re-enter password. [Continue] 30 Chapter 2 Set Supervisor Password Enter Current Password [ ] Enter New Password [ ] Confirm New Password [ ] 2. When you can enable...
Acer Aspire 5538 Series Service Guide
Page 43
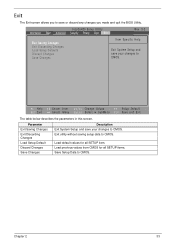
... Changes Exit Discarding Changes Load Setup Default Discard Changes Save Changes Description Exit System Setup and save or discard any changes you made and quit the BIOS Utility. Load previous values from CMOS for all SETUP items. Save Setup Data to CMOS. InsydeH20 Setup Utility Information Main Advanced Security Power Boot Exit Rev. 3.5 Exit Saving Changes Exit Discarding Changes Load Setup Defaults Discard Changes Save Changes Item Specific Help Exit System Setup and save your changes to CMOS...
... Changes Exit Discarding Changes Load Setup Default Discard Changes Save Changes Description Exit System Setup and save or discard any changes you made and quit the BIOS Utility. Load previous values from CMOS for all SETUP items. Save Setup Data to CMOS. InsydeH20 Setup Utility Information Main Advanced Security Power Boot Exit Rev. 3.5 Exit Saving Changes Exit Discarding Changes Load Setup Defaults Discard Changes Save Changes Item Specific Help Exit System Setup and save your changes to CMOS...
Acer Aspire 5538 Series Service Guide
Page 68
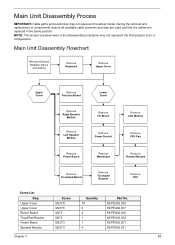
Main Unit Disassembly Flowchart Remove External Modules before proceeding Remove Keyboard Remove Upper Cover Upper Cover Remove Function Board Lower Cover Remove Right Speaker Module Remove Left Speaker Module Remove I/O Board Remove Power Socket Remove LCD Module Remove CPU Fan Remove Power Board Remove Mainboard Remove Thermal Module Remove Touchpad Board Remove Touchpad Bracket Remove CPU Screw List Step Upper Cover Upper Cover Button Board TouchPad Bracket Power Board Speaker Module Screw M2.5*8 M2.5*6 M2*3 M2*3 M2.5*3 M2.5*3 Quantity 18 6 4 1 1 4 Part No. 86.PEA02.006...
Main Unit Disassembly Flowchart Remove External Modules before proceeding Remove Keyboard Remove Upper Cover Upper Cover Remove Function Board Lower Cover Remove Right Speaker Module Remove Left Speaker Module Remove I/O Board Remove Power Socket Remove LCD Module Remove CPU Fan Remove Power Board Remove Mainboard Remove Thermal Module Remove Touchpad Board Remove Touchpad Bracket Remove CPU Screw List Step Upper Cover Upper Cover Button Board TouchPad Bracket Power Board Speaker Module Screw M2.5*8 M2.5*6 M2*3 M2*3 M2.5*3 M2.5*3 Quantity 18 6 4 1 1 4 Part No. 86.PEA02.006...
Acer Aspire 5538 Series Service Guide
Page 162
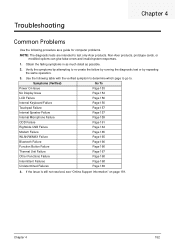
... (Verified) Go To Power On Issue Page 153 No Display Issue Page 154 LCD Failure Page 156 Internal Keyboard Failure Page 156 Touchpad Failure Page 157 Internal Speaker Failure Page 157 Internal Microphone Failure Page 159 ODD Failure Page 161 Rightside USB Failure Page 164 Modem Failure Page 165 WLAN/WiMAX Failure Page 165 Bluetooth Failure Page 166 Function Button Failure Page 166...
... (Verified) Go To Power On Issue Page 153 No Display Issue Page 154 LCD Failure Page 156 Internal Keyboard Failure Page 156 Touchpad Failure Page 157 Internal Speaker Failure Page 157 Internal Microphone Failure Page 159 ODD Failure Page 161 Rightside USB Failure Page 164 Modem Failure Page 165 WLAN/WiMAX Failure Page 165 Bluetooth Failure Page 166 Function Button Failure Page 166...
Acer Aspire 5538 Series Service Guide
Page 164
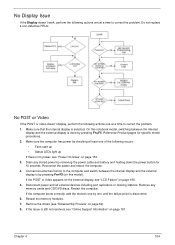
... the memory modules. 7. Disconnect power and all external devices including port replicators or docking stations. Do not replace a non-defective FRUs: No POST or Video If the POST or video doesn't display, perform the following occurs: • Fans start up • Status LEDs light up If there is selected. If the computer boots correctly, add the devices one by removing the power cable and battery and holding down the power button for specific model...
... the memory modules. 7. Disconnect power and all external devices including port replicators or docking stations. Do not replace a non-defective FRUs: No POST or Video If the POST or video doesn't display, perform the following occurs: • Fans start up • Status LEDs light up If there is selected. If the computer boots correctly, add the devices one by removing the power cable and battery and holding down the power button for specific model...
Acer Aspire 5538 Series Service Guide
Page 165
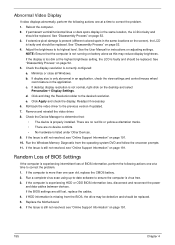
... location, the LCD is virus free. 3. See the User Manual for instructions on page 52. 5. Minimize or close all Windows. Run the Windows Memory Diagnostic from the BIOS, the drive may reduce display brightness. If HDD information is still not resolved, see "Online Support Information" on page 191. 155 Chapter 4 Replace the Motherboard. 6. Click and drag the Resolution slider to the previous version if updated. 7. Remove and reinstall the video driver...
... location, the LCD is virus free. 3. See the User Manual for instructions on page 52. 5. Minimize or close all Windows. Run the Windows Memory Diagnostic from the BIOS, the drive may reduce display brightness. If HDD information is still not resolved, see "Online Support Information" on page 191. 155 Chapter 4 Replace the Motherboard. 6. Click and drag the Resolution slider to the previous version if updated. 7. Remove and reinstall the video driver...
Acer Aspire 5538 Series Service Guide
Page 170
... Recovery Options screen displays. Run the Windows Memory Diagnostic Tool. Restart the computer and press F2 to locate and resolve issues with the computer. Check the BIOS settings are correct and that CD/DVD drive is set correctly. 7. Chapter 4 160 b. g. Remove any key to start to resolve the problem. 4. For more information see Windows Help and Support. 5. Restore system and file settings from a command prompt. Replace the HDD. Run the Windows Vista Startup Repair Utility: a. e. Run Windows Check Disk...
... Recovery Options screen displays. Run the Windows Memory Diagnostic Tool. Restart the computer and press F2 to locate and resolve issues with the computer. Check the BIOS settings are correct and that CD/DVD drive is set correctly. 7. Chapter 4 160 b. g. Remove any key to start to resolve the problem. 4. For more information see Windows Help and Support. 5. Restore system and file settings from a command prompt. Replace the HDD. Run the Windows Vista Startup Repair Utility: a. e. Run Windows Check Disk...
Acer Aspire 5538 Series Service Guide
Page 173
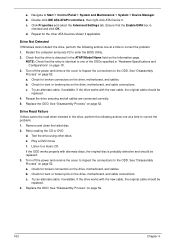
... on the drive, motherboard, and cables. See "Disassembly Process" on page 52. 163 Chapter 4 c. Turn off the power and remove the cover to inspect the connections to one of the ODDs specified in "Hardware Specifications and Configurations" on the drive, motherboard, and cable connections. a. Drive Read Failure If discs cannot be replaced. 4. Listen to correct the problem. 1. If the drive works with the new cable, the original cable should be replaced. 3. Remove and clean the failed disc. 2. Check...
... on the drive, motherboard, and cables. See "Disassembly Process" on page 52. 163 Chapter 4 c. Turn off the power and remove the cover to inspect the connections to one of the ODDs specified in "Hardware Specifications and Configurations" on the drive, motherboard, and cable connections. a. Drive Read Failure If discs cannot be replaced. 4. Listen to correct the problem. 1. If the drive works with the new cable, the original cable should be replaced. 3. Remove and clean the failed disc. 2. Check...

Acer Aspire 5538 Series Service Guide
Page 178
... analyzing an intermittent problem, do not replace any error is OK. 2. Rerun the test to verify that there are no more information see "Online Support Information" on page 191. If the mouse uses a wireless connection, insert new batteries and confirm there is ok. 3. See the mouse user manual. 3. Remove any recently added software and reboot. 8. Remove any recently added hardware and associated software. 7. Remove and reinstall the mouse driver. 12. There are...
... analyzing an intermittent problem, do not replace any error is OK. 2. Rerun the test to verify that there are no more information see "Online Support Information" on page 191. If the mouse uses a wireless connection, insert new batteries and confirm there is ok. 3. See the mouse user manual. 3. Remove any recently added software and reboot. 8. Remove any recently added hardware and associated software. 7. Remove and reinstall the mouse driver. 12. There are...
Acer Aspire 5538 Series Service Guide
Page 189
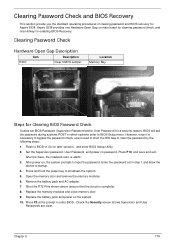
... BIOS recovery for enabling BIOS Recovery. However, once it is complete). 8. After the Save, the notebook auto re-starts. 3. Remove the battery pack and AC adapter. 7. Check the Security screen shows Supervisor and User Passwords are clear. Clearing Password Check Hardware Open Gap Description Item Description R397 Clear CMOS Jumper Location Memory Bay Steps for a security reason, BIOS will ask the password during systems POST or when systems enter to BIOS Setup menu. Press and hold the power key to startup. 4. Replace...
... BIOS recovery for enabling BIOS Recovery. However, once it is complete). 8. After the Save, the notebook auto re-starts. 3. Remove the battery pack and AC adapter. 7. Check the Security screen shows Supervisor and User Passwords are clear. Clearing Password Check Hardware Open Gap Description Item Description R397 Clear CMOS Jumper Location Memory Bay Steps for a security reason, BIOS will ask the password during systems POST or when systems enter to BIOS Setup menu. Press and hold the power key to startup. 4. Replace...

Acer Aspire 5538 Series Service Guide
Page 223
...Camera Board Removing 94 Replacing 109 caps lock on indicator 9 CPU Removing 90 Replacing 115 CPU Fan Replacing 117 Index D DC-In Cable Removing 81 DIMM Module Removing 52 Replacing 141 Display 4 display hotkeys 13 E Euro Key 14 External Module Disassembly Flowchart 44 F Fan Removing 87 Replacing 117 Features 1 FLASH Utility 34 Flash Utility 34 FPC Cable Removing 96 Replacing 107 FRU (Field Replaceable Unit) List 181 H Hard Disk Drive Module Removing 46 Replacing 143 Heatsink Fan 87 Hibernation mode hotkey 13 Hot Keys 11 I I/O Board Removing 78 Replacing 122 Indicators 9 Intermittent Problems...
...Camera Board Removing 94 Replacing 109 caps lock on indicator 9 CPU Removing 90 Replacing 115 CPU Fan Replacing 117 Index D DC-In Cable Removing 81 DIMM Module Removing 52 Replacing 141 Display 4 display hotkeys 13 E Euro Key 14 External Module Disassembly Flowchart 44 F Fan Removing 87 Replacing 117 Features 1 FLASH Utility 34 Flash Utility 34 FPC Cable Removing 96 Replacing 107 FRU (Field Replaceable Unit) List 181 H Hard Disk Drive Module Removing 46 Replacing 143 Heatsink Fan 87 Hibernation mode hotkey 13 Hot Keys 11 I I/O Board Removing 78 Replacing 122 Indicators 9 Intermittent Problems...

Acer Aspire 5538 Series Service Guide
Page 224
... 138 Keyboard Failure 156 L LCD Bezel Removing 92 Replacing 110 LCD Brackets Removing 98 Replacing 106 LCD Cable Removing 96, 107 LCD Failure 156 LCD Module Disassembly 91 Reassembly 103 Removing 85 Replacing 113 LCD Module Disassembly Flowchart 91 LCD Panel Removing 95 Replacing 108 Lower Covers Replacing 147 M Main Unit Disassembly Flowchart 58 Mainboard Removing 82 Replacing 119 media access on indicator 9 Media Board Removing 75 214 Replacing 125 Microphone Removing 99 Replacing 104 Model Definition 192 N No Display Issue 154 num lock on indicator 9 O ODD Replacing 145 Online Support...
... 138 Keyboard Failure 156 L LCD Bezel Removing 92 Replacing 110 LCD Brackets Removing 98 Replacing 106 LCD Cable Removing 96, 107 LCD Failure 156 LCD Module Disassembly 91 Reassembly 103 Removing 85 Replacing 113 LCD Module Disassembly Flowchart 91 LCD Panel Removing 95 Replacing 108 Lower Covers Replacing 147 M Main Unit Disassembly Flowchart 58 Mainboard Removing 82 Replacing 119 media access on indicator 9 Media Board Removing 75 214 Replacing 125 Microphone Removing 99 Replacing 104 Model Definition 192 N No Display Issue 154 num lock on indicator 9 O ODD Replacing 145 Online Support...


