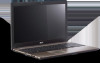
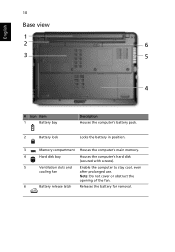
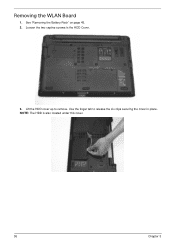
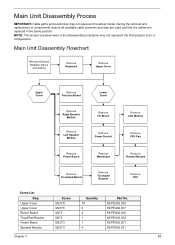
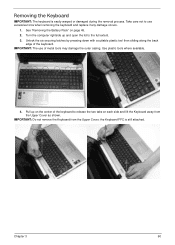
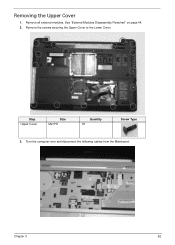
Acer Aspire 5538 Notebook Series Start Guide
Page 10
10 Base view English # Icon Item 1 Battery bay Description Houses the computer's battery pack. 2 Battery lock Locks the battery in position. 3 Memory compartment Houses the computer's main memory. 4 Hard disk bay Houses the computer's hard disk (secured with screws). 5 Ventilation slots and Enable the computer to stay cool, even cooling fan after prolonged use. Note: Do not cover or obstruct the opening of the fan. 6 Battery release latch Releases the battery for removal.
Acer Aspire 5538 Series Service Guide
Page 7
...28 Power 31 Boot 32 Exit 33 BIOS Flash Utility 34 DOS Flash Utility 35 WinFlash Utility 36 Remove HDD/BIOS Password Utilities 37 Removing BIOS Passwords 38 Miscellaneous Utilities 39 Machine Disassembly and Replacement 42 Disassembly Requirements 42 Related Information 42 General... Removing the Battery Pack 45 Removing the Hard Disk Drive Module 46 Removing the Optical Disk Drive Module 49 Removing the DIMM Module 52 Removing the WLAN Board 55 Main Unit Disassembly Process 58 Main Unit Disassembly Flowchart 58 Removing the Keyboard 60 Removing the Upper Cover 62 Removing ...
Acer Aspire 5538 Series Service Guide
Page 8
...Removing the Touchpad Bracket 69 Removing the Power Board 71 Removing the Speaker Modules 73 Removing the Media Board 75 Removing the Bluetooth Module 77 Removing the I/O Board 78 Removing the DC-In Cable 81 Removing the Mainboard 82 Removing the LCD Module 85 Removing the Fan 87 Removing the Thermal Module 89 Removing...Modules 127 Replacing the Power Board 129 Replacing the Touchpad Bracket 130 Replacing the Button Board 132 Replacing the Upper Cover 134 Replacing the Keyboard 138 External Module Reassembly Process 140 Replacing the WLAN Board 140 Replacing the DIMM Modules ...
Acer Aspire 5538 Series Service Guide
Page 18
... lock Description Houses the computer's battery pack. No. 1 Icon Item Battery bay Description Houses the computer's battery pack. 8 Chapter 1 Note: The battery shown is for removal. Note: Do not cover or obstruct the opening of the fan. Enable the computer to stay cool, even after prolonged use.
Acer Aspire 5538 Series Service Guide
Page 54
External Modules Disassembly Flowchart Turn off system and peripherals power Disconnect power and signal cables from system Remove Battery Remove Dummy Card Remove Lower Covers Remove DIMMs Remove WLAN Remove HDD Remove ODD Screw List Step HDD Module HDD Carrier WLAN Board ODD Module ODD Bracket Screw M2.5*4 M3*3 M2*3 M2.5*3 M2*3 (silver) Quantity 2 4 1 1 2 Part No. 86....
Acer Aspire 5538 Series Service Guide
Page 56
Six tabs hold the door in the HDD Cover. 3. Lift the HDD cover up using the finger tab to remove. Chapter 3 46 See "Removing the Battery Pack" on page 45 2. Loosen the two captive screws in place. Removing the Hard Disk Drive Module 1.
Acer Aspire 5538 Series Service Guide
Page 59
Remove the HDD from the carrier. Loosen the three captive screws in the HDD Cover. 49 Chapter 3 See "Removing the Battery Pack" on page 45 2. 8. Removing the Optical Disk Drive Module 1.
Acer Aspire 5538 Series Service Guide
Page 60
Step ODD Module Size M2.5*3 Quantity 1 5. Six tabs hold the door in place. 4. Remove the screw securing the ODD module. 3. Lift the HDD cover up using the finger tab to remove. Slide the ODD module out of the assembly Screw Type Chapter 3 50
Acer Aspire 5538 Series Service Guide
Page 62
Lift the Memory Cover up using the thumb tab (indicated by the circle below shows the locations of SODIMM slot 0 and SODIMM slot 1. Loosen the two captive screws in place. 4. Identify the SODIMM to remove. The image below ) to release the seven clips securing the cover in the Memory Cover. 3. See "Removing the Battery Pack" on page 45 2. Slot 0 must be populated first when installing or replacing defective memory. 01 Chapter 3 52 Removing the DIMM Module 1. Pull up to remove.
Acer Aspire 5538 Series Service Guide
Page 65
Loosen the two captive screws in place. NOTE: The HDD is also located under this cover. 55 Chapter 3 Use the finger tab to remove. Removing the WLAN Board 1. Lift the HDD cover up to release the six clips securing the cover in the HDD Cover. 3. See "Removing the Battery Pack" on page 45. 2.
Acer Aspire 5538 Series Service Guide
Page 68
... same position. Main Unit Disassembly Flowchart Remove External Modules before proceeding Remove Keyboard Remove Upper Cover Upper Cover Remove Function Board Lower Cover Remove Right Speaker Module Remove Left Speaker Module Remove I/O Board Remove Power Socket Remove LCD Module Remove CPU Fan Remove Power Board Remove Mainboard Remove Thermal Module Remove Touchpad Board Remove Touchpad Bracket Remove CPU Screw List Step Upper Cover Upper Cover Button Board TouchPad Bracket Power Board...
Acer Aspire 5538 Series Service Guide
Page 70
... and replace if any damage occurs. 1. IMPORTANT: Do not remove the Keyboard from the Upper Cover as shown. Take care not to use of metal tools may damage the outer casing. the Keyboard FFC is easily warped or damaged during the removal process. Use plastic tools where available. 4. Chapter 3 60...sliding along the back edge of the keyboard to the full extent. 3. Removing the Keyboard IMPORTANT: The keyboard is still attached. See "Removing the Battery Pack" on each side and lift the Keyboard away from the Upper Cover; Pull up and open the lid to release the two tabs on ...
Acer Aspire 5538 Series Service Guide
Page 72
Remove the screws securing the Upper Cover to the Lower Cover. Removing the Upper Cover 1. Turn the computer over and disconnect the following cables from the Mainboard: Chapter 3 62 See "External Modules Disassembly Flowchart" on page 44. 2. Step Upper Cover Size M2.5*8 Quantity 18 Screw Type 3. Remove all external modules.
Acer Aspire 5538 Series Service Guide
Page 74
Release the locking latch and disconnect the Media Board FFC as shown. 4. Remove the six securing screws from the Upper Cover. d. Step Upper Cover Size M2.5*6 Quantity 6 Screw Type Chapter 3 64
Acer Aspire 5538 Series Service Guide
Page 76
Step Button Board Size M2*3 Quantity 4 Screw Type Chapter 3 66 Remove the mylar sheet covering the Button Board. 3. To replace the Button Board, replace the entire Upper Cover. 1. Remove the four screws securing the button board to the Upper Cover. See "Removing the Upper Cover" on page 62. 2. Removing the Button Board IMPORTANT: The Touchpad Board cannot be removed individually.
Acer Aspire 5538 Series Service Guide
Page 77
Peel back the two FFCs to remove the Button Board. 6. Slide the Button Board out from under the securing tab in the Upper Cover as shown. 67 Chapter 3 4. IMPORTANT: Ensure that the FFCs are disconnected before attempting to release the adhesive. Lift the securing latch and disconnect the single FFC connecting the Button Board to the Touchpad. 5.
Acer Aspire 5538 Series Service Guide
Page 78
IMPORTANT: Ensure that the FFC is not torn off during removal. Chapter 3 68 7. Pull the Mainboard FFC through the cover as shown.
Acer Aspire 5538 Series Service Guide
Page 79
Remove the single screw securing the Touchpad Bracket to first push the securing tabs back so that the bracket may be more readily removed. 69 Chapter 3 NOTE: It may be necessary to use a tool to the Upper Cover. Removing the Touchpad Bracket 1. See "Removing the Button Board" on page 66. 2. Pull the bracket up from under the securing tabs along the top edge. Step TouchPad Bracket Size M2*3 Quantity 1 Screw Type 3.
Acer Aspire 5538 Series Service Guide
Page 81
Removing the Power Board 1. Tilt the board 90 degrees to the Lower Cover. Remove the single screw securing the Power Board to clear the securing tab. 71 Chapter 3 See "Removing the Upper Cover" on page 62. 2. Pull the FFC up to remove it from the adhesive securing it to the Speaker Module. 4. Step Power Board Size M2.5*3 Quantity 1 Screw Type 3.
Acer Aspire 5538 Series Service Guide
Page 83
See "Removing the Power Board" on page 71. 2. Removing the Speaker Modules 1. Lift the right side speaker out from the Lower Cover and peel back the mylar to the left speaker. 73 Chapter 3 Peel back the mylar sheet to expose the speaker cable all the way to expose the speaker wire as shown. 4. Step Speaker Module Size M2.5*3 Quantity 4 Screw Type 3. Remove the four screws securing the Speakers to the Upper Cover.