User Guide
Page 1
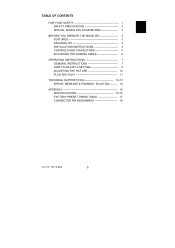
TABLE OF CONTENTS FOR YOUR SAFETY 1 SAFETY PRECAUTIONS 2 SPECIAL NOTES ON LCD MONITORS 3 BEFORE YOU OPERATE THE MONITOR 3 FEATURES 3 PACKING LIST 3 INSTALLATION INSTRUCTIONS 4 CONTROLS AND CONNECTORS 5 ADJUSTING THE VIEWING ANGLE 6 OPERATING INSTRUCTIONS 7 GENERAL INSTRUCTIONS 7 HOW TO ADJUST A SETTING 9 ADJUSTING THE PICTURE 10 PLUG AND PLAY 11 TECHNICAL SUPPORT(FAQ 12-13 ERROR MESSAGE & POSSIBLE SOLUTION -------- 14 APPENDIX 15 SPECIFICATIONS 15-16 FACTORY PRESET TIMING TABLE 17 CONNECTOR PIN ASSIGNMENT 18 41L1700-786-1B 英文 0
TABLE OF CONTENTS FOR YOUR SAFETY 1 SAFETY PRECAUTIONS 2 SPECIAL NOTES ON LCD MONITORS 3 BEFORE YOU OPERATE THE MONITOR 3 FEATURES 3 PACKING LIST 3 INSTALLATION INSTRUCTIONS 4 CONTROLS AND CONNECTORS 5 ADJUSTING THE VIEWING ANGLE 6 OPERATING INSTRUCTIONS 7 GENERAL INSTRUCTIONS 7 HOW TO ADJUST A SETTING 9 ADJUSTING THE PICTURE 10 PLUG AND PLAY 11 TECHNICAL SUPPORT(FAQ 12-13 ERROR MESSAGE & POSSIBLE SOLUTION -------- 14 APPENDIX 15 SPECIFICATIONS 15-16 FACTORY PRESET TIMING TABLE 17 CONNECTOR PIN ASSIGNMENT 18 41L1700-786-1B 英文 0
User Guide
Page 2
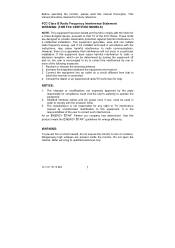
.... 2. FCC Class B Radio Frequency Interference Statement WARNING: (FOR FCC CERTIFIED MODELS) NOTE: This equipment has been tested and found to comply with the limits for any , must be used in a particular installation. The changes or modifications not expressly approved by one or more of the following measures: 1. Shielded interface cables and AC power cord, if any radio or...
.... 2. FCC Class B Radio Frequency Interference Statement WARNING: (FOR FCC CERTIFIED MODELS) NOTE: This equipment has been tested and found to comply with the limits for any , must be used in a particular installation. The changes or modifications not expressly approved by one or more of the following measures: 1. Shielded interface cables and AC power cord, if any radio or...
User Guide
Page 3
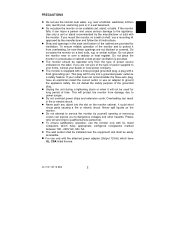
... liquids on a wall or shelf, use a mounting kit approved by the manufacturer and follow the kit instructions. PRECAUTIONS z Do not use the monitor near or over a radiator or heat register. Use only a cart or stand recommended by yourself; Please refer all servicing to service the monitor by the manufacturer or sold with UL listed computers which have an electrician install the correct...
... liquids on a wall or shelf, use a mounting kit approved by the manufacturer and follow the kit instructions. PRECAUTIONS z Do not use the monitor near or over a radiator or heat register. Use only a cart or stand recommended by yourself; Please refer all servicing to service the monitor by the manufacturer or sold with UL listed computers which have an electrician install the correct...
User Guide
Page 4
... • 43.2cm(17") TFT Color LCD Monitor • Crisp, Clear Display for replacement when the screen is dark, flickering or not lighting up. Never attempt to replace it on again to the nature of 99.99% or more. Power Cord 4. Turn off the Power Switch and then turn it by changing the image or turning off the Power Switch for hours. Contact your dealer for Windows • Recommened Resolutions: 1280 X 1024 @60Hz...
... • 43.2cm(17") TFT Color LCD Monitor • Crisp, Clear Display for replacement when the screen is dark, flickering or not lighting up. Never attempt to replace it on again to the nature of 99.99% or more. Power Cord 4. Turn off the Power Switch and then turn it by changing the image or turning off the Power Switch for hours. Contact your dealer for Windows • Recommened Resolutions: 1280 X 1024 @60Hz...
User Guide
Page 5
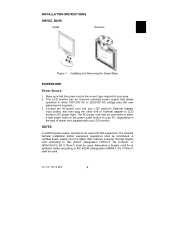
... 220/240V AC voltage area (No user adjustment is the correct type required in your LCD monitor's External Adapter input socket, and then plug the other end of External adapter to LCD monitor's DC-power-input. The AC-power cord may be connected to IEC 60245 (designation H05RR-F 3G 0.75mm2) shall be of power cord supplied with this equipment. The relevant national installation and/or equipment regulations shall be...
... 220/240V AC voltage area (No user adjustment is the correct type required in your LCD monitor's External Adapter input socket, and then plug the other end of External adapter to LCD monitor's DC-power-input. The AC-power cord may be connected to IEC 60245 (designation H05RR-F 3G 0.75mm2) shall be of power cord supplied with this equipment. The relevant national installation and/or equipment regulations shall be...
User Guide
Page 6
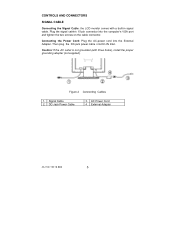
Signal Cable 2. External Adapter 41L1700-786-1B 英文 5 CONTROLS AND CONNECTORS SIGNAL CABLE Connecting the Signal Cable: the LCD monitor comes with three holes), install the proper grounding adapter (not supplied). Plug the signal cable′s 15-pin connector into DC-IN Inlet. Figure 2 Connecting Cables 1. Then plug the DC-jack power cable into the computer's VGA port and tighten the two screws on the cable connector. DC-Jack Power Cable 3. Connecting the Power Cord: Plug the AC-power cord into the External Adapter. Caution: If the AC...
Signal Cable 2. External Adapter 41L1700-786-1B 英文 5 CONTROLS AND CONNECTORS SIGNAL CABLE Connecting the Signal Cable: the LCD monitor comes with three holes), install the proper grounding adapter (not supplied). Plug the signal cable′s 15-pin connector into DC-IN Inlet. Figure 2 Connecting Cables 1. Then plug the DC-jack power cable into the computer's VGA port and tighten the two screws on the cable connector. DC-Jack Power Cable 3. Connecting the Power Cord: Plug the AC-power cord into the External Adapter. Caution: If the AC...
User Guide
Page 7
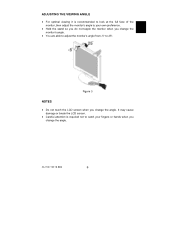
Figure 3 NOTES • Do not touch the LCD screen when you change the angle. 41L1700-786-1B 英文 6 It may cause damage or break the LCD screen. • Careful attention is recommended to look at the full face of the monitor, then adjust the monitor's angle to 25°. ADJUSTING THE VIEWING ANGLE • For optimal viewing it is required not to catch...
Figure 3 NOTES • Do not touch the LCD screen when you change the angle. 41L1700-786-1B 英文 6 It may cause damage or break the LCD screen. • Careful attention is recommended to look at the full face of the monitor, then adjust the monitor's angle to 25°. ADJUSTING THE VIEWING ANGLE • For optimal viewing it is required not to catch...
User Guide
Page 8
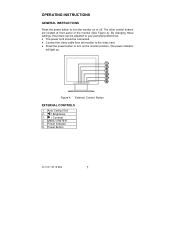
... 4 External Control Button EXTERNAL CONTROLS 1. Auto Config / Exit 2. / Brightness 3. / Contrast 4. OPERATING INSTRUCTIONS GENERAL INSTRUCTIONS Press the power button to turn the monitor on the monitor position. The power indicator will light up. By changing these settings, the picture can be adjusted to your personal preferences. • The power cord should be connected. • Connect the video cable from the monitor to the video card. • Press the power button to turn on or off. Power Indicator 6. Power Button 41L1700-786-1B 英文 7 MENU / ENTER...
... 4 External Control Button EXTERNAL CONTROLS 1. Auto Config / Exit 2. / Brightness 3. / Contrast 4. OPERATING INSTRUCTIONS GENERAL INSTRUCTIONS Press the power button to turn the monitor on the monitor position. The power indicator will light up. By changing these settings, the picture can be adjusted to your personal preferences. • The power cord should be connected. • Connect the video cable from the monitor to the video card. • Press the power button to turn on or off. Power Indicator 6. Power Button 41L1700-786-1B 英文 7 MENU / ENTER...
User Guide
Page 9
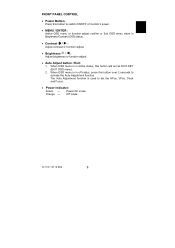
... mode. 41L1700-786-1B 英文 8 FRONT PANEL CONTROL • Power Button: Press this button over 2 seconds to activate the Auto Adjustment function. When OSD menu is in off status, press this button to set the HPos, VPos, Clock and Focus. • Power Indicator: Green - The Auto Adjustment function is in Brightness/Contrast OSD status. • Contrast / : Adjust contrast or function adjust. • Brightness / : Adjust brightness or function adjust. • Auto Adjust button / Exit: 1. When OSD menu is used to switch ON/OFF of monitor's power...
... mode. 41L1700-786-1B 英文 8 FRONT PANEL CONTROL • Power Button: Press this button over 2 seconds to activate the Auto Adjustment function. When OSD menu is in off status, press this button to set the HPos, VPos, Clock and Focus. • Power Indicator: Green - The Auto Adjustment function is in Brightness/Contrast OSD status. • Contrast / : Adjust contrast or function adjust. • Brightness / : Adjust brightness or function adjust. • Auto Adjust button / Exit: 1. When OSD menu is used to switch ON/OFF of monitor's power...
User Guide
Page 10
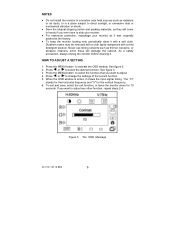
... "H" stands for the horizontal frequency and "V" for 10 seconds. If you want to adjust any other function, repeat steps 2-4. Never use strong solvents such as it was originally packed at the factory. • To keep the monitor looking new, periodically clean it with a mild detergent solution. As a safety precaution, always unplug the monitor before cleaning it shows the input signal timing. Press the MENU-button...
... "H" stands for the horizontal frequency and "V" for 10 seconds. If you want to adjust any other function, repeat steps 2-4. Never use strong solvents such as it was originally packed at the factory. • To keep the monitor looking new, periodically clean it with a mild detergent solution. As a safety precaution, always unplug the monitor before cleaning it shows the input signal timing. Press the MENU-button...
User Guide
Page 11
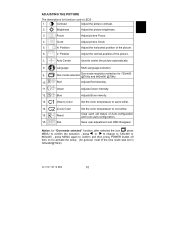
.... 4. H. Position Adjust the horizontal position of the picture. 7. Exit Adjusts Blue intensity. ADJUSTING THE PICTURE The descriptions for 720x400 @70Hz and 640x400 @70Hz 10. Language Multi-Language selection. 9. Green Adjusts Green intensity. 12. Set the color temperature to warm white. V. Dos-mode selected Dos-mode resolution selection for function control LEDS 1. Reset 16. Clear each old status of the Dos mode was set in 720x400@70Hz). 41L1700-786-1B 英文 10 Red Adjusts Red intensity. 11. Save user adjustment and OSD...
.... 4. H. Position Adjust the horizontal position of the picture. 7. Exit Adjusts Blue intensity. ADJUSTING THE PICTURE The descriptions for 720x400 @70Hz and 640x400 @70Hz 10. Language Multi-Language selection. 9. Green Adjusts Green intensity. 12. Set the color temperature to warm white. V. Dos-mode selected Dos-mode resolution selection for function control LEDS 1. Reset 16. Clear each old status of the Dos mode was set in 720x400@70Hz). 41L1700-786-1B 英文 10 Red Adjusts Red intensity. 11. Save user adjustment and OSD...
User Guide
Page 12
... power supply consumption. The display is restored by reducing power consumption when there is no video input signal this monitor, following a time-out period, will automatically switch to a "Screen Saver" feature except the display is completely off. PLUG AND PLAY Plug & Play DDC1/2B Feature This monitor is equipped with a grounding type attachment plug, rated 10A, 250V, CEE-22 male configuration. This monitor meets the Green monitor standards as set...
... power supply consumption. The display is restored by reducing power consumption when there is no video input signal this monitor, following a time-out period, will automatically switch to a "Screen Saver" feature except the display is completely off. PLUG AND PLAY Plug & Play DDC1/2B Feature This monitor is equipped with a grounding type attachment plug, rated 10A, 250V, CEE-22 male configuration. This monitor meets the Green monitor standards as set...
User Guide
Page 13
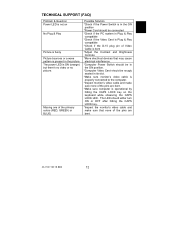
... LOCK LED. Missing one of the primary colors (RED, GREEN, or BLUE) Possible Solution *Check if the Power Switch is in the ON position *Power Cord should be connected *Check if the PC system is Plug & Play compatible *Check if the Video Card is Plug & Play compatible *Check if the D-15 plug pin of Video Cable is bent *Adjust the Contrast and Brightness Controls. *Move electrical devices that may cause electrical interference. *Computer Power Switch should be in the ON position. *Computer Video Card...
... LOCK LED. Missing one of the primary colors (RED, GREEN, or BLUE) Possible Solution *Check if the Power Switch is in the ON position *Power Cord should be connected *Check if the PC system is Plug & Play compatible *Check if the Video Card is Plug & Play compatible *Check if the D-15 plug pin of Video Cable is bent *Adjust the Contrast and Brightness Controls. *Move electrical devices that may cause electrical interference. *Computer Power Switch should be in the ON position. *Computer Video Card...
User Guide
Page 14
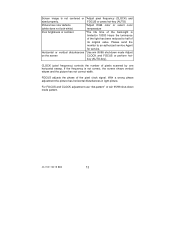
... one horizontal sweep. Horizontal or vertical disturbances *Use win 95/98 shut-down mode pattern. 41L1700-786-1B 英文 13 Screen image is not correct, the screen shows vertical stripes and the picture has not correct width. FOCUS or press hot-key (AUTO) Picture has color defects *Adjust RGB color or select color (white does not look white) temperature Poor brightness or contrast *The life time of the back-light is...
... one horizontal sweep. Horizontal or vertical disturbances *Use win 95/98 shut-down mode pattern. 41L1700-786-1B 英文 13 Screen image is not correct, the screen shows vertical stripes and the picture has not correct width. FOCUS or press hot-key (AUTO) Picture has color defects *Adjust RGB color or select color (white does not look white) temperature Poor brightness or contrast *The life time of the back-light is...
User Guide
Page 15
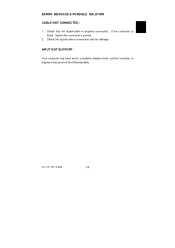
INPUT NOT SUPPORT : Your computer has been set to unsuitable display mode ,set the computer to display mode given in the following table. 41L1700-786-1B 英文 14 ERROR MESSAGE & POSSIBLE SOLUTION CABLE NOT CONNECTED : 1. Check that the signal-cable is properly connected , If the connector is loose, tighten the connector's screws. 2. Check the signal-cable's connection pins for damage.
INPUT NOT SUPPORT : Your computer has been set to unsuitable display mode ,set the computer to display mode given in the following table. 41L1700-786-1B 英文 14 ERROR MESSAGE & POSSIBLE SOLUTION CABLE NOT CONNECTED : 1. Check that the signal-cable is properly connected , If the connector is loose, tighten the connector's screws. 2. Check the signal-cable's connection pins for damage.
User Guide
Page 16
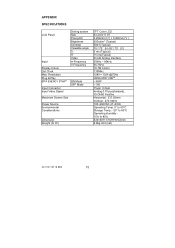
... 65°C Operating Humidity : 10% to 85% 434×407×173(H×W×D)mm 5.8kg Unit (net) 41L1700-786-1B 英文 15 APPENDIX SPECIFICATIONS LCD Panel Input Display Colors Dot Clock Max. Resolution Plug & Play EPA ENERGY STAR® Input Connector Input Video Signal Driving system Size Pixel pitch Brightness Contrast Viewable angle Tr Tf Video H-Frequency V-Frequency ON Mode OFF Mode Maximum Screen Size Power Source Environmental Considerations Dimension Weight (N.
... 65°C Operating Humidity : 10% to 85% 434×407×173(H×W×D)mm 5.8kg Unit (net) 41L1700-786-1B 英文 15 APPENDIX SPECIFICATIONS LCD Panel Input Display Colors Dot Clock Max. Resolution Plug & Play EPA ENERGY STAR® Input Connector Input Video Signal Driving system Size Pixel pitch Brightness Contrast Viewable angle Tr Tf Video H-Frequency V-Frequency ON Mode OFF Mode Maximum Screen Size Power Source Environmental Considerations Dimension Weight (N.
User Guide
Page 17
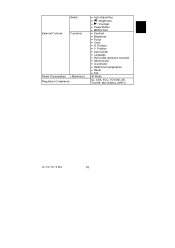
Position • Auto Center • Language • Dos-mode resolution selected • (Warm)Color • (Cool)Color • RGB Color temperature • Reset • Exit 45 Watts UL, CSA, FCC, TÜV/GS, CE, TCO'99, ISO13406-2, MPR II 41L1700-786-1B 英文 16 Position • V. Switch External Controls: Functions Power Consumption ( Maximum ) Regulatory Compliance • Auto Adjust Key • / Brightness • / Contrast • Power Button • MENU/ Exit • Contrast • Brightness • Focus • Clock • H.
Position • Auto Center • Language • Dos-mode resolution selected • (Warm)Color • (Cool)Color • RGB Color temperature • Reset • Exit 45 Watts UL, CSA, FCC, TÜV/GS, CE, TCO'99, ISO13406-2, MPR II 41L1700-786-1B 英文 16 Position • V. Switch External Controls: Functions Power Consumption ( Maximum ) Regulatory Compliance • Auto Adjust Key • / Brightness • / Contrast • Power Button • MENU/ Exit • Contrast • Brightness • Focus • Clock • H.
User Guide
Page 18
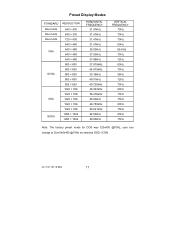
ICON. 41L1700-786-1B 英文 17 Preset Display Modes STANDARD Dos-mode Dos-mode Dos-mode VGA SVGA XGA SXGA RESOLUTION 640 × 400 640 × 350 720 × 400 640 &#... × 768 1024 × 768 1024 × 768 1280 × 1024 1280 × 1024 HORIZONTAL FREQUENCY 31.47kHz 31.47kHz 31.47kHz 31.47kHz 35.00kHz 37.50kHz 37.86kHz 37.879kHz 46.875kHz 35.16kHz...VERTICAL FREQUENCY 70Hz 70Hz 70Hz 60Hz 66.6Hz 75Hz 72Hz 60Hz 75Hz 56Hz 72Hz 75Hz 60Hz 70Hz 75Hz 60Hz 75Hz 60Hz 75Hz Note: The factory preset mode for DOS was 720x400 @70Hz, user can change to Dos 640x400 @70Hz by selected OSD...
ICON. 41L1700-786-1B 英文 17 Preset Display Modes STANDARD Dos-mode Dos-mode Dos-mode VGA SVGA XGA SXGA RESOLUTION 640 × 400 640 × 350 720 × 400 640 &#... × 768 1024 × 768 1024 × 768 1280 × 1024 1280 × 1024 HORIZONTAL FREQUENCY 31.47kHz 31.47kHz 31.47kHz 31.47kHz 35.00kHz 37.50kHz 37.86kHz 37.879kHz 46.875kHz 35.16kHz...VERTICAL FREQUENCY 70Hz 70Hz 70Hz 60Hz 66.6Hz 75Hz 72Hz 60Hz 75Hz 56Hz 72Hz 75Hz 60Hz 70Hz 75Hz 60Hz 75Hz 60Hz 75Hz Note: The factory preset mode for DOS was 720x400 @70Hz, user can change to Dos 640x400 @70Hz by selected OSD...
User Guide
Page 19
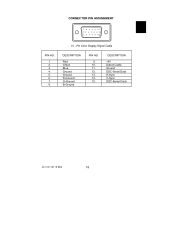
DESCRIPTION +5V Detect Cable Ground DDC-Serial Data H-Sync V-Sync DDC-Serial Clock 41L1700-786-1B 英文 18 CONNECTOR PIN ASSIGNMENT 1 5 6 10 11 15 PIN NO. 1. 2. 3. 4. 5. 6. 7. 8. 15 - Pin Color Display Signal Cable DESCRIPTION Red Green Blue Ground Ground R-Ground G-Ground B-Ground PIN NO. 9. 10. 11. 12. 13. 14. 15.
DESCRIPTION +5V Detect Cable Ground DDC-Serial Data H-Sync V-Sync DDC-Serial Clock 41L1700-786-1B 英文 18 CONNECTOR PIN ASSIGNMENT 1 5 6 10 11 15 PIN NO. 1. 2. 3. 4. 5. 6. 7. 8. 15 - Pin Color Display Signal Cable DESCRIPTION Red Green Blue Ground Ground R-Ground G-Ground B-Ground PIN NO. 9. 10. 11. 12. 13. 14. 15.

