
AL2223WD LCD Monitor User's Guide EN
Page 1
Table of Contents Precautions ...2 Special notes on LCD monitors 2 Package contents 3 Installation instructions 3 Assembling the monitor 3 Adjusting the viewing angle 4 Connecting the devices 6 Switching the power 7 Adjusting display settings 7 External controls 7 OSD options...8 OSD menu ...8 Troubleshooting 11 General specifications 12 1
Table of Contents Precautions ...2 Special notes on LCD monitors 2 Package contents 3 Installation instructions 3 Assembling the monitor 3 Adjusting the viewing angle 4 Connecting the devices 6 Switching the power 7 Adjusting display settings 7 External controls 7 OSD options...8 OSD menu ...8 Troubleshooting 11 General specifications 12 1

AL2223WD LCD Monitor User's Guide EN
Page 2
... on the desktop pattern you encounter a problem, please check the "Troubleshooting" section first. If this IT product through electrocution or other hazards. it from the display screen, including sprays. y If you use . Turning the LCD monitor off the power switch and then turn it can lead to a new image. If such objects touch the screen, the LCD panel may be used to treat and recycle industrial technology products...
... on the desktop pattern you encounter a problem, please check the "Troubleshooting" section first. If this IT product through electrocution or other hazards. it from the display screen, including sprays. y If you use . Turning the LCD monitor off the power switch and then turn it can lead to a new image. If such objects touch the screen, the LCD panel may be used to treat and recycle industrial technology products...
AL2223WD LCD Monitor User's Guide EN
Page 3
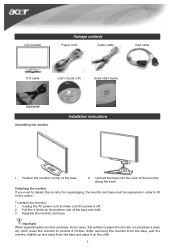
... a clean, flat surface to protect it on top of the monitor along the track. To detach the monitor: 1. Pull the 4 hooks on and place a clean dry cloth under the monitor to place the monitor on the bottom side of the base and hold. 3. Separate the monitor and base. Position the monitor on the cloth. 3 LCD monitor Package contents Power cord Audio cable VGA cable DVI cable User's Guide (CD) Quick Start Guide (Optional) Assembling the monitor Installation instructions 1. Detaching the monitor If you need...
... a clean, flat surface to protect it on top of the monitor along the track. To detach the monitor: 1. Pull the 4 hooks on and place a clean dry cloth under the monitor to place the monitor on the bottom side of the base and hold. 3. Separate the monitor and base. Position the monitor on the cloth. 3 LCD monitor Package contents Power cord Audio cable VGA cable DVI cable User's Guide (CD) Quick Start Guide (Optional) Assembling the monitor Installation instructions 1. Detaching the monitor If you need...
AL2223WD LCD Monitor User's Guide EN
Page 4
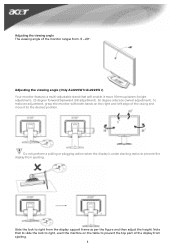
... the display from -5 - 20°. Adjusting the viewing angle (Only AL2223W h/AL2223W r) Your monitor features a multi-adjustable stand that to slide the lock to right, erect the machine on the right and left edge of the casing and move 90mm up/down (height adjustment), 25 degree forward/backward (tilt adjustment), 60 degree side/side (swivel adjustment). Adjusting the viewing angle The viewing angle of the monitor ranges...
... the display from -5 - 20°. Adjusting the viewing angle (Only AL2223W h/AL2223W r) Your monitor features a multi-adjustable stand that to slide the lock to right, erect the machine on the right and left edge of the casing and move 90mm up/down (height adjustment), 25 degree forward/backward (tilt adjustment), 60 degree side/side (swivel adjustment). Adjusting the viewing angle The viewing angle of the monitor ranges...
AL2223WD LCD Monitor User's Guide EN
Page 5
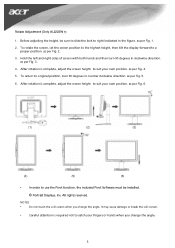
... included Pivot Software must be sure to slide the lock to a proper position. as per Fig. 4. 5. as per Fig. 5. 6. After rotation is complete, adjust the screen height to suit your own position. After rotation is required not to catch your own position. NOTES • Do not touch the LCD screen when you change the angle. Before adjusting the height, be installed. © Portrait Displays, Inc. as...
... included Pivot Software must be sure to slide the lock to a proper position. as per Fig. 4. 5. as per Fig. 5. 6. After rotation is complete, adjust the screen height to suit your own position. After rotation is required not to catch your own position. NOTES • Do not touch the LCD screen when you change the angle. Before adjusting the height, be installed. © Portrait Displays, Inc. as...
AL2223WD LCD Monitor User's Guide EN
Page 6
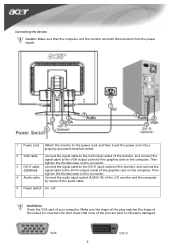
... pins are both disconnected from the power supply. 1 Power cord Attach the monitor to the power cord, and then insert the power cord into . Then tighten the thumbscrews on the connector. 3 DVI-D cable Connect the signal cable to the DVI-D input socket of the monitor, and connect the (Optional) signal cable to the VGA output socket of the graphics card on the computer. Make sure the shape of the plug matches the shape of the...
... pins are both disconnected from the power supply. 1 Power cord Attach the monitor to the power cord, and then insert the power cord into . Then tighten the thumbscrews on the connector. 3 DVI-D cable Connect the signal cable to the DVI-D input socket of the monitor, and connect the (Optional) signal cable to the VGA output socket of the graphics card on the computer. Make sure the shape of the plug matches the shape of the...
AL2223WD LCD Monitor User's Guide EN
Page 7
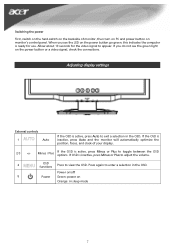
... volume. 4 OSD functions Press to exit a selection in the OSD. Power on/off 5 Power Green: power on the power button or a video signal, check the connections. Allow about 10 seconds for use. Press again to toggle between the OSD options. If you see the green light on Orange: in the OSD. When you do not see the LED on monitor's control panel. If the OSD is inactive, press Auto and the monitor will automatically optimize the position...
... volume. 4 OSD functions Press to exit a selection in the OSD. Power on/off 5 Power Green: power on the power button or a video signal, check the connections. Allow about 10 seconds for use. Press again to toggle between the OSD options. If you see the green light on Orange: in the OSD. When you do not see the LED on monitor's control panel. If the OSD is inactive, press Auto and the monitor will automatically optimize the position...
AL2223WD LCD Monitor User's Guide EN
Page 8
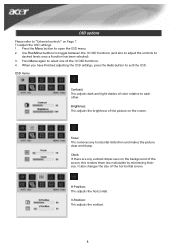
.... H-Position: This adjusts the horizontal. V-Position: This adjusts the vertical. 8 OSD options Please refer to "External controls" on the screen. Press Menu again to exit the OSD. It also changes the size of the 10 OSD functions. 4. Press the Menu button to desired levels once a function has been selected). 3. Use Plus/Minus buttons to toggle between the 10 OSD functions (and also to adjust the controls to open the OSD menu. 2. OSD menu Contrast: This adjusts dark and light...
.... H-Position: This adjusts the horizontal. V-Position: This adjusts the vertical. 8 OSD options Please refer to "External controls" on the screen. Press Menu again to exit the OSD. It also changes the size of the 10 OSD functions. 4. Press the Menu button to desired levels once a function has been selected). 3. Use Plus/Minus buttons to toggle between the 10 OSD functions (and also to adjust the controls to open the OSD menu. 2. OSD menu Contrast: This adjusts dark and light...
AL2223WD LCD Monitor User's Guide EN
Page 11
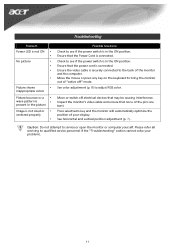
... servicing to see if the power switch is in the ON position. Troubleshooting Problem Power LED is not ON y y No picture y y y y Picture shows y inappropriate colors Picture bounces or a y wave pattern is y present in the picture Image is not sized or y centered properly y Possible Solutions Check to qualified service personnel if the "Troubleshooting" section cannot solve your display. Caution: Do not attempt to service or open the monitor or computer yourself. See horizontal and vertical position adjustment...
... servicing to see if the power switch is in the ON position. Troubleshooting Problem Power LED is not ON y y No picture y y y y Picture shows y inappropriate colors Picture bounces or a y wave pattern is y present in the picture Image is not sized or y centered properly y Possible Solutions Check to qualified service personnel if the "Troubleshooting" section cannot solve your display. Caution: Do not attempt to service or open the monitor or computer yourself. See horizontal and vertical position adjustment...
AL2223WD LCD Monitor User's Guide EN
Page 12
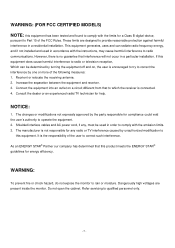
... 0.80W 0.70W 513.8x417.7x203.8mm (with stand) 5.2kg / 7.4 kg 513.8x390.6x258.4 mm (with stand) (Only AL2223W h/AL2223W r) 7.0 kg / 9.3 kg (Only AL2223W h/AL2223W r) Lamp disposal Lamp(s) inside this product contain mercury and must be recycled or disposed of vertical External controls Power Button Control Buttons OSD Function Contrast/Brightness Focus/Clock Position Color Language OSD setting Auto config / Input signal Information Reset Exit Video Interface Video Sync Audio Plug & Play Power Power source Power consumption [Energy Star] On.
... 0.80W 0.70W 513.8x417.7x203.8mm (with stand) 5.2kg / 7.4 kg 513.8x390.6x258.4 mm (with stand) (Only AL2223W h/AL2223W r) 7.0 kg / 9.3 kg (Only AL2223W h/AL2223W r) Lamp disposal Lamp(s) inside this product contain mercury and must be recycled or disposed of vertical External controls Power Button Control Buttons OSD Function Contrast/Brightness Focus/Clock Position Color Language OSD setting Auto config / Input signal Information Reset Exit Video Interface Video Sync Audio Plug & Play Power Power source Power consumption [Energy Star] On.
AL2223WD Service Guide
Page 5
... for a Class B digital device, pursuant to Part 15 of the user to correct such interference. It is connected. 4. If this equipment does cause harmful interference to radio or television reception, Which can radiate radio frequency energy, and if not installed and used in a particular installation. WARNING: To prevent fire or chock hazard, do not expose the monitor to qualified...
... for a Class B digital device, pursuant to Part 15 of the user to correct such interference. It is connected. 4. If this equipment does cause harmful interference to radio or television reception, Which can radiate radio frequency energy, and if not installed and used in a particular installation. WARNING: To prevent fire or chock hazard, do not expose the monitor to qualified...

AL2223WD Service Guide
Page 6
... safely. Never spill liquids on the monitor cabinet. To ensure reliable operation of power source indicated on a wall or shelf, use only with a third (grounding) pin. This plug will not be easily accessible. l Never push any object into a grounded power outlet as a safety feature. opening or removing covers can expose you to power surges. l For use a mounting kit approved by the manufacture or...
... safely. Never spill liquids on the monitor cabinet. To ensure reliable operation of power source indicated on a wall or shelf, use only with a third (grounding) pin. This plug will not be easily accessible. l Never push any object into a grounded power outlet as a safety feature. opening or removing covers can expose you to power surges. l For use a mounting kit approved by the manufacture or...
AL2223WD Service Guide
Page 7
... find slightly uneven brightness in the screen depending on again to make sure the flicker disappears. l You may remain after switching the image, when the same image is recovered slowly by changing the image or turning off the Power Switch and then turn it on the desktop pattern you use . It may flicker during initial use . l Due to the nature of the fluorescent light, the screen may include...
... find slightly uneven brightness in the screen depending on again to make sure the flicker disappears. l You may remain after switching the image, when the same image is recovered slowly by changing the image or turning off the Power Switch and then turn it on the desktop pattern you use . It may flicker during initial use . l Due to the nature of the fluorescent light, the screen may include...
AL2223WD Service Guide
Page 9
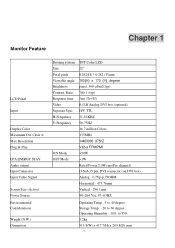
Monitor Feature Chapter 1 LCD Panel Input Display Color Maximum Dot Clock ® Max Resolution Plug & Play EPA ENERGY STAY Audio output Input Connector Input Video Signal Screen Size (Active) Power Source Environmental Considerations Weight (N.W.) Dimension Driving system Size Pixel pitch Viewable angle Brightness Contrast Ratio Response time Video Separate Sync H-Frequency V-Frequency ON Mode OFF Mode TFT Color LCD 22" 0.282(H) * 0.282 (V)mm 160(H) x 170 (V) degree panel: 300 cd/m2(typ) 700:1 (typ) 5ms (Tr+Tf) R,G,B Analog, DVI box (optional) H/V TTL 31-81KHZ 56-75HZ...
Monitor Feature Chapter 1 LCD Panel Input Display Color Maximum Dot Clock ® Max Resolution Plug & Play EPA ENERGY STAY Audio output Input Connector Input Video Signal Screen Size (Active) Power Source Environmental Considerations Weight (N.W.) Dimension Driving system Size Pixel pitch Viewable angle Brightness Contrast Ratio Response time Video Separate Sync H-Frequency V-Frequency ON Mode OFF Mode TFT Color LCD 22" 0.282(H) * 0.282 (V)mm 160(H) x 170 (V) degree panel: 300 cd/m2(typ) 700:1 (typ) 5ms (Tr+Tf) R,G,B Analog, DVI box (optional) H/V TTL 31-81KHZ 56-75HZ...

AL2223WD Service Guide
Page 25
... in OSD. OPERATING INSTRUCTIONS Chapter 2 Front Panel Definition This Section defines the front panel User Interface for Led Indictor and Key function. If OSD is inactive, press once, then press the buttons marked or to select or adjust OSD options. Function Press again to view OSD. If OSD is 5 AUTO inactive, press and the monitor will automatically optimize the position, focus and clock of your display. - 25 - If OSD...
... in OSD. OPERATING INSTRUCTIONS Chapter 2 Front Panel Definition This Section defines the front panel User Interface for Led Indictor and Key function. If OSD is inactive, press once, then press the buttons marked or to select or adjust OSD options. Function Press again to view OSD. If OSD is 5 AUTO inactive, press and the monitor will automatically optimize the position, focus and clock of your display. - 25 - If OSD...
AL2223WD Service Guide
Page 27
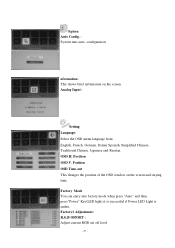
Position OSD V. Position OSD Time -out This changes the position of the OSD window on the screen. OSD H. Option Auto Config. : System runs auto -configuration. Factory1 Adjustment: R,G,B OFFSET : Adjust current RGB cut off level - 27 - Analog Input: Setting Language: Select the OSD menu language from English, French, German, Italian, Spanish, Simplified Chinese, Traditional Chinese, Japanese and Russian. Factory Mode You can entry into factory mode when press "Auto" and then press"Power" Key(LED light),it is successful if Power LED Light is amber. nformation...
Position OSD V. Position OSD Time -out This changes the position of the OSD window on the screen. OSD H. Option Auto Config. : System runs auto -configuration. Factory1 Adjustment: R,G,B OFFSET : Adjust current RGB cut off level - 27 - Analog Input: Setting Language: Select the OSD menu language from English, French, German, Italian, Spanish, Simplified Chinese, Traditional Chinese, Japanese and Russian. Factory Mode You can entry into factory mode when press "Auto" and then press"Power" Key(LED light),it is successful if Power LED Light is amber. nformation...
AL2223WD Service Guide
Page 28
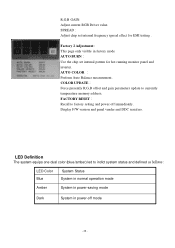
... color (blue/amber) led to indict system status and defined LED Color Blue System Status System in normal operation mode Amber System in power-saving mode Dark System in factory mode AUTO BURN Use the chip set internal frequency spread effect for hot running monitor panel and inverter. COLOR UPDATE Force presently R,G,B offset and gain parameters update to factory setting and power off mode - 28 - R,G,B GAIN: Adjust current RGB Driver value. SPREAD : Adjust chip set internal pattern for EMI testing . FACTORY RESET...
... color (blue/amber) led to indict system status and defined LED Color Blue System Status System in normal operation mode Amber System in power-saving mode Dark System in factory mode AUTO BURN Use the chip set internal frequency spread effect for hot running monitor panel and inverter. COLOR UPDATE Force presently R,G,B offset and gain parameters update to factory setting and power off mode - 28 - R,G,B GAIN: Adjust current RGB Driver value. SPREAD : Adjust chip set internal pattern for EMI testing . FACTORY RESET...
AL2223WD Service Guide
Page 29
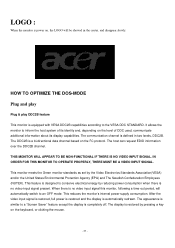
.... After the video input signal is restored, full power is restored and the display is completely off. The appearance is defined in the center, and disappear slowly. The communication channel is similar to the VESA DDC STANDARD. HOW TO OPTIMIZE THE DOS-MODE Plug and play Plug & play DDC2B feature This monitor is equipped with VESA DDC2B capabilities according to a "Screen Saver" feature...
.... After the video input signal is restored, full power is restored and the display is completely off. The appearance is defined in the center, and disappear slowly. The communication channel is similar to the VESA DDC STANDARD. HOW TO OPTIMIZE THE DOS-MODE Plug and play Plug & play DDC2B feature This monitor is equipped with VESA DDC2B capabilities according to a "Screen Saver" feature...

AL2223WD Service Guide
Page 30
... the wallet plug with units intended for the power cord shall be 125 volt AC. USING THE RIGHT POWER CORD The accessory power cord for the Northern American region is UL listed and CSA labeled. Please note that power supply card needs to power outlet of personal computer: Please use VDE 0602, 0625, 0821 approval power cord in European counties. - 30 - The voltage rating for connection to use a cord set consisting...
... the wallet plug with units intended for the power cord shall be 125 volt AC. USING THE RIGHT POWER CORD The accessory power cord for the Northern American region is UL listed and CSA labeled. Please note that power supply card needs to power outlet of personal computer: Please use VDE 0602, 0625, 0821 approval power cord in European counties. - 30 - The voltage rating for connection to use a cord set consisting...
AL2223WD Service Guide
Page 41
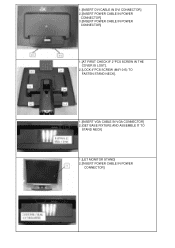
1.[INSERT DVI CABLE IN DVI CONNECTOR] 2.[INSERT POWER CABLE IN POWER CONNECTOR] 3.[INSERT POWER CABLE IN POWER CONNECTOR] 1.[AT FIRST CHECK IF 2*PCS SCREW IN THE COVER IS LOST]. 2.[LOCK 4*PCS SCREW (M4*10-B) TO FASTEN STAND NECK]. 1.[INSERT VGA CABLE IN VGA CONNECTOR] 2.[GET BASE FIXTURE AND ASSEMBLE IT TO STAND NECK] 1.[LET MONITOR STAND] 2.[INSERT POWER CABLE IN POWER CONNECTOR]
1.[INSERT DVI CABLE IN DVI CONNECTOR] 2.[INSERT POWER CABLE IN POWER CONNECTOR] 3.[INSERT POWER CABLE IN POWER CONNECTOR] 1.[AT FIRST CHECK IF 2*PCS SCREW IN THE COVER IS LOST]. 2.[LOCK 4*PCS SCREW (M4*10-B) TO FASTEN STAND NECK]. 1.[INSERT VGA CABLE IN VGA CONNECTOR] 2.[GET BASE FIXTURE AND ASSEMBLE IT TO STAND NECK] 1.[LET MONITOR STAND] 2.[INSERT POWER CABLE IN POWER CONNECTOR]


