
AL2223WD LCD Monitor User's Guide EN
Page 1
Table of Contents Precautions ...2 Special notes on LCD monitors 2 Package contents 3 Installation instructions 3 Assembling the monitor 3 Adjusting the viewing angle 4 Connecting the devices 6 Switching the power 7 Adjusting display settings 7 External controls 7 OSD options...8 OSD menu ...8 Troubleshooting 11 General specifications 12 1
Table of Contents Precautions ...2 Special notes on LCD monitors 2 Package contents 3 Installation instructions 3 Assembling the monitor 3 Adjusting the viewing angle 4 Connecting the devices 6 Switching the power 7 Adjusting display settings 7 External controls 7 OSD options...8 OSD menu ...8 Troubleshooting 11 General specifications 12 1

AL2223WD LCD Monitor User's Guide EN
Page 2
...by yourself. When this happens, the screen will clean stubborn stains. The monitor should be used to a new image. y When cleaning this IT product through electrocution or other hazards. Recycling information Acer cares very much about /sustainability.htm United States: http://www.ciwmb.ca.gov...reviewing the information provided below: Worldwide: http://global.acer.com/about protecting the environment, and firmly believes that can lead to the unit. y Do not cover the slots and openings on the monitor - Precautions y The monitor may be damaged if placed too near the screen....
...by yourself. When this happens, the screen will clean stubborn stains. The monitor should be used to a new image. y When cleaning this IT product through electrocution or other hazards. Recycling information Acer cares very much about /sustainability.htm United States: http://www.ciwmb.ca.gov...reviewing the information provided below: Worldwide: http://global.acer.com/about protecting the environment, and firmly believes that can lead to the unit. y Do not cover the slots and openings on the monitor - Precautions y The monitor may be damaged if placed too near the screen....
AL2223WD LCD Monitor User's Guide EN
Page 3
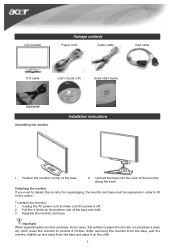
...carton. Pull the 4 hooks on top of the base. 2. Separate the monitor and base. Position the monitor on the bottom side of the monitor along the track. Important When separating the monitor and base, find a clean, flat surface to place the monitor on the cloth. 3 Unplug the AC power cord to make sure the... power is off. 2. To detach the monitor: 1. After removing the monitor from the base, pull the monitor slightly up and away from the base and place it on and place a clean dry cloth under the monitor to fit in order to protect it further. Connect the base ...
...carton. Pull the 4 hooks on top of the base. 2. Separate the monitor and base. Position the monitor on the bottom side of the monitor along the track. Important When separating the monitor and base, find a clean, flat surface to place the monitor on the cloth. 3 Unplug the AC power cord to make sure the... power is off. 2. To detach the monitor: 1. After removing the monitor from the base, pull the monitor slightly up and away from the base and place it on and place a clean dry cloth under the monitor to fit in order to protect it further. Connect the base ...
AL2223WD LCD Monitor User's Guide EN
Page 4
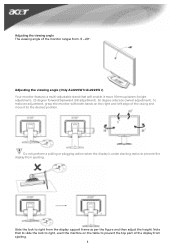
...the display from the display support frame as per the figure and then adjust the height. Adjusting the viewing angle (Only AL2223W h/AL2223W r) Your monitor features a multi-adjustable stand that to slide the lock to right, erect the machine on the right and left edge of the casing and ... 90mm up/down (height adjustment), 25 degree forward/backward (tilt adjustment), 60 degree side/side (swivel adjustment). To make an adjustment, grasp the monitor with both hands on the table to the desired position. Do not perform a pulling or plugging action when the display is under slanting status to...
...the display from the display support frame as per the figure and then adjust the height. Adjusting the viewing angle (Only AL2223W h/AL2223W r) Your monitor features a multi-adjustable stand that to slide the lock to right, erect the machine on the right and left edge of the casing and ... 90mm up/down (height adjustment), 25 degree forward/backward (tilt adjustment), 60 degree side/side (swivel adjustment). To make an adjustment, grasp the monitor with both hands on the table to the desired position. Do not perform a pulling or plugging action when the display is under slanting status to...
AL2223WD LCD Monitor User's Guide EN
Page 6
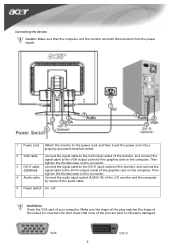
..., and then insert the power cord into a properly grounded electrical socket. 2 VGA cable Connect the signal cable to the VGA input socket of the monitor, and connect the signal cable to the DVI-D output socket of the socket it is inserted into. Make sure the shape of the plug matches...thumbscrews on the computer. VGA 6 DVI-D Then tighten the thumbscrews on the connector. 4 Audio cable Connect the audio input socket (AUDIO IN) of the LCD monitor and the computer by means of the graphics card on the connector. 3 DVI-D cable Connect the signal cable to the DVI-D input socket of the...
..., and then insert the power cord into a properly grounded electrical socket. 2 VGA cable Connect the signal cable to the VGA input socket of the monitor, and connect the signal cable to the DVI-D output socket of the socket it is inserted into. Make sure the shape of the plug matches...thumbscrews on the computer. VGA 6 DVI-D Then tighten the thumbscrews on the connector. 4 Audio cable Connect the audio input socket (AUDIO IN) of the LCD monitor and the computer by means of the graphics card on the connector. 3 DVI-D cable Connect the signal cable to the DVI-D input socket of the...
AL2223WD LCD Monitor User's Guide EN
Page 7
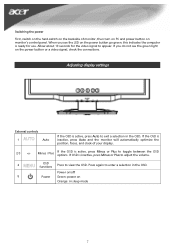
...to view the OSD. Allow about 10 seconds for use. If OSD is active, press Auto to appear. If you see the green light on monitor's control panel. Adjusting display settings External controls 1 Auto If the OSD is inactive, press Minus or Plus to adjust the volume. 4 OSD ... 5 Power Green: power on the power button go green, this indicates the computer is inactive, press Auto and the monitor will automatically optimize the position, focus, and clock of monitor, then turn on PC and power button on the power button or a video signal, check the connections. If the...
...to view the OSD. Allow about 10 seconds for use. If OSD is active, press Auto to appear. If you see the green light on monitor's control panel. Adjusting display settings External controls 1 Auto If the OSD is inactive, press Minus or Plus to adjust the volume. 4 OSD ... 5 Power Green: power on the power button go green, this indicates the computer is inactive, press Auto and the monitor will automatically optimize the position, focus, and clock of monitor, then turn on PC and power button on the power button or a video signal, check the connections. If the...
AL2223WD LCD Monitor User's Guide EN
Page 11
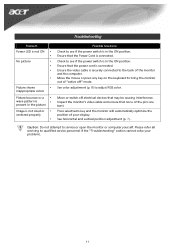
... the power switch is in the ON position. Ensure that may be causing interference. See horizontal and vertical position adjustment (p. 7). Inspect the monitor's video cable and ensure that the Power Cord is securely connected to see if the power switch is connected. Caution: Do not attempt to... adjust RGB color. See color adjustment (p. 8) to service or open the monitor or computer yourself. Ensure the video cable is connected. Move or switch off " mode. Check to the back of the pins are bent. ...
... the power switch is in the ON position. Ensure that may be causing interference. See horizontal and vertical position adjustment (p. 7). Inspect the monitor's video cable and ensure that the Power Cord is securely connected to see if the power switch is connected. Caution: Do not attempt to... adjust RGB color. See color adjustment (p. 8) to service or open the monitor or computer yourself. Ensure the video cable is connected. Move or switch off " mode. Check to the back of the pins are bent. ...
AL2223WD Service Guide
Page 5
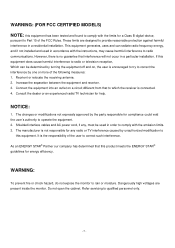
... communications. The manufacturer is the responsibility of the following measures: 1. WARNING: To prevent fire or chock hazard, do not expose the monitor to qualified personnel only. - 5 - If this equipment. Refer servicing to rain or moisture. It is not responsible for any ,... circuit different from that interference will not occur in a particular installation. Do not open the cabinet. These limits are present inside the monitor. WARNING: (FOR FCC CERTIFIED MODELS) NOTE: this product meets the ENERGY STAR® guidelines for energy efficiency. However, there is ...
... communications. The manufacturer is the responsibility of the following measures: 1. WARNING: To prevent fire or chock hazard, do not expose the monitor to qualified personnel only. - 5 - If this equipment. Refer servicing to rain or moisture. It is not responsible for any ,... circuit different from that interference will not occur in a particular installation. Do not open the cabinet. These limits are present inside the monitor. WARNING: (FOR FCC CERTIFIED MODELS) NOTE: this product meets the ENERGY STAR® guidelines for energy efficiency. However, there is ...

AL2223WD Service Guide
Page 6
...a fire or electric shock. l Never push any object into a grounded power outlet as a safety feature. If you mount the monitor on the monitor cabinet. l Do not overload power strips and extension cords. opening or removing covers can expose you are not blocked or covered. ...PRECAUTIONS l Do not use the monitor near a bathtub, washbowl, kitchen sink, laundry tub, Swimming pool or in a wet basement. l Slots and openings in a bookcase or...
...a fire or electric shock. l Never push any object into a grounded power outlet as a safety feature. If you mount the monitor on the monitor cabinet. l Do not overload power strips and extension cords. opening or removing covers can expose you are not blocked or covered. ...PRECAUTIONS l Do not use the monitor near a bathtub, washbowl, kitchen sink, laundry tub, Swimming pool or in a wet basement. l Slots and openings in a bookcase or...
AL2223WD Service Guide
Page 7
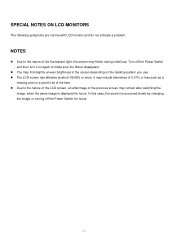
... pixels of the time. NOTES l Due to make sure the flicker disappears. It may flicker during initial use . SPECIAL NOTES ON LCD MONITORS The following symptoms are normal with LCD monitor and do not indicate a problem. l Due to the nature of the LCD screen, an afterimage of the fluorescent light, the screen...
... pixels of the time. NOTES l Due to make sure the flicker disappears. It may flicker during initial use . SPECIAL NOTES ON LCD MONITORS The following symptoms are normal with LCD monitor and do not indicate a problem. l Due to the nature of the LCD screen, an afterimage of the fluorescent light, the screen...
AL2223WD Service Guide
Page 8
Table of contents Chapter 1 MONITOR FEATURE 9 Chapter 2 OPERATING INSTRUTION 25 Chapter 3 Machine assembly 31 Chapter 4 TROBLE SHOOTING 42 Chapter 5 CONNECTOR INFORMATION 45 Chapter 6 FRU LIST 47 Chapter 7 SCHEMATIC DIAGRAM 51 Chapter 8 POWER BOARD INFORMATION 60 - 8 -
Table of contents Chapter 1 MONITOR FEATURE 9 Chapter 2 OPERATING INSTRUTION 25 Chapter 3 Machine assembly 31 Chapter 4 TROBLE SHOOTING 42 Chapter 5 CONNECTOR INFORMATION 45 Chapter 6 FRU LIST 47 Chapter 7 SCHEMATIC DIAGRAM 51 Chapter 8 POWER BOARD INFORMATION 60 - 8 -
AL2223WD Service Guide
Page 9
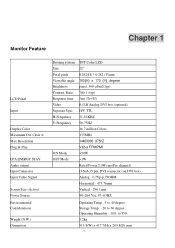
Monitor Feature Chapter 1 LCD Panel Input Display Color Maximum Dot Clock ® Max Resolution Plug & Play EPA ENERGY STAY Audio output Input Connector Input Video Signal ...
Monitor Feature Chapter 1 LCD Panel Input Display Color Maximum Dot Clock ® Max Resolution Plug & Play EPA ENERGY STAY Audio output Input Connector Input Video Signal ...

AL2223WD Service Guide
Page 25
Function Press again to exit a selection in sleep mode 2 OSD Press to select or adjust OSD options. If OSD is 5 AUTO inactive, press and the monitor will automatically optimize the position, focus and clock of your display. - 25 - If OSD is active, press to view OSD. If OSD is inactive, press ...
Function Press again to exit a selection in sleep mode 2 OSD Press to select or adjust OSD options. If OSD is 5 AUTO inactive, press and the monitor will automatically optimize the position, focus and clock of your display. - 25 - If OSD is active, press to view OSD. If OSD is inactive, press ...
AL2223WD Service Guide
Page 28
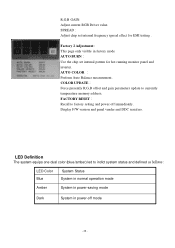
... mode Amber System in power-saving mode Dark System in factory mode AUTO BURN Use the chip set internal frequency spread effect for hot running monitor panel and inverter. Display F/W version and panel vender and DDC serial no. FACTORY RESET Recall to factory setting and power off mode - 28 - R,G,B GAIN: Adjust...
... mode Amber System in power-saving mode Dark System in factory mode AUTO BURN Use the chip set internal frequency spread effect for hot running monitor panel and inverter. Display F/W version and panel vender and DDC serial no. FACTORY RESET Recall to factory setting and power off mode - 28 - R,G,B GAIN: Adjust...

AL2223WD Service Guide
Page 29
...the Video Electronics Standards Association(VESA) and/or the United States Environmental Protection Agency (EPA) and The Swedish Confederation Employees (NUTEK). This monitor meets the Green monitor standards as set by pressing a key on the keyboard, or clicking the mouse. - 29 - When there is no video-input ...DDC2B channel. After the video input signal is restored, full power is restored and the display is automatically redrawn. LOGO : When the monitor is power on, the LOGO will automatically switch to inform the host system of its identity and, depending on the level of DDC ...
...the Video Electronics Standards Association(VESA) and/or the United States Environmental Protection Agency (EPA) and The Swedish Confederation Employees (NUTEK). This monitor meets the Green monitor standards as set by pressing a key on the keyboard, or clicking the mouse. - 29 - When there is no video-input ...DDC2B channel. After the video input signal is restored, full power is restored and the display is automatically redrawn. LOGO : When the monitor is power on, the LOGO will automatically switch to inform the host system of its identity and, depending on the level of DDC ...
AL2223WD Service Guide
Page 31
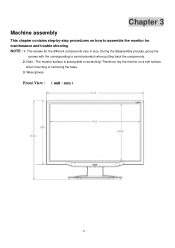
Chapter 3 Machine assembly This chapter contains step-by-step procedures on a soft surface when mounting or removing the base. 3. The screws for maintenance and trouble shooting NOTE : 1. Therefore, lay the monitor on how to assemble the monitor for the different components vary in size. During the disassembly process, group the screws with the corresponding to scratching! Front View : ( unit : mm ) -31 - Note : The monitor surface is susceptible to avoid mismatch when putting back the components. 2. Wear gloves.
Chapter 3 Machine assembly This chapter contains step-by-step procedures on a soft surface when mounting or removing the base. 3. The screws for maintenance and trouble shooting NOTE : 1. Therefore, lay the monitor on how to assemble the monitor for the different components vary in size. During the disassembly process, group the screws with the corresponding to scratching! Front View : ( unit : mm ) -31 - Note : The monitor surface is susceptible to avoid mismatch when putting back the components. 2. Wear gloves.
AL2223WD Service Guide
Page 41
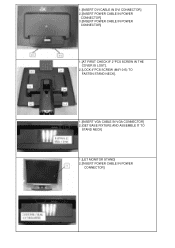
1.[INSERT DVI CABLE IN DVI CONNECTOR] 2.[INSERT POWER CABLE IN POWER CONNECTOR] 3.[INSERT POWER CABLE IN POWER CONNECTOR] 1.[AT FIRST CHECK IF 2*PCS SCREW IN THE COVER IS LOST]. 2.[LOCK 4*PCS SCREW (M4*10-B) TO FASTEN STAND NECK]. 1.[INSERT VGA CABLE IN VGA CONNECTOR] 2.[GET BASE FIXTURE AND ASSEMBLE IT TO STAND NECK] 1.[LET MONITOR STAND] 2.[INSERT POWER CABLE IN POWER CONNECTOR]
1.[INSERT DVI CABLE IN DVI CONNECTOR] 2.[INSERT POWER CABLE IN POWER CONNECTOR] 3.[INSERT POWER CABLE IN POWER CONNECTOR] 1.[AT FIRST CHECK IF 2*PCS SCREW IN THE COVER IS LOST]. 2.[LOCK 4*PCS SCREW (M4*10-B) TO FASTEN STAND NECK]. 1.[INSERT VGA CABLE IN VGA CONNECTOR] 2.[GET BASE FIXTURE AND ASSEMBLE IT TO STAND NECK] 1.[LET MONITOR STAND] 2.[INSERT POWER CABLE IN POWER CONNECTOR]


