User Manual
Page 3
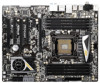
Contents 1 Introduction 5 1.1 Package Contents 5 1.2 Specifications 6 1.3 Motherboard Layout (X79 Extreme6/GB / X79 Extreme6 12 1.4 I/O Panel (X79 Extreme6/GB / X79 Extreme6 13 1.5 ASRock Game Blaster (X79 Extreme6/GB 15 2 Installation 18 2.1 Screw Holes 18 2.2 Pre-installation Precautions 18 2.3 CPU Installation 19.../ SATA3 HDD Hot Plug Feature and Operation Guide 64 2.21 Driver Installation Guide 66 2.22 Installing Windows® 7 / 7 64-bit / VistaTM / VistaTM 64-bit With RAID Functions 66 2.23 Installing Windows® 7 / 7 64-bit / VistaTM / VistaTM 64-bit / XP / XP 64-...
Contents 1 Introduction 5 1.1 Package Contents 5 1.2 Specifications 6 1.3 Motherboard Layout (X79 Extreme6/GB / X79 Extreme6 12 1.4 I/O Panel (X79 Extreme6/GB / X79 Extreme6 13 1.5 ASRock Game Blaster (X79 Extreme6/GB 15 2 Installation 18 2.1 Screw Holes 18 2.2 Pre-installation Precautions 18 2.3 CPU Installation 19.../ SATA3 HDD Hot Plug Feature and Operation Guide 64 2.21 Driver Installation Guide 66 2.22 Installing Windows® 7 / 7 64-bit / VistaTM / VistaTM 64-bit With RAID Functions 66 2.23 Installing Windows® 7 / 7 64-bit / VistaTM / VistaTM 64-bit / XP / XP 64-...
User Manual
Page 4
...; XP / XP 64-bit Without RAID Functions 67 2.23.2 Installing Windows® 7 / 7 64-bit / VistaTM / VistaTM 64-bit Without RAID Functions 68 2.24 Teaming Function Operation Guide (X79 Extreme6/GB 69 2.25 Untied Overclocking Technology 72 3 UEFI SETUP UTILITY 73 3.1 Introduction 73 3.1.1 UEFI Menu Bar 73 3.1.2 Navigation Keys 74 3.2 Main Screen 74 3.3 OC...
...; XP / XP 64-bit Without RAID Functions 67 2.23.2 Installing Windows® 7 / 7 64-bit / VistaTM / VistaTM 64-bit Without RAID Functions 68 2.24 Teaming Function Operation Guide (X79 Extreme6/GB 69 2.25 Untied Overclocking Technology 72 3 UEFI SETUP UTILITY 73 3.1 Introduction 73 3.1.1 UEFI Menu Bar 73 3.1.2 Navigation Keys 74 3.2 Main Screen 74 3.3 OC...
User Manual
Page 5
... in Windows® 7 / 7 64-bit / VistaTM / VistaTM 64bit, it is recommended to change without further notice. In case any modifications of the Support CD. www.asrock.com/support/index.asp 1.1 Package Contents ASRock X79 Extreme6/GB / X79 Extreme6 Motherboard (ATX Form Factor: 12.0-in x 9.6-in, 30.5 cm x 24.4 cm) ASRock X79 Extreme6/GB / X79 Extreme6 Quick Installation Guide ASRock X79 Extreme6/GB / X79 Extreme6 Support...
... in Windows® 7 / 7 64-bit / VistaTM / VistaTM 64bit, it is recommended to change without further notice. In case any modifications of the Support CD. www.asrock.com/support/index.asp 1.1 Package Contents ASRock X79 Extreme6/GB / X79 Extreme6 Motherboard (ATX Form Factor: 12.0-in x 9.6-in, 30.5 cm x 24.4 cm) ASRock X79 Extreme6/GB / X79 Extreme6 Quick Installation Guide ASRock X79 Extreme6/GB / X79 Extreme6 Support...
User Manual
Page 9
.... Before you want to use . 5. You can use ASRock XFast RAM to DDR3_ C2.) 4. Currently Intel® Socket 2011 Sandy Bridge-E Processor doesn't support PCIE 3.0, but this motherboard supports 2-channel, 4-channel, 6-channel, and 8-channel modes. Microsoft® Windows® 7 / 7 64-bit / VistaTM / VistaTM ...XP / XP 64-bit compliant (see CAUTION 19) * For detailed product information, please visit our website: http://www.asrock.com WARNING Please realize that Windows® cannot use more than 4GB for the reservation for the first priority. It should be less than four ...
.... Before you want to use . 5. You can use ASRock XFast RAM to DDR3_ C2.) 4. Currently Intel® Socket 2011 Sandy Bridge-E Processor doesn't support PCIE 3.0, but this motherboard supports 2-channel, 4-channel, 6-channel, and 8-channel modes. Microsoft® Windows® 7 / 7 64-bit / VistaTM / VistaTM ...XP / XP 64-bit compliant (see CAUTION 19) * For detailed product information, please visit our website: http://www.asrock.com WARNING Please realize that Windows® cannot use more than 4GB for the reservation for the first priority. It should be less than four ...
User Manual
Page 10
...64257;ciency when the CPU cores are idle without entering operating systems first like MS-DOS or Windows®. Your friends then can boost USB storage device performance. ASRock website: http://www.asrock.com 8. With this tool and save your Apple devices, such as a profile and ... allows you can save the new BIOS file to adjust. To use FAT32/16/12 file system. 9. ASRock website: http://www.asrock.com/Feature/SmartView/index.asp 11. ASRock Instant Flash is Windows® 7 / 7 64 bit / VistaTM / VistaTM 64 bit, and your USB flash drive, floppy...
...64257;ciency when the CPU cores are idle without entering operating systems first like MS-DOS or Windows®. Your friends then can boost USB storage device performance. ASRock website: http://www.asrock.com 8. With this tool and save your Apple devices, such as a profile and ... allows you can save the new BIOS file to adjust. To use FAT32/16/12 file system. 9. ASRock website: http://www.asrock.com/Feature/SmartView/index.asp 11. ASRock Instant Flash is Windows® 7 / 7 64 bit / VistaTM / VistaTM 64 bit, and your USB flash drive, floppy...

User Manual
Page 11
...utility. 15. Please note that is detected, the system will be higher than 50% under Windows® OS 32-bit CPU. Intel Rapid Storage Technology enterprise 3.0, ASRock XFast RAM and ASRock Game Blaster are transferring currently. 13. For EuP ready power supply selection, we recommend you resume... RAM is not recommended to extend their BIOS without fear of Your Data: With the status window, you can be under heavy-loading or overclocking. ASRock X-FAN will automatically shutdown. Only USB2.0 ports support this motherboard offers stepless control, it is that cannot be ...
...utility. 15. Please note that is detected, the system will be higher than 50% under Windows® OS 32-bit CPU. Intel Rapid Storage Technology enterprise 3.0, ASRock XFast RAM and ASRock Game Blaster are transferring currently. 13. For EuP ready power supply selection, we recommend you resume... RAM is not recommended to extend their BIOS without fear of Your Data: With the status window, you can be under heavy-loading or overclocking. ASRock X-FAN will automatically shutdown. Only USB2.0 ports support this motherboard offers stepless control, it is that cannot be ...
User Manual
Page 17
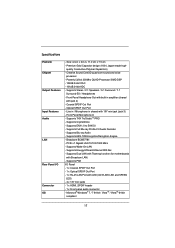
... Dual LAN with Teaming function (for motherboards with LED (ACT/LINK LED and SPEED LED) - 4 x 1/8" mini jacks - 1 x HDMI_SPDIF header - 1 x Front panel audio connector - Microsoft® Windows® 7 / 7 64-bit / VistaTM / VistaTM 64-bit compliant 17 Size: 4.3-in x 3.0-in shared with jack 4) - Powerful 32-bit 200Mhz QUAD-Processor SIMD DSP - 102dB 24...
... Dual LAN with Teaming function (for motherboards with LED (ACT/LINK LED and SPEED LED) - 4 x 1/8" mini jacks - 1 x HDMI_SPDIF header - 1 x Front panel audio connector - Microsoft® Windows® 7 / 7 64-bit / VistaTM / VistaTM 64-bit compliant 17 Size: 4.3-in x 3.0-in shared with jack 4) - Powerful 32-bit 200Mhz QUAD-Processor SIMD DSP - 102dB 24...

User Manual
Page 26
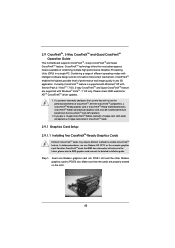
Step 4. Please make sure to take effect. 26 ASRock Game Blaster is not supported under Windows® XP / XP 64-bit. Restart your computer for ASRock Game Blaster to use Windows® VistaTM 32-bit / 64-bit or Windows® 7 32-bit / 64-bit. Step 3. Follow the step by step driver setup directions.
Step 4. Please make sure to take effect. 26 ASRock Game Blaster is not supported under Windows® XP / XP 64-bit. Restart your computer for ASRock Game Blaster to use Windows® VistaTM 32-bit / 64-bit or Windows® 7 32-bit / 64-bit. Step 3. Follow the step by step driver setup directions.

User Manual
Page 37
... up to PCIE3 slot. Step2. If required, connect the auxiliary power source to the PCI Express graphics cards. 37 Currently, NVIDIA® SLITM technology supports Windows® XP / XP 64-bit / VistaTM / VistaTM 64-bit / 7 / 7 64-bit OS. NVIDIA® 3-Way SLITM and Quad SLITM technology support... Windows® VistaTM / VistaTM 64-bit / 7 / 7 64-bit OS only. For 3-Way SLITM technology, you should have two identical Quad SLITM-ready graphics cards that are ...
... up to PCIE3 slot. Step2. If required, connect the auxiliary power source to the PCI Express graphics cards. 37 Currently, NVIDIA® SLITM technology supports Windows® XP / XP 64-bit / VistaTM / VistaTM 64-bit / 7 / 7 64-bit OS. NVIDIA® 3-Way SLITM and Quad SLITM technology support... Windows® VistaTM / VistaTM 64-bit / 7 / 7 64-bit OS only. For 3-Way SLITM technology, you should have two identical Quad SLITM-ready graphics cards that are ...
User Manual
Page 40
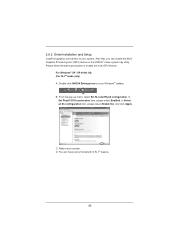
... GPU acceleration item, please select Enabled. 2.8.2 Driver Installation and Setup Install the graphics card drivers to enable the multi-GPU feature. Reboot your system. For Windows® XP / XP 64-bit OS: (For SLITM mode only) A. In Select an SLI configuration item, please select Enable SLI. Double-click NVIDIA...
... GPU acceleration item, please select Enabled. 2.8.2 Driver Installation and Setup Install the graphics card drivers to enable the multi-GPU feature. Reboot your system. For Windows® XP / XP 64-bit OS: (For SLITM mode only) A. In Select an SLI configuration item, please select Enable SLI. Double-click NVIDIA...

User Manual
Page 41
...All Programs, and then click NVIDIA Corporation. And click Apply. F. You can freely enjoy the benefit of SLITM or Quad SLITM feature. 41 E. For Windows® VistaTM / VistaTM 64-bit / 7 / 7 64-bit OS: (For SLITM and Quad SLITM mode) A. In Set PhysX GPU acceleration item, please ...select Enabled. Click the Start icon on your system. D. Reboot your Windows taskbar. B. Select NVIDIA Control Panel tab. In Select an SLI configuration item, please select Enable SLI. Select Control Panel tab. G.
...All Programs, and then click NVIDIA Corporation. And click Apply. F. You can freely enjoy the benefit of SLITM or Quad SLITM feature. 41 E. For Windows® VistaTM / VistaTM 64-bit / 7 / 7 64-bit OS: (For SLITM and Quad SLITM mode) A. In Set PhysX GPU acceleration item, please ...select Enabled. Click the Start icon on your system. D. Reboot your Windows taskbar. B. Select NVIDIA Control Panel tab. In Select an SLI configuration item, please select Enable SLI. Select Control Panel tab. G.

User Manual
Page 42
... SLI. In Select a hardware acceleration setting for identification or explanation and to the owners' benefit, without intent to D on page 41. For Windows® VistaTM / VistaTM 64-bit / 7 / 7 64-bit OS: (For 3-Way SLITM mode) A. From the pop-up menu, select Set SLI and PhysX configuration...
... SLI. In Select a hardware acceleration setting for identification or explanation and to the owners' benefit, without intent to D on page 41. For Windows® VistaTM / VistaTM 64-bit / 7 / 7 64-bit OS: (For 3-Way SLITM mode) A. From the pop-up menu, select Set SLI and PhysX configuration...
User Manual
Page 43
...the future, please refer to enable CrossFireXTM feature. Combining a range of CrossFireXTM. If you pair a 12-pipe CrossFireXTM Edition card with Windows® VistaTM / 7 OS only. If a customer incorrectly configures their system they will release in CrossFireXTM mode. 2.9.1 ...require different methods to AMD graphics card manuals for ATITM CrossFireXTM driver updates. 1. Currently CrossFireXTM feature is supported with Windows® XP with intelligent software design and an innovative interconnect mechanism, CrossFireXTM enables the highest possible level of combining multiple...
...the future, please refer to enable CrossFireXTM feature. Combining a range of CrossFireXTM. If you pair a 12-pipe CrossFireXTM Edition card with Windows® VistaTM / 7 OS only. If a customer incorrectly configures their system they will release in CrossFireXTM mode. 2.9.1 ...require different methods to AMD graphics card manuals for ATITM CrossFireXTM driver updates. 1. Currently CrossFireXTM feature is supported with Windows® XP with intelligent software design and an innovative interconnect mechanism, CrossFireXTM enables the highest possible level of combining multiple...
User Manual
Page 46
...website for ATITM driver updates. ATI Catalyst Control Center Step 6. Power on your system. Please check AMD website for details. For Windows® XP OS: A. Please check Microsoft website for details. Restart your computer and boot into OS. Install the VGA card drivers to your... check the item "Enable CrossFireXTM". Install the required drivers to your system, and restart your system, there is an optional download. AMD recommends Windows® XP Service Pack 2 or higher to download it again): http://www.microsoft.com/windowsxp/sp2/default.mspx B. Remove the AMD driver if...
...website for ATITM driver updates. ATI Catalyst Control Center Step 6. Power on your system. Please check AMD website for details. For Windows® XP OS: A. Please check Microsoft website for details. Restart your computer and boot into OS. Install the VGA card drivers to your... check the item "Enable CrossFireXTM". Install the required drivers to your system, and restart your system, there is an optional download. AMD recommends Windows® XP Service Pack 2 or higher to download it again): http://www.microsoft.com/windowsxp/sp2/default.mspx B. Remove the AMD driver if...

User Manual
Page 51
.... Connect Mic_IN (MIC) to OUT2_L. Connect Audio_R (RIN) to OUT2_R and Audio_L (LIN) to MIC2_L. MIC_RET and OUT_RET are for AC'97 audio panel. For Windows® XP / XP 64-bit OS: Select "Mixer". Front Panel Audio Header (9-pin HD_AUDIO1) (see p.12 No. 16) Vbus IntA_P4_SSRXIntA_P4_SSRX+ GND IntA_P4_SSTXIntA_P4_SSTX+ GND IntA_P4_DIntA_P4_D+ Vbus...
.... Connect Mic_IN (MIC) to OUT2_L. Connect Audio_R (RIN) to OUT2_R and Audio_L (LIN) to MIC2_L. MIC_RET and OUT_RET are for AC'97 audio panel. For Windows® XP / XP 64-bit OS: Select "Mixer". Front Panel Audio Header (9-pin HD_AUDIO1) (see p.12 No. 16) Vbus IntA_P4_SSRXIntA_P4_SSRX+ GND IntA_P4_SSTXIntA_P4_SSTX+ GND IntA_P4_DIntA_P4_D+ Vbus...
User Manual
Page 52
... LED is on when the system is reading or writing data. The LED keeps blinking when the system is in the Realtek Control panel. For Windows® 7 / 7 64-bit / VistaTM / VistaTM 64-bit OS: Go to the power status indicator on the chassis front panel.
... LED is on when the system is reading or writing data. The LED keeps blinking when the system is in the Realtek Control panel. For Windows® 7 / 7 64-bit / VistaTM / VistaTM 64-bit OS: Go to the power status indicator on the chassis front panel.
User Manual
Page 66
... VistaTM / VistaTM 64-bit optical disk into the optical drive again to continue the OS installation. 66 Therefore, the drivers you want to install Windows?" Enter UEFI SETUP UTILITY Advanced screen Storage Configuration. If you install can be installed on the support CD driver page. 2.21 Driver ...; SATA2 / SATA3 ports with RAID functions, please follow the instruction to SATA Hard Disks Installation and RAID Configuration", which is not supported under Windows® XP / XP 64-bit. When you see "Where do you need to [Yes] for Intel® SATA2 / SATA3 ports. Set the ...
... VistaTM / VistaTM 64-bit optical disk into the optical drive again to continue the OS installation. 66 Therefore, the drivers you want to install Windows?" Enter UEFI SETUP UTILITY Advanced screen Storage Configuration. If you install can be installed on the support CD driver page. 2.21 Driver ...; SATA2 / SATA3 ports with RAID functions, please follow the instruction to SATA Hard Disks Installation and RAID Configuration", which is not supported under Windows® XP / XP 64-bit. When you see "Where do you need to [Yes] for Intel® SATA2 / SATA3 ports. Set the ...

User Manual
Page 67
... Set Up UEFI. Using SATA / SATA2 / SATA3 HDDs without RAID functions, please follow below procedures according to the OS you install. 2.23.1 Installing Windows® XP / XP 64-bit Without RAID Functions If you want to use both "RAID Installation Guide" and "Intel Rapid Storage Information" for RAID ... SATA3_1 ports.) Set the option "ASMedia SATA3 Mode" to [IDE]. (For SATA3_A0 to SATA3_A2 ports.) STEP 2: Install Windows® XP / XP 64-bit OS on your system. 67 B. After the installation of Windows® 7 / 7 64-bit / VistaTM / VistaTM 64-bit OS, if you want to manage RAID functions, ...
... Set Up UEFI. Using SATA / SATA2 / SATA3 HDDs without RAID functions, please follow below procedures according to the OS you install. 2.23.1 Installing Windows® XP / XP 64-bit Without RAID Functions If you want to use both "RAID Installation Guide" and "Intel Rapid Storage Information" for RAID ... SATA3_1 ports.) Set the option "ASMedia SATA3 Mode" to [IDE]. (For SATA3_A0 to SATA3_A2 ports.) STEP 2: Install Windows® XP / XP 64-bit OS on your system. 67 B. After the installation of Windows® 7 / 7 64-bit / VistaTM / VistaTM 64-bit OS, if you want to manage RAID functions, ...

User Manual
Page 68
...AHCI]. (For SATA2_0 to SATA2_3, SATA3_0 and SATA3_1 ports.) Set the option "ASMedia SATA3 Mode" to [AHCI]. (For SATA3_A0 to SATA3_A2 ports.) STEP 2: Install Windows® 7 / 7 64-bit / VistaTM / VistaTM 64-bit OS on your system. 68 B. Enter UEFI SETUP UTILITY Advanced screen Storage Configuration. ... Mode" to [IDE]. (For SATA2_0 to SATA2_3, SATA3_0 and SATA3_1 ports.) Set the option "ASMedia SATA3 Mode" to [IDE]. (For SATA3_A0 to install Windows® 7 / 7 64-bit / VistaTM / VistaTM 64-bit OS on your SATA / SATA2 / SATA3 HDDs without NCQ function STEP 1: Set Up UEFI. A. ...
...AHCI]. (For SATA2_0 to SATA2_3, SATA3_0 and SATA3_1 ports.) Set the option "ASMedia SATA3 Mode" to [AHCI]. (For SATA3_A0 to SATA3_A2 ports.) STEP 2: Install Windows® 7 / 7 64-bit / VistaTM / VistaTM 64-bit OS on your system. 68 B. Enter UEFI SETUP UTILITY Advanced screen Storage Configuration. ... Mode" to [IDE]. (For SATA2_0 to SATA2_3, SATA3_0 and SATA3_1 ports.) Set the option "ASMedia SATA3 Mode" to [IDE]. (For SATA3_A0 to install Windows® 7 / 7 64-bit / VistaTM / VistaTM 64-bit OS on your SATA / SATA2 / SATA3 HDDs without NCQ function STEP 1: Set Up UEFI. A. ...
User Manual
Page 71
... team members to a switch. * Not all network adapters made by others are defined, they have defined and exit the Manage Teams window. 13. Repeat steps 5. Click the Preview tab to create all team members before applying the changes. 12. Type the value for teaming. 71 If you...
... team members to a switch. * Not all network adapters made by others are defined, they have defined and exit the Manage Teams window. 13. Repeat steps 5. Click the Preview tab to create all team members before applying the changes. 12. Type the value for teaming. 71 If you...


