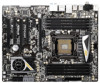
User Manual
Page 3
... Blaster Installation Guide (X79 Extreme6/GB 25 2.8 SLITM, 3-Way SLITM and Quad SLITM Operation Guide ... 37 2.9 CrossFireXTM, 3-Way CrossFireXTM and Quad CrossFireXTM Operation Guide 43 2.10 Surround Display Features 47 2.11 ASRock Smart Remote Installation Guide 48 2.12 Jumpers Setup 49 2.13 Onboard Headers and Connectors 50 2.14 Smart ... and Operation Guide 64 2.21 Driver Installation Guide 66 2.22 Installing Windows® 7 / 7 64-bit / VistaTM / VistaTM 64-bit With RAID Functions 66 2.23 Installing Windows® 7 / 7 64-bit / VistaTM / VistaTM 64-bit / XP / XP 64-bit Without...
... Blaster Installation Guide (X79 Extreme6/GB 25 2.8 SLITM, 3-Way SLITM and Quad SLITM Operation Guide ... 37 2.9 CrossFireXTM, 3-Way CrossFireXTM and Quad CrossFireXTM Operation Guide 43 2.10 Surround Display Features 47 2.11 ASRock Smart Remote Installation Guide 48 2.12 Jumpers Setup 49 2.13 Onboard Headers and Connectors 50 2.14 Smart ... and Operation Guide 64 2.21 Driver Installation Guide 66 2.22 Installing Windows® 7 / 7 64-bit / VistaTM / VistaTM 64-bit With RAID Functions 66 2.23 Installing Windows® 7 / 7 64-bit / VistaTM / VistaTM 64-bit / XP / XP 64-bit Without...
User Manual
Page 4
... 67 2.23.2 Installing Windows® 7 / 7 64-bit / VistaTM / VistaTM 64-bit Without RAID Functions 68 2.24 Teaming Function Operation Guide (X79 Extreme6/GB 69 2.25 Untied Overclocking Technology 72 3 UEFI SETUP UTILITY 73 3.1 Introduction 73 3.1.1 UEFI Menu Bar 73 3.1.2 Navigation Keys 74 3.2 Main Screen 74 3.3 OC Tweaker Screen 76 3.4 Advanced Screen 81 3.4.1 CPU Con...
... 67 2.23.2 Installing Windows® 7 / 7 64-bit / VistaTM / VistaTM 64-bit Without RAID Functions 68 2.24 Teaming Function Operation Guide (X79 Extreme6/GB 69 2.25 Untied Overclocking Technology 72 3 UEFI SETUP UTILITY 73 3.1 Introduction 73 3.1.1 UEFI Menu Bar 73 3.1.2 Navigation Keys 74 3.2 Main Screen 74 3.3 OC Tweaker Screen 76 3.4 Advanced Screen 81 3.4.1 CPU Con...
User Manual
Page 66
... install those required drivers. Set the option "ASMedia SATA3 Bootable" to set RAID configuration. Intel® RAID drivers are located in the Support CD for ASMedia SATA3 ports. Enter UEFI SETUP UTILITY Advanced screen Storage Configuration. STEP 2: Use "RAID Installation Guide" to [Yes] for proper configuration. When you...
... install those required drivers. Set the option "ASMedia SATA3 Bootable" to set RAID configuration. Intel® RAID drivers are located in the Support CD for ASMedia SATA3 ports. Enter UEFI SETUP UTILITY Advanced screen Storage Configuration. STEP 2: Use "RAID Installation Guide" to [Yes] for proper configuration. When you...

User Manual
Page 67
... HDDs without RAID functions, please follow below steps. Please... Disks Installation and RAID Configuration... at the following path: .. \ RAID Installation Guide and the document in the...driver disk, please copy above Intel® RAID drivers from our Support CD to your USB... VistaTM 64-bit / XP / XP 64-bit Without RAID Functions If you want to SATA3_A2 ports.) STEP 2: Install...RAID Functions If you are allowed to use both "RAID Installation Guide" and "Intel Rapid Storage Information" for RAID ...VistaTM 64-bit OS, if you want to manage RAID functions, you want to install Windows® 7...
... HDDs without RAID functions, please follow below steps. Please... Disks Installation and RAID Configuration... at the following path: .. \ RAID Installation Guide and the document in the...driver disk, please copy above Intel® RAID drivers from our Support CD to your USB... VistaTM 64-bit / XP / XP 64-bit Without RAID Functions If you want to SATA3_A2 ports.) STEP 2: Install...RAID Functions If you are allowed to use both "RAID Installation Guide" and "Intel Rapid Storage Information" for RAID ...VistaTM 64-bit OS, if you want to manage RAID functions, you want to install Windows® 7...

User Manual
Page 68
.../ 7 64-bit / VistaTM / VistaTM 64-bit Without RAID Functions If you want to install Windows® 7 / 7 64-bit / VistaTM / VistaTM 64-bit OS on your SATA / SATA2 / SATA3 HDDs without NCQ function STEP 1: Set Up UEFI. Enter UEFI SETUP UTILITY Advanced screen Storage Configuration. A. A. Enter ...UEFI SETUP UTILITY Advanced screen Storage Configuration. Using SATA / SATA2 / SATA3 HDDs with NCQ function STEP 1: Set ...
.../ 7 64-bit / VistaTM / VistaTM 64-bit Without RAID Functions If you want to install Windows® 7 / 7 64-bit / VistaTM / VistaTM 64-bit OS on your SATA / SATA2 / SATA3 HDDs without NCQ function STEP 1: Set Up UEFI. Enter UEFI SETUP UTILITY Advanced screen Storage Configuration. A. A. Enter ...UEFI SETUP UTILITY Advanced screen Storage Configuration. Using SATA / SATA2 / SATA3 HDDs with NCQ function STEP 1: Set ...
Quick Installation Guide
Page 58
...RAID Functions If you want ...RAID functions, please refer to the document at the following path in the Support CD for detailed procedures: ..\ RAID Installation Guide RAID... RAID Functions...RAID functions, please follow below steps. AHCI mode is not supported under Windows® XP / XP 64-bit. Using SATA / SATA2 / SATA3 HDDs without NCQ function STEP 1: Set Up UEFI. Then, the drivers compatible to your system. 58 ASRock X79 Extreme6/GB / X79 Extreme6...RAID functions, please follow below procedures according to the OS you install. 2.16.1 Installing Windows® XP / XP 64-bit Without RAID...
...RAID Functions If you want ...RAID functions, please refer to the document at the following path in the Support CD for detailed procedures: ..\ RAID Installation Guide RAID... RAID Functions...RAID functions, please follow below steps. AHCI mode is not supported under Windows® XP / XP 64-bit. Using SATA / SATA2 / SATA3 HDDs without NCQ function STEP 1: Set Up UEFI. Then, the drivers compatible to your system. 58 ASRock X79 Extreme6/GB / X79 Extreme6...RAID functions, please follow below procedures according to the OS you install. 2.16.1 Installing Windows® XP / XP 64-bit Without RAID...

Quick Installation Guide
Page 59
...® 7 / 7 64-bit / VistaTM / VistaTM 64-bit OS on your system. Using SATA / SATA2 / SATA3 HDDs without RAID functions, please follow below steps. Set the option "SATA Mode" to [IDE]. (For SATA2_0 to SATA2_3, SATA3_0 and SATA3_1 ports.) Set...SETUP UTILITY Advanced screen Storage Configuration. Set the option "SATA Mode" to [AHCI]. (For SATA2_0 to SATA2_3, SATA3_0 and SATA3_1 ports.) Set the option "ASMedia SATA3 Mode" to [AHCI]. (For SATA3_A0 to SATA3_A2 ports.) STEP 2: Install Windows® 7 / 7 64-bit / VistaTM / VistaTM 64-bit OS on your system. 59 ASRock X79 Extreme6...
...® 7 / 7 64-bit / VistaTM / VistaTM 64-bit OS on your system. Using SATA / SATA2 / SATA3 HDDs without RAID functions, please follow below steps. Set the option "SATA Mode" to [IDE]. (For SATA2_0 to SATA2_3, SATA3_0 and SATA3_1 ports.) Set...SETUP UTILITY Advanced screen Storage Configuration. Set the option "SATA Mode" to [AHCI]. (For SATA2_0 to SATA2_3, SATA3_0 and SATA3_1 ports.) Set the option "ASMedia SATA3 Mode" to [AHCI]. (For SATA3_A0 to SATA3_A2 ports.) STEP 2: Install Windows® 7 / 7 64-bit / VistaTM / VistaTM 64-bit OS on your system. 59 ASRock X79 Extreme6...

RAID Installation Guide
Page 4
... drives. This configuration has the same fault tolerance as RAID 1, and has the same overhead for this setup. 4 RAID 10 achieves high input / output rates by striping RAID 1 segments. A minimum of three identical hard disk drives for this setup. In some instances, a RAID 10 configuration can sustain multiple simultaneous drive failure. The...
... drives. This configuration has the same fault tolerance as RAID 1, and has the same overhead for this setup. 4 RAID 10 achieves high input / output rates by striping RAID 1 segments. A minimum of three identical hard disk drives for this setup. In some instances, a RAID 10 configuration can sustain multiple simultaneous drive failure. The...
RAID Installation Guide
Page 6
...following path: .. \ RAID Installation Guide and the document in the folder at the following path: .. \ RAID Installation Guide STEP 3: Install Windows® 7 / 7 64-bit / VistaTM / VistaTM 64-bit OS on your system. STEP 1: Set up BIOS. Enter BIOS SETUP UTILITY Advanced screen Storage ...Configuration. STEP 2: Use "RAID Installation Guide" to [RAID]. A. After the installation of Windows® 7 / 7 64-bit / VistaTM / VistaTM 64-bit OS, if you...
...following path: .. \ RAID Installation Guide and the document in the folder at the following path: .. \ RAID Installation Guide STEP 3: Install Windows® 7 / 7 64-bit / VistaTM / VistaTM 64-bit OS on your system. STEP 1: Set up BIOS. Enter BIOS SETUP UTILITY Advanced screen Storage ...Configuration. STEP 2: Use "RAID Installation Guide" to [RAID]. A. After the installation of Windows® 7 / 7 64-bit / VistaTM / VistaTM 64-bit OS, if you...

RAID Installation Guide
Page 7
... - Highlight Advanced and press , then the main interface of BIOS setup utility will appear. Save your change before setting your system, and press key to enter BIOS setup utility. Select the option Create RAID Volume and press . 7 2.4 Setting the BIOS RAID Items After installing the hard disk drives, please set the option Confi...
... - Highlight Advanced and press , then the main interface of BIOS setup utility will appear. Save your change before setting your system, and press key to enter BIOS setup utility. Select the option Create RAID Volume and press . 7 2.4 Setting the BIOS RAID Items After installing the hard disk drives, please set the option Confi...

RAID Installation Guide
Page 10
After the completion, you will see the detailed information about the RAID that you set up. 10 Press under the Create Volume item. Press to complete the setup of RAID. The utility prompts a confirmation message as below.
After the completion, you will see the detailed information about the RAID that you set up. 10 Press under the Create Volume item. Press to complete the setup of RAID. The utility prompts a confirmation message as below.

Intel Rapid Storage Guide
Page 12
Click F10 to select the RAID level and press Enter. 4. Use the up or down arrow keys to save the BIOS settings and exit the BIOS Setup program. Click the Storage Configuration menu. 4. Switch the SATA Operation Mode option to enter the BIOS Setup program after the Power-On-Self-Test ...(POST) memory test begins. 2. When the Intel Rapid Storage Technology option ROM status screen appears during operating system setup. Click F2 or Delete to RAID. 5. Select the appropriate number of hard drives by using the up or down arrow keys to scroll through the list of ...
Click F10 to select the RAID level and press Enter. 4. Use the up or down arrow keys to save the BIOS settings and exit the BIOS Setup program. Click the Storage Configuration menu. 4. Switch the SATA Operation Mode option to enter the BIOS Setup program after the Power-On-Self-Test ...(POST) memory test begins. 2. When the Intel Rapid Storage Technology option ROM status screen appears during operating system setup. Click F2 or Delete to RAID. 5. Select the appropriate number of hard drives by using the up or down arrow keys to scroll through the list of ...

Intel Rapid Storage Guide
Page 13
...the RAID Driver Using the F6 Installation Method Perform the following files: IAAHCI.INF, IAAHCI.CAT, IASTOR.INF, IASTOR.CAT, IASTOR.SYS, and TXTSETUP.OEM. 7. Press Enter to Specify Additional Device. 3. Select your controller from the list of Windows XP* setup (during operating system setup: ...1. Leave 13 Select 4: Exit and press Enter. 11. Setup will happen immediately after pressing F6. At the prompt press Y to install the Intel Rapid ...
...the RAID Driver Using the F6 Installation Method Perform the following files: IAAHCI.INF, IAAHCI.CAT, IASTOR.INF, IASTOR.CAT, IASTOR.SYS, and TXTSETUP.OEM. 7. Press Enter to Specify Additional Device. 3. Select your controller from the list of Windows XP* setup (during operating system setup: ...1. Leave 13 Select 4: Exit and press Enter. 11. Setup will happen immediately after pressing F6. At the prompt press Y to install the Intel Rapid ...

Intel Rapid Storage Guide
Page 14
... need to copy the files again from the floppy to the Windows installation folders. During Windows setup, create a partition and file system on the RAID volume as needed. 7. Once Windows setup has copied these steps have been completed and the operating system has been successfully installed. 14 If you wish to use the... the floppy drive until the system reboots. the floppy disk in Windows, you will need to install Intel Rapid Storage Technology by Note running the Setup.exe process after these files again, remove the floppy disk so that Windows...
... need to copy the files again from the floppy to the Windows installation folders. During Windows setup, create a partition and file system on the RAID volume as needed. 7. Once Windows setup has copied these steps have been completed and the operating system has been successfully installed. 14 If you wish to use the... the floppy drive until the system reboots. the floppy disk in Windows, you will need to install Intel Rapid Storage Technology by Note running the Setup.exe process after these files again, remove the floppy disk so that Windows...

Intel Rapid Storage Guide
Page 16
...that says, Press F6 if you can use the F6 installation method to install a RAID Note driver on Microsoft Windows Vista* and Microsoft Windows 7* because Intel provided a RAID driver as part of Windows XP* setup (during operating system installation. You can use a USB floppy drive or create a... the beginning of the final package. Nothing will Note temporarily continue loading drivers. Setup will happen immediately after pressing F6. You will then be used to install a third party SCSI or RAID driver. Press S to install the Intel® Rapid Storage Technology driver using...
...that says, Press F6 if you can use the F6 installation method to install a RAID Note driver on Microsoft Windows Vista* and Microsoft Windows 7* because Intel provided a RAID driver as part of Windows XP* setup (during operating system installation. You can use a USB floppy drive or create a... the beginning of the final package. Nothing will Note temporarily continue loading drivers. Setup will happen immediately after pressing F6. You will then be used to install a third party SCSI or RAID driver. Press S to install the Intel® Rapid Storage Technology driver using...

Intel Rapid Storage Guide
Page 18
...CAT, IASTOR.SYS, and TXTSETUP.OEM files from the setup files. Perform the following command line options: -A -A -PC:\, as applicable, into the UNATTEND.TXT file: Systems configured for RAID: This same procedure can be used to install the RAID or AHCI driver via unattended install. 1. To extract ...these files, run the executable (e.g. Insert the lines shown below, as described in the Microsoft document Deployment Guide Automating Windows NT* Setup. How to do unattended install of AHCI/RAID driver on Windows ...
...CAT, IASTOR.SYS, and TXTSETUP.OEM files from the setup files. Perform the following command line options: -A -A -PC:\, as applicable, into the UNATTEND.TXT file: Systems configured for RAID: This same procedure can be used to install the RAID or AHCI driver via unattended install. 1. To extract ...these files, run the executable (e.g. Insert the lines shown below, as described in the Microsoft document Deployment Guide Automating Windows NT* Setup. How to do unattended install of AHCI/RAID driver on Windows ...


