

Intel Smart Response Installation Guide
Page 1
... setup instruction: 1. You MUST have both the HDD you just need to set the UEFI option "SATA Mode" to [RAID Mode]. After clicking OK button, SRT will enable automatically, and the RST GUI will refresh to use Enhanced or Maximized Mode. 6. Once open RST GUI from either Start Menu or by step instructions below. For the new version RST driver, please check our website for the latest information: http://www.asrock...
... setup instruction: 1. You MUST have both the HDD you just need to set the UEFI option "SATA Mode" to [RAID Mode]. After clicking OK button, SRT will enable automatically, and the RST GUI will refresh to use Enhanced or Maximized Mode. 6. Once open RST GUI from either Start Menu or by step instructions below. For the new version RST driver, please check our website for the latest information: http://www.asrock...
User Manual
Page 3
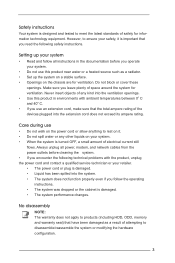
... the hardware configuration. 3 No disassembly NOTE: The warranty does not apply to products (including HDD, ODD, memory and warranty seal) that the total ampere rating of the devices plugged into the system. • The system does not function properly even if you follow all power, modem, and network cables from the power outlets before you read the following safety instructions. Setting...
... the hardware configuration. 3 No disassembly NOTE: The warranty does not apply to products (including HDD, ODD, memory and warranty seal) that the total ampere rating of the devices plugged into the system. • The system does not function properly even if you follow all power, modem, and network cables from the power outlets before you read the following safety instructions. Setting...

User Manual
Page 5
... Specifications 8 1.3 System Motherboard Components 9 1.4 Rear Panel Connections 11 1.5 System Chassis 12 1.6 Remote Controller 13 2 Opening the chassis 14 3 Reinstalling the ODD/HDD 15 4 Installing the second HDD 16 5 Reinstalling the DIMMs 18 6 Reinstalling the CPU 19 7 Driver Installation 20 8 UTILITY MEMU 21 8.1 Instant Boot 21 8.1.1 Introduction 21 8.1.2 Installation 22 8.2 ASRock Extreme Tuning Utility (AXTU 25 8.2.1 Introduction 25 8.2.2 Installation 25 8.2.3 Function 25 8.3 Symantec Norton AntiVirus Software free bundle (Trial version 29 8.4 THX TruStudio Software...
... Specifications 8 1.3 System Motherboard Components 9 1.4 Rear Panel Connections 11 1.5 System Chassis 12 1.6 Remote Controller 13 2 Opening the chassis 14 3 Reinstalling the ODD/HDD 15 4 Installing the second HDD 16 5 Reinstalling the DIMMs 18 6 Reinstalling the CPU 19 7 Driver Installation 20 8 UTILITY MEMU 21 8.1 Instant Boot 21 8.1.1 Introduction 21 8.1.2 Installation 22 8.2 ASRock Extreme Tuning Utility (AXTU 25 8.2.1 Introduction 25 8.2.2 Installation 25 8.2.3 Function 25 8.3 Symantec Norton AntiVirus Software free bundle (Trial version 29 8.4 THX TruStudio Software...
User Manual
Page 7
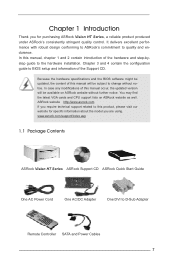
... D-Sub Adapter Remote Controller SATA and Power Cables 7 Because the hardware specifications and the BIOS software might be updated, the content of this manual will be subject to change without further notice. www.asrock.com/support/index.asp 1.1 Package Contents ASRock Vision HT Series ASRock Support CD ASRock Quick Start Guide One AC Power Cord One AC/DC Adapter One DVI to quality and endurance. Chapter 1 Introduction Thank you for specific information about the model you require technical support related...
... D-Sub Adapter Remote Controller SATA and Power Cables 7 Because the hardware specifications and the BIOS software might be updated, the content of this manual will be subject to change without further notice. www.asrock.com/support/index.asp 1.1 Package Contents ASRock Vision HT Series ASRock Support CD ASRock Quick Start Guide One AC Power Cord One AC/DC Adapter One DVI to quality and endurance. Chapter 1 Introduction Thank you for specific information about the model you require technical support related...
User Manual
Page 8
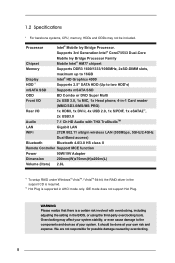
... phone, 4-in-1 Card reader (MMC/SD3.0/MS/MS PRO) Rear I/O 1x HDMI, 1x DVI-I, 4x USB 2.0, 1x S/PDIF, 1x eSATA2*2, 2x USB3.0 Audio 7.1 Ch HD Audio with THX TruStudioTM LAN Gigabit LAN WiFi 2T2R 802.11 a/b/g/n wireless LAN (300Mbps, 5GHz/2.4GHz Dual-Band access) Bluetooth Bluetooth 4.0/3.0 HS class II Remote Controller Support MCE function Power 90W/19V Adapter Dimension 200mm(W)x70mm(H)x200m(L) Volume (liters) 2.8L *1 To setup RAID under Windows® VistaTM...
... phone, 4-in-1 Card reader (MMC/SD3.0/MS/MS PRO) Rear I/O 1x HDMI, 1x DVI-I, 4x USB 2.0, 1x S/PDIF, 1x eSATA2*2, 2x USB3.0 Audio 7.1 Ch HD Audio with THX TruStudioTM LAN Gigabit LAN WiFi 2T2R 802.11 a/b/g/n wireless LAN (300Mbps, 5GHz/2.4GHz Dual-Band access) Bluetooth Bluetooth 4.0/3.0 HS class II Remote Controller Support MCE function Power 90W/19V Adapter Dimension 200mm(W)x70mm(H)x200m(L) Volume (liters) 2.8L *1 To setup RAID under Windows® VistaTM...

User Manual
Page 12
Headphone 28. Slot-in -1 Card reader (MMC/SD3.0/MS/MS Pro) 31. Power ON/OFF button with status indicator 32. Microphone 29. 1.5 System Chassis 27. USB3.0 ports: USB devices 30. 4-in Optical Disc Drive 12
Headphone 28. Slot-in -1 Card reader (MMC/SD3.0/MS/MS Pro) 31. Power ON/OFF button with status indicator 32. Microphone 29. 1.5 System Chassis 27. USB3.0 ports: USB devices 30. 4-in Optical Disc Drive 12
User Manual
Page 20
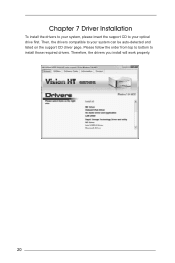
Chapter 7 Driver Installation To install the drivers to your system, please insert the support CD to your optical drive first. Then, the drivers compatible to your system can be auto-detected and listed on the support CD driver page. Therefore, the drivers you install will work properly. 20 Please follow the order from top to bottom to install those required drivers.
Chapter 7 Driver Installation To install the drivers to your system, please insert the support CD to your optical drive first. Then, the drivers compatible to your system can be auto-detected and listed on the support CD driver page. Therefore, the drivers you install will work properly. 20 Please follow the order from top to bottom to install those required drivers.
User Manual
Page 22
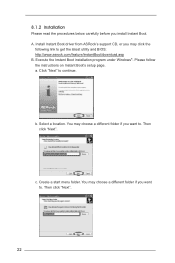
... folder if you want to get the latest utility and BIOS: http://www.asrock.com/feature/InstantBoot/download.asp B. Create a start menu folder. Execute the Instant Boot installation program under Windows®. Then click "Next". Then click "Next". 22 a. Please follow the instructions on Instant Boot's setup page. Install Instant Boot driver from ASRock's support CD, or you install Instant Boot. 8.1.2 Installation Please read the procedures below carefully before you...
... folder if you want to get the latest utility and BIOS: http://www.asrock.com/feature/InstantBoot/download.asp B. Create a start menu folder. Execute the Instant Boot installation program under Windows®. Then click "Next". Then click "Next". 22 a. Please follow the instructions on Instant Boot's setup page. Install Instant Boot driver from ASRock's support CD, or you install Instant Boot. 8.1.2 Installation Please read the procedures below carefully before you...
User Manual
Page 23
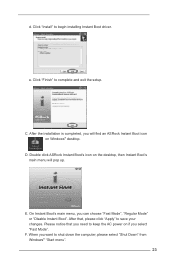
... the AC power on Windows® desktop. Click "Install" to save your changes. E. Double click ASRock Instant Boot's icon on the desktop, then Instant Boot's main menu will find an ASRock Instant Boot icon on if you can choose "Fast Mode", "Regular Mode" or "Disable Instant Boot". When you will pop up. e. Click "Finish" to shut down the computer, please select "Shut Down" from Windows® "Start menu". 23
... the AC power on Windows® desktop. Click "Install" to save your changes. E. Double click ASRock Instant Boot's icon on the desktop, then Instant Boot's main menu will find an ASRock Instant Boot icon on if you can choose "Fast Mode", "Regular Mode" or "Disable Instant Boot". When you will pop up. e. Click "Finish" to shut down the computer, please select "Shut Down" from Windows® "Start menu". 23
User Manual
Page 25
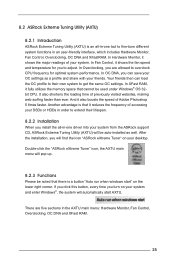
... ASRock Extreme Tuning Utility (AXTU) is a button "Auto run when windows start AXTU. And it also boosts the speed of previously visited websites, making web surfing faster than ever. If you click this button, every time you are five sections in -one tool to get the same OC settings. In Fan Control, it shows the major readings of accessing your SSDs or HDDs in...
... ASRock Extreme Tuning Utility (AXTU) is a button "Auto run when windows start AXTU. And it also boosts the speed of previously visited websites, making web surfing faster than ever. If you click this button, every time you are five sections in -one tool to get the same OC settings. In Fan Control, it shows the major readings of accessing your SSDs or HDDs in...

User Manual
Page 30
Therefore, you . Click the THX icon on the Windows® task bar. 8.4 THX TruStudio Software free bundle After you install THX audio driver from our support CD, there will be a THX icon shown on the Windows® task bar, you will see the THX TruStudio software application as below, which provides Surround/Crystalizer/Speaker/Smart volume/Dialog plus functions for you can adjust your audio and enjoy THX TruStudio freely. 30
Therefore, you . Click the THX icon on the Windows® task bar. 8.4 THX TruStudio Software free bundle After you install THX audio driver from our support CD, there will be a THX icon shown on the Windows® task bar, you will see the THX TruStudio software application as below, which provides Surround/Crystalizer/Speaker/Smart volume/Dialog plus functions for you can adjust your audio and enjoy THX TruStudio freely. 30
User Manual
Page 37
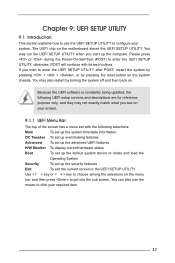
... H/W Monitor To display current hardware status Boot To set up the default system device to locate and load the Operating System Security To set up the computer. Chapter 9: UEFI SETUP UTILITY 9.1 Introduction This section explains how to use the mouse to click your system. You can also use the UEFI SETUP UTILITY to configure your required item. 37 You may also restart by pressing the reset button on . If you start...
... H/W Monitor To display current hardware status Boot To set up the default system device to locate and load the Operating System Security To set up the computer. Chapter 9: UEFI SETUP UTILITY 9.1 Introduction This section explains how to use the mouse to click your system. You can also use the UEFI SETUP UTILITY to configure your required item. 37 You may also restart by pressing the reset button on . If you start...

User Manual
Page 44
This option will be hidden if the installed CPU does not support Intel Virtualization Technology. No-Execution (NX) Memory Protection Technology is set to [Enabled], a VMM (Virtual Machine Architecture) can prevent data pages from being used by Vanderpool Technology. An IA-32 processor with "No Execute (NX) Memory Protection" can utilize the additional hardware capabilities provided by malicious software to the IA-32 Intel Architecture...
This option will be hidden if the installed CPU does not support Intel Virtualization Technology. No-Execution (NX) Memory Protection Technology is set to [Enabled], a VMM (Virtual Machine Architecture) can prevent data pages from being used by Vanderpool Technology. An IA-32 processor with "No Execute (NX) Memory Protection" can utilize the additional hardware capabilities provided by malicious software to the IA-32 Intel Architecture...
User Manual
Page 57
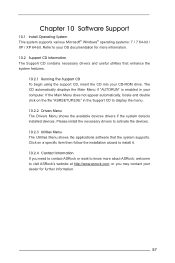
... useful utilities that the system supports. or you need to contact ASRock or want to display the menu. 10.2.2 Drivers Menu The Drivers Menu shows the available devices drivers if the system detects installed devices. If the Main Menu does not appear automatically, locate and double click on a specific item then follow the installation wizard to install it. 10.2.4 Contact Information If you may contact your computer. Chapter 10 Software Support 10.1 Install Operating...
... useful utilities that the system supports. or you need to contact ASRock or want to display the menu. 10.2.2 Drivers Menu The Drivers Menu shows the available devices drivers if the system detects installed devices. If the Main Menu does not appear automatically, locate and double click on a specific item then follow the installation wizard to install it. 10.2.4 Contact Information If you may contact your computer. Chapter 10 Software Support 10.1 Install Operating...
Quick Installation Guide
Page 2
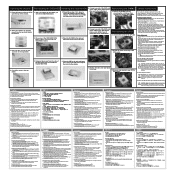
... or cover these openings. Care during use this product near water or a heated source such as a radiator. • Set up your retailer. • The power cord or plug is important that the total ampere rating of the CPU fan. 2. Carefully remove the top shield. Reinstalling the ODD/HDD 1. Place the first HDD to rest on the motherboard. Desconecte el cable de alimentación SATA...
... or cover these openings. Care during use this product near water or a heated source such as a radiator. • Set up your retailer. • The power cord or plug is important that the total ampere rating of the CPU fan. 2. Carefully remove the top shield. Reinstalling the ODD/HDD 1. Place the first HDD to rest on the motherboard. Desconecte el cable de alimentación SATA...
RAID Installation Guide
Page 6
... you start to configure the RAID function, you need to check the installation guide in the folder at the following path: .. \ RAID Installation Guide STEP 3: Install Windows® 7 / 7 64-bit / VistaTM / VistaTM 64-bit OS on your SATA HDDs with RAID functions, please follow below steps. STEP 2: Use "RAID Installation Guide" to [RAID]. B. Enter UEFI SETUP UTILITY Advanced screen SATA Configuration. Please refer to the document in the Support CD, "Guide to SATA Hard Disks Installation and RAID Configuration", which is located in the...
... you start to configure the RAID function, you need to check the installation guide in the folder at the following path: .. \ RAID Installation Guide STEP 3: Install Windows® 7 / 7 64-bit / VistaTM / VistaTM 64-bit OS on your SATA HDDs with RAID functions, please follow below steps. STEP 2: Use "RAID Installation Guide" to [RAID]. B. Enter UEFI SETUP UTILITY Advanced screen SATA Configuration. Please refer to the document in the Support CD, "Guide to SATA Hard Disks Installation and RAID Configuration", which is located in the...

Intel Rapid Storage Guide
Page 1
... and lower power consumption. When using one drive, the user can have additional protection against data loss in a RAID 0 configuration, data can also improve the performance of disk intensive retrieval applications such as well. Through AHCI, storage performance is improved through Native Command Queuing (NCQ). AHCI also delivers longer battery life with version 9.5, a brand new user interface makes creating and managing your...
... and lower power consumption. When using one drive, the user can have additional protection against data loss in a RAID 0 configuration, data can also improve the performance of disk intensive retrieval applications such as well. Through AHCI, storage performance is improved through Native Command Queuing (NCQ). AHCI also delivers longer battery life with version 9.5, a brand new user interface makes creating and managing your...
Intel Rapid Storage Guide
Page 12
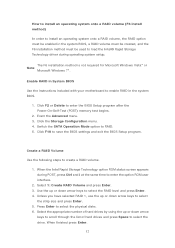
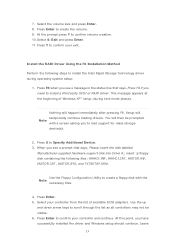
... the BIOS settings and exit the BIOS Setup program. Select the appropriate number of hard drives and press Space to select the drive. Switch the SATA Operation Mode option to enter the BIOS Setup program after the Power-On-Self-Test (POST) memory test begins. 2. Click F2 or Delete to RAID. 5. When finished press Enter. 12 Enable RAID in System BIOS Use the instructions included with your motherboard to create a RAID volume. 1. Select 1: Create RAID Volume and press Enter. 3. Create a RAID Volume Use...
... the BIOS settings and exit the BIOS Setup program. Select the appropriate number of hard drives and press Space to select the drive. Switch the SATA Operation Mode option to enter the BIOS Setup program after the Power-On-Self-Test (POST) memory test begins. 2. Click F2 or Delete to RAID. 5. When finished press Enter. 12 Enable RAID in System BIOS Use the instructions included with your motherboard to create a RAID volume. 1. Select 1: Create RAID Volume and press Enter. 3. Create a RAID Volume Use...
Intel Rapid Storage Guide
Page 13
... have successfully installed the driver and Windows setup should continue. 7. Use the Floppy Configuration Utility to install a third party SCSI or RAID driver. Select the volume size and press Enter. 8. Nothing will temporarily continue loading drivers. Setup will happen immediately after pressing F6. When you to install the Intel Rapid Storage Technology driver during text-mode phase). At this point, you need to create a floppy disk with a screen asking...
... have successfully installed the driver and Windows setup should continue. 7. Use the Floppy Configuration Utility to install a third party SCSI or RAID driver. Select the volume size and press Enter. 8. Nothing will temporarily continue loading drivers. Setup will happen immediately after pressing F6. When you to install the Intel Rapid Storage Technology driver during text-mode phase). At this point, you need to create a floppy disk with a screen asking...

Intel Rapid Storage Guide
Page 15
... the operating system. If your RAID controller is not enabled, enabling the RAID controller is not recommended or supported when a SATA hard drive is already installed? Turn off the system and install one or more additional hard drives. 3. If your system to create a RAID volume. Enabling the RAID controller may cause an immediate blue screen with an 0x0000007b error code, followed by a reboot. If you wish to create a RAID volume. 1. Turn on your operating system is enabled. Use the...
... the operating system. If your RAID controller is not enabled, enabling the RAID controller is not recommended or supported when a SATA hard drive is already installed? Turn off the system and install one or more additional hard drives. 3. If your system to create a RAID volume. Enabling the RAID controller may cause an immediate blue screen with an 0x0000007b error code, followed by a reboot. If you wish to create a RAID volume. 1. Turn on your operating system is enabled. Use the...

