User Manual
Page 7
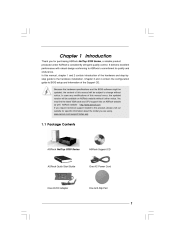
...change without further notice. It delivers excellent performance with robust design conforming to ASRock's commitment to quality and endurance. Chapter 3 and 4 contain the configuration guide to BIOS setup and information of the hardware and step-bystep guide to the hardware installation... product, please visit our website for purchasing ASRock NetTop S330 Series, a reliable product produced under ASRock's consistently stringent quality control. ASRock website http://www.asrock.com If you are using. Because the hardware specifications and the BIOS software might be updated, the content of ...
...change without further notice. It delivers excellent performance with robust design conforming to ASRock's commitment to quality and endurance. Chapter 3 and 4 contain the configuration guide to BIOS setup and information of the hardware and step-bystep guide to the hardware installation... product, please visit our website for purchasing ASRock NetTop S330 Series, a reliable product produced under ASRock's consistently stringent quality control. ASRock website http://www.asrock.com If you are using. Because the hardware specifications and the BIOS software might be updated, the content of ...
User Manual
Page 8
WARNING Please realize that there is a certain risk involved with overclocking, including adjusting the setting in the BIOS, or using the third-party overclocking tools. We are not responsible for system usage under Windows® XP, Windows® XP 64-bit, Windows® ...
WARNING Please realize that there is a certain risk involved with overclocking, including adjusting the setting in the BIOS, or using the third-party overclocking tools. We are not responsible for system usage under Windows® XP, Windows® XP 64-bit, Windows® ...
User Manual
Page 20
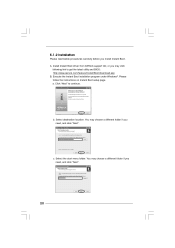
... follow the instructions on Instant Boot setup page. Select the start menu folder. You may click following link to continue. Install Instant Boot driver from ASRock support CD, or you need , and click "Next". 20 You may choose a different folder if you may choose a different folder if you install Instant Boot.... a. b. c. A. Execute the Instant Boot installation program under Windows®. Select destination location. Click "Next" to get the latest utility and BIOS: http://www.asrock.com/feature/InstantBoot/download.asp B.
... follow the instructions on Instant Boot setup page. Select the start menu folder. You may click following link to continue. Install Instant Boot driver from ASRock support CD, or you need , and click "Next". 20 You may choose a different folder if you may choose a different folder if you install Instant Boot.... a. b. c. A. Execute the Instant Boot installation program under Windows®. Select destination location. Click "Next" to get the latest utility and BIOS: http://www.asrock.com/feature/InstantBoot/download.asp B.

User Manual
Page 26
...screen has a menu bar with its test routines. Please press during the Power-On-Self-Test (POST) to enter the BIOS SETUP UTILITY, otherwise, POST will continue with the following BIOS setup screens and descriptions are for reference purpose only, and they may not exactly match what you start up the computer... set up the default system device to locate and load the Operating System Security To set up the system time/date information To load the BIOS according to your system. You may also restart by pressing the reset button on the menu bar, and then press to choose among the selections...
...screen has a menu bar with its test routines. Please press during the Power-On-Self-Test (POST) to enter the BIOS SETUP UTILITY, otherwise, POST will continue with the following BIOS setup screens and descriptions are for reference purpose only, and they may not exactly match what you start up the computer... set up the default system device to locate and load the Operating System Security To set up the system time/date information To load the BIOS according to your system. You may also restart by pressing the reset button on the menu bar, and then press to choose among the selections...

User Manual
Page 27
Main Smart System Overview System Time System Date BIOS Version Processor Type [14:00:09] [Tue 04/21/2009] : A945GC P1.00 : Intel (R) Atom (TM) CPU 330 @ 1.60GHz (64bit) : 1600MHz Processor Speed Microcode Update : ...] Use this item to specify the system time. 6.1.2 Navigation Keys Please check the following table for all the settings To save changes and exit the BIOS SETUP UTILITY To jump to the Exit Screen or exit the current screen 6.2 Main Screen When you enter the...
Main Smart System Overview System Time System Date BIOS Version Processor Type [14:00:09] [Tue 04/21/2009] : A945GC P1.00 : Intel (R) Atom (TM) CPU 330 @ 1.60GHz (64bit) : 1600MHz Processor Speed Microcode Update : ...] Use this item to specify the system time. 6.1.2 Navigation Keys Please check the following table for all the settings To save changes and exit the BIOS SETUP UTILITY To jump to the Exit Screen or exit the current screen 6.2 Main Screen When you enter the...

User Manual
Page 28
... compatible with all the setup questions. If system boot failure occurs after saving the changes. Main Smart Advanced Smart Settings Save Changes and Exit Load BIOS Defaults Load Performance Setup Default Enter F1 F9 F10 ESC Select Screen Select Item Go to save the changes and exit the... UTILITY Boot Security Exit Exit system setup after loading, please resume optimal default settings. F10 key can load the BIOS setup according to your requirements. Load Performance Setup Default This performance setup default may not be used for this operation. 6.3 Smart Screen In the Smart ...
... compatible with all the setup questions. If system boot failure occurs after saving the changes. Main Smart Advanced Smart Settings Save Changes and Exit Load BIOS Defaults Load Performance Setup Default Enter F1 F9 F10 ESC Select Screen Select Item Go to save the changes and exit the... UTILITY Boot Security Exit Exit system setup after loading, please resume optimal default settings. F10 key can load the BIOS setup according to your requirements. Load Performance Setup Default This performance setup default may not be used for this operation. 6.3 Smart Screen In the Smart ...
User Manual
Page 29
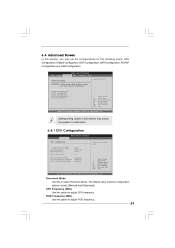
Setting wrong values in below sections may cause the system to malfunction. 6.4.1 CPU Configuration BIOS SETUP UTILITY Advanced CPU Configuration Overclock Mode CPU Frequency (MHz) PCIE Frequency (MHz) Boot Failure Guard Spread Spectrum Ratio Actual ... Use this option to adjust CPU frequency. The default value is [Auto]. CPU Frequency (MHz) Use this option to adjust PCIE frequency. 29 BIOS SETUP UTILITY Boot Security Exit Options for the following items: CPU Configuration, Chipset Configuration, ACPI Configuration, SATA Configuration, PCIPnP Configuration and USB Configuration. ...
Setting wrong values in below sections may cause the system to malfunction. 6.4.1 CPU Configuration BIOS SETUP UTILITY Advanced CPU Configuration Overclock Mode CPU Frequency (MHz) PCIE Frequency (MHz) Boot Failure Guard Spread Spectrum Ratio Actual ... Use this option to adjust CPU frequency. The default value is [Auto]. CPU Frequency (MHz) Use this option to adjust PCIE frequency. 29 BIOS SETUP UTILITY Boot Security Exit Options for the following items: CPU Configuration, Chipset Configuration, ACPI Configuration, SATA Configuration, PCIPnP Configuration and USB Configuration. ...
User Manual
Page 30
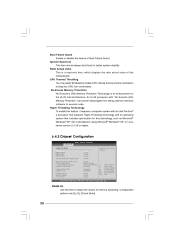
... Intel Architecture. DRAM tCL Use this item to [Enabled] if using Microsoft® Windows® XP, or Linux kernel version 2.4.18 or higher. 6.4.2 Chipset Configuration BIOS SETUP UTILITY Advanced Chipset Settings DRAM DRAM DRAM DRAM tCL tRCD tRP tRAS [Auto] [Auto] [Auto] [Auto] [Auto] [Auto] [DVMT Mode] [Maximum DVMT] [Normal] [Enabled...
... Intel Architecture. DRAM tCL Use this item to [Enabled] if using Microsoft® Windows® XP, or Linux kernel version 2.4.18 or higher. 6.4.2 Chipset Configuration BIOS SETUP UTILITY Advanced Chipset Settings DRAM DRAM DRAM DRAM tCL tRCD tRP tRAS [Auto] [Auto] [Auto] [Auto] [Auto] [Auto] [DVMT Mode] [Maximum DVMT] [Normal] [Enabled...
User Manual
Page 33
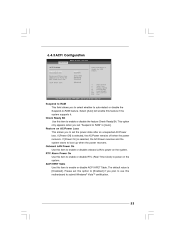
... feature. Onboard LAN Power On Use this motherboard to set this option to [Enabled] if you to submit Windows® VistaTM certification. 33 6.4.3 ACPI Configuration BIOS SETUP UTILITY Advanced ACPI Settings Suspend To RAM Check Ready Bit Restore on the system. Check Ready Bit Use this item to enable or disable...
... feature. Onboard LAN Power On Use this motherboard to set this option to [Enabled] if you to submit Windows® VistaTM certification. 33 6.4.3 ACPI Configuration BIOS SETUP UTILITY Advanced ACPI Settings Suspend To RAM Check Ready Bit Restore on the system. Check Ready Bit Use this item to enable or disable...

User Manual
Page 34
... It is 32. PCI Latency Timer The default value is recommended to enable or disable the "SATA Configuration" feature. 6.4.5 PCIPnP Configuration BIOS SETUP UTILITY Advanced Advanced PCI / PnP Settings PCI Latency Timer [32] Value in units of PCI clocks for PCI device latency timer register... Option General Help Load Defaults Save and Exit Exit v02.54 (C) Copyright 1985-2005, American Megatrends, Inc. 6.4.4 SA TA Configuration SAT BIOS SETUP UTILITY Advanced SATA Configuration SATA Configuration SATAII_1 SATAII_2 [Enabled] [ATAPI CDROM] [Hard Disk] Disabled Enabled Options +F1 F9 F10 ESC ...
... It is 32. PCI Latency Timer The default value is recommended to enable or disable the "SATA Configuration" feature. 6.4.5 PCIPnP Configuration BIOS SETUP UTILITY Advanced Advanced PCI / PnP Settings PCI Latency Timer [32] Value in units of PCI clocks for PCI device latency timer register... Option General Help Load Defaults Save and Exit Exit v02.54 (C) Copyright 1985-2005, American Megatrends, Inc. 6.4.4 SA TA Configuration SAT BIOS SETUP UTILITY Advanced SATA Configuration SATA Configuration SATAII_1 SATAII_2 [Enabled] [ATAPI CDROM] [Hard Disk] Disabled Enabled Options +F1 F9 F10 ESC ...
User Manual
Page 35
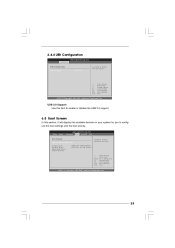
Enter F1 F9 F10 ESC Select Screen Select Item Go to configure the boot settings and the boot priority. BIOS SETUP UTILITY Advanced Boot Security Exit Main Smart Boot Settings Boot Settings Configuration 1st Boot Device 2nd Boot Device Hard Disk Drives CD.../DVD Drives [HDD: PM - ROM C] Configure Settings during System Boot. HDS722580VL] [CD / DVD: 3S - 6.4.6 USB Configuration BIOS SETUP UTILITY Advanced USB Configuration USB 2.0 Support [Enabled] To enable or disable USB 2.0 support. +F1 F9 F10 ESC Select Screen Select Item Change Option General...
Enter F1 F9 F10 ESC Select Screen Select Item Go to configure the boot settings and the boot priority. BIOS SETUP UTILITY Advanced Boot Security Exit Main Smart Boot Settings Boot Settings Configuration 1st Boot Device 2nd Boot Device Hard Disk Drives CD.../DVD Drives [HDD: PM - ROM C] Configure Settings during System Boot. HDS722580VL] [CD / DVD: 3S - 6.4.6 USB Configuration BIOS SETUP UTILITY Advanced USB Configuration USB 2.0 Support [Enabled] To enable or disable USB 2.0 support. +F1 F9 F10 ESC Select Screen Select Item Change Option General...

User Manual
Page 36
The default value is [Enabled]. 6.5.1 Boot Settings Configuration BIOS SETUP UTILITY Boot Boot Settings Configuration Full Screen Logo AddOn ROM Display Boot From Onboard LAN Bootup Num-Lock [Enabled] [Enabled] [Disabled] [On] Disabled: Displays ...
The default value is [Enabled]. 6.5.1 Boot Settings Configuration BIOS SETUP UTILITY Boot Boot Settings Configuration Full Screen Logo AddOn ROM Display Boot From Onboard LAN Bootup Num-Lock [Enabled] [Enabled] [Disabled] [On] Disabled: Displays ...
User Manual
Page 37
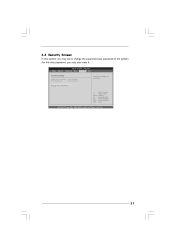
Enter F1 F9 F10 ESC Select Screen Select Item Change General Help Load Defaults Save and Exit Exit v02.54 (C) Copyright 1985-2005, American Megatrends, Inc. 37 BIOS SETUP UTILITY Advanced Boot Security Exit Main Smart Security Settings Supervisor Password : Not Installed User Password : Not Installed Change Supervisor Password Change User Password Install or Change the password. For the user password, you may also clear it. 6.6 Security Screen In this section, you may set or change the supervisor/user password for the system.
Enter F1 F9 F10 ESC Select Screen Select Item Change General Help Load Defaults Save and Exit Exit v02.54 (C) Copyright 1985-2005, American Megatrends, Inc. 37 BIOS SETUP UTILITY Advanced Boot Security Exit Main Smart Security Settings Supervisor Password : Not Installed User Password : Not Installed Change Supervisor Password Change User Password Install or Change the password. For the user password, you may also clear it. 6.6 Security Screen In this section, you may set or change the supervisor/user password for the system.

User Manual
Page 38
... Screen Select Item Go to discard all changes. Save Changes and Exit When you are allowed to load and save the changes and exit the BIOS SETUP UTILITY. F10 key can be used for this option, you select this option, it will pop-out the following message, "Discard changes ... Would you select this option, it will pop-out the following message, "Discard changes?" Discard Changes and Exit When you like to exit the BIOS SETUP UTILITY without saving any changes. Discard Changes When you like to save three user defaults according to your own requirements. 38 Select [OK] ...
... Screen Select Item Go to discard all changes. Save Changes and Exit When you are allowed to load and save the changes and exit the BIOS SETUP UTILITY. F10 key can be used for this option, you select this option, it will pop-out the following message, "Discard changes ... Would you select this option, it will pop-out the following message, "Discard changes?" Discard Changes and Exit When you like to exit the BIOS SETUP UTILITY without saving any changes. Discard Changes When you like to save three user defaults according to your own requirements. 38 Select [OK] ...
