User Manual
Page 3
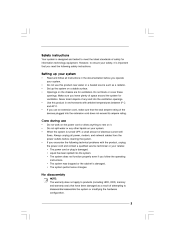
... rating of the devices plugged into the system. • The system does not function properly even if you follow all power, modem, and network cables from the power outlets before you leave plenty of safety for ventilation. Openings on a stable surface. Safety instructions Your system is designed and tested to disassemble/reassemble the system or modifying the hardware configuration. 3 Setting up the system...
... rating of the devices plugged into the system. • The system does not function properly even if you follow all power, modem, and network cables from the power outlets before you leave plenty of safety for ventilation. Openings on a stable surface. Safety instructions Your system is designed and tested to disassemble/reassemble the system or modifying the hardware configuration. 3 Setting up the system...
User Manual
Page 7
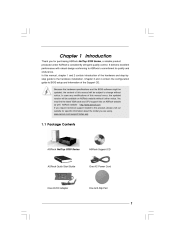
... are using. www.asrock.com/support/index.asp 1.1 Package Contents ASRock NetTop S330 Series ASRock Support CD ASRock Quick Start Guide One AC Power Cord One AC/DC Adapter One Anti-Slip Pad 7 Chapter 3 and 4 contain the configuration guide to quality and endurance. Because the hardware specifications and the BIOS software might be updated, the content of this manual occur, the updated version will be available on ASRock website as well. In case any...
... are using. www.asrock.com/support/index.asp 1.1 Package Contents ASRock NetTop S330 Series ASRock Support CD ASRock Quick Start Guide One AC Power Cord One AC/DC Adapter One Anti-Slip Pad 7 Chapter 3 and 4 contain the configuration guide to quality and endurance. Because the hardware specifications and the BIOS software might be updated, the content of this manual occur, the updated version will be available on ASRock website as well. In case any...
User Manual
Page 8
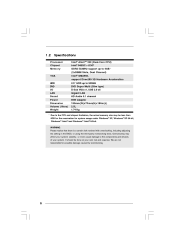
..., support DirectX9 3D Hardware Acceleration 2.5" HDD up to 500GB DVD Super Multi (Slim type) D-Sub VGA x1, USB 2.0 x6 Gigabit LAN HD Audio 5.1 channel 65W Adapter 195mm(W)x70mm(H)x186m(L) 2.5L 1.74 Kg Processor Chipset Memory VGA HDD DVD I/O LAN Sound Power Dimension Volume (liters) Weight * Due to the CPU and chipset limitation, the actual memory size may affect your system stability, or even cause damage to the components and devices of...
..., support DirectX9 3D Hardware Acceleration 2.5" HDD up to 500GB DVD Super Multi (Slim type) D-Sub VGA x1, USB 2.0 x6 Gigabit LAN HD Audio 5.1 channel 65W Adapter 195mm(W)x70mm(H)x186m(L) 2.5L 1.74 Kg Processor Chipset Memory VGA HDD DVD I/O LAN Sound Power Dimension Volume (liters) Weight * Due to the CPU and chipset limitation, the actual memory size may affect your system stability, or even cause damage to the components and devices of...

User Manual
Page 10
System Fan Connection System fan connector Ground +12V Rotation 4. CPU Fan Connection CPU fan connector SYS_FAN_TACH +12V Ground 10 System Memory Socket Connection 2 2 1 1 1 1 Installing a memory module Removing a memory module 3. NOTE. 1. SATA and Power Connections SATA & Power Connections HDD ODD Connect to ODD Connect to HDD Connect to SATA Connector (12) Connect to ATX5V Power Connector (13) Connect to SATA Connector (14) 2.
System Fan Connection System fan connector Ground +12V Rotation 4. CPU Fan Connection CPU fan connector SYS_FAN_TACH +12V Ground 10 System Memory Socket Connection 2 2 1 1 1 1 Installing a memory module Removing a memory module 3. NOTE. 1. SATA and Power Connections SATA & Power Connections HDD ODD Connect to ODD Connect to HDD Connect to SATA Connector (12) Connect to ATX5V Power Connector (13) Connect to SATA Connector (14) 2.

User Manual
Page 12
Drive activity indicator 24. Optical Disc Drive 23. Power ON/OFF button with status indicator 12 1.5 System Chassis Opening the system chassis 1. Remove the screws on the backside. 2. Slide the top panel backwards. 22 24 23 22.
Drive activity indicator 24. Optical Disc Drive 23. Power ON/OFF button with status indicator 12 1.5 System Chassis Opening the system chassis 1. Remove the screws on the backside. 2. Slide the top panel backwards. 22 24 23 22.

User Manual
Page 13
Hard Disc Drive 13 System Cooling Fan 26. Optical Disc Drive 27. 1.6 Internal System Components Optical disc & Hard disk drives The optical disc and hard disc drives are mounted in a drive cage. The cage can be removed by removing the top screws. 27 25 26 25.
Hard Disc Drive 13 System Cooling Fan 26. Optical Disc Drive 27. 1.6 Internal System Components Optical disc & Hard disk drives The optical disc and hard disc drives are mounted in a drive cage. The cage can be removed by removing the top screws. 27 25 26 25.

User Manual
Page 15
5. Connecting Power (DC-In Jack Port) 8. Power on the System (Power Switch) 15 Connecting External Audio Device (Line In Port) 7. Connecting Stereo Speakers or Headphones (Front L/R Out Port) 6.
5. Connecting Power (DC-In Jack Port) 8. Power on the System (Power Switch) 15 Connecting External Audio Device (Line In Port) 7. Connecting Stereo Speakers or Headphones (Front L/R Out Port) 6.
User Manual
Page 18
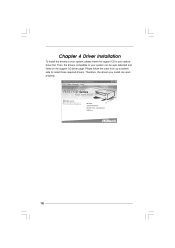
Chapter 4 Driver Installation To install the drivers to your system, please insert the support CD to your system can work properly. 18 Therefore, the drivers you install can be auto-detected and listed on the support CD driver page. Then, the drivers compatible to install those required drivers. Please follow the order from up to bottom side to your optical drive first.
Chapter 4 Driver Installation To install the drivers to your system, please insert the support CD to your system can work properly. 18 Therefore, the drivers you install can be auto-detected and listed on the support CD driver page. Then, the drivers compatible to install those required drivers. Please follow the order from up to bottom side to your optical drive first.

User Manual
Page 19
... running speed for OS to resume to working state, which normally enable the Sleep/Standby and Hibernation modes in just a few seconds. In Fast Mode, it uses S3 and takes only a few seconds for your system *. Chapter 5 Utility Menu The utilities meu shows the applications and other software that this product supports. 5.1 Instant Boot 5.1.1 Introduction Instant Boot, a user-friendly tool that does not secure ID and Password...
... running speed for OS to resume to working state, which normally enable the Sleep/Standby and Hibernation modes in just a few seconds. In Fast Mode, it uses S3 and takes only a few seconds for your system *. Chapter 5 Utility Menu The utilities meu shows the applications and other software that this product supports. 5.1 Instant Boot 5.1.1 Introduction Instant Boot, a user-friendly tool that does not secure ID and Password...
User Manual
Page 20
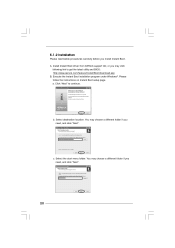
... the instructions on Instant Boot setup page. Click "Next" to get the latest utility and BIOS: http://www.asrock.com/feature/InstantBoot/download.asp B. Select the start menu folder. c. Select destination location. You may choose a different folder if you need , and click "Next". a. You may choose a different folder if you need , and click "Next". 20 Install Instant Boot driver from ASRock support CD, or you install Instant Boot. 5.1.2 Installation Please...
... the instructions on Instant Boot setup page. Click "Next" to get the latest utility and BIOS: http://www.asrock.com/feature/InstantBoot/download.asp B. Select the start menu folder. c. Select destination location. You may choose a different folder if you need , and click "Next". a. You may choose a different folder if you need , and click "Next". 20 Install Instant Boot driver from ASRock support CD, or you install Instant Boot. 5.1.2 Installation Please...
User Manual
Page 21
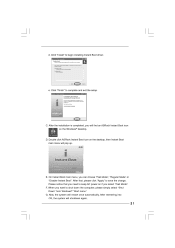
..." from Windows® "Start menu". G. Now, the system will shutdown again. 21 E. Please notice that , please click "Apply" to begin installing Instant Boot driver. e. After the installation is completed, you can choose "Fast Mode", "Regular Mode" or "Disable Instant Boot". After reentering into OS, the system will restart once automatically. Double click ASRock Instant Boot icon on the Windows® desktop. On Instant Boot main menu, you...
..." from Windows® "Start menu". G. Now, the system will shutdown again. 21 E. Please notice that , please click "Apply" to begin installing Instant Boot driver. e. After the installation is completed, you can choose "Fast Mode", "Regular Mode" or "Disable Instant Boot". After reentering into OS, the system will restart once automatically. Double click ASRock Instant Boot icon on the Windows® desktop. On Instant Boot main menu, you...

User Manual
Page 24
... "Auto apply when program starts", it will pop up. ASRock is completed, you turn on the desktop, then ASRock OC Tuner main menu will start with the default settings. Auto run some test programs to run when Windows starts If you click this button, every time you will automatically start the OC Tuner. Double click ASRock OC Tuner icon on your system and enter Windows®, the system will...
... "Auto apply when program starts", it will pop up. ASRock is completed, you turn on the desktop, then ASRock OC Tuner main menu will start with the default settings. Auto run some test programs to run when Windows starts If you click this button, every time you will automatically start the OC Tuner. Double click ASRock OC Tuner icon on your system and enter Windows®, the system will...

User Manual
Page 26
... default system device to locate and load the Operating System Security To set up the computer. You may run the BIOS SETUP UTILITY when you wish to enter the BIOS SETUP UTILITY after POST, restart the system by pressing + + , or by turning the system off and then back on the menu bar, and then press to configure your screen. 6.1.1 BIOS Menu Bar The top of the Main Smart Advanced Boot screen...
... default system device to locate and load the Operating System Security To set up the computer. You may run the BIOS SETUP UTILITY when you wish to enter the BIOS SETUP UTILITY after POST, restart the system by pressing + + , or by turning the system off and then back on the menu bar, and then press to configure your screen. 6.1.1 BIOS Menu Bar The top of the Main Smart Advanced Boot screen...
User Manual
Page 30
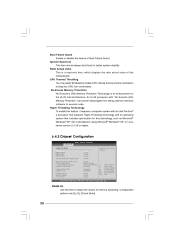
... DRAM Configuration Internal Graphics Mode Select DVMT Mode Select DVMT/FIXED Memory Onboard GPU Clock Onboard HD Audio OnBoard Lan VCORE Voltage DRAM Voltage VTT Voltage Select Screen Select Item Change Option General Help Load Defaults Save and Exit Exit v02.54 (C) Copyright 1985-2005, American Megatrends, Inc. An IA-32 processor with an Intel Pentium® 4 processor that supports Hyper-Threading technology and an operating...
... DRAM Configuration Internal Graphics Mode Select DVMT Mode Select DVMT/FIXED Memory Onboard GPU Clock Onboard HD Audio OnBoard Lan VCORE Voltage DRAM Voltage VTT Voltage Select Screen Select Item Change Option General Help Load Defaults Save and Exit Exit v02.54 (C) Copyright 1985-2005, American Megatrends, Inc. An IA-32 processor with an Intel Pentium® 4 processor that supports Hyper-Threading technology and an operating...
User Manual
Page 31
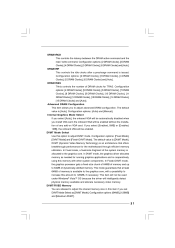
... This controls the latency between the DRAM active command and the read / write command. Configuration options: [Fixed Mode], [DVMT Mode] and [Fixed+DVMT Mode]. This mode guarantees that offers breakthrough performance for the motherboard through efficient memory utilization. Internal Graphics Mode Select If you select [Auto], the onboard VGA will be used under Windows® VistaTM OS because the driver will not be automatically disabled when you select [Enabled...
... This controls the latency between the DRAM active command and the read / write command. Configuration options: [Fixed Mode], [DVMT Mode] and [Fixed+DVMT Mode]. This mode guarantees that offers breakthrough performance for the motherboard through efficient memory utilization. Internal Graphics Mode Select If you select [Auto], the onboard VGA will be used under Windows® VistaTM OS because the driver will not be automatically disabled when you select [Enabled...
User Manual
Page 33
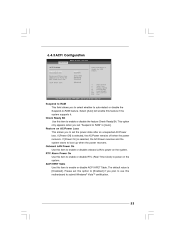
.../Power Loss Onboard LAN Power On RTC Alarm Power On ACPI HPET Table [Auto] [Enabled] [Power Off] [Disabled] [Disabled] [Disabled] Select Screen Select Item Change Option General Help Load Defaults Save and Exit Exit Select auto-detect or disable the STR feature. +F1 F9 F10 ESC v02.54 (C) Copyright 1985-2005, American Megatrends, Inc. Please set this motherboard to boot up when the power recovers. 6.4.3 ACPI Configuration BIOS SETUP UTILITY Advanced ACPI Settings...
.../Power Loss Onboard LAN Power On RTC Alarm Power On ACPI HPET Table [Auto] [Enabled] [Power Off] [Disabled] [Disabled] [Disabled] Select Screen Select Item Change Option General Help Load Defaults Save and Exit Exit Select auto-detect or disable the STR feature. +F1 F9 F10 ESC v02.54 (C) Copyright 1985-2005, American Megatrends, Inc. Please set this motherboard to boot up when the power recovers. 6.4.3 ACPI Configuration BIOS SETUP UTILITY Advanced ACPI Settings...

User Manual
Page 34
... 1985-2005, American Megatrends, Inc. 6.4.4 SA TA Configuration SAT BIOS SETUP UTILITY Advanced SATA Configuration SATA Configuration SATAII_1 SATAII_2 [Enabled] [ATAPI CDROM] [Hard Disk] Disabled Enabled Options +F1 F9 F10 ESC Select Screen Select Item Change Option General Help Load Defaults Save and Exit Exit v02.54 (C) Copyright 1985-2005, American Megatrends, Inc. SATA Configuration Use this item to keep the default value unless the installed PCI expansion cards' specifications require other settings. 34 It is 32.
... 1985-2005, American Megatrends, Inc. 6.4.4 SA TA Configuration SAT BIOS SETUP UTILITY Advanced SATA Configuration SATA Configuration SATAII_1 SATAII_2 [Enabled] [ATAPI CDROM] [Hard Disk] Disabled Enabled Options +F1 F9 F10 ESC Select Screen Select Item Change Option General Help Load Defaults Save and Exit Exit v02.54 (C) Copyright 1985-2005, American Megatrends, Inc. SATA Configuration Use this item to keep the default value unless the installed PCI expansion cards' specifications require other settings. 34 It is 32.
User Manual
Page 35
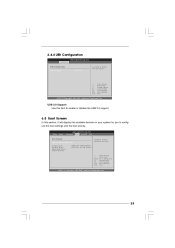
HDS722580VL] [CD / DVD: 3S - BIOS SETUP UTILITY Advanced Boot Security Exit Main Smart Boot Settings Boot Settings Configuration 1st Boot Device 2nd Boot Device Hard Disk Drives CD/DVD Drives [HDD: PM - USB 2.0 Support Use this item to enable or disable the USB 2.0 support. 6.5 Boot Screen In this section, it will display the available devices on your system for you to Sub Screen General Help Load Defaults Save and Exit Exit v02.54 (C) Copyright 1985-2005, American Megatrends, Inc. 35 ROM C] Configure Settings during System Boot. Enter F1 F9...
HDS722580VL] [CD / DVD: 3S - BIOS SETUP UTILITY Advanced Boot Security Exit Main Smart Boot Settings Boot Settings Configuration 1st Boot Device 2nd Boot Device Hard Disk Drives CD/DVD Drives [HDD: PM - USB 2.0 Support Use this item to enable or disable the USB 2.0 support. 6.5 Boot Screen In this section, it will display the available devices on your system for you to Sub Screen General Help Load Defaults Save and Exit Exit v02.54 (C) Copyright 1985-2005, American Megatrends, Inc. 35 ROM C] Configure Settings during System Boot. Enter F1 F9...
User Manual
Page 37
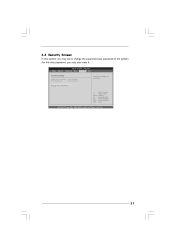
Enter F1 F9 F10 ESC Select Screen Select Item Change General Help Load Defaults Save and Exit Exit v02.54 (C) Copyright 1985-2005, American Megatrends, Inc. 37 6.6 Security Screen In this section, you may set or change the supervisor/user password for the system. BIOS SETUP UTILITY Advanced Boot Security Exit Main Smart Security Settings Supervisor Password : Not Installed User Password : Not Installed Change Supervisor Password Change User Password Install or Change the password. For the user password, you may also clear it.
Enter F1 F9 F10 ESC Select Screen Select Item Change General Help Load Defaults Save and Exit Exit v02.54 (C) Copyright 1985-2005, American Megatrends, Inc. 37 6.6 Security Screen In this section, you may set or change the supervisor/user password for the system. BIOS SETUP UTILITY Advanced Boot Security Exit Main Smart Security Settings Supervisor Password : Not Installed User Password : Not Installed Change Supervisor Password Change User Password Install or Change the password. For the user password, you may also clear it.
User Manual
Page 39
... automatically, locate and double click on a specific item then follow the installation wizard to know more information. 7 . 2 Support CD Information The Support CD contains necessary drivers and useful utilities that the system supports. or you need to contact ASRock or want to install it. 7.2.4 Contact Information If you may contact your CD-ROM drive. Refer to display the menus. 7 . 2 . 2 Drivers Menu The Drivers Menu shows the available devices drivers if the...
... automatically, locate and double click on a specific item then follow the installation wizard to know more information. 7 . 2 Support CD Information The Support CD contains necessary drivers and useful utilities that the system supports. or you need to contact ASRock or want to install it. 7.2.4 Contact Information If you may contact your CD-ROM drive. Refer to display the menus. 7 . 2 . 2 Drivers Menu The Drivers Menu shows the available devices drivers if the...

