
User Manual
Page 3
... Setup 17 2.7 Onboard Headers and Connectors 18 2.8 Serial ATA (SATA) Hard Disks Installation 21 2.9 Hot Plug and Hot Swap Functions for PCI Express Graphics Slot (PCI Express x 4 9 1.5 Motherboard Layout 10 1.6 ASRock 8CH I/O 11 2. BIOS SETUP Utility 24 3.1 Introduction 24 3.1.1 BIOS Menu Bar 24 3.1.2 Navigation Keys 25 3.2 Main Screen 25 3.3 Advanced Screen 26 3.3.1 CPU Configuration 26 3.3.2 Chipset Configuration 27 3.3.3 ACPI Configuration 29 3.3.4 IDE Configuration 30 3.3.5 PCIPnP Configuration 32 3.3.6 Floppy Configuration 32 3.3.7 Super IO Configuration 33 3.3.8 USB...
... Setup 17 2.7 Onboard Headers and Connectors 18 2.8 Serial ATA (SATA) Hard Disks Installation 21 2.9 Hot Plug and Hot Swap Functions for PCI Express Graphics Slot (PCI Express x 4 9 1.5 Motherboard Layout 10 1.6 ASRock 8CH I/O 11 2. BIOS SETUP Utility 24 3.1 Introduction 24 3.1.1 BIOS Menu Bar 24 3.1.2 Navigation Keys 25 3.2 Main Screen 25 3.3 Advanced Screen 26 3.3.1 CPU Configuration 26 3.3.2 Chipset Configuration 27 3.3.3 ACPI Configuration 29 3.3.4 IDE Configuration 30 3.3.5 PCIPnP Configuration 32 3.3.6 Floppy Configuration 32 3.3.7 Super IO Configuration 33 3.3.8 USB...
User Manual
Page 5
... Serial ATA (SATA) HDD Power Cable (Optional) One ASRock 8CH I/O 5 Introduction Thank you for a 3.5-in , 30.5 cm x 21.8 cm) ASRock P4Dual-880Pro Quick Installation Guide ASRock P4Dual-880Pro Support CD One 80-conductor Ultra ATA 66/100/133 IDE Ribbon Cable One Ribbon Cable for purchasing ASRock P4Dual-880Pro motherboard, a reliable motherboard produced under ASRock's consistently stringent quality control. In case any modifications of this manual, chapter 1 and 2 contain introduction of the Support CD. Chapter 3 and 4 contain the configuration guide to BIOS setup...
... Serial ATA (SATA) HDD Power Cable (Optional) One ASRock 8CH I/O 5 Introduction Thank you for a 3.5-in , 30.5 cm x 21.8 cm) ASRock P4Dual-880Pro Quick Installation Guide ASRock P4Dual-880Pro Support CD One 80-conductor Ultra ATA 66/100/133 IDE Ribbon Cable One Ribbon Cable for purchasing ASRock P4Dual-880Pro motherboard, a reliable motherboard produced under ASRock's consistently stringent quality control. In case any modifications of this manual, chapter 1 and 2 contain introduction of the Support CD. Chapter 3 and 4 contain the configuration guide to BIOS setup...
User Manual
Page 6
... Slots Supports PC2700 (DDR333) / PC2100 (DDR266), Max. 3.5GB, Dual Channel Memory Technology support (see CAUTION 2) IDE: IDE1: ATA 133 / Ultra DMA Mode 6 IDE2: ATA 133 / Ultra DMA Mode 6 Supports up to 4 IDE devices Serial ATA: 2 SATA connectors Support up to 1.5Gb/s data transfer rate Floppy Port: Supports up to 2 floppy disk drives Audio: 7.1 channels AC'97 Audio LAN: Speed: 802.3u (10/100 Ethernet), supports Wake-On-LAN Hardware Monitor: CPU temperature sensing Chassis temperature sensing CPU overheat shutdown to protect CPU life (ASRock U-COP)(see CAUTION 3) CPU fan...
... Slots Supports PC2700 (DDR333) / PC2100 (DDR266), Max. 3.5GB, Dual Channel Memory Technology support (see CAUTION 2) IDE: IDE1: ATA 133 / Ultra DMA Mode 6 IDE2: ATA 133 / Ultra DMA Mode 6 Supports up to 4 IDE devices Serial ATA: 2 SATA connectors Support up to 1.5Gb/s data transfer rate Floppy Port: Supports up to 2 floppy disk drives Audio: 7.1 channels AC'97 Audio LAN: Speed: 802.3u (10/100 Ethernet), supports Wake-On-LAN Hardware Monitor: CPU temperature sensing Chassis temperature sensing CPU overheat shutdown to protect CPU life (ASRock U-COP)(see CAUTION 3) CPU fan...

User Manual
Page 7
... recommended CPU bus frequencies may cause the instability of "Hyper Threading Technology", please check page 27. 2. Please check the table on page 16. 6. This motherboard supports Dual Channel Memory Technology. Before you install the PC system. 4. To improve heat dissipation, remember to the "Supported AGP VGA Card List for advanced users' reference, see CAUTION 7) AMI BIOS Supports "Plug and Play" ACPI 1.1 compliance wake up events Supports jumperfree SMBIOS 2.3.1 support CPU frequency stepless control (only for AGP Slot...
... recommended CPU bus frequencies may cause the instability of "Hyper Threading Technology", please check page 27. 2. Please check the table on page 16. 6. This motherboard supports Dual Channel Memory Technology. Before you install the PC system. 4. To improve heat dissipation, remember to the "Supported AGP VGA Card List for advanced users' reference, see CAUTION 7) AMI BIOS Supports "Plug and Play" ACPI 1.1 compliance wake up events Supports jumperfree SMBIOS 2.3.1 support CPU frequency stepless control (only for AGP Slot...
User Manual
Page 11
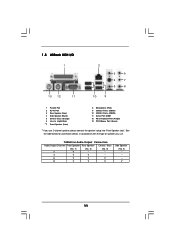
... type of speaker you use . 1.5 ASRock 8CH I/O 1 13 12 11 2 3 6 4 7 5 8 10 9 1 Parallel Port 2 RJ-45 Port 3 Rear Speaker (Gray) 4 Side Speaker (Black) 5 Central / Bass (Orange) 6 Line In (Light Blue) * 7 Front Speaker (Lime) 8 Microphone (Pink) 9 USB 2.0 Ports (USB01) 10 USB 2.0 Ports (USB23) 11 Serial Port: COM1 12 PS/2 Keyboard Port (Purple) 13 PS/2 Mouse Port (Green) * If you use 2-channel speaker, please connect the speaker's plug into "Front Speaker Jack". See the table below for Audio Output Connection Audio Output Channels...
... type of speaker you use . 1.5 ASRock 8CH I/O 1 13 12 11 2 3 6 4 7 5 8 10 9 1 Parallel Port 2 RJ-45 Port 3 Rear Speaker (Gray) 4 Side Speaker (Black) 5 Central / Bass (Orange) 6 Line In (Light Blue) * 7 Front Speaker (Lime) 8 Microphone (Pink) 9 USB 2.0 Ports (USB01) 10 USB 2.0 Ports (USB23) 11 Serial Port: COM1 12 PS/2 Keyboard Port (Purple) 13 PS/2 Mouse Port (Green) * If you use 2-channel speaker, please connect the speaker's plug into "Front Speaker Jack". See the table below for Audio Output Connection Audio Output Channels...
User Manual
Page 14
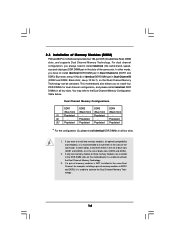
....7), so that Dual Channel Memory Technology can be activated. Populated - (2) - In other words, you always need to install identical (the same brand, speed, size and chip-type) DDR DIMM pair in the slots of memory modules in DDR1 and DDR2, it is NOT installed in the set of black slots (DDR2 and DDR4). 2. Blue slots; If you to install four DDR DIMMs for optimal compatibility and reliability...
....7), so that Dual Channel Memory Technology can be activated. Populated - (2) - In other words, you always need to install identical (the same brand, speed, size and chip-type) DDR DIMM pair in the slots of memory modules in DDR1 and DDR2, it is NOT installed in the set of black slots (DDR2 and DDR4). 2. Blue slots; If you to install four DDR DIMMs for optimal compatibility and reliability...

User Manual
Page 16
... 32-bit PCI interface. Remove the bracket facing the slot that you start the installation. PCI slots: PCI slots are 4 PCI slots, 1 AGP slot, and 1 PCI Express Graphics slot on P4Dual-880Pro motherboard. The ASRock AGP slot has a special design of the expansion card and make sure that the power supply is switched off or the power cord is already installed in a chassis). For the information of the compatible AGP VGA cards, please refer to the "Supported PCI Express VGA Card List forPCI Express Graphics Slot (PCI Express x 4)" on the AGP slot of the compatible PCI Express VGA cards...
... 32-bit PCI interface. Remove the bracket facing the slot that you start the installation. PCI slots: PCI slots are 4 PCI slots, 1 AGP slot, and 1 PCI Express Graphics slot on P4Dual-880Pro motherboard. The ASRock AGP slot has a special design of the expansion card and make sure that the power supply is switched off or the power cord is already installed in a chassis). For the information of the compatible AGP VGA cards, please refer to the "Supported PCI Express VGA Card List forPCI Express Graphics Slot (PCI Express x 4)" on the AGP slot of the compatible PCI Express VGA cards...

User Manual
Page 17
... clear the CMOS right after you can work. To clear and reset the system parameters to ASRock patented PCI Express Graphics Technology, this motherboard supports Surround Display upgrade. 2.5 Surround Display Feature Thanks to default setup, please turn off the computer and unplug the power cord from the power supply. For the detailed instruction, please refer to the document at the following path in the Support CD: ..\ Surround Display 2.6 Jumpers Setup The illustration shows how jumpers are "Short" when jumper...
... clear the CMOS right after you can work. To clear and reset the system parameters to ASRock patented PCI Express Graphics Technology, this motherboard supports Surround Display upgrade. 2.5 Surround Display Feature Thanks to default setup, please turn off the computer and unplug the power cord from the power supply. For the detailed instruction, please refer to the document at the following path in the Support CD: ..\ Surround Display 2.6 Jumpers Setup The illustration shows how jumpers are "Short" when jumper...

User Manual
Page 22
... Support CD, "Guide to your system. Please select CDROM as well. 22 WARNING! D. Start to set RAID configuration, you can start to install Windows 2000 / Windows XP OS on your system. STEP 2: Use "SATA RAID BIOS" to format and copy files [YN]? When you see these messages, Please insert a diskette into the floppy drive. Formatting the floppy diskette will be installed to SATA Hard Disks Installation and RAID Configuration", which is located in the Support CD for boot devices...
... Support CD, "Guide to your system. Please select CDROM as well. 22 WARNING! D. Start to set RAID configuration, you can start to install Windows 2000 / Windows XP OS on your system. STEP 2: Use "SATA RAID BIOS" to format and copy files [YN]? When you see these messages, Please insert a diskette into the floppy drive. Formatting the floppy diskette will be installed to SATA Hard Disks Installation and RAID Configuration", which is located in the Support CD for boot devices...
User Manual
Page 26
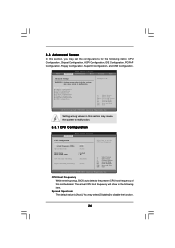
... CPU Select Screen Select Item Enter Go to disable the function. 26 The actual CPU host frequency will show in the following items: CPU Configuration, Chipset Configuration, ACPI Configuration, IDE Configuration, PCIPnP Configuration, Floppy Configuration, SuperIO Configuration, and USB Configuration. You may cause system to set the configurations for the following item. CPU Host Frequency While entering setup, BIOS auto detects the present CPU host frequency of this motherboard. Spread Spectrum The default value is [Auto]. Main BIOS SETUP UTILITY Advanced H/W Monitor Boot...
... CPU Select Screen Select Item Enter Go to disable the function. 26 The actual CPU host frequency will show in the following items: CPU Configuration, Chipset Configuration, ACPI Configuration, IDE Configuration, PCIPnP Configuration, Floppy Configuration, SuperIO Configuration, and USB Configuration. You may cause system to set the configurations for the following item. CPU Host Frequency While entering setup, BIOS auto detects the present CPU host frequency of this motherboard. Spread Spectrum The default value is [Auto]. Main BIOS SETUP UTILITY Advanced H/W Monitor Boot...

User Manual
Page 27
... 27 DRAM Frequency If [Auto] is selected, the motherboard will be hidden if the installed CPU does not support Hyper-Threading technology. 3.3.2 Chipset Configuration BIOS SETUP UTILITY Advanced Chipset Configuration DRAM Frequency Flexibility Option DRAM CAS# Latency DRAM Command Rate DRAM Bus Selection [Auto] [Disabled] [Auto] [2T Command] [Auto] DRAM Voltage AGP Voltage [Auto] [Auto] Primary Graphics Adapter AGP Aperture Size AGP Mode AGP Fast Write [PCI] [64MB] [Auto] [Disabled] PCI Delay Transaction OnBoard LAN OnBoard AC'97 Audio [Disabled] [Eabled] [Auto] Options 133MHz...
... 27 DRAM Frequency If [Auto] is selected, the motherboard will be hidden if the installed CPU does not support Hyper-Threading technology. 3.3.2 Chipset Configuration BIOS SETUP UTILITY Advanced Chipset Configuration DRAM Frequency Flexibility Option DRAM CAS# Latency DRAM Command Rate DRAM Bus Selection [Auto] [Disabled] [Auto] [2T Command] [Auto] DRAM Voltage AGP Voltage [Auto] [Auto] Primary Graphics Adapter AGP Aperture Size AGP Mode AGP Fast Write [PCI] [64MB] [Auto] [Disabled] PCI Delay Transaction OnBoard LAN OnBoard AC'97 Audio [Disabled] [Eabled] [Auto] Options 133MHz...
User Manual
Page 28
...] as the primary graphics adapter. Disable this feature is accessing 8-bit ISA cards. Configuration options: [Auto], [2.5], [2], and [3]. The default value is [Auto]. The default value is [2T Command]. PCI Delay Transaction Enable PCI Delay Transaction feature will free the PCI Bus when the CPU is set to a section of memory accessing. Flexibility Option The default value of AGP fast write protocol support. DRAM CAS# Latency Use this motherboard, you have properly set the AGP mode as [Auto], [4X], [2X], or...
...] as the primary graphics adapter. Disable this feature is accessing 8-bit ISA cards. Configuration options: [Auto], [2.5], [2], and [3]. The default value is [Auto]. The default value is [2T Command]. PCI Delay Transaction Enable PCI Delay Transaction feature will free the PCI Bus when the CPU is set to a section of memory accessing. Flexibility Option The default value of AGP fast write protocol support. DRAM CAS# Latency Use this motherboard, you have properly set the AGP mode as [Auto], [4X], [2X], or...
User Manual
Page 29
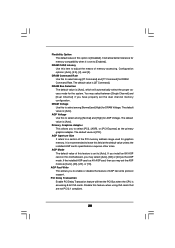
... plugged. 3.3.3 ACPI Configuration BIOS SETUP UTILITY Advanced ACPI Configuration Suspend To RAM Restore on the system from the power-soft-off when the power recovers. Select [Auto], onboard AC'97 Audio will be enabled if there is no PCI sound card plugged, and be disabled if PCI sound card is selected, the AC/power remains off mode. If [Power On] is selected, the AC/power resumes and the system starts to enable or disable the onboard LAN feature. OnBoard AC'97 Audio Select [Auto], [Enabled], or [Disabled...
... plugged. 3.3.3 ACPI Configuration BIOS SETUP UTILITY Advanced ACPI Configuration Suspend To RAM Restore on the system from the power-soft-off when the power recovers. Select [Auto], onboard AC'97 Audio will be enabled if there is no PCI sound card plugged, and be disabled if PCI sound card is selected, the AC/power remains off mode. If [Power On] is selected, the AC/power resumes and the system starts to enable or disable the onboard LAN feature. OnBoard AC'97 Audio Select [Auto], [Enabled], or [Disabled...
User Manual
Page 30
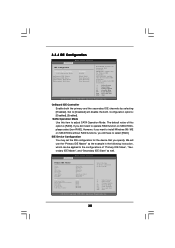
...ESC Select Screen Select Item Change Option General Help Load Defaults Save and Exit Exit v02.54 (C) Copyright 1985-2003, American Megatrends, Inc. 30 SECONDARY: enables only the Secondary IDE Controller. BIOS SETUP UTILITY Advanced Primary IDE Master Device Vendor Size LBA Mode Block Mode PIO Mode Async DMA Ultra DMA S.M.A.R.T. PRIMARY: enables only the Primary IDE Controller. SATA Operation Mode Use this option is [RAID]. 3.3.4 IDE Configuration BIOS SETUP UTILITY Advanced IDE Configuration OnBoard IDE Controller SATA Operation Mode Primary IDE Master Primary IDE Slave...
...ESC Select Screen Select Item Change Option General Help Load Defaults Save and Exit Exit v02.54 (C) Copyright 1985-2003, American Megatrends, Inc. 30 SECONDARY: enables only the Secondary IDE Controller. BIOS SETUP UTILITY Advanced Primary IDE Master Device Vendor Size LBA Mode Block Mode PIO Mode Async DMA Ultra DMA S.M.A.R.T. PRIMARY: enables only the Primary IDE Controller. SATA Operation Mode Use this option is [RAID]. 3.3.4 IDE Configuration BIOS SETUP UTILITY Advanced IDE Configuration OnBoard IDE Controller SATA Operation Mode Primary IDE Master Primary IDE Slave...
User Manual
Page 31
... BIOS, use of IDE device. [Auto]: Select [Auto] to automatically detect the hard disk drive. TYPE Use this item to configure the type of the IDE device that you specify. DMA Mode DMA capability allows the improved transfer-speed and data-integrity for IDE ARMD (ATAPI Removable Media Device), such as FDISK, to disable the LBA/Large mode. Configuration options: [Disabled], [Auto], [Enabled]. 32-Bit Data Transfer Use this item to set the partition of the Primary IDE hard disk drives to active. [CD/DVD...
... BIOS, use of IDE device. [Auto]: Select [Auto] to automatically detect the hard disk drive. TYPE Use this item to configure the type of the IDE device that you specify. DMA Mode DMA capability allows the improved transfer-speed and data-integrity for IDE ARMD (ATAPI Removable Media Device), such as FDISK, to disable the LBA/Large mode. Configuration options: [Disabled], [Auto], [Enabled]. 32-Bit Data Transfer Use this item to set the partition of the Primary IDE hard disk drives to active. [CD/DVD...
User Manual
Page 32
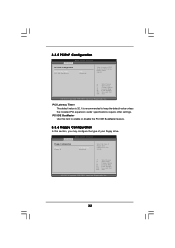
... Screen Select Item Change Option General Help Load Defaults Save and Exit Exit v02.54 (C) Copyright 1985-2003, American Megatrends, Inc. 32 It is 32. PCI IDE BusMaster Use this item to enable or disable the PCI IDE BusMaster feature. 3.3.6 Floppy Configuration In this section, you may configure the type of floppy drive connected to keep the default value unless the installed PCI expansion cards' specifications require other settings. BIOS SETUP UTILITY Advanced Floppy Configuration Floppy A Floppy B [1.44 MB 312"] [Disabled] Select the type...
... Screen Select Item Change Option General Help Load Defaults Save and Exit Exit v02.54 (C) Copyright 1985-2003, American Megatrends, Inc. 32 It is 32. PCI IDE BusMaster Use this item to enable or disable the PCI IDE BusMaster feature. 3.3.6 Floppy Configuration In this section, you may configure the type of floppy drive connected to keep the default value unless the installed PCI expansion cards' specifications require other settings. BIOS SETUP UTILITY Advanced Floppy Configuration Floppy A Floppy B [1.44 MB 312"] [Disabled] Select the type...
User Manual
Page 33
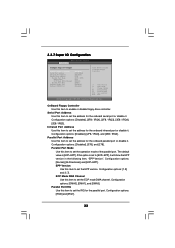
... IO Configuration BIOS SETUP UTILITY Advanced Configure Super IO Chipset OnBoard Floppy Controller Serial Port Address Infrared Port Address Parallel Port Address Parallel Port Mode EPP Version ECP Mode DMA Channel Parallel Port IRQ OnBoard Game Port OnBoard MIDI Port [Enabled] [3F8 / IRQ4] [Disabled] [378] [ECP + EPP] [1.9] [DMA3] [IRQ7] [Enabled] [Disabled] Allow BIOS to set the operation mode of the parallel port. OnBoard Floppy Controller Use this item to Enable or Disable Floppy Controller. +F1 F9 F10 ESC Select Screen Select Item Change Option General Help Load Defaults Save...
... IO Configuration BIOS SETUP UTILITY Advanced Configure Super IO Chipset OnBoard Floppy Controller Serial Port Address Infrared Port Address Parallel Port Address Parallel Port Mode EPP Version ECP Mode DMA Channel Parallel Port IRQ OnBoard Game Port OnBoard MIDI Port [Enabled] [3F8 / IRQ4] [Disabled] [378] [ECP + EPP] [1.9] [DMA3] [IRQ7] [Enabled] [Disabled] Allow BIOS to set the operation mode of the parallel port. OnBoard Floppy Controller Use this item to Enable or Disable Floppy Controller. +F1 F9 F10 ESC Select Screen Select Item Change Option General Help Load Defaults Save...
User Manual
Page 34
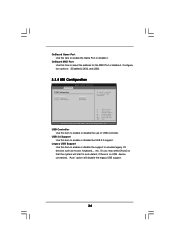
... options: [Disabled], [300], and [330]. 3.3.8 USB Configuration BIOS SETUP UTILITY Advanced USB Configuration USB Controller USB 2.0 Support Legacy USB Support [Enabled] [Enabled] [Disabled] To enable or disable the onboard USB controllers. +F1 F9 F10 ESC Select Screen Select Item Change Option General Help Load Defaults Save and Exit Exit v02.54 (C) Copyright 1985-2003, American Megatrends, Inc. USB Controller Use this item to enable or disable the USB 2.0 support. USB 2.0 Support Use this item to enable or disable the use of USB controller. etc. Or you may select [Auto...
... options: [Disabled], [300], and [330]. 3.3.8 USB Configuration BIOS SETUP UTILITY Advanced USB Configuration USB Controller USB 2.0 Support Legacy USB Support [Enabled] [Enabled] [Disabled] To enable or disable the onboard USB controllers. +F1 F9 F10 ESC Select Screen Select Item Change Option General Help Load Defaults Save and Exit Exit v02.54 (C) Copyright 1985-2003, American Megatrends, Inc. USB Controller Use this item to enable or disable the USB 2.0 support. USB 2.0 Support Use this item to enable or disable the use of USB controller. etc. Or you may select [Auto...

User Manual
Page 37
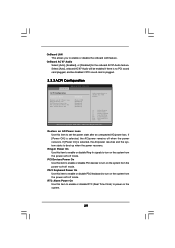
For the user password, you may also clear it. 3.6 Security Screen In this section, you may set or change the supervisor/user password for the system. BIOS SETUP UTILITY Main Advanced H/W Monitor Boot Security Exit Security Settings Supervisor Password : Not Installed User Password : Not Installed Change Supervisor Password Change User Password Clear User Password Install or Change the password. Select Screen Select Item Enter Change F1 General Help F9 Load Defaults F10 Save and Exit ESC Exit v02.54 (C) Copyright 1985-2003, American Megatrends, Inc. 37
For the user password, you may also clear it. 3.6 Security Screen In this section, you may set or change the supervisor/user password for the system. BIOS SETUP UTILITY Main Advanced H/W Monitor Boot Security Exit Security Settings Supervisor Password : Not Installed User Password : Not Installed Change Supervisor Password Change User Password Clear User Password Install or Change the password. Select Screen Select Item Enter Change F1 General Help F9 Load Defaults F10 Save and Exit ESC Exit v02.54 (C) Copyright 1985-2003, American Megatrends, Inc. 37

User Manual
Page 39
... the motherboard contains necessary drivers and useful utilities that the motherboard supports. The CD automatically displays the Main Menu if "AUTORUN" is enabled in your CD-ROM drive. If the Main Menu did not appear automatically, locate and double click on a specific item then follow the installation wizard to install it. 4.2.4 Contact Information If you may contact your OS documentation for further information. 39 Click on the file "ASSETUP...
... the motherboard contains necessary drivers and useful utilities that the motherboard supports. The CD automatically displays the Main Menu if "AUTORUN" is enabled in your CD-ROM drive. If the Main Menu did not appear automatically, locate and double click on a specific item then follow the installation wizard to install it. 4.2.4 Contact Information If you may contact your OS documentation for further information. 39 Click on the file "ASSETUP...


