User Manual
Page 5
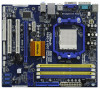
... Contents One ASRock N68C-GS UCC / N68C-S UCC Motherboard (Micro ATX Form Factor: 9.6-in x 8.2-in, 24.4 cm x 20.8 cm) One ASRock N68C-GS UCC / N68C-S UCC Quick Installation Guide One ASRock N68C-GS UCC / N68C-S UCC Support CD Two Serial ATA (SATA) Data Cables (Optional) One I/O Panel Shield 5 Chapter 3 and 4 contain the configuration guide to BIOS setup and information of this manual occur, the updated version will...
... Contents One ASRock N68C-GS UCC / N68C-S UCC Motherboard (Micro ATX Form Factor: 9.6-in x 8.2-in, 24.4 cm x 20.8 cm) One ASRock N68C-GS UCC / N68C-S UCC Quick Installation Guide One ASRock N68C-GS UCC / N68C-S UCC Support CD Two Serial ATA (SATA) Data Cables (Optional) One I/O Panel Shield 5 Chapter 3 and 4 contain the configuration guide to BIOS setup and information of this manual occur, the updated version will...
User Manual
Page 9
... access ASRock Instant Flash. ASRock website http://www.asrock.com 8. ASRock Instant Flash is supported depends on this motherboard, please refer to change. Just launch this utility, you can update your USB flash drive, floppy disk or hard drive, then you adopt. Please check NVIDIA® website for the compatible memory modules. This convenient BIOS update tool...
... access ASRock Instant Flash. ASRock website http://www.asrock.com 8. ASRock Instant Flash is supported depends on this motherboard, please refer to change. Just launch this utility, you can update your USB flash drive, floppy disk or hard drive, then you adopt. Please check NVIDIA® website for the compatible memory modules. This convenient BIOS update tool...

User Manual
Page 20
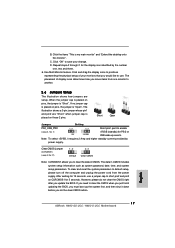
... short pin2 and pin3 on pins, the jumper is "Short". Click and drag the display icons to clear the CMOS when you just finish updating the BIOS, you must boot up events. The data in CMOS. If no jumper cap is placed on CLRCMOS1 for the display icon identified by power... supply. Repeat steps A through C for 5 seconds. When the jumper cap is placed on these 2 pins. Note: To select +5VSB, it down before you update the BIOS. The placement of your change. The illustration shows a 3-pin jumper whose pin1 and pin2 are setup. However, please do not clear the CMOS right after...
... short pin2 and pin3 on pins, the jumper is "Short". Click and drag the display icons to clear the CMOS when you just finish updating the BIOS, you must boot up events. The data in CMOS. If no jumper cap is placed on CLRCMOS1 for the display icon identified by power... supply. Repeat steps A through C for 5 seconds. When the jumper cap is placed on these 2 pins. Note: To select +5VSB, it down before you update the BIOS. The placement of your change. The illustration shows a 3-pin jumper whose pin1 and pin2 are setup. However, please do not clear the CMOS right after...
User Manual
Page 32
... security features Exit To exit the current screen or the BIOS SETUP UTILITY Use < > key or < > key to locate and load the Operating System Security To set up the computer. Because the BIOS software is constantly being updated, the following selections: Main To set up the system... time/date information OC Tweaker To set up overclocking features Advanced To set up the advanced BIOS features H/W Monitor To display current hardware status...
... security features Exit To exit the current screen or the BIOS SETUP UTILITY Use < > key or < > key to locate and load the Operating System Security To set up the computer. Because the BIOS software is constantly being updated, the following selections: Main To set up the system... time/date information OC Tweaker To set up overclocking features Advanced To set up the advanced BIOS features H/W Monitor To display current hardware status...

User Manual
Page 33
...for the function description of each navigation key. System Time [Hour:Minute:Second] Use this item to specify the system date. 33 N68C-GS UCC BIOS SETUP UTILITY Main OC Tweaker Advanced H/W Monitor Boot Security Exit System Overview System Time System Date [17:00:09] [Fri 02/12/...2010] BIOS Version : N68C-GS UCC P1.00 Processor Type : AMD Athlon (tm) 64 X2 Dual Core Processor 4000+ (64bit) Processor Speed : 2000MHz Microcode Update : 40F32/62 L1 Cache Size : 256KB L2 Cache Size : 2048KB Total Memory DDRII_1 ...
...for the function description of each navigation key. System Time [Hour:Minute:Second] Use this item to specify the system date. 33 N68C-GS UCC BIOS SETUP UTILITY Main OC Tweaker Advanced H/W Monitor Boot Security Exit System Overview System Time System Date [17:00:09] [Fri 02/12/...2010] BIOS Version : N68C-GS UCC P1.00 Processor Type : AMD Athlon (tm) 64 X2 Dual Core Processor 4000+ (64bit) Processor Speed : 2000MHz Microcode Update : 40F32/62 L1 Cache Size : 256KB L2 Cache Size : 2048KB Total Memory DDRII_1 ...

User Manual
Page 34
... Boot Security Exit System Overview System Time System Date [17:00:09] [Fri 02/12/2010] BIOS Version : N68C-S UCC P1.00 Processor Type : AMD Athlon (tm) 64 X2 Dual Core Processor 4000+ (64bit) Processor Speed : 2000MHz Microcode Update : 40F32/62 L1 Cache Size : 256KB L2 Cache Size : 2048KB Total Memory DDRII_1 DDRII_2 : 1024MB...
... Boot Security Exit System Overview System Time System Date [17:00:09] [Fri 02/12/2010] BIOS Version : N68C-S UCC P1.00 Processor Type : AMD Athlon (tm) 64 X2 Dual Core Processor 4000+ (64bit) Processor Speed : 2000MHz Microcode Update : 40F32/62 L1 Cache Size : 256KB L2 Cache Size : 2048KB Total Memory DDRII_1 DDRII_2 : 1024MB...
User Manual
Page 42
... Configuration ACPI Configuration Storage Configuration PCIPnP Configuration Floppy Configuration SuperIO Configuration USB Configuration BIOS Update Utility ASRock Instant Flash Select Screen Select Item Enter Go to malfunction. Just launch this tool and save the new BIOS file to update your BIOS, and reboot your BIOS only in this section, you to malfunction. Please be noted that the...
... Configuration ACPI Configuration Storage Configuration PCIPnP Configuration Floppy Configuration SuperIO Configuration USB Configuration BIOS Update Utility ASRock Instant Flash Select Screen Select Item Enter Go to malfunction. Just launch this tool and save the new BIOS file to update your BIOS, and reboot your BIOS only in this section, you to malfunction. Please be noted that the...
Quick Installation Guide
Page 5
..., 24.4 cm x 20.8 cm) One ASRock N68C-GS UCC / N68C-S UCC Quick Installation Guide One ASRock N68C-GS UCC / N68C-S UCC Support CD Two Serial ATA (SATA) Data Cables (Optional) One I/O Panel Shield English 5 ASRock N68C-GS UCC / N68C-S UCC Motherboard Chapter 3 and 4 contain the configuration guide to quality and endurance. Because the motherboard specifications and the BIOS software might be updated, the content of the motherboard...
..., 24.4 cm x 20.8 cm) One ASRock N68C-GS UCC / N68C-S UCC Quick Installation Guide One ASRock N68C-GS UCC / N68C-S UCC Support CD Two Serial ATA (SATA) Data Cables (Optional) One I/O Panel Shield English 5 ASRock N68C-GS UCC / N68C-S UCC Motherboard Chapter 3 and 4 contain the configuration guide to quality and endurance. Because the motherboard specifications and the BIOS software might be updated, the content of the motherboard...
Quick Installation Guide
Page 9
...cores are idle. To use FAT32/16/12 file system. 14. Please be shared and worked on the same motherboard. 9 ASRock N68C-GS UCC / N68C-S UCC Motherboard English OC DNA literally tells you what it is supported depends on this utility, you can press key during the POST... your friends! In other complicated flash utility. The software name itself - ASRock website: http://www.asrock.com 13. Please be noticed that the OC profile can update your SATAII hard disk drive to update system BIOS without preparing an additional floppy diskette or other words, it is a revolutionary...
...cores are idle. To use FAT32/16/12 file system. 14. Please be shared and worked on the same motherboard. 9 ASRock N68C-GS UCC / N68C-S UCC Motherboard English OC DNA literally tells you what it is supported depends on this utility, you can press key during the POST... your friends! In other complicated flash utility. The software name itself - ASRock website: http://www.asrock.com 13. Please be noticed that the OC profile can update your SATAII hard disk drive to update system BIOS without preparing an additional floppy diskette or other words, it is a revolutionary...
Quick Installation Guide
Page 17
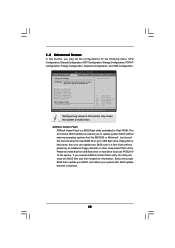
... turn off the computer and unplug the power cord from one , two and three. 6. However, please do the clear-CMOS action. English 17 ASRock N68C-GS UCC / N68C-S UCC Motherboard Use Multi Monitor feature. The illustration shows a 3-pin jumper whose pin1 and pin2 are setup. The data in CMOS. C. After waiting for...power supply. D. Click "OK" to save your monitors that you would like to use a jumper cap to clear the CMOS when you just finish updating the BIOS, you need to short pin2 and pin3 on these 2 pins. Repeat steps A through C for 15 seconds, use . If you must boot up ...
... turn off the computer and unplug the power cord from one , two and three. 6. However, please do the clear-CMOS action. English 17 ASRock N68C-GS UCC / N68C-S UCC Motherboard Use Multi Monitor feature. The illustration shows a 3-pin jumper whose pin1 and pin2 are setup. The data in CMOS. C. After waiting for...power supply. D. Click "OK" to save your monitors that you would like to use a jumper cap to clear the CMOS when you just finish updating the BIOS, you need to short pin2 and pin3 on these 2 pins. Repeat steps A through C for 15 seconds, use . If you must boot up ...


