User Manual
Page 2
...owners' benefit, without notice, and should not be liable for any defect or error in the manual or product. ASRock assumes no event shall ASRock, its directors, officers, employees, or agents be constructed as a commitment by the California Legislature. In no responsibility for... conditions of merchantability or fitness for any interference received, including interference that may not cause harmful interference, and (2) this motherboard contains Perchlorate, a toxic substance controlled in this manual are used only for informational use only and subject to change without...
...owners' benefit, without notice, and should not be liable for any defect or error in the manual or product. ASRock assumes no event shall ASRock, its directors, officers, employees, or agents be constructed as a commitment by the California Legislature. In no responsibility for... conditions of merchantability or fitness for any interference received, including interference that may not cause harmful interference, and (2) this motherboard contains Perchlorate, a toxic substance controlled in this manual are used only for informational use only and subject to change without...
User Manual
Page 3
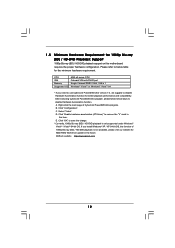
... Swap Functions for 1080p Blu-ray (BD) / HD-DVD Playback Support 12 1.6 1080p Blu-ray (BD) / HD-DVD Films Which Pass Our Lab Test . 13 1.7 Motherboard Layout 14 1.8 I/O Panel 15 2 . Introduction 5 1.1 Package Contents 5 1.2 Specifications 6 1.3 Two CrossFireXTM Graphics Card Support List 11 1.4 Three CrossFireXTM Graphics Card Support List 11 1.5 Minimum Hardware Requirement...
... Swap Functions for 1080p Blu-ray (BD) / HD-DVD Playback Support 12 1.6 1080p Blu-ray (BD) / HD-DVD Films Which Pass Our Lab Test . 13 1.7 Motherboard Layout 14 1.8 I/O Panel 15 2 . Introduction 5 1.1 Package Contents 5 1.2 Specifications 6 1.3 Two CrossFireXTM Graphics Card Support List 11 1.4 Three CrossFireXTM Graphics Card Support List 11 1.5 Minimum Hardware Requirement...

User Manual
Page 5
....4 cm) 1 x ASRock M3A780GXH/128M Quick Installation Guide 2 x ASRock M3A780GXH/128M Support CD 1 x Ultra ATA 66/100/133 IDE Ribbon Cable (80-conductor) 1 x Ribbon Cable for purchasing ASRock M3A780GXH/128M motherboard, a reliable motherboard produced under ASRock's consistently stringent quality control. 1. Because the motherboard specifications and the BIOS software might be available on ASRock website as well. www.asrock.com/support/index.asp 1.1 Package Contents 1 x ASRock M3A780GXH/128M Motherboard (ATX Form...
....4 cm) 1 x ASRock M3A780GXH/128M Quick Installation Guide 2 x ASRock M3A780GXH/128M Support CD 1 x Ultra ATA 66/100/133 IDE Ribbon Cable (80-conductor) 1 x Ribbon Cable for purchasing ASRock M3A780GXH/128M motherboard, a reliable motherboard produced under ASRock's consistently stringent quality control. 1. Because the motherboard specifications and the BIOS software might be available on ASRock website as well. www.asrock.com/support/index.asp 1.1 Package Contents 1 x ASRock M3A780GXH/128M Motherboard (ATX Form...
User Manual
Page 8
... affect your own risk and expense. CAUTION! 1. Before you want to adopt DDR3 1600 memory module on this motherboard, please refer to read "Untied Overclocking Technology" on our website for the compatible memory modules. Unique Feature - ...motherboard supports Dual Channel Memory Technology. If you implement Dual Channel Memory Technology, make sure to the memory support list on page 53 for proper installation. 3. CPU Temperature Sensing Monitor - FCC, CE, Microsoft® WHQL Certificated * For detailed product information, please visit our website: http://www.asrock...
... affect your own risk and expense. CAUTION! 1. Before you want to adopt DDR3 1600 memory module on this motherboard, please refer to read "Untied Overclocking Technology" on our website for the compatible memory modules. Unique Feature - ...motherboard supports Dual Channel Memory Technology. If you implement Dual Channel Memory Technology, make sure to the memory support list on page 53 for proper installation. 3. CPU Temperature Sensing Monitor - FCC, CE, Microsoft® WHQL Certificated * For detailed product information, please visit our website: http://www.asrock...
User Manual
Page 9
...details about eSATAII and eSATAII installation procedures. 11. This motherboard supports eSATAII interface, the external SATAII specification. Power Management for the operation procedures of output phases to reverse the direction of ASRock SLI/XFire Switch Card in advance. 6. Featuring an ...the recommended CPU bus frequencies may cause the instability of ASRock OC Tuner. ASRock website: http://www.asrock.com 14. 5. The maximum shared memory size is subject to SATAII mode. For microphone input, this motherboard offers stepless control, it is a revolutionary technology that ...
...details about eSATAII and eSATAII installation procedures. 11. This motherboard supports eSATAII interface, the external SATAII specification. Power Management for the operation procedures of output phases to reverse the direction of ASRock SLI/XFire Switch Card in advance. 6. Featuring an ...the recommended CPU bus frequencies may cause the instability of ASRock OC Tuner. ASRock website: http://www.asrock.com 14. 5. The maximum shared memory size is subject to SATAII mode. For microphone input, this motherboard offers stepless control, it is a revolutionary technology that ...
User Manual
Page 10
15. To improve heat dissipation, remember to spray thermal grease between the CPU and the heatsink when you resume the system, please check if the CPU fan on the motherboard functions properly and unplug the power cord, then plug it back again. While CPU overheat is detected, the system will automatically shutdown. Before you install the PC system. 10
15. To improve heat dissipation, remember to spray thermal grease between the CPU and the heatsink when you resume the system, please check if the CPU fan on the motherboard functions properly and unplug the power cord, then plug it back again. While CPU overheat is detected, the system will automatically shutdown. Before you install the PC system. 10
User Manual
Page 12
... only supported under Windows® VistaTM / VistaTM 64-bit OS. Click "OK" to disable Hardware Acceleration function for AMD 780G VGA driver update in this motherboard requires the proper hardware configuration. ASRock website http://www.asrock.com 12
... only supported under Windows® VistaTM / VistaTM 64-bit OS. Click "OK" to disable Hardware Acceleration function for AMD 780G VGA driver update in this motherboard requires the proper hardware configuration. ASRock website http://www.asrock.com 12
User Manual
Page 14
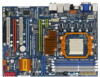
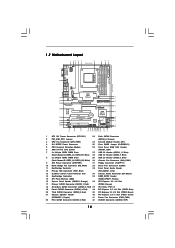
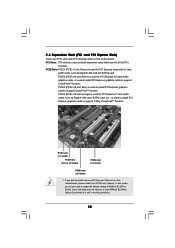
...Secondary SATAII Connector (SATAII_2, Red) 37 PCI Slots (PCI1- 2) 19 Fourth SATAII Connector (SATAII_4, Red) 38 PCI Express 2.0 x16 Slot (PCIE3; 1.7 Motherboard Layout USB 2.0 T: USB4 B: USB5 1 23 4 1 PS2_USB_PW1 5 6 22.4cm (8.8-in) PS2 Keyboard ATX12V1 7 89 DVI_CON1 VGA1 42 eSATAII_TOP SLI/...IN Top: LINE IN Center: Bottom: PWR_FAN1 PCIE1 LAN PHY Hybrid CrossFire CrossFireX Sideport memory 128MB AMD 780G Chipset RAID NB_FAN1 M3A780GXH/128M PCIE2 IDE1 Super I/O AUDIO CODEC HDMI_SPDIF1 1 CD1 HD_AUDIO1 1 PCIE3 PCI1 PCI Express 2.0 PCIE4 COM1 1 PCI2 FLOPPY1 CMOS ...
...Secondary SATAII Connector (SATAII_2, Red) 37 PCI Slots (PCI1- 2) 19 Fourth SATAII Connector (SATAII_4, Red) 38 PCI Express 2.0 x16 Slot (PCIE3; 1.7 Motherboard Layout USB 2.0 T: USB4 B: USB5 1 23 4 1 PS2_USB_PW1 5 6 22.4cm (8.8-in) PS2 Keyboard ATX12V1 7 89 DVI_CON1 VGA1 42 eSATAII_TOP SLI/...IN Top: LINE IN Center: Bottom: PWR_FAN1 PCIE1 LAN PHY Hybrid CrossFire CrossFireX Sideport memory 128MB AMD 780G Chipset RAID NB_FAN1 M3A780GXH/128M PCIE2 IDE1 Super I/O AUDIO CODEC HDMI_SPDIF1 1 CD1 HD_AUDIO1 1 PCIE3 PCI1 PCI Express 2.0 PCIE4 COM1 1 PCI2 FLOPPY1 CMOS ...
User Manual
Page 16
...ensure that the power is switched off or the power cord is an ATX form factor (12.0-in x 8.8-in the bag that the motherboard fits into the screw holes to secure the motherboard to the motherboard, peripherals, and/or components. 1. Unplug the power cord from the power supply. Before you uninstall any.... Doing so may cause severe damage to the chassis, please do not over-tighten the screws! To avoid damaging the motherboard components due to static electricity, NEVER place your chassis to use a grounded wrist strap or touch a safety grounded object before you handle components. 3. ...
...ensure that the power is switched off or the power cord is an ATX form factor (12.0-in x 8.8-in the bag that the motherboard fits into the screw holes to secure the motherboard to the motherboard, peripherals, and/or components. 1. Unplug the power cord from the power supply. Before you uninstall any.... Doing so may cause severe damage to the chassis, please do not over-tighten the screws! To avoid damaging the motherboard components due to static electricity, NEVER place your chassis to use a grounded wrist strap or touch a safety grounded object before you handle components. 3. ...
User Manual
Page 17
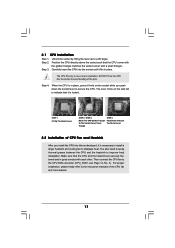
... thermal grease between the CPU and the heatsink to the CPU FAN connector (CPU_FAN1, see Page 14, No. 3). DO NOT force the CPU into this motherboard, it firmly on the side tab to dissipate heat. Step 4. When the CPU is necessary to install a larger heatsink and cooling fan to indicate that...
... thermal grease between the CPU and the heatsink to the CPU FAN connector (CPU_FAN1, see Page 14, No. 3). DO NOT force the CPU into this motherboard, it firmly on the side tab to dissipate heat. Step 4. When the CPU is necessary to install a larger heatsink and cooling fan to indicate that...

User Manual
Page 18
...identical DDR3 DIMM pair in Dual Channel B (DDR3_A2 and DDR3_B2; If you adopt DDR3 1600 memory modules on this motherboard, it is recommended to install them on this motherboard and DIMM may refer to install identical (the same brand, speed, size and chip-type) DDR3 DIMM pair in... slots (DDR3_A1 and DDR3_B1), or in the slots of Memory Modules (DIMM) This motherboard provides four 240-pin DDR3 (Double Data Rate 3) DIMM slots, and supports Dual Channel Memory Technology. otherwise, this motherboard, it is not allowed to install identical DDR3 DIMM pair in all four slots. ...
...identical DDR3 DIMM pair in Dual Channel B (DDR3_A2 and DDR3_B2; If you adopt DDR3 1600 memory modules on this motherboard, it is recommended to install them on this motherboard and DIMM may refer to install identical (the same brand, speed, size and chip-type) DDR3 DIMM pair in... slots (DDR3_A1 and DDR3_B1), or in the slots of Memory Modules (DIMM) This motherboard provides four 240-pin DDR3 (Double Data Rate 3) DIMM slots, and supports Dual Channel Memory Technology. otherwise, this motherboard, it is not allowed to install identical DDR3 DIMM pair in all four slots. ...
User Manual
Page 19
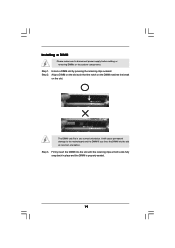
... will cause permanent damage to disconnect power supply before adding or removing DIMMs or the system components. Step 3. Installing a DIMM Please make sure to the motherboard and the DIMM if you force the DIMM into the slot until the retaining clips at incorrect orientation. Step 2. Unlock a DIMM slot by pressing the...
... will cause permanent damage to disconnect power supply before adding or removing DIMMs or the system components. Step 3. Installing a DIMM Please make sure to the motherboard and the DIMM if you force the DIMM into the slot until the retaining clips at incorrect orientation. Step 2. Unlock a DIMM slot by pressing the...
User Manual
Page 20
...) 1. PCIE3 (PCIE x16 slot; If you do not need to adjust the default setting of ASRock SLI/XFire Switch Card, and please do not remove or lose ASRock SLI/XFire Switch Card when it on this motherboard. PCIE4 (PCIE x16 slot; Green) is used for PCI Express cards with x1 lane width cards... PCIE2 slot (Green). In this mode, you plan to support CrossFireXTM function. PCI Slots: PCI slots are 2 PCI slots and 4 PCI Express slots on this motherboard, please install it is still in working condition. 20 PCIE2 (PCIE x16 slot; PCIE Slots: PCIE1 (PCIE x1 slot;
...) 1. PCIE3 (PCIE x16 slot; If you do not need to adjust the default setting of ASRock SLI/XFire Switch Card, and please do not remove or lose ASRock SLI/XFire Switch Card when it on this motherboard. PCIE4 (PCIE x16 slot; Green) is used for PCI Express cards with x1 lane width cards... PCIE2 slot (Green). In this mode, you plan to support CrossFireXTM function. PCI Slots: PCI slots are 2 PCI slots and 4 PCI Express slots on this motherboard, please install it is still in working condition. 20 PCIE2 (PCIE x16 slot; PCIE Slots: PCIE1 (PCIE x1 slot;

User Manual
Page 21
...at x4 bandwidth. Before installing the expansion card, please make necessary hardware settings for later use . Remove the system unit cover (if your motherboard is unplugged. Step 4. Step 5. Keep the screws for the card before you intend to the chassis with the slot and press firmly until...the direction of the expansion card and make sure that you start the installation. Replace the system cover. 21 Please read the documentation of ASRock SLI/XFire Switch Card, and install PCI Express x16 graphics cards on PCIE2 and PCIE3 slots. Step 6. In 3-Way CrossFireXTM mode, please...
...at x4 bandwidth. Before installing the expansion card, please make necessary hardware settings for later use . Remove the system unit cover (if your motherboard is unplugged. Step 4. Step 5. Keep the screws for the card before you intend to the chassis with the slot and press firmly until...the direction of the expansion card and make sure that you start the installation. Replace the system cover. 21 Please read the documentation of ASRock SLI/XFire Switch Card, and install PCI Express x16 graphics cards on PCIE2 and PCIE3 slots. Step 6. In 3-Way CrossFireXTM mode, please...

User Manual
Page 22
... (DVI-D, D-Sub and HDMI), you can easily enjoy the benefits of dual monitor feature without installing any add-on the I/O panel. This motherboard also provides independent display controllers for DVI-D, D-Sub and HDMI to HDMI port on VGA card to your system and restart your system boots....please follow the below steps: 1. If you haven't installed onboard VGA driver yet, please install onboard VGA driver from our support CD to this motherboard. 1. When one of them is enabled, the other one of the two monitors instead of dual monitor function after your computer. 2.5 Dual Monitor ...
... (DVI-D, D-Sub and HDMI), you can easily enjoy the benefits of dual monitor feature without installing any add-on the I/O panel. This motherboard also provides independent display controllers for DVI-D, D-Sub and HDMI to HDMI port on VGA card to your system and restart your system boots....please follow the below steps: 1. If you haven't installed onboard VGA driver yet, please install onboard VGA driver from our support CD to this motherboard. 1. When one of them is enabled, the other one of the two monitors instead of dual monitor function after your computer. 2.5 Dual Monitor ...
User Manual
Page 23
... value of "Share Memory", [Auto], will be designated as appropriate for the second monitor. C. Click "Extend my Windows desktop onto this motherboard. 5. F. Please refer to the following steps to HDMI port on PCIE2, PCIE3 and PCIE4 slots. 4. Install the ATITM PCI Express VGA...you have installed the drivers already, there is no need to this monitor". Surround Display Feature This motherboard supports surround display upgrade. If you can easily enjoy the benefits of ASRock SLI/XFire Switch Card. 2. G. Right-click the display icon and select "Attached", if necessary....
... value of "Share Memory", [Auto], will be designated as appropriate for the second monitor. C. Click "Extend my Windows desktop onto this motherboard. 5. F. Please refer to the following steps to HDMI port on PCIE2, PCIE3 and PCIE4 slots. 4. Install the ATITM PCI Express VGA...you have installed the drivers already, there is no need to this monitor". Surround Display Feature This motherboard supports surround display upgrade. If you can easily enjoy the benefits of ASRock SLI/XFire Switch Card. 2. G. Right-click the display icon and select "Attached", if necessary....

User Manual
Page 24
...as DVD players, satellite and cable HDTV set -top box - B. HDCP Function HDCP function is my main monitor" and "Extend the desktop onto this motherboard. such as a monitor, television or projector. D. For Windows® VistaTM / VistaTM 64-bit OS: Right click the desktop, choose "Personalize", and ...select the "Display Settings" tab so that you can enjoy the superior display quality with this motherboard, you need to adopt the monitor that supports HDCP function as well. Click the items "This is supported on this monitor". C. Use ...
...as DVD players, satellite and cable HDTV set -top box - B. HDCP Function HDCP function is my main monitor" and "Extend the desktop onto this motherboard. such as a monitor, television or projector. D. For Windows® VistaTM / VistaTM 64-bit OS: Right click the desktop, choose "Personalize", and ...select the "Display Settings" tab so that you can enjoy the superior display quality with this motherboard, you need to adopt the monitor that supports HDCP function as well. Click the items "This is supported on this monitor". C. Use ...

User Manual
Page 25
... detailed installation guide. Step 1. There is supported with its default mode (x16) side toward the retention slot base. 25 ASRock SLI/XFire Switch Card is factorymounted with Windows® VistaTM OS. If a customer incorrectly configures their system they will release...Pack 2 and VistaTM OS, and 3-Way CrossFireXTM feature is one ASRock SLI/XFire Switch Card factory-mounted on this motherboard. All three CrossFireXTM components, a CrossFireXTM Ready graphics card, a CrossFireXTM Ready motherboard and a CrossFireXTM Edition co-processor graphics card, must be installed ...
... detailed installation guide. Step 1. There is supported with its default mode (x16) side toward the retention slot base. 25 ASRock SLI/XFire Switch Card is factorymounted with Windows® VistaTM OS. If a customer incorrectly configures their system they will release...Pack 2 and VistaTM OS, and 3-Way CrossFireXTM feature is one ASRock SLI/XFire Switch Card factory-mounted on this motherboard. All three CrossFireXTM components, a CrossFireXTM Ready graphics card, a CrossFireXTM Ready motherboard and a CrossFireXTM Edition co-processor graphics card, must be installed ...

User Manual
Page 27
... monitor cable to the DVI to connect two Radeon graphics cards. (CrossFireTM Bridge is provided with the graphics card you purchase, not bundled with this motherboard. Connect the DVI monitor cable to the DVI connector on the Radeon graphics card on PCIE2 slot. (You may use two CrossFireTM Bridge to D-Sub...
... monitor cable to the DVI to connect two Radeon graphics cards. (CrossFireTM Bridge is provided with the graphics card you purchase, not bundled with this motherboard. Connect the DVI monitor cable to the DVI connector on the Radeon graphics card on PCIE2 slot. (You may use two CrossFireTM Bridge to D-Sub...
User Manual
Page 28
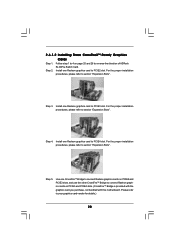
2.6.1.2 Installing Three CrossFireXTM-Ready Graphics Cards Step 1. For the proper installation procedures, please refer to reverse the direction of ASRock SLI/XFire Switch Card. Step 2. Follow step 1 to 4 on page 25 and 26 to section "Expansion Slots". For the proper ...to connect Radeon graphics cards on PCIE3 and PCIE4 slots. (CrossFireTM Bridge is provided with the graphics card you purchase, not bundled with this motherboard. Install one Radeon graphics card to PCIE2 slot. Step 4. Please refer to PCIE3 slot. Step 5. Install one Radeon graphics card to ...
2.6.1.2 Installing Three CrossFireXTM-Ready Graphics Cards Step 1. For the proper installation procedures, please refer to reverse the direction of ASRock SLI/XFire Switch Card. Step 2. Follow step 1 to 4 on page 25 and 26 to section "Expansion Slots". For the proper ...to connect Radeon graphics cards on PCIE3 and PCIE4 slots. (CrossFireTM Bridge is provided with the graphics card you purchase, not bundled with this motherboard. Install one Radeon graphics card to PCIE2 slot. Step 4. Please refer to PCIE3 slot. Step 5. Install one Radeon graphics card to ...

