User Manual
Page 9
... and overclock your hardware devices to perform over-clocking. Please refer to change. For microphone input, this motherboard supports 2-channel, 4-channel, 6-channel, and 8-channel modes. For audio output, this motherboard supports both stereo and mono modes. This motherboard supports eSATAII interface, the external SATAII specification. The voltage regulator can also connect SATA hard disk to SATAII mode. 5. Please visit our website for USB 2.0 works fine under Windows® environment. ASRock website: http://www.asrock.com 14. Before installing SATAII hard disk to...
... and overclock your hardware devices to perform over-clocking. Please refer to change. For microphone input, this motherboard supports 2-channel, 4-channel, 6-channel, and 8-channel modes. For audio output, this motherboard supports both stereo and mono modes. This motherboard supports eSATAII interface, the external SATAII specification. The voltage regulator can also connect SATA hard disk to SATAII mode. 5. Please visit our website for USB 2.0 works fine under Windows® environment. ASRock website: http://www.asrock.com 14. Before installing SATAII hard disk to...
User Manual
Page 15
...V V -- 8 V V V V *** To support AC3 audio format with the type of speaker you use . LAN Port LED Indications Activity/Link LED SPEED LED Status Description Status Description ACT/LINK SPEED LED LED Off No Activity Off 10Mbps connection Blinking Data Activity Orange 100Mbps connection Green 1Gbps connection LAN Port ** If you use 2-channel speaker, please connect the speaker's plug into "Front Speaker Jack". The driver is located under VistaTM, please install the HDMI audio driver in accordance with HDMI Audio under the path: ..\Drivers\NB Audio\REALTEK\XP64_XP...
...V V -- 8 V V V V *** To support AC3 audio format with the type of speaker you use . LAN Port LED Indications Activity/Link LED SPEED LED Status Description Status Description ACT/LINK SPEED LED LED Off No Activity Off 10Mbps connection Blinking Data Activity Orange 100Mbps connection Green 1Gbps connection LAN Port ** If you use 2-channel speaker, please connect the speaker's plug into "Front Speaker Jack". The driver is located under VistaTM, please install the HDMI audio driver in accordance with HDMI Audio under the path: ..\Drivers\NB Audio\REALTEK\XP64_XP...

User Manual
Page 21
... card connector with screws. Fasten the card to use . PCIE2 / PCIE3 / SLI/XFire Switch Card Retention Slot Configurations PCIE2 Slot PCIE3 Slot SLI/XFire Switch Card (Green) (Blue) Retention Slot Single Graphics Card PCIE x16 N/A (Default) Dual Graphics Cards in a chassis). Step 3. Step 2. Step 5. Keep the screws for the card before you intend to the chassis with the slot and press firmly until the card is unplugged. In CrossFireXTM mode, please reverse the direction of ASRock SLI/XFire Switch Card, and install PCI Express x16 graphics cards...
... card connector with screws. Fasten the card to use . PCIE2 / PCIE3 / SLI/XFire Switch Card Retention Slot Configurations PCIE2 Slot PCIE3 Slot SLI/XFire Switch Card (Green) (Blue) Retention Slot Single Graphics Card PCIE x16 N/A (Default) Dual Graphics Cards in a chassis). Step 3. Step 2. Step 5. Keep the screws for the card before you intend to the chassis with the slot and press firmly until the card is unplugged. In CrossFireXTM mode, please reverse the direction of ASRock SLI/XFire Switch Card, and install PCI Express x16 graphics cards...

User Manual
Page 22
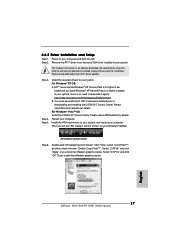
.... If you haven't installed onboard VGA driver yet, please install onboard VGA driver from our support CD to HDMI port on the I /O panel. When you can start to support dual VGA output so that DVI-D, D-sub and HDMI can drive same or different display contents. This motherboard also provides independent display controllers for DVI-D, D-Sub and HDMI to use dual monitor function on VGA card to your system boots. 2.5 Dual Monitor and Surround Display Features Dual Monitor Feature This motherboard supports dual monitor feature. To enable dual monitor feature, please follow...
.... If you haven't installed onboard VGA driver yet, please install onboard VGA driver from our support CD to HDMI port on the I /O panel. When you can start to support dual VGA output so that DVI-D, D-sub and HDMI can drive same or different display contents. This motherboard also provides independent display controllers for DVI-D, D-Sub and HDMI to use dual monitor function on VGA card to your system boots. 2.5 Dual Monitor and Surround Display Features Dual Monitor Feature This motherboard supports dual monitor feature. To enable dual monitor feature, please follow...

User Manual
Page 30
... Framework installed prior to download it again): http://www.microsoft.com/windowsxp/sp2/default.mspx B. We recommend using this utility to your system, and restart your system. Install the VGA card drivers to uninstall any VGA driver installed in your system. Restart your computer and boot into OS. 2.6.2 Driver Installation and Setup Step 1. Click "View", select "CrossFireXTM", and then check the item "Enable CrossFireXTM". Power on your Windows®...
... Framework installed prior to download it again): http://www.microsoft.com/windowsxp/sp2/default.mspx B. We recommend using this utility to your system, and restart your system. Install the VGA card drivers to uninstall any VGA driver installed in your system. Restart your computer and boot into OS. 2.6.2 Driver Installation and Setup Step 1. Click "View", select "CrossFireXTM", and then check the item "Enable CrossFireXTM". Power on your Windows®...

User Manual
Page 41
... as a set-top box, DVD player, A/V receiver and a compatible digital audio or video monitor, such as HDTV. Connect the HDMI output connector on this picture shows the wrong example of connecting HDMI_SPDIF cable to the user manual of HDMI_SPDIF cable to HDMI device, such as a digital television (DTV). Please refer to the fan connector of HDMI VGA card or other VGA card. To use HDMI function on HDMI VGA card to the wrong connector of PCI Express VGA card. Step 3. 2.10 HDMI_SPDIF Header Connection Guide HDMI (High-Definition...
... as a set-top box, DVD player, A/V receiver and a compatible digital audio or video monitor, such as HDTV. Connect the HDMI output connector on this picture shows the wrong example of connecting HDMI_SPDIF cable to the user manual of HDMI_SPDIF cable to HDMI device, such as a digital television (DTV). Please refer to the fan connector of HDMI VGA card or other VGA card. To use HDMI function on HDMI VGA card to the wrong connector of PCI Express VGA card. Step 3. 2.10 HDMI_SPDIF Header Connection Guide HDMI (High-Definition...
User Manual
Page 49
... for proper configuration. Therefore, the drivers you install can be auto-detected and listed on the support CD driver page. Then, the drivers compatible to boot your system. (There are two ASRock Support CD in the Support CD: .. \ RAID Installation Guide 49 Enter BIOS SETUP UTILITY Advanced screen IDE Configuration. A. Insert the ASRock Support CD into your optical drive to your optical drive first. E. STEP 1: Set up , press key, and then a window for Windows® XP / XP 64-bit.) B. Set the "SATA Operation Mode" option to set RAID configuration. D.
... for proper configuration. Therefore, the drivers you install can be auto-detected and listed on the support CD driver page. Then, the drivers compatible to boot your system. (There are two ASRock Support CD in the Support CD: .. \ RAID Installation Guide 49 Enter BIOS SETUP UTILITY Advanced screen IDE Configuration. A. Insert the ASRock Support CD into your optical drive to your optical drive first. E. STEP 1: Set up , press key, and then a window for Windows® XP / XP 64-bit.) B. Set the "SATA Operation Mode" option to set RAID configuration. D.

User Manual
Page 50
... "SATA Operation Mode" to load the AMD RAID drivers. Enter BIOS SETUP UTILITY Advanced screen IDE Configuration. Insert the Windows® VistaTM / Windows® VistaTM 64-bit optical disk into your optical drive, and click the "Load Driver" button on the left on your system. At the beginning of 2 or more SATA / SATAII HDDs with RAID functions, please follow the instruction to install Windows® VistaTM / Windows® VistaTM 64-bit OS on the bottom to [RAID] first. STEP 2: Use "RAID Installation Guide" to install Windows...
... "SATA Operation Mode" to load the AMD RAID drivers. Enter BIOS SETUP UTILITY Advanced screen IDE Configuration. Insert the Windows® VistaTM / Windows® VistaTM 64-bit optical disk into your optical drive, and click the "Load Driver" button on the left on your system. At the beginning of 2 or more SATA / SATAII HDDs with RAID functions, please follow the instruction to install Windows® VistaTM / Windows® VistaTM 64-bit OS on the bottom to [RAID] first. STEP 2: Use "RAID Installation Guide" to install Windows...
User Manual
Page 58
...to system stability or compatibility issue with some memory modules or power supplies. Configuration options: [Auto], [Enabled] and [Disabled]. Secure Virtual Machine When this option is set to [Manual], you may reduce CPU voltage and memory frequency, and lead to [Enabled], a VMM (Virtual Machine Architecture) can utilize the additional hardware capabilities provided by default. Cool 'n' Quiet Use this function may adjust the value of Processor Frequency and Processor Voltage. Configuration options: [Auto], [BSP Only] and [All Cores]. Configuration options: [+12%] to [-12...
...to system stability or compatibility issue with some memory modules or power supplies. Configuration options: [Auto], [Enabled] and [Disabled]. Secure Virtual Machine When this option is set to [Manual], you may reduce CPU voltage and memory frequency, and lead to [Enabled], a VMM (Virtual Machine Architecture) can utilize the additional hardware capabilities provided by default. Cool 'n' Quiet Use this function may adjust the value of Processor Frequency and Processor Voltage. Configuration options: [Auto], [BSP Only] and [All Cores]. Configuration options: [+12%] to [-12...
User Manual
Page 72
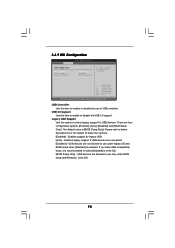
... under legacy OS and BIOS setup when [Disabled] is [BIOS Setup Only]. USB 2.0 Support Use this item to enable or disable the USB 2.0 support. 3.4.9 USB Configuration BIOS SETUP UTILITY Advanced USB Configuration USB Controller USB 2.0 Support Legacy USB Support [Enabled] [Enabled] [BIOS Setup Only] To enable or disable the onboard USB controllers. +F1 F9 F10 ESC Select Screen Select Item Change Option General Help Load Defaults Save and Exit Exit v02.54 (C) Copyright 1985-2003, American Megatrends, Inc. The default value is selected. USB devices are connected. [Disabled] -
... under legacy OS and BIOS setup when [Disabled] is [BIOS Setup Only]. USB 2.0 Support Use this item to enable or disable the USB 2.0 support. 3.4.9 USB Configuration BIOS SETUP UTILITY Advanced USB Configuration USB Controller USB 2.0 Support Legacy USB Support [Enabled] [Enabled] [BIOS Setup Only] To enable or disable the onboard USB controllers. +F1 F9 F10 ESC Select Screen Select Item Change Option General Help Load Defaults Save and Exit Exit v02.54 (C) Copyright 1985-2003, American Megatrends, Inc. The default value is selected. USB devices are connected. [Disabled] -
User Manual
Page 75
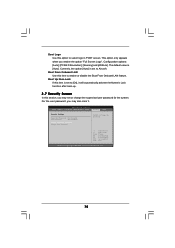
...LAN Use this option to select logo in POST screen. This option only appears when you may set to Aircraft. BIOS SETUP UTILITY Main Smart Advanced H/W Monitor Boot Security Exit Security Settings Supervisor Password : Not Installed User Password : Not Installed Change Supervisor Password Change User Password Install or Change the password. Configuration options: [Auto], [PCIE2.0 Revolution], [Scenery] and [ASRock]. The default value is [Auto]. For the user password, you enable the option "Full Screen Logo". Boot Logo Use this item to enable or disable the Boot From Onboard LAN...
...LAN Use this option to select logo in POST screen. This option only appears when you may set to Aircraft. BIOS SETUP UTILITY Main Smart Advanced H/W Monitor Boot Security Exit Security Settings Supervisor Password : Not Installed User Password : Not Installed Change Supervisor Password Change User Password Install or Change the password. Configuration options: [Auto], [PCIE2.0 Revolution], [Scenery] and [ASRock]. The default value is [Auto]. For the user password, you enable the option "Full Screen Logo". Boot Logo Use this item to enable or disable the Boot From Onboard LAN...
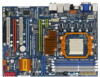
Quick Installation Guide
Page 3
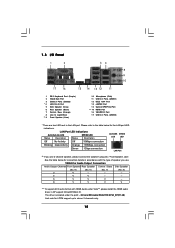
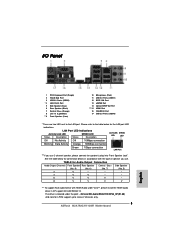
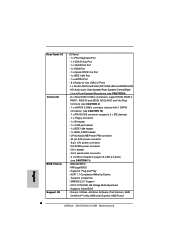
.../LINK SPEED LED LED Off No Activity Off 10Mbps connection Blinking Data Activity Orange 100Mbps connection Green 1Gbps connection LAN Port ** If you use 2-channel speaker, please connect the speaker's plug into "Front Speaker Jack". Please refer to stereo 2 channels only. 3 ASRock M3A780GXH/128M Motherboard English The driver is located under VistaTM, please install the HDMI audio driver in XP support CD AAX780GX-10. TABLE for the LAN port LED indications. I/O Panel 1 PS/2 Keyboard Port (Purple) 2 VGA/D-Sub Port 3 USB 2.0 Ports (USB23) * 4 LAN RJ-45 Port 5 Side Speaker...
.../LINK SPEED LED LED Off No Activity Off 10Mbps connection Blinking Data Activity Orange 100Mbps connection Green 1Gbps connection LAN Port ** If you use 2-channel speaker, please connect the speaker's plug into "Front Speaker Jack". Please refer to stereo 2 channels only. 3 ASRock M3A780GXH/128M Motherboard English The driver is located under VistaTM, please install the HDMI audio driver in XP support CD AAX780GX-10. TABLE for the LAN port LED indications. I/O Panel 1 PS/2 Keyboard Port (Purple) 2 VGA/D-Sub Port 3 USB 2.0 Ports (USB23) * 4 LAN RJ-45 Port 5 Side Speaker...
Quick Installation Guide
Page 6
... SB Voltage Multi-adjustment - Explorer, AMD Fusion English 6 ASRock M3A780GXH/128M Motherboard CPU/Chassis/NB/Power FAN connector - 24 pin ATX power connector - 8 pin 12V power connector - CD in /Front Speaker/Microphone (see CAUTION 8) - 6 x Serial ATAII 3.0Gb/s connectors, support RAID (RAID 0, RAID 1, RAID 10 and JBOD), NCQ, AHCI and "Hot Plug" functions (see CAUTION 11) - 8Mb AMI BIOS - Drivers, Utilities, AntiVirus Software (Trial Version), AMD OverDriveTM Utility, AMD Live! Rear Panel I/O Connector BIOS Feature Support CD I/O Panel - 1 x PS/2 Keyboard Port - 1 x VGA/D-Sub Port...
... SB Voltage Multi-adjustment - Explorer, AMD Fusion English 6 ASRock M3A780GXH/128M Motherboard CPU/Chassis/NB/Power FAN connector - 24 pin ATX power connector - 8 pin 12V power connector - CD in /Front Speaker/Microphone (see CAUTION 8) - 6 x Serial ATAII 3.0Gb/s connectors, support RAID (RAID 0, RAID 1, RAID 10 and JBOD), NCQ, AHCI and "Hot Plug" functions (see CAUTION 11) - 8Mb AMI BIOS - Drivers, Utilities, AntiVirus Software (Trial Version), AMD OverDriveTM Utility, AMD Live! Rear Panel I/O Connector BIOS Feature Support CD I/O Panel - 1 x PS/2 Keyboard Port - 1 x VGA/D-Sub Port...
Quick Installation Guide
Page 8
... also connect SATA hard disk to reverse the direction of "User Manual" in our lab test. 8. In other than the recommended CPU bus frequencies may cause the instability of output phases to use Intelligent Energy Saver function, please enable Cool 'n' Quiet option in the BIOS setup in advance. 6. Although this motherboard requires the proper hardware configuration. If you to surveil your system by hardware monitor function and overclock...
... also connect SATA hard disk to reverse the direction of "User Manual" in our lab test. 8. In other than the recommended CPU bus frequencies may cause the instability of output phases to use Intelligent Energy Saver function, please enable Cool 'n' Quiet option in the BIOS setup in advance. 6. Although this motherboard requires the proper hardware configuration. If you to surveil your system by hardware monitor function and overclock...

Quick Installation Guide
Page 18
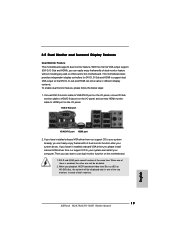
... cards on PCIE2, PCIE3 and PCIE4 slots. PCIE2 / PCIE3 / SLI/XFire Switch Card Retention Slot Configurations PCIE2 Slot PCIE3 Slot SLI/XFire Switch Card (Green) (Blue) Retention Slot Single Graphics Card PCIE x16 N/A (Default) Dual Graphics Cards in a chassis). Remove the system unit cover (if your motherboard is already installed in CrossFireXTM Mode PCIE x8 PCIE x8 English Installing an expansion card Step 1. Therefore, both these two slots will work at x4 bandwidth. Fasten the card to use . Replace the system cover. 18 ASRock M3A780GXH/128M Motherboard...
... cards on PCIE2, PCIE3 and PCIE4 slots. PCIE2 / PCIE3 / SLI/XFire Switch Card Retention Slot Configurations PCIE2 Slot PCIE3 Slot SLI/XFire Switch Card (Green) (Blue) Retention Slot Single Graphics Card PCIE x16 N/A (Default) Dual Graphics Cards in a chassis). Remove the system unit cover (if your motherboard is already installed in CrossFireXTM Mode PCIE x8 PCIE x8 English Installing an expansion card Step 1. Therefore, both these two slots will work at x4 bandwidth. Fasten the card to use . Replace the system cover. 18 ASRock M3A780GXH/128M Motherboard...
Quick Installation Guide
Page 19
... of both monitors. 19 ASRock M3A780GXH/128M Motherboard English With the internal VGA output support (DVI-D, D-Sub and HDMI), you have installed onboard VGA driver from our support CD to use dual monitor function on this motherboard. Then you playback HDCP-protected video from Blu-ray (BD) or HD-DVD disc, the content will be displayed only in one will be disabled. 2. When you can drive same or different display contents. DVI-D and HDMI ports cannot...
... of both monitors. 19 ASRock M3A780GXH/128M Motherboard English With the internal VGA output support (DVI-D, D-Sub and HDMI), you have installed onboard VGA driver from our support CD to use dual monitor function on this motherboard. Then you playback HDCP-protected video from Blu-ray (BD) or HD-DVD disc, the content will be displayed only in one will be disabled. 2. When you can drive same or different display contents. DVI-D and HDMI ports cannot...
Quick Installation Guide
Page 27
... "Apply" (if you install three Radeon graphics cards). English 27 ASRock M3A780GXH/128M Motherboard Remove the ATITM driver if you have any previously installed Catalyst drivers prior to download it again): http://www.microsoft.com/windowsxp/sp2/default.mspx B. We recommend using this utility to uninstall any VGA driver installed in your computer. Step 5. 2.6.2 Driver Installation and Setup Step 1. ATITM recommends Windows® XP Service Pack 2 or higher to downloading and installing the CATALYST Control Center.
... "Apply" (if you install three Radeon graphics cards). English 27 ASRock M3A780GXH/128M Motherboard Remove the ATITM driver if you have any previously installed Catalyst drivers prior to download it again): http://www.microsoft.com/windowsxp/sp2/default.mspx B. We recommend using this utility to uninstall any VGA driver installed in your computer. Step 5. 2.6.2 Driver Installation and Setup Step 1. ATITM recommends Windows® XP Service Pack 2 or higher to downloading and installing the CATALYST Control Center.
Quick Installation Guide
Page 41
... PCI / PCIE buses. When you wish to enter BIOS Setup after POST, please restart the system by pressing + + , or pressing the reset button on page 7 for the possible overclocking risk before you enable Untied Overclocking function, please enter "Overclock Mode" option of BIOS setup to set the selection from the "BIN" folder in the Support CD to the User Manual (PDF file) contained in your CD-ROM drive. It will enhance motherboard features. Therefore, CPU FSB is a menu...
... PCI / PCIE buses. When you wish to enter BIOS Setup after POST, please restart the system by pressing + + , or pressing the reset button on page 7 for the possible overclocking risk before you enable Untied Overclocking function, please enter "Overclock Mode" option of BIOS setup to set the selection from the "BIN" folder in the Support CD to the User Manual (PDF file) contained in your CD-ROM drive. It will enhance motherboard features. Therefore, CPU FSB is a menu...
RAID Installation Guide
Page 4
...) RAID functions on SATA / SATAII HDDs, you want to install Windows XP or Windows XP 64-bit on a RAID disk composed of system boot-up BIOS. B. Insert the ASRock Support CD into the floppy diskette. Then you want to generate Serial ATA driver diskette [YN]?", press . When prompted, insert the SATA / SATAII driver diskette containing AMD RAID driver. STEP 1: Set up , press key, and then a window for details. STEP 3: Use "RAID Installation Guide" to set the RAID configuration by using the Windows RAID installation guide in...
...) RAID functions on SATA / SATAII HDDs, you want to install Windows XP or Windows XP 64-bit on a RAID disk composed of system boot-up BIOS. B. Insert the ASRock Support CD into the floppy diskette. Then you want to generate Serial ATA driver diskette [YN]?", press . When prompted, insert the SATA / SATAII driver diskette containing AMD RAID driver. STEP 1: Set up , press key, and then a window for details. STEP 3: Use "RAID Installation Guide" to set the RAID configuration by using the Windows RAID installation guide in...
RAID Installation Guide
Page 5
... "SATA Operation Mode" to [IDE] in BIOS. 1.4 Create Disk Array Power on IDE HDDs and there are two ASRock Support CD in our Support CD: (There are no SATA / SATAII device used, please set up "SATA Operation Mode" to [RAID] first. STEP 2: Use "RAID Installation Guide" to [RAID]. STEP 3: Install Windows Vista / Vista 64-bit OS on the bottom to load the AMD RAID drivers. Insert the Windows Vista / Windows Vista 64-bit optical disk into the optical drive again to boot your system. If you install Windows...
... "SATA Operation Mode" to [IDE] in BIOS. 1.4 Create Disk Array Power on IDE HDDs and there are two ASRock Support CD in our Support CD: (There are no SATA / SATAII device used, please set up "SATA Operation Mode" to [RAID] first. STEP 2: Use "RAID Installation Guide" to [RAID]. STEP 3: Install Windows Vista / Vista 64-bit OS on the bottom to load the AMD RAID drivers. Insert the Windows Vista / Windows Vista 64-bit optical disk into the optical drive again to boot your system. If you install Windows...


