RAID Installation Guide
Page 1
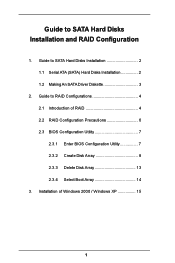
Guide to RAID Configurations 4 2.1 Introduction of Windows 2000 / Windows XP 15 1 Installation of RAID 4 2.2 RAID Configuration Precautions 6 2.3 BIOS Configuration Utility 7 2.3.1 Enter BIOS Configuration Utility 7 2.3.2 Create Disk Array 8 2.3.3 Delete Disk Array 13 2.3.4 Select Boot Array 14 3. Guide to SATA Hard Disks Installation 2 1.1 Serial ATA (SATA) Hard Disks Installation 2 1.2 Making An SATA Driver Diskette 3 2. Guide to SATA Hard Disks Installation and RAID Configuration 1.
Guide to RAID Configurations 4 2.1 Introduction of Windows 2000 / Windows XP 15 1 Installation of RAID 4 2.2 RAID Configuration Precautions 6 2.3 BIOS Configuration Utility 7 2.3.1 Enter BIOS Configuration Utility 7 2.3.2 Create Disk Array 8 2.3.3 Delete Disk Array 13 2.3.4 Select Boot Array 14 3. Guide to SATA Hard Disks Installation 2 1.1 Serial ATA (SATA) Hard Disks Installation 2 1.2 Making An SATA Driver Diskette 3 2. Guide to SATA Hard Disks Installation and RAID Configuration 1.

RAID Installation Guide
Page 3
... want to generate Serial ATA driver diskette [YN]?", press . STEP 1: Insert the ASRock Support CD into your optical ...drive to VIA RAID Tool", which is located in it! WARNING! STEP 3: When you see these messages, Please insert a diskette into the floppy drive at this moment!) STEP 2: During POST at the following path: .. \ VIA RAID Tool 3 Start to make an SATA driver...installation. Please insert a floppy diskette into the floppy diskette. Once you have the SATA driver diskette ready, you may also set RAID 0 / RAID 1 / JBOD configuration before ...
... want to generate Serial ATA driver diskette [YN]?", press . STEP 1: Insert the ASRock Support CD into your optical ...drive to VIA RAID Tool", which is located in it! WARNING! STEP 3: When you see these messages, Please insert a diskette into the floppy drive at this moment!) STEP 2: During POST at the following path: .. \ VIA RAID Tool 3 Start to make an SATA driver...installation. Please insert a floppy diskette into the floppy diskette. Once you have the SATA driver diskette ready, you may also set RAID 0 / RAID 1 / JBOD configuration before ...

RAID Installation Guide
Page 15
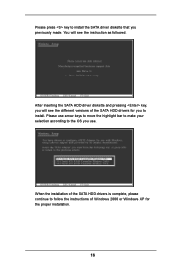
At this moment, please press key and the following information will see the message at the bottom of Windows 2000 or Windows XP, please insert Windows 2000 or Windows XP CD into the optical drive. 3. Then remove the floppy diskette, and reboot the system. At the very beginning, you need to install a third party SCSI or RAID driver...." Installation of Windows 2000 / Windows XP For the installation of the screen, "Press F6 if you will ap p ea r. 15
At this moment, please press key and the following information will see the message at the bottom of Windows 2000 or Windows XP, please insert Windows 2000 or Windows XP CD into the optical drive. 3. Then remove the floppy diskette, and reboot the system. At the very beginning, you need to install a third party SCSI or RAID driver...." Installation of Windows 2000 / Windows XP For the installation of the screen, "Press F6 if you will ap p ea r. 15
RAID Installation Guide
Page 16
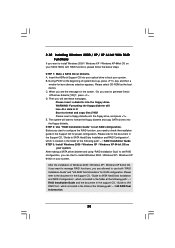
You will see the instruction as followed. When the installation of the SATA HDD drivers is complete, please continue to follow the instructions of the SATA HDD drivers for the proper installation. 16 Please press key to the OS you use. Please use arrow keys to move the highlight bar to make your selection according to install the SATA driver diskette that you will see the different versions of Windows 2000 or Windows XP for you to install. After inserting the SATA HDD driver diskette and pressing key, you previously made.
You will see the instruction as followed. When the installation of the SATA HDD drivers is complete, please continue to follow the instructions of the SATA HDD drivers for the proper installation. 16 Please press key to the OS you use. Please use arrow keys to move the highlight bar to make your selection according to install the SATA driver diskette that you will see the different versions of Windows 2000 or Windows XP for you to install. After inserting the SATA HDD driver diskette and pressing key, you previously made.

User Manual
Page 7
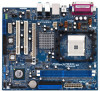
CD in header - Drivers, Utilities, AntiVirus Software - Connector BIOS Feature Support CD Hardware Monitor OS Certifications - 2 x Serial ATA 1.5Gb/s connectors, support RAID (RAID 0, 1, JBOD) and "Hot Plug" functions - 2 x ATA133 ...
CD in header - Drivers, Utilities, AntiVirus Software - Connector BIOS Feature Support CD Hardware Monitor OS Certifications - 2 x Serial ATA 1.5Gb/s connectors, support RAID (RAID 0, 1, JBOD) and "Hot Plug" functions - 2 x ATA133 ...

User Manual
Page 14
With the internal onboard VGA and the external add-on K8VM890 motherboard. Please note that you can install VGA cards and VGA card drivers to enjoy multi-monitors. 14 After setting up BIOS, you select should be less than the total capability of Multi Monitor feature. PCIE2 (PCIE x 1 slot) ...
With the internal onboard VGA and the external add-on K8VM890 motherboard. Please note that you can install VGA cards and VGA card drivers to enjoy multi-monitors. 14 After setting up BIOS, you select should be less than the total capability of Multi Monitor feature. PCIE2 (PCIE x 1 slot) ...
User Manual
Page 20
..." for RAID configuration. After the installation of system boot-up, press key, and then a window for proper configuration. STEP 1: Make a SATA Driver Diskette. B. C. Formatting the floppy diskette will see the message on your optical drive to VIA RAID Tool", which is located in the folder at...OS on your system. Then you will lose ALL data in it! WARNING! Please insert a floppy diskette into the floppy drive. Insert the ASRock Support CD into the floppy diskette. When you see these messages, Please insert a diskette into the floppy drive, and press . Before you...
..." for RAID configuration. After the installation of system boot-up, press key, and then a window for proper configuration. STEP 1: Make a SATA Driver Diskette. B. C. Formatting the floppy diskette will see the message on your optical drive to VIA RAID Tool", which is located in the folder at...OS on your system. Then you will lose ALL data in it! WARNING! Please insert a floppy diskette into the floppy drive. Insert the ASRock Support CD into the floppy diskette. When you see these messages, Please insert a diskette into the floppy drive, and press . Before you...
User Manual
Page 21
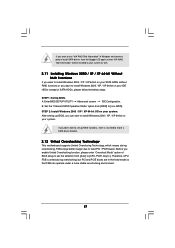
... enter "Overclock Mode" option of SATA HDDs, please follow the below steps. Therefore, CPU FSB is no need to make a SATA driver diskette. 2.12 Untied Overclocking Technology This motherboard supports Untied Overclocing Technology, which means during overclocking, but PCI and PCIE buses are in Windows... environment, please install SATA drivers from [Auto] to [non-RAID]. STEP 2: Install Windows 2000 / XP / XP 64-bit OS on your IDE HDDs instead of...
... enter "Overclock Mode" option of SATA HDDs, please follow the below steps. Therefore, CPU FSB is no need to make a SATA driver diskette. 2.12 Untied Overclocking Technology This motherboard supports Untied Overclocing Technology, which means during overclocking, but PCI and PCIE buses are in Windows... environment, please install SATA drivers from [Auto] to [non-RAID]. STEP 2: Install Windows 2000 / XP / XP 64-bit OS on your IDE HDDs instead of...

User Manual
Page 38
...your OS documentation for more about ASRock, welcome to display the menus. 4.2.2 Drivers Menu The Drivers Menu shows the available devices drivers including ASRock Express GbL PCI Express LAN card driver if the system detects the installed devices. Please install the necessary drivers to your CD-ROM drive. ... 2000 / XP / XP 64-bit. or you need to contact ASRock or want to know more information. 4.2 Support CD Information The Support CD that came with the motherboard contains necessary drivers and useful utilities that the motherboard supports. The CD automatically displays the ...
...your OS documentation for more about ASRock, welcome to display the menus. 4.2.2 Drivers Menu The Drivers Menu shows the available devices drivers including ASRock Express GbL PCI Express LAN card driver if the system detects the installed devices. Please install the necessary drivers to your CD-ROM drive. ... 2000 / XP / XP 64-bit. or you need to contact ASRock or want to know more information. 4.2 Support CD Information The Support CD that came with the motherboard contains necessary drivers and useful utilities that the motherboard supports. The CD automatically displays the ...

User Manual
Page 39
Select Settings, then Control Panel. 2. Switch to implement settings. 39 If you are using this feature, please make sure to install "AMD Processor Driver" from the "Support CD" first. Double-click the Display icon in the Control Panel then select the Screen Saver tab. 4. Click the "Power..." button. From ...
Select Settings, then Control Panel. 2. Switch to implement settings. 39 If you are using this feature, please make sure to install "AMD Processor Driver" from the "Support CD" first. Double-click the Display icon in the Control Panel then select the Screen Saver tab. 4. Click the "Power..." button. From ...


