RAID Installation Guide
Page 11
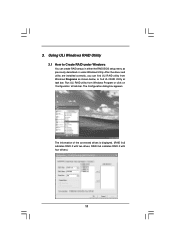
After the driver and utility are installed correctly, you can create RAID arrays in either the RAID BIOS setup menu as shown below, or find ULi RAID Utility ...
After the driver and utility are installed correctly, you can create RAID arrays in either the RAID BIOS setup menu as shown below, or find ULi RAID Utility ...

RAID Installation Guide
Page 13
... the drives. After the drives and type are configured, a dialog box appears to confirm that you that the next action will destroy information in selected drivers is active for RAID 1, 5 and RAID 0+1 only. Then, click 'Yes' to restart your system when a dialog box appears to warn you have changed the RAID...
... the drives. After the drives and type are configured, a dialog box appears to confirm that you that the next action will destroy information in selected drivers is active for RAID 1, 5 and RAID 0+1 only. Then, click 'Yes' to restart your system when a dialog box appears to warn you have changed the RAID...

RAID Installation Guide
Page 14
Make sure the information in selected drivers is selected. Click 'OK' after the array is no longer in the drives. A dialog box appears to confirm that you that the next action will ...
Make sure the information in selected drivers is selected. Click 'OK' after the array is no longer in the drives. A dialog box appears to confirm that you that the next action will ...

RAID Installation Guide
Page 16
Click on 'Yes'. Make sure the information in selected drivers is no longer in use before clicking on 'OK' or 'Apply' to confirm that the next action will be moved to warn you that you have changed the RAID settings. 16 Then, click 'Yes' to restart your system when a dialog box appears to start RAID type migration. After the drives and type are configured, a dialog box appears to 'Selected Drives' list by clicking the right arrow key. The selected drive or RAID will destroy information in the drives. Click the desired drive or RAID from the 'Available Drives' list.
Click on 'Yes'. Make sure the information in selected drivers is no longer in use before clicking on 'OK' or 'Apply' to confirm that the next action will be moved to warn you that you have changed the RAID settings. 16 Then, click 'Yes' to restart your system when a dialog box appears to start RAID type migration. After the drives and type are configured, a dialog box appears to 'Selected Drives' list by clicking the right arrow key. The selected drive or RAID will destroy information in the drives. Click the desired drive or RAID from the 'Available Drives' list.

User Manual
Page 4
Software Support 51 4.1 Install Operating System 51 4.2 Support CD Information 51 4.2.1 Running Support CD 51 4.2.2 Drivers Menu 51 4.2.3 Utilities Menu 51 4.2.4 Contact Information 51 APPENDIX: AMD's Cool 'n' QuietTM Technology ...... 52 4 3.3.8 USB Configuration 47 3.4 Hardware Health Event Monitoring Screen 47 3.5 Boot Screen 48 3.5.1 Boot Settings Configuration 48 3.6 Security Screen 49 3.7 Exit Screen 50 4 .
Software Support 51 4.1 Install Operating System 51 4.2 Support CD Information 51 4.2.1 Running Support CD 51 4.2.2 Drivers Menu 51 4.2.3 Utilities Menu 51 4.2.4 Contact Information 51 APPENDIX: AMD's Cool 'n' QuietTM Technology ...... 52 4 3.3.8 USB Configuration 47 3.4 Hardware Health Event Monitoring Screen 47 3.5 Boot Screen 48 3.5.1 Boot Settings Configuration 48 3.6 Security Screen 49 3.7 Exit Screen 50 4 .

User Manual
Page 7
... BIOS - Motherboard Temperature Sensing - Microsoft® Windows® 2000 / XP / XP 64-bit compliant - SMBIOS 2.3.1 Support - FCC, CE, Microsoft® WHQL Certificated 7 CD in header - Drivers, Utilities, AntiVirus Software (Trial Version) - CPU/Chassis FAN connector - 20 pin ATX power connector - 4 pin 12V power connector - Front panel audio connector - 2 x USB 2.0 headers (support...
... BIOS - Motherboard Temperature Sensing - Microsoft® Windows® 2000 / XP / XP 64-bit compliant - SMBIOS 2.3.1 Support - FCC, CE, Microsoft® WHQL Certificated 7 CD in header - Drivers, Utilities, AntiVirus Software (Trial Version) - CPU/Chassis FAN connector - 20 pin ATX power connector - 4 pin 12V power connector - Front panel audio connector - 2 x USB 2.0 headers (support...

User Manual
Page 18
... SLITM-ready graphics cards that your power supply unit (PSU) can provide at least the minimum power required by your graphics card driver supports the NVIDIA SLITM technology. Enjoy the benefit of graphics cards will not work together properly. (Even the GPU chips version shall...certified. 2. If required, connect an auxiliary power source to the previous section "Dual Graphics Feature" for proper jumper setting. Download the latest driver from the NVIDIA website (www. Step 2. Please refer to the PCI Express graphics cards. Currently, NVIDIA SLITM technology supports Windows XP and XP...
... SLITM-ready graphics cards that your power supply unit (PSU) can provide at least the minimum power required by your graphics card driver supports the NVIDIA SLITM technology. Enjoy the benefit of graphics cards will not work together properly. (Even the GPU chips version shall...certified. 2. If required, connect an auxiliary power source to the previous section "Dual Graphics Feature" for proper jumper setting. Download the latest driver from the NVIDIA website (www. Step 2. Please refer to the PCI Express graphics cards. Currently, NVIDIA SLITM technology supports Windows XP and XP...

User Manual
Page 19
... nView system tray utility. Then, reboot your Windows taskbar. B. From the nView Desktop Manager window, select the Desktop Management tab. Step8. Install the graphics card drivers to SLI/XFIRE power connector. A. Click the NVIDIA Settings icon on your system. Connect a 4-pin ATX power cable to your computer and boot into OS...
... nView system tray utility. Then, reboot your Windows taskbar. B. From the nView Desktop Manager window, select the Desktop Management tab. Step8. Install the graphics card drivers to SLI/XFIRE power connector. A. Click the NVIDIA Settings icon on your system. Connect a 4-pin ATX power cable to your computer and boot into OS...

User Manual
Page 31
AHCI requires appropriate software support (e.g., an AHCI driver, which is still power-on and in working condition. What is Hot Plug Function? If the SATA / SATAII HDDs are built as Hot Plug. If ... Hot Swap Functions for SATA / SATAII HDDs and eSATAII Devices K8SLI-eSATA2 motherboard supports Hot Plug and Hot Swap functions for SATA / SATAII / eSATAII Devices in our support CD). For example, with Hot Plug capability that it is still power-on the driver by ULi RAID configuration tools to exchange drives easily. However...
AHCI requires appropriate software support (e.g., an AHCI driver, which is still power-on and in working condition. What is Hot Plug Function? If the SATA / SATAII HDDs are built as Hot Plug. If ... Hot Swap Functions for SATA / SATAII HDDs and eSATAII Devices K8SLI-eSATA2 motherboard supports Hot Plug and Hot Swap functions for SATA / SATAII / eSATAII Devices in our support CD). For example, with Hot Plug capability that it is still power-on the driver by ULi RAID configuration tools to exchange drives easily. However...

User Manual
Page 32
...and RAID Configuration", at the beginning of system boot-up, press key, and then a window for proper configuration. STEP 1: Insert the ASRock Support CD into your optical drive to boot your system. (Do NOT insert any floppy diskette into the floppy drive. Please insert a ... Manual \ RAID Installation Guide \ English.pdf 32 WARNING! Before you start to configure the RAID function, you need to make a SATA / SATAII driver diskette before you install the OS. Formatting the floppy diskette will start the OS installation. 2.13 Using SATA / SATAII HDDs With RAID Functions If you...
...and RAID Configuration", at the beginning of system boot-up, press key, and then a window for proper configuration. STEP 1: Insert the ASRock Support CD into your optical drive to boot your system. (Do NOT insert any floppy diskette into the floppy drive. Please insert a ... Manual \ RAID Installation Guide \ English.pdf 32 WARNING! Before you start to configure the RAID function, you need to make a SATA / SATAII driver diskette before you install the OS. Formatting the floppy diskette will start the OS installation. 2.13 Using SATA / SATAII HDDs With RAID Functions If you...
User Manual
Page 33
... BIOS setup to set the option from [RAID] to [AHCI]. 2. Using SATA / SATAII HDDs Operating in Non-RAID Mode 1. Before you need. Make a SATA / SATAII driver diskette by following the proper steps of BIOS setup to set the selection from [RAID] to [non- Please follow the below procedures for selecting the...
... BIOS setup to set the option from [RAID] to [AHCI]. 2. Using SATA / SATAII HDDs Operating in Non-RAID Mode 1. Before you need. Make a SATA / SATAII driver diskette by following the proper steps of BIOS setup to set the selection from [RAID] to [non- Please follow the below procedures for selecting the...
User Manual
Page 51
... Information The Support CD that came with the motherboard contains necessary drivers and useful utilities that the motherboard supports. or you need to contact ASRock or want to visit ASRock's website at http://www.asrock.com; The CD automatically displays the Main Menu if "AUTORUN"... 51 Refer to your CD-ROM drive. Please install the necessary drivers to display the menus. 4.2.2 Drivers Menu The Drivers Menu shows the available devices drivers including ASRock Express GbL PCI Express LAN card driver if the system detects the installed devices. Because motherboard settings and ...
... Information The Support CD that came with the motherboard contains necessary drivers and useful utilities that the motherboard supports. or you need to contact ASRock or want to visit ASRock's website at http://www.asrock.com; The CD automatically displays the Main Menu if "AUTORUN"... 51 Refer to your CD-ROM drive. Please install the necessary drivers to display the menus. 4.2.2 Drivers Menu The Drivers Menu shows the available devices drivers including ASRock Express GbL PCI Express LAN card driver if the system detects the installed devices. Because motherboard settings and ...

User Manual
Page 52
...'s Cool 'n' QuietTM technology under Windows system. When using Windows 2000 / XP/ XP 64-bit operating system, please follow the instruction below to install "AMD Processor Driver" from the "Support CD" first. If you are using this feature, please make sure to enable AMD's Cool 'n' QuietTM technology: 1. The following dialog box appears...
...'s Cool 'n' QuietTM technology under Windows system. When using Windows 2000 / XP/ XP 64-bit operating system, please follow the instruction below to install "AMD Processor Driver" from the "Support CD" first. If you are using this feature, please make sure to enable AMD's Cool 'n' QuietTM technology: 1. The following dialog box appears...

Quick Installation Guide
Page 6
... 1.1 Compliance Wake Up Events - CD in header - Chassis Fan Tachometer - Drivers, Utilities, AntiVirus Software (Trial Version) - Microsoft® Windows® 2000 / XP / XP 64-bit compliant - SMBIOS 2.3.1 Support - CPU Temperature Sensing - Motherboard Temperature Sensing - FCC, CE, Microsoft® WHQL Certificated English 6 ASRock K8SLI-eSATA2 Motherboard Supports "Plug and Play" - CPU Overheat Shutdown to Protect...
... 1.1 Compliance Wake Up Events - CD in header - Chassis Fan Tachometer - Drivers, Utilities, AntiVirus Software (Trial Version) - Microsoft® Windows® 2000 / XP / XP 64-bit compliant - SMBIOS 2.3.1 Support - CPU Temperature Sensing - Motherboard Temperature Sensing - FCC, CE, Microsoft® WHQL Certificated English 6 ASRock K8SLI-eSATA2 Motherboard Supports "Plug and Play" - CPU Overheat Shutdown to Protect...
Quick Installation Guide
Page 14
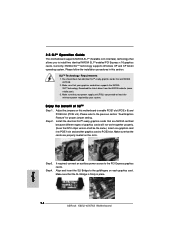
...ASRock K8SLI-eSATA2 Motherboard Step 2. Step3. If required, connect an auxiliary power source to enable PCIE1 slot (PCIE x 8) and PCIE3 slot (PCIE x 8). 2.5 SLITM Operation Guide This motherboard supports NVIDIA SLITM (Scalable Link Interface) technology that allows you to the goldfingers on each graphics card. Download the latest driver...Make sure that your power supply unit (PSU) can provide at least the minimum power required by your graphics card driver supports the NVIDIA SLITM technology. Make sure that the SLI Bridge is firmly in this motherboard to the PCI Express ...
...ASRock K8SLI-eSATA2 Motherboard Step 2. Step3. If required, connect an auxiliary power source to enable PCIE1 slot (PCIE x 8) and PCIE3 slot (PCIE x 8). 2.5 SLITM Operation Guide This motherboard supports NVIDIA SLITM (Scalable Link Interface) technology that allows you to the goldfingers on each graphics card. Download the latest driver...Make sure that your power supply unit (PSU) can provide at least the minimum power required by your graphics card driver supports the NVIDIA SLITM technology. Make sure that the SLI Bridge is firmly in this motherboard to the PCI Express ...

Quick Installation Guide
Page 15
Step6. Install the graphics card drivers to your system. English 15 ASRock K8SLI-eSATA2 Motherboard Power on your Windows taskbar. Click Properties to SLI/XFIRE power connector. Step7. Then, reboot your system. C. Connect a 4-pin ATX power cable to display the Display Properties dialog box. Install the "SLI Enabled" driver of the graphics card that , you can...
Step6. Install the graphics card drivers to your system. English 15 ASRock K8SLI-eSATA2 Motherboard Power on your Windows taskbar. Click Properties to SLI/XFIRE power connector. Step7. Then, reboot your system. C. Connect a 4-pin ATX power cable to display the Display Properties dialog box. Install the "SLI Enabled" driver of the graphics card that , you can...

Quick Installation Guide
Page 27
... such as RAID1 then it is called "Hot Swap" for the action to exchange your SATAII hard disk. AHCI requires appropriate software support (e.g., an AHCI driver, which is Hot Swap Function? If you obey "safely remove hardware" mechanism like USB flash drive, you may simply plug your eSATAII devices to the... and remove the SATA / SATAII HDDs while the system is equipped with eSATAII interface, you can be flush out when removing the eSATAII device. 27 ASRock K8SLI-eSATA2 Motherboard English
... such as RAID1 then it is called "Hot Swap" for the action to exchange your SATAII hard disk. AHCI requires appropriate software support (e.g., an AHCI driver, which is Hot Swap Function? If you obey "safely remove hardware" mechanism like USB flash drive, you may simply plug your eSATAII devices to the... and remove the SATA / SATAII HDDs while the system is equipped with eSATAII interface, you can be flush out when removing the eSATAII device. 27 ASRock K8SLI-eSATA2 Motherboard English

Quick Installation Guide
Page 28
...Using SATA / SATAII HDDs With RAID Functions If you want to format and copy files [YN]? Start to generate Serial ATA driver diskette [YN]?", press . Before you start to configure the RAID function, you need to set RAID 0 / RAID 1 /...proper configuration. WARNING! Please find the document, "Guide to format the floppy diskette and copy SATA / SATAII drivers into your system. (Do NOT insert any floppy diskette into the floppy drive at this moment!) STEP 2: During...the Support CD: .. \ Information \ Manual \ RAID Installation Guide \ English.pdf 28 ASRock K8SLI-eSATA2 Motherboard English
...Using SATA / SATAII HDDs With RAID Functions If you want to format and copy files [YN]? Start to generate Serial ATA driver diskette [YN]?", press . Before you start to configure the RAID function, you need to set RAID 0 / RAID 1 /...proper configuration. WARNING! Please find the document, "Guide to format the floppy diskette and copy SATA / SATAII drivers into your system. (Do NOT insert any floppy diskette into the floppy drive at this moment!) STEP 2: During...the Support CD: .. \ Information \ Manual \ RAID Installation Guide \ English.pdf 28 ASRock K8SLI-eSATA2 Motherboard English

Quick Installation Guide
Page 29
... Mode" in the fixed mode so that FSB can operate under a more stable overclocking environment. 29 ASRock K8SLI-eSATA2 Motherboard English Start Windows 2000, windows XP, or Windows XP 64-bit OS installation. Make a SATA / SATAII driver diskette by following the proper steps of BIOS setup to set the selection from [Auto] to install...
... Mode" in the fixed mode so that FSB can operate under a more stable overclocking environment. 29 ASRock K8SLI-eSATA2 Motherboard English Start Windows 2000, windows XP, or Windows XP 64-bit OS installation. Make a SATA / SATAII driver diskette by following the proper steps of BIOS setup to set the selection from [Auto] to install...

Quick Installation Guide
Page 30
The BIOS Setup program is designed to display the menus. 30 ASRock K8SLI-eSATA2 Motherboard English The Support CD that will display the Main Menu automatically if "AUTORUN" is a menu-driven program, which allows you to scroll through its ... various Microsoft® Windows® operating systems: 2000 / XP / XP 64-bit. It will enhance motherboard features. otherwise, POST continues with the motherboard contains necessary drivers and useful utilities that came with its various sub-menus and to enter BIOS Setup utility; When you wish to the User Manual (PDF file...
The BIOS Setup program is designed to display the menus. 30 ASRock K8SLI-eSATA2 Motherboard English The Support CD that will display the Main Menu automatically if "AUTORUN" is a menu-driven program, which allows you to scroll through its ... various Microsoft® Windows® operating systems: 2000 / XP / XP 64-bit. It will enhance motherboard features. otherwise, POST continues with the motherboard contains necessary drivers and useful utilities that came with its various sub-menus and to enter BIOS Setup utility; When you wish to the User Manual (PDF file...


