
RAID Installation Guide
Page 2
For SATA installation guide, please refer to SATA Hard Disks Installation 1.1 Serial ATA (SATA) Hard Disks Installation ULi M1697 chipset supports Serial ATA (SATA) hard disks with RAID functions, including RAID 0, RAID 1, RAID 0+1, JBOD, and RAID 5. This section will guide you how to create RAID on this motherboard for internal storage devices. You may install SATA hard disks on SATA ports. 2 1. Guide to Serial ATA (SATA) Hard Disks Installation of "User Manual" in the support CD.
For SATA installation guide, please refer to SATA Hard Disks Installation 1.1 Serial ATA (SATA) Hard Disks Installation ULi M1697 chipset supports Serial ATA (SATA) hard disks with RAID functions, including RAID 0, RAID 1, RAID 0+1, JBOD, and RAID 5. This section will guide you how to create RAID on this motherboard for internal storage devices. You may install SATA hard disks on SATA ports. 2 1. Guide to Serial ATA (SATA) Hard Disks Installation of "User Manual" in the support CD.

User Manual
Page 1
All rights reserved. 1 K8SLI-eSATA2 User Manual Version 1.1 Published February 2006 Copyright©2006 ASRock INC.
All rights reserved. 1 K8SLI-eSATA2 User Manual Version 1.1 Published February 2006 Copyright©2006 ASRock INC.

User Manual
Page 2
... damages (including damages for backup purpose, without intent to the contents of this manual, ASRock does not provide warranty of any defect or error in the manual or product. ASRock Website: http://www.asrock.com 2 Disclaimer: Specifications and information contained in this manual are used only for identification or explanation and to the implied warranties or...
... damages (including damages for backup purpose, without intent to the contents of this manual, ASRock does not provide warranty of any defect or error in the manual or product. ASRock Website: http://www.asrock.com 2 Disclaimer: Specifications and information contained in this manual are used only for identification or explanation and to the implied warranties or...

User Manual
Page 5
... of this manual occur, the updated version will be available on ASRock website as well. Because the motherboard specifications and the BIOS software might be subject to quality and endurance. ASRock website http://www.asrock.com 1.1 Package Contents 1 x ASRock K8SLI-eSATA2 Motherboard (ATX Form Factor: 12.0-in x 8.2-in, 30.5 cm x 20.8 cm) 1 x ASRock K8SLI-eSATA2 Quick Installation Guide 1 x ASRock K8SLI-eSATA2 Support CD...
... of this manual occur, the updated version will be available on ASRock website as well. Because the motherboard specifications and the BIOS software might be subject to quality and endurance. ASRock website http://www.asrock.com 1.1 Package Contents 1 x ASRock K8SLI-eSATA2 Motherboard (ATX Form Factor: 12.0-in x 8.2-in, 30.5 cm x 20.8 cm) 1 x ASRock K8SLI-eSATA2 Quick Installation Guide 1 x ASRock K8SLI-eSATA2 Support CD...
User Manual
Page 13
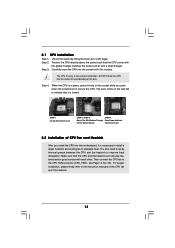
... secure the CPU. Step 4. 2.1 CPU Installation Step 1. Position the CPU directly above the socket such that it firmly on the side tab to the instruction manuals of the pins. The CPU fits only in good contact with a small triangle. Lever 90° Up Socket Corner CPU Golden Triangle STEP 1: Lift Up...
... secure the CPU. Step 4. 2.1 CPU Installation Step 1. Position the CPU directly above the socket such that it firmly on the side tab to the instruction manuals of the pins. The CPU fits only in good contact with a small triangle. Lever 90° Up Socket Corner CPU Golden Triangle STEP 1: Lift Up...
User Manual
Page 24
Please follow the instruction in our manual and chassis manual to the front panel audio header as below: A. If you use AC'97 audio panel, please install it to install your system. 2. C. MIC_RET and OUT_RET ...
Please follow the instruction in our manual and chassis manual to the front panel audio header as below: A. If you use AC'97 audio panel, please install it to install your system. 2. C. MIC_RET and OUT_RET ...

User Manual
Page 32
..., Please insert a diskette into the floppy drive at this moment!) STEP 2: During POST at the following path in the Support CD: .. \ Information \ Manual \ RAID Installation Guide \ English.pdf 32 STEP 5: The system will start the OS installation. Please select CDROM as the boot device. STEP 4: Then you... ALL data in the Support CD for boot devices selection appears. Please insert a floppy diskette into the floppy diskette. STEP 1: Insert the ASRock Support CD into your optical drive to boot your system. (Do NOT insert any floppy diskette into the floppy drive. Before you start to...
..., Please insert a diskette into the floppy drive at this moment!) STEP 2: During POST at the following path in the Support CD: .. \ Information \ Manual \ RAID Installation Guide \ English.pdf 32 STEP 5: The system will start the OS installation. Please select CDROM as the boot device. STEP 4: Then you... ALL data in the Support CD for boot devices selection appears. Please insert a floppy diskette into the floppy diskette. STEP 1: Insert the ASRock Support CD into your optical drive to boot your system. (Do NOT insert any floppy diskette into the floppy drive. Before you start to...
User Manual
Page 37
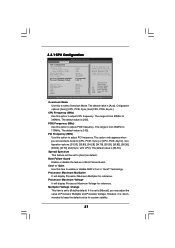
... Multiplier for reference. Processor Maximum Multiplier It will be set to 340MHz. However, it is from 90MHz to [Auto] as default. If Manual, multiplier and voltage will display Processor Maximum Voltage for reference. PCIE Frequency (MHz) Use this option to adjust PCI frequency. Con figuration options...2003, American Megatrends, Inc. The range is from 90MHz to [CPU, PCIE, Sync.] or [CPU, PCIE, Async.]. The range is set to [Manual], you set to select Overclock Mode. If it is [200]. The default value is [100]. The default value is [Auto]. The default value ...
... Multiplier for reference. Processor Maximum Multiplier It will be set to 340MHz. However, it is from 90MHz to [Auto] as default. If Manual, multiplier and voltage will display Processor Maximum Voltage for reference. PCIE Frequency (MHz) Use this option to adjust PCI frequency. Con figuration options...2003, American Megatrends, Inc. The range is from 90MHz to [CPU, PCIE, Sync.] or [CPU, PCIE, Async.]. The range is set to [Manual], you set to select Overclock Mode. If it is [200]. The default value is [100]. The default value is [Auto]. The default value ...

User Manual
Page 38
... Change Processor Multiplier Processor Voltage Memory Clock Flexibility Option CAS Latency TRAS TRP [Auto] [200] [100] [Auto] [Enabled] [Enabled] x11 2200 MHz 1.450 V [Manual] [x11 2200 MHz] [1.450V] [Auto] [Disabled] [Auto] [Auto] [Auto] If AUTO, multiplier and voltage will be set based on User Selection in Setup.... Item Change Option General Help Load Defaults Save and Exit Exit v02.54 (C) Copyright 1985-2003, American Megatrends, Inc. If Manual, multiplier and voltage will be left at the rated frequency/voltage. For example, if the value of "Processor Maximum Multiplier" is set to...
... Change Processor Multiplier Processor Voltage Memory Clock Flexibility Option CAS Latency TRAS TRP [Auto] [200] [100] [Auto] [Enabled] [Enabled] x11 2200 MHz 1.450 V [Manual] [x11 2200 MHz] [1.450V] [Auto] [Disabled] [Auto] [Auto] [Auto] If AUTO, multiplier and voltage will be set based on User Selection in Setup.... Item Change Option General Help Load Defaults Save and Exit Exit v02.54 (C) Copyright 1985-2003, American Megatrends, Inc. If Manual, multiplier and voltage will be left at the rated frequency/voltage. For example, if the value of "Processor Maximum Multiplier" is set to...

Quick Installation Guide
Page 4
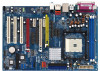
In case any modifications of this manual occur, the updated version will be available on ASRock website as well. ASRock website http://www.asrock.com 1.1 Package Contents 1 x ASRock K8SLI-eSATA2 Motherboard (ATX Form Factor: 12.0-in x 8.2-in, 30.5 cm x 20.8 cm) 1 x ASRock K8SLI-eSATA2 Quick Installation Guide 1 x ASRock K8SLI-eSATA2 Support CD 1 x Ultra ATA 66/100/133 IDE Ribbon Cable (80-conductor) 1 x 3.5-in the...
In case any modifications of this manual occur, the updated version will be available on ASRock website as well. ASRock website http://www.asrock.com 1.1 Package Contents 1 x ASRock K8SLI-eSATA2 Motherboard (ATX Form Factor: 12.0-in x 8.2-in, 30.5 cm x 20.8 cm) 1 x ASRock K8SLI-eSATA2 Quick Installation Guide 1 x ASRock K8SLI-eSATA2 Support CD 1 x Ultra ATA 66/100/133 IDE Ribbon Cable (80-conductor) 1 x 3.5-in the...

Quick Installation Guide
Page 7
... directly. 7. You can also connect SATA hard disk to enable AMD's Cool 'n' QuietTM technology under Microsoft® Windows® XP SP1 or SP2 / 2000 SP4. 7 ASRock K8SLI-eSATA2 Motherboard English CAUTION! 1. Before you plan to install only one PCI Express VGA card to this motherboard offers stepless control, it to SATAII connector, please...
... directly. 7. You can also connect SATA hard disk to enable AMD's Cool 'n' QuietTM technology under Microsoft® Windows® XP SP1 or SP2 / 2000 SP4. 7 ASRock K8SLI-eSATA2 Motherboard English CAUTION! 1. Before you plan to install only one PCI Express VGA card to this motherboard offers stepless control, it to SATAII connector, please...
Quick Installation Guide
Page 9
... place, press it firmly on the carpet or the like. Install CPU fan and heatsink. Carefully insert the CPU into the socket to the instruction manuals of your motherboard directly on the socket while you install motherboard components or change any motherboard settings. 1. Step 5. Installation Pre-installation Precautions Take note of... 4. For proper installation, please kindly refer to avoid bending of the following precautions before touching any component, place it fits in one correct orientation. English 9 ASRock K8SLI-eSATA2 Motherboard
... place, press it firmly on the carpet or the like. Install CPU fan and heatsink. Carefully insert the CPU into the socket to the instruction manuals of your motherboard directly on the socket while you install motherboard components or change any motherboard settings. 1. Step 5. Installation Pre-installation Precautions Take note of... 4. For proper installation, please kindly refer to avoid bending of the following precautions before touching any component, place it fits in one correct orientation. English 9 ASRock K8SLI-eSATA2 Motherboard

Quick Installation Guide
Page 20
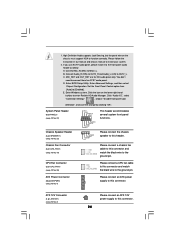
.... Enter BIOS Setup Utility. ATX 12V Connector Please connect an ATX 12V (4-pin ATX12V1) power supply to this connector. (see p.2 No. 2) 20 ASRock K8SLI-eSATA2 Motherboard English Chassis Speaker Header (4-pin SPEAKER 1) (see p.2 No. 23) Chassis Fan Connector (3-pin CHA_FAN1) (see p.2 No. 19) CPU Fan ...Click the icon on the chassis must support HDA to enter Realtek HD Audio Manager. Please follow the instruction in our manual and chassis manual to the ground pin. B. High Definition Audio supports Jack Sensing, but the panel wire on the lower right hand...
.... Enter BIOS Setup Utility. ATX 12V Connector Please connect an ATX 12V (4-pin ATX12V1) power supply to this connector. (see p.2 No. 2) 20 ASRock K8SLI-eSATA2 Motherboard English Chassis Speaker Header (4-pin SPEAKER 1) (see p.2 No. 23) Chassis Fan Connector (3-pin CHA_FAN1) (see p.2 No. 19) CPU Fan ...Click the icon on the chassis must support HDA to enter Realtek HD Audio Manager. Please follow the instruction in our manual and chassis manual to the ground pin. B. High Definition Audio supports Jack Sensing, but the panel wire on the lower right hand...

Quick Installation Guide
Page 26
... under "SATA Operation Mode" in the Support CD for internal storage devices. STEP 1: Install the SATA / SATAII hard disks into the drive bays of "User Manual" in BIOS setup. 2.10 Serial ATA (SATA) / Serial ATAII (SATAII) Hard Disks Installation This motherboard adopts ULi M1697 chipset that supports Serial ATA (SATA) / Serial.... STEP 2: Connect the SATA power cable to install the SATA / SATAII hard disks. Please refer to use RAID functions on this motherboard for details. 26 ASRock K8SLI-eSATA2 Motherboard English
... under "SATA Operation Mode" in the Support CD for internal storage devices. STEP 1: Install the SATA / SATAII hard disks into the drive bays of "User Manual" in BIOS setup. 2.10 Serial ATA (SATA) / Serial ATAII (SATAII) Hard Disks Installation This motherboard adopts ULi M1697 chipset that supports Serial ATA (SATA) / Serial.... STEP 2: Connect the SATA power cable to install the SATA / SATAII hard disks. Please refer to use RAID functions on this motherboard for details. 26 ASRock K8SLI-eSATA2 Motherboard English

Quick Installation Guide
Page 28
STEP 1: Insert the ASRock Support CD into your optical drive to boot your system. (Do NOT insert any floppy diskette into the floppy diskette. STEP 4: Then you will start ...-bit OS on your SATA / SATAII HDDs with RAID functions, you need to check the installation guide in the Support CD: .. \ Information \ Manual \ RAID Installation Guide \ English.pdf 28 ASRock K8SLI-eSATA2 Motherboard English Once you have the SATA / SATAII driver diskette ready, you may start to install Windows 2000 / Windows XP / Windows XP...
STEP 1: Insert the ASRock Support CD into your optical drive to boot your system. (Do NOT insert any floppy diskette into the floppy diskette. STEP 4: Then you will start ...-bit OS on your SATA / SATAII HDDs with RAID functions, you need to check the installation guide in the Support CD: .. \ Information \ Manual \ RAID Installation Guide \ English.pdf 28 ASRock K8SLI-eSATA2 Motherboard English Once you have the SATA / SATAII driver diskette ready, you may start to install Windows 2000 / Windows XP / Windows XP...

Quick Installation Guide
Page 30
... BIOS Setup utility; For the detailed information about BIOS Setup, please refer to be user-friendly. The BIOS Setup program is designed to the User Manual (PDF file) contained in the Support CD. 4. Software Support CD information This motherboard supports various Microsoft® Windows® operating systems: 2000 / XP / XP 64... + + , or pressing the reset button on the file "ASSETUP. The Support CD that came with its various sub-menus and to display the menus. 30 ASRock K8SLI-eSATA2 Motherboard English EXE" from the "BIN" folder in your CD-ROM drive.
... BIOS Setup utility; For the detailed information about BIOS Setup, please refer to be user-friendly. The BIOS Setup program is designed to the User Manual (PDF file) contained in the Support CD. 4. Software Support CD information This motherboard supports various Microsoft® Windows® operating systems: 2000 / XP / XP 64... + + , or pressing the reset button on the file "ASSETUP. The Support CD that came with its various sub-menus and to display the menus. 30 ASRock K8SLI-eSATA2 Motherboard English EXE" from the "BIN" folder in your CD-ROM drive.

Quick Installation Guide
Page 53
.. \ Information \ Manual \ RAID Installation Guide \ Chinese.pdf 53 ASRock K8SLI-eSATA2 Motherboard
.. \ Information \ Manual \ RAID Installation Guide \ Chinese.pdf 53 ASRock K8SLI-eSATA2 Motherboard
