
User Manual
Page 5
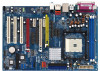
... will be updated, the content of the Support CD. Introduction Thank you for purchasing ASRock K8SLI-eSATA2 motherboard, a reliable motherboard produced under ASRock's consistently stringent quality control. Chapter 3 and 4 contain the configuration guide to change without...and the BIOS software might be available on ASRock website as well. ASRock website http://www.asrock.com 1.1 Package Contents 1 x ASRock K8SLI-eSATA2 Motherboard (ATX Form Factor: 12.0-in x 8.2-in, 30.5 cm x 20.8 cm) 1 x ASRock K8SLI-eSATA2 Quick Installation Guide 1 x ASRock K8SLI-eSATA2 Support CD 1 x Ultra ATA 66/...
... will be updated, the content of the Support CD. Introduction Thank you for purchasing ASRock K8SLI-eSATA2 motherboard, a reliable motherboard produced under ASRock's consistently stringent quality control. Chapter 3 and 4 contain the configuration guide to change without...and the BIOS software might be available on ASRock website as well. ASRock website http://www.asrock.com 1.1 Package Contents 1 x ASRock K8SLI-eSATA2 Motherboard (ATX Form Factor: 12.0-in x 8.2-in, 30.5 cm x 20.8 cm) 1 x ASRock K8SLI-eSATA2 Quick Installation Guide 1 x ASRock K8SLI-eSATA2 Support CD 1 x Ultra ATA 66/...
Quick Installation Guide
Page 1
... this guide. In no responsibility for a particular purpose. All rights reserved. 1 ASRock K8SLI-eSATA2 Motherboard English Operation is subject to infringe. With respect to the contents of this guide, ASRock does not provide warranty of any kind, either expressed or implied, including but not... purchaser for identification or explanation and to the owners' benefit, without written consent of ASRock Inc. ASRock Website: http://www.asrock.com Published February 2006 Copyright©2006 ASRock INC. Products and corporate names appearing in this guide may or may not be registered...
... this guide. In no responsibility for a particular purpose. All rights reserved. 1 ASRock K8SLI-eSATA2 Motherboard English Operation is subject to infringe. With respect to the contents of this guide, ASRock does not provide warranty of any kind, either expressed or implied, including but not... purchaser for identification or explanation and to the owners' benefit, without written consent of ASRock Inc. ASRock Website: http://www.asrock.com Published February 2006 Copyright©2006 ASRock INC. Products and corporate names appearing in this guide may or may not be registered...

Quick Installation Guide
Page 2
... Port (FUTURE_CPU_PORT1) 36 J1 / J2 / J3 / J4 / J7 / J8 / J9 / J10 Jumpers 37 eSATAII Connector (eSATAII_TOP) 38 eSATAII Connector (eSATAII_BOTTOM) 39 CPU Fan Connector (CPU_FAN1) 2 ASRock K8SLI-eSATA2 Motherboard
... Port (FUTURE_CPU_PORT1) 36 J1 / J2 / J3 / J4 / J7 / J8 / J9 / J10 Jumpers 37 eSATAII Connector (eSATAII_TOP) 38 eSATAII Connector (eSATAII_BOTTOM) 39 CPU Fan Connector (CPU_FAN1) 2 ASRock K8SLI-eSATA2 Motherboard

Quick Installation Guide
Page 4
... ATA (SATA) Data Cables (Optional) 2 x Serial ATA (SATA) HDD Power Cables (Optional) 1 x ASRock eSATAII I/O Shield 1 x ASRock SLI Bridge 4 ASRock K8SLI-eSATA2 Motherboard English ASRock website http://www.asrock.com 1.1 Package Contents 1 x ASRock K8SLI-eSATA2 Motherboard (ATX Form Factor: 12.0-in x 8.2-in, 30.5 cm x 20.8 cm) 1 x ASRock K8SLI-eSATA2 Quick Installation Guide 1 x ASRock K8SLI-eSATA2 Support CD 1 x Ultra ATA 66/100/133 IDE Ribbon Cable (80-conductor...
... ATA (SATA) Data Cables (Optional) 2 x Serial ATA (SATA) HDD Power Cables (Optional) 1 x ASRock eSATAII I/O Shield 1 x ASRock SLI Bridge 4 ASRock K8SLI-eSATA2 Motherboard English ASRock website http://www.asrock.com 1.1 Package Contents 1 x ASRock K8SLI-eSATA2 Motherboard (ATX Form Factor: 12.0-in x 8.2-in, 30.5 cm x 20.8 cm) 1 x ASRock K8SLI-eSATA2 Quick Installation Guide 1 x ASRock K8SLI-eSATA2 Support CD 1 x Ultra ATA 66/100/133 IDE Ribbon Cable (80-conductor...

Quick Installation Guide
Page 5
...- Realtek PHY RTL8201CL - Supports AMD's Cool 'n' QuietTM Technology (see CAUTION 4) - Supports Hyper-Transport Technology - Supports Wake-On-LAN ASRock eSATAII I /O - Boot Failure Guard (B.F.G.) - 1 x Future CPU Port (Supports CPU upgrade from AMD K8 754-Pin CPU to...ASRock U-COP (see CAUTION 1) - Support DDR400/333/266 - CPU Frequency Stepless Control (see page 11 for details) - 3 x PCI slots - 1 x PCI Express x 16 / x 8 slot - 1 x PCI Express x 1 / x 8 slot - 1 x PCI Express x 1 slot - ATX Form Factor: 12.0-in x 8.2-in / Line out / Microphone English 5 ASRock K8SLI-eSATA2...
...- Realtek PHY RTL8201CL - Supports AMD's Cool 'n' QuietTM Technology (see CAUTION 4) - Supports Hyper-Transport Technology - Supports Wake-On-LAN ASRock eSATAII I /O - Boot Failure Guard (B.F.G.) - 1 x Future CPU Port (Supports CPU upgrade from AMD K8 754-Pin CPU to...ASRock U-COP (see CAUTION 1) - Support DDR400/333/266 - CPU Frequency Stepless Control (see page 11 for details) - 3 x PCI slots - 1 x PCI Express x 16 / x 8 slot - 1 x PCI Express x 1 / x 8 slot - 1 x PCI Express x 1 slot - ATX Form Factor: 12.0-in x 8.2-in / Line out / Microphone English 5 ASRock K8SLI-eSATA2...

Quick Installation Guide
Page 6
... connectors (support 4 x IDE devices) - 1 x Floppy connector - 1 x IR header - 1 x Game header - ACPI 1.1 Compliance Wake Up Events - Motherboard Temperature Sensing - FCC, CE, Microsoft® WHQL Certificated English 6 ASRock K8SLI-eSATA2 Motherboard CPU Temperature Sensing - Voltage Monitoring: +12V, +5V, +3.3V, Vcore - Supports jumperfree - CPU Fan Tachometer - Connector BIOS Feature Support CD Hardware Monitor OS Certifications - 4 x Serial...
... connectors (support 4 x IDE devices) - 1 x Floppy connector - 1 x IR header - 1 x Game header - ACPI 1.1 Compliance Wake Up Events - Motherboard Temperature Sensing - FCC, CE, Microsoft® WHQL Certificated English 6 ASRock K8SLI-eSATA2 Motherboard CPU Temperature Sensing - Voltage Monitoring: +12V, +5V, +3.3V, Vcore - Supports jumperfree - CPU Fan Tachometer - Connector BIOS Feature Support CD Hardware Monitor OS Certifications - 4 x Serial...

Quick Installation Guide
Page 7
... 25 to adjust your SATAII hard disk drive to enable AMD's Cool 'n' QuietTM technology under Microsoft® Windows® XP SP1 or SP2 / 2000 SP4. 7 ASRock K8SLI-eSATA2 Motherboard English To improve heat dissipation, remember to the "Supported PCI Express VGA Card List for details about eSATAII and eSATAII installation procedures. (Port Multiplier...
... 25 to adjust your SATAII hard disk drive to enable AMD's Cool 'n' QuietTM technology under Microsoft® Windows® XP SP1 or SP2 / 2000 SP4. 7 ASRock K8SLI-eSATA2 Motherboard English To improve heat dissipation, remember to the "Supported PCI Express VGA Card List for details about eSATAII and eSATAII installation procedures. (Port Multiplier...

Quick Installation Guide
Page 8
1.3 Supported PCI Express VGA Card List for SLITM Mode (for Windows XP / XP 64-bit only) Graphics Chip Vendor NVIDIA Model Name ASUS EN6600 ASUS EN6600GT Series ASUS EN6800LE ASUS EN6800GT ASUS EN7800GTX/2DHTV Chipset Name GeForce 6600 GeForce 6600GT GeForce 6800LE GeForce 6800GT GeForce 7800GTX For the latest updates of the supported PCI Express VGA card list for SLITM Mode, please visit our website for details. ASRock website: http://www.asrock.com/support/index.htm English 8 ASRock K8SLI-eSATA2 Motherboard
1.3 Supported PCI Express VGA Card List for SLITM Mode (for Windows XP / XP 64-bit only) Graphics Chip Vendor NVIDIA Model Name ASUS EN6600 ASUS EN6600GT Series ASUS EN6800LE ASUS EN6800GT ASUS EN7800GTX/2DHTV Chipset Name GeForce 6600 GeForce 6600GT GeForce 6800LE GeForce 6800GT GeForce 7800GTX For the latest updates of the supported PCI Express VGA card list for SLITM Mode, please visit our website for details. ASRock website: http://www.asrock.com/support/index.htm English 8 ASRock K8SLI-eSATA2 Motherboard
Quick Installation Guide
Page 9
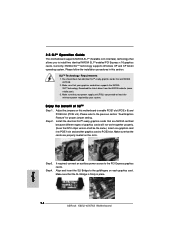
... comes with a small triangle. The CPU fits only in place, press it firmly on the carpet or the like. When the CPU is locked. English 9 ASRock K8SLI-eSATA2 Motherboard Hold components by lifting the lever up to a 90° angle. Step 3. Step 5. Installation Pre-installation Precautions Take note of the following precautions before...
... comes with a small triangle. The CPU fits only in place, press it firmly on the carpet or the like. When the CPU is locked. English 9 ASRock K8SLI-eSATA2 Motherboard Hold components by lifting the lever up to a 90° angle. Step 3. Step 5. Installation Pre-installation Precautions Take note of the following precautions before...

Quick Installation Guide
Page 10
... on the DIMM matches the break on the slot. Step 3. The DIMM only fits in place and the DIMM is properly seated. 10 ASRock K8SLI-eSATA2 Motherboard English Firmly insert the DIMM into the slot at both ends fully snap back in one correct orientation. 2.2 Installation of Memory Modules (DIMM...) K8SLI-eSATA2 motherboard provides two 184-pin DDR (Double Data Rate) DIMM slots. Please make sure to the motherboard and the DIMM if you force the...
... on the DIMM matches the break on the slot. Step 3. The DIMM only fits in place and the DIMM is properly seated. 10 ASRock K8SLI-eSATA2 Motherboard English Firmly insert the DIMM into the slot at both ends fully snap back in one correct orientation. 2.2 Installation of Memory Modules (DIMM...) K8SLI-eSATA2 motherboard provides two 184-pin DDR (Double Data Rate) DIMM slots. Please make sure to the motherboard and the DIMM if you force the...

Quick Installation Guide
Page 11
...Pin CPU or AM2 940-Pin CPU J7 J8 (Using add-on ASRock 939CPU Board or AM2CPU Board) J1 J2 J3 J4 J11 J12 J13 NOTE When adjusting the jumper settings, you may use it properly. 11 ASRock K8SLI-eSATA2 Motherboard This Jumper Cap Remover is bundled in your AMD K8 754-...Pin CPU to the table below for those required jumpers on K8SLI-eSATA2 motherboard. Before you removing the jumper caps more easily. Please refer to K8...
...Pin CPU or AM2 940-Pin CPU J7 J8 (Using add-on ASRock 939CPU Board or AM2CPU Board) J1 J2 J3 J4 J11 J12 J13 NOTE When adjusting the jumper settings, you may use it properly. 11 ASRock K8SLI-eSATA2 Motherboard This Jumper Cap Remover is bundled in your AMD K8 754-...Pin CPU to the table below for those required jumpers on K8SLI-eSATA2 motherboard. Before you removing the jumper caps more easily. Please refer to K8...

Quick Installation Guide
Page 12
... the jumper set tings on the slot. Before installing the expansion card, please make necessary hardware settings for different functions. Replace the system cover. 12 ASRock K8SLI-eSATA2 Motherboard English Align the card connector with the slot and press firmly until the card is completely seated on page 13 for the card before...
... the jumper set tings on the slot. Before installing the expansion card, please make necessary hardware settings for different functions. Replace the system cover. 12 ASRock K8SLI-eSATA2 Motherboard English Align the card connector with the slot and press firmly until the card is completely seated on page 13 for the card before...

Quick Installation Guide
Page 13
... PCIE x 1) (Default) J14 J15 J16 J20 J18 J19 J17 J21 Enable PCIE1 (PCIE x 8) / PCIE3 (PCIE x 8) J14 J15 J16 J20 J18 J19 J17 J21 English 13 ASRock K8SLI-eSATA2 Motherboard You can also adjust the jumpers according to the below for the correct jumper settings. When installing the add-on VGA cards to this...
... PCIE x 1) (Default) J14 J15 J16 J20 J18 J19 J17 J21 Enable PCIE1 (PCIE x 8) / PCIE3 (PCIE x 8) J14 J15 J16 J20 J18 J19 J17 J21 English 13 ASRock K8SLI-eSATA2 Motherboard You can also adjust the jumpers according to the below for the correct jumper settings. When installing the add-on VGA cards to this...
Quick Installation Guide
Page 14
... SLITM technology supports Windows XP and XP 64-bit operating system. Make sure that your system. Adjust the jumpers on the slots. Step4. English 14 ASRock K8SLI-eSATA2 Motherboard SLITM Technology Requirements 1. Make sure that the SLI Bridge is firmly in this motherboard to install two identical NVIDIA SLITM enabled PCI Express x 16...
... SLITM technology supports Windows XP and XP 64-bit operating system. Make sure that your system. Adjust the jumpers on the slots. Step4. English 14 ASRock K8SLI-eSATA2 Motherboard SLITM Technology Requirements 1. Make sure that the SLI Bridge is firmly in this motherboard to install two identical NVIDIA SLITM enabled PCI Express x 16...

Quick Installation Guide
Page 15
... of our support CD to enable the multi-GPU feature. Power on your system. C. Connect a 4-pin ATX power cable to PCIE1 slot. Step5. English 15 ASRock K8SLI-eSATA2 Motherboard Install the graphics card drivers to display the Display Properties dialog box. B. From the pop-up menu, select nView Desktop Manager, and then click...
... of our support CD to enable the multi-GPU feature. Power on your system. C. Connect a 4-pin ATX power cable to PCIE1 slot. Step5. English 15 ASRock K8SLI-eSATA2 Motherboard Install the graphics card drivers to display the Display Properties dialog box. B. From the pop-up menu, select nView Desktop Manager, and then click...

Quick Installation Guide
Page 16
E. Click the slider to infringe. 16 ASRock K8SLI-eSATA2 Motherboard English G. Click the Enable SLI multi-GPU check box. F. Select the NVIDIA GeForce tab. I. H. From the Display Properties dialog box, select the Settings tab then click Advanced. Click OK when done. * SLITM appearing here is a registered trademark of NVIDIA Technologies Inc., and is used only for identification or explanation and to the owners' benefit, without intent to display the following screen, then select the SLI multi-GPU item.
E. Click the slider to infringe. 16 ASRock K8SLI-eSATA2 Motherboard English G. Click the Enable SLI multi-GPU check box. F. Select the NVIDIA GeForce tab. I. H. From the Display Properties dialog box, select the Settings tab then click Advanced. Click OK when done. * SLITM appearing here is a registered trademark of NVIDIA Technologies Inc., and is used only for identification or explanation and to the owners' benefit, without intent to display the following screen, then select the SLI multi-GPU item.

Quick Installation Guide
Page 17
... for PS/2 or USB wake up events. Do NOT place jumper caps over the headers and connectors will cause permanent damage of the connector. 17 ASRock K8SLI-eSATA2 Motherboard The data in CMOS. When the jumper cap is placed on CLRCMOS1 for 5 seconds. The illustration shows a 3-pin jumper whose pin1 and pin2 are...
... for PS/2 or USB wake up events. Do NOT place jumper caps over the headers and connectors will cause permanent damage of the connector. 17 ASRock K8SLI-eSATA2 Motherboard The data in CMOS. When the jumper cap is placed on CLRCMOS1 for 5 seconds. The illustration shows a 3-pin jumper whose pin1 and pin2 are...

Quick Installation Guide
Page 18
... connectors with corresponding color to the instruction of the SATA data cable can also use only one IDE device on page 22 for the details. ASRock K8SLI-eSATA2 Motherboard English
... connectors with corresponding color to the instruction of the SATA data cable can also use only one IDE device on page 22 for the details. ASRock K8SLI-eSATA2 Motherboard English

Quick Installation Guide
Page 19
If those USB 2.0 ports on the I /O accommodates 4 default USB 2.0 ports. USB 2.0 Header (9-pin USB67) (see p.2 No. 16) ASRock eSATAII I /O panel are not sufficient, this USB 2.0 header is available to support 2 additional USB 2.0 ports. If those USB 2.0 ports on ... available to receive stereo audio input CD1 from sound sources such as a CD-ROM, DVD-ROM, TV tuner card, or MPEG card. English 19 ASRock K8SLI-eSATA2 Motherboard Infrared Module Header (5-pin IR1) (see p.2 No. 26) This connector allows you to support 2 additional USB 2.0 ports. Internal Audio Connectors ...
If those USB 2.0 ports on the I /O accommodates 4 default USB 2.0 ports. USB 2.0 Header (9-pin USB67) (see p.2 No. 16) ASRock eSATAII I /O panel are not sufficient, this USB 2.0 header is available to support 2 additional USB 2.0 ports. If those USB 2.0 ports on ... available to receive stereo audio input CD1 from sound sources such as a CD-ROM, DVD-ROM, TV tuner card, or MPEG card. English 19 ASRock K8SLI-eSATA2 Motherboard Infrared Module Header (5-pin IR1) (see p.2 No. 26) This connector allows you to support 2 additional USB 2.0 ports. Internal Audio Connectors ...

Quick Installation Guide
Page 20
... 12V Connector Please connect an ATX 12V (4-pin ATX12V1) power supply to this connector and match the black wire to this connector. (see p.2 No. 2) 20 ASRock K8SLI-eSATA2 Motherboard English Please follow the instruction in our manual and chassis manual to MIC2_L. Enter Advanced Settings, and then select Chipset Configuration. Please connect a CPU...
... 12V Connector Please connect an ATX 12V (4-pin ATX12V1) power supply to this connector and match the black wire to this connector. (see p.2 No. 2) 20 ASRock K8SLI-eSATA2 Motherboard English Please follow the instruction in our manual and chassis manual to MIC2_L. Enter Advanced Settings, and then select Chipset Configuration. Please connect a CPU...


