User Manual
Page 7
... this manual will be subject to quality and endurance. Chapter 4 contains the configuration guide of the software and utilities. It delivers excellent performance with robust design conforming to ASRock's commitment to change without further notice. In this motherboard, please visit our website for specific information about the model you for purchasing ASRock H97M Pro4 motherboard...
... this manual will be subject to quality and endurance. Chapter 4 contains the configuration guide of the software and utilities. It delivers excellent performance with robust design conforming to ASRock's commitment to change without further notice. In this motherboard, please visit our website for specific information about the model you for purchasing ASRock H97M Pro4 motherboard...

User Manual
Page 31
... "Recording Volume". B. If you use an AC'97 audio panel, please install it to install your system. 2. English 25 H97M Pro4 1. Connect Ground (GND) to the "FrontMic" Tab in our manual and chassis manual to the front panel audio header by the steps below: A. To activate the front mic, go to Ground (GND). Connect...
... "Recording Volume". B. If you use an AC'97 audio panel, please install it to install your system. 2. English 25 H97M Pro4 1. Connect Ground (GND) to the "FrontMic" Tab in our manual and chassis manual to the front panel audio header by the steps below: A. To activate the front mic, go to Ground (GND). Connect...
User Manual
Page 34
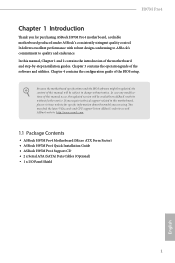
... Edition card with Windows® 7 / 7 64-bit / 8 / 8 64-bit / 8.1 / 8.1 64-bit OS. 1. You should only use a AMD certified PSU. Please refer to AMD graphics card manuals for detailed installation guide. 2.7.1 Installing Two CrossFireXTM-Ready Graphics Cards Step 1 Insert one graphics card into PCIE1 slot and the other graphics card to use...
... Edition card with Windows® 7 / 7 64-bit / 8 / 8 64-bit / 8.1 / 8.1 64-bit OS. 1. You should only use a AMD certified PSU. Please refer to AMD graphics card manuals for detailed installation guide. 2.7.1 Installing Two CrossFireXTM-Ready Graphics Cards Step 1 Insert one graphics card into PCIE1 slot and the other graphics card to use...
User Manual
Page 61
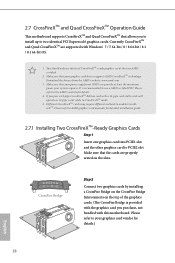
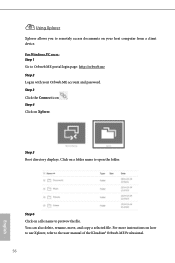
... from the App Store (iOS) or Play Store (Android). Step 3 Tap the host computer name that you will see the desktop of your host computer. H97M Pro4 Step 5 Enter the Windows password to log in and you want to access under the Remote Desktop section. Step 2 Log in and you will see... 4 Enter the Windows password to use Orbweb.ME Professional. Please refer to launch it. Step 1 Tap the "Orbweb.ME Professional" app icon to the user manual of your Orbweb.ME account and password.
... from the App Store (iOS) or Play Store (Android). Step 3 Tap the host computer name that you will see the desktop of your host computer. H97M Pro4 Step 5 Enter the Windows password to log in and you want to access under the Remote Desktop section. Step 2 Log in and you will see... 4 Enter the Windows password to use Orbweb.ME Professional. Please refer to launch it. Step 1 Tap the "Orbweb.ME Professional" app icon to the user manual of your Orbweb.ME account and password.
User Manual
Page 62
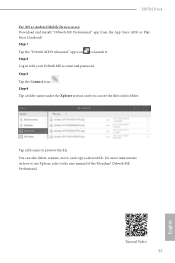
... host computer from a client device. Step 3 Click the Connect icon . Step 5 Root directory displays. Step 6 Click on how to use Xplorer, refer to the user manual of the Kloudian® Orbweb.ME Professional. 56 English For more instructions on a file name to preivew the file. Click on Xplorer. You can also...
... host computer from a client device. Step 3 Click the Connect icon . Step 5 Root directory displays. Step 6 Click on how to use Xplorer, refer to the user manual of the Kloudian® Orbweb.ME Professional. 56 English For more instructions on a file name to preivew the file. Click on Xplorer. You can also...
User Manual
Page 63
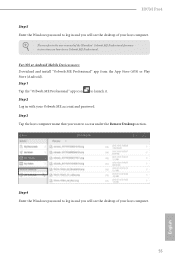
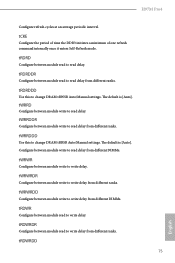
Step 3 Tap the Connect icon . Tap a file name to the user manual of the Kloudian® Orbweb.ME Professional. For more instructions on how to use Xplorer, refer to preivew the file. Step 4 Tap a folder name under ....ME Professional" app icon to launch it. Step 2 Log in this folder. You can see the files in with your Orbweb.ME account and password. H97M Pro4 For iOS or Android Mobile Devices users: Download and install "Orbweb.ME Professional" app from the App Store (iOS) or Play Store (Android).
Step 3 Tap the Connect icon . Tap a file name to the user manual of the Kloudian® Orbweb.ME Professional. For more instructions on how to use Xplorer, refer to preivew the file. Step 4 Tap a folder name under ....ME Professional" app icon to launch it. Step 2 Log in this folder. You can see the files in with your Orbweb.ME account and password. H97M Pro4 For iOS or Android Mobile Devices users: Download and install "Orbweb.ME Professional" app from the App Store (iOS) or Play Store (Android).
User Manual
Page 81
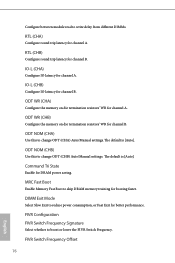
...from different ranks. tRDRDDR Configure between module write to write delay. tWRWRDD Configure between module read to change DRAM tRWSR Auto/Manual settings. tWRRDDR Configure between module write to read to write delay from different DIMMs. tRDWR Configure between module write to write... Configure between module read to write delay from different DIMMs. tWRWR Configure between module write to read delay from different ranks. H97M Pro4 Configure refresh cycles at an average periodic interval. tCKE Configure the period of time the DDR3 initiates a minimum of one refresh...
...from different ranks. tRDRDDR Configure between module write to write delay. tWRWRDD Configure between module read to change DRAM tRWSR Auto/Manual settings. tWRRDDR Configure between module write to read to write delay from different DIMMs. tRDWR Configure between module write to write... Configure between module read to write delay from different DIMMs. tWRWR Configure between module write to read delay from different ranks. H97M Pro4 Configure refresh cycles at an average periodic interval. tCKE Configure the period of time the DDR3 initiates a minimum of one refresh...
User Manual
Page 82
ODT WR (CHA) Configure the memory on die termination resistors' WR for channel B. ODT NOM (CHB) Use this to change ODT (CHA) Auto/Manual settings. Command Tri State Enable for channel B. FIVR Configuration FIVR Switch Frequency Signature Select whether to reduce power consumption, or Fast Exit for better performance. ... memory training for booting faster. The default is [Auto]. FIVR Switch Frequency Offset 76 English ODT NOM (CHA) Use this to change ODT (CHB) Auto/Manual settings. The default is [Auto]. IO-L (CHA) Configure IO latency for channel B.
ODT WR (CHA) Configure the memory on die termination resistors' WR for channel B. ODT NOM (CHB) Use this to change ODT (CHA) Auto/Manual settings. Command Tri State Enable for channel B. FIVR Configuration FIVR Switch Frequency Signature Select whether to reduce power consumption, or Fast Exit for better performance. ... memory training for booting faster. The default is [Auto]. FIVR Switch Frequency Offset 76 English ODT NOM (CHA) Use this to change ODT (CHB) Auto/Manual settings. The default is [Auto]. IO-L (CHA) Configure IO latency for channel B.
Quick Installation Guide
Page 7
...; ASRock H97M Pro4 Support CD • 2 x Serial ATA (SATA) Data Cables (Optional) • 1 x I/O Panel Shield 5 English H97M Pro4 Chapter 1 Introduction Thank you are using. If you require technical support related to quality and endurance. You may find the latest VGA cards and CPU support list on ASRock's website without notice. In case any modifications of this manual...
...; ASRock H97M Pro4 Support CD • 2 x Serial ATA (SATA) Data Cables (Optional) • 1 x I/O Panel Shield 5 English H97M Pro4 Chapter 1 Introduction Thank you are using. If you require technical support related to quality and endurance. You may find the latest VGA cards and CPU support list on ASRock's website without notice. In case any modifications of this manual...
Quick Installation Guide
Page 27
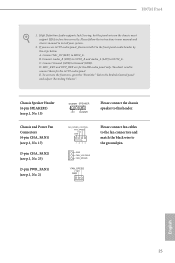
... header. E. High Definition Audio supports Jack Sensing, but the panel wire on the chassis must support HDA to MIC2_L. Connect Mic_IN (MIC) to function correctly. H97M Pro4 1. B. You don't need to connect them for the HD audio panel only. Connect Ground (GND) to install your system. 2. To activate the front mic, go...
... header. E. High Definition Audio supports Jack Sensing, but the panel wire on the chassis must support HDA to MIC2_L. Connect Mic_IN (MIC) to function correctly. H97M Pro4 1. B. You don't need to connect them for the HD audio panel only. Connect Ground (GND) to install your system. 2. To activate the front mic, go...
