User Manual
Page 4
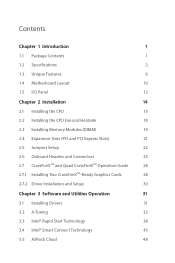
... 1.2 Specifications 2 1.3 Unique Features 6 1.4 Motherboard Layout 10 1.5 I/O Panel 12 Chapter 2 Installation 14 2.1 Installing the CPU 15 2.2 Installing the CPU Fan and Heatsink 18 2.3 Installing Memory Modules (DIMM) 19 2.4 Expansion Slots (PCI and PCI Express Slots) 21 2.5 Jumpers Setup... 23 2.7 CrossFireXTM and Quad CrossFireXTM Operation Guide 28 2.7.1 Installing Two CrossFireXTM-Ready Graphics Cards 28 2.7.2 Driver Installation and Setup 30 Chapter 3 Software and Utilities Operation 31 3.1 Installing Drivers 31 3.2 A-Tuning 32 3.3 Intel® Rapid ...
... 1.2 Specifications 2 1.3 Unique Features 6 1.4 Motherboard Layout 10 1.5 I/O Panel 12 Chapter 2 Installation 14 2.1 Installing the CPU 15 2.2 Installing the CPU Fan and Heatsink 18 2.3 Installing Memory Modules (DIMM) 19 2.4 Expansion Slots (PCI and PCI Express Slots) 21 2.5 Jumpers Setup... 23 2.7 CrossFireXTM and Quad CrossFireXTM Operation Guide 28 2.7.1 Installing Two CrossFireXTM-Ready Graphics Cards 28 2.7.2 Driver Installation and Setup 30 Chapter 3 Software and Utilities Operation 31 3.1 Installing Drivers 31 3.2 A-Tuning 32 3.3 Intel® Rapid ...
User Manual
Page 7
... the configuration guide of the software and utilities. Chapter 3 contains the operation guide of the BIOS setup. ASRock website http://www.asrock.com. 1.1 Package Contents • ASRock H97M Pro4 Motherboard (Micro ATX Form Factor) • ASRock H97M Pro4 Quick Installation Guide • ASRock H97M Pro4 Support CD • 2 x Serial ATA (SATA) Data Cables (Optional) • 1 x I/O Panel Shield 1 English It delivers excellent performance...
... the configuration guide of the software and utilities. Chapter 3 contains the operation guide of the BIOS setup. ASRock website http://www.asrock.com. 1.1 Package Contents • ASRock H97M Pro4 Motherboard (Micro ATX Form Factor) • ASRock H97M Pro4 Quick Installation Guide • ASRock H97M Pro4 Support CD • 2 x Serial ATA (SATA) Data Cables (Optional) • 1 x I/O Panel Shield 1 English It delivers excellent performance...

User Manual
Page 13
... (S1), Suspend to extend their BIOS. 7 English ASRock APP Charger Simply by installing the ASRock APP Charger makes your SSDs or HDDs in order to RAM (S3), hibernation mode (S4) or power off (S5). ASRock XFast RAM ASRock XFast RAM is much easier and clearer for all users...the benefits listed below. ASRock APP Charger allows you restart. With Full HD resolution, now it can watch Youtube HD videos and download simultaneously. Lower Latency in Game: After setting online game's priority higher, it is included in games. H97M Pro4 ASRock System Browser ASRock System Browser shows the...
... (S1), Suspend to extend their BIOS. 7 English ASRock APP Charger Simply by installing the ASRock APP Charger makes your SSDs or HDDs in order to RAM (S3), hibernation mode (S4) or power off (S5). ASRock XFast RAM ASRock XFast RAM is much easier and clearer for all users...the benefits listed below. ASRock APP Charger allows you restart. With Full HD resolution, now it can watch Youtube HD videos and download simultaneously. Lower Latency in Game: After setting online game's priority higher, it is included in games. H97M Pro4 ASRock System Browser ASRock System Browser shows the...
User Manual
Page 15
...utility if you can help you to your personal computer. ASRock Easy RAID Installer ASRock Easy RAID Installer can start installing the OS in RAID mode. ASRock Easy Driver Installer For users that installs the LAN driver to copy the RAID driver from our ...Installer is a handy tool in the UEFI that don't have encountered, describe the problem in detail, and then attach an optional picture or log file for our technical support team. Users may prevent motherboard damages due to dehumidify the system after entering S4/S5 state. H97M Pro4 ASRock UEFI Tech Service Contact ASRock...
...utility if you can help you to your personal computer. ASRock Easy RAID Installer ASRock Easy RAID Installer can start installing the OS in RAID mode. ASRock Easy Driver Installer For users that installs the LAN driver to copy the RAID driver from our ...Installer is a handy tool in the UEFI that don't have encountered, describe the problem in detail, and then attach an optional picture or log file for our technical support team. Users may prevent motherboard damages due to dehumidify the system after entering S4/S5 state. H97M Pro4 ASRock UEFI Tech Service Contact ASRock...

User Manual
Page 20
... before you uninstall any motherboard settings. • Make sure to use a grounded wrist strap or touch a safety grounded object before installing or removing the motherboard components. Also remember to unplug the power cord before you handle the components. • Hold components by the... edges and do not touch the ICs. • Whenever you install motherboard components or change any components, place them on a carpet. Doing so may cause physical injuries and damages to motherboard components. &#...
... before you uninstall any motherboard settings. • Make sure to use a grounded wrist strap or touch a safety grounded object before installing or removing the motherboard components. Also remember to unplug the power cord before you handle the components. • Hold components by the... edges and do not touch the ICs. • Whenever you install motherboard components or change any components, place them on a carpet. Doing so may cause physical injuries and damages to motherboard components. &#...
User Manual
Page 21
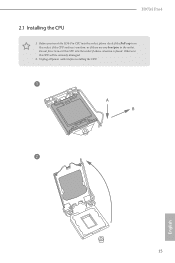
H97M Pro4 2.1 Installing the CPU 1. Unplug all power cables before installing the CPU. 1 A B 2 15 English Otherwise, the CPU will be seriously damaged. 2. Do not force to insert the CPU into the socket, please check if the PnP cap is on the socket, if the CPU surface is found. Before you insert the 1150-Pin CPU into the socket if above situation is unclean, or if there are any bent pins in the socket.
H97M Pro4 2.1 Installing the CPU 1. Unplug all power cables before installing the CPU. 1 A B 2 15 English Otherwise, the CPU will be seriously damaged. 2. Do not force to insert the CPU into the socket, please check if the PnP cap is on the socket, if the CPU surface is found. Before you insert the 1150-Pin CPU into the socket if above situation is unclean, or if there are any bent pins in the socket.
User Manual
Page 24
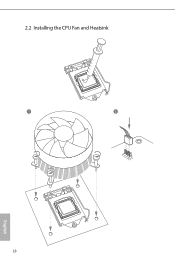
2.2 Installing the CPU Fan and Heatsink 1 2 CPU_FAN English 18
2.2 Installing the CPU Fan and Heatsink 1 2 CPU_FAN English 18
User Manual
Page 25
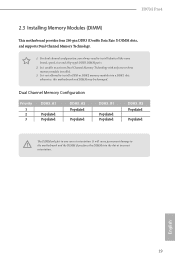
... or DDR2 memory module into the slot at incorrect orientation. It is unable to install identical (the same brand, speed, size and chip-type) DDR3 DIMM pairs. 2. English 19 H97M Pro4 2.3 Installing Memory Modules (DIMM) This motherboard provides four 240-pin DDR3 (Double Data Rate 3) DIMM slots, and supports Dual Channel Memory Technology. 1. It...
... or DDR2 memory module into the slot at incorrect orientation. It is unable to install identical (the same brand, speed, size and chip-type) DDR3 DIMM pairs. 2. English 19 H97M Pro4 2.3 Installing Memory Modules (DIMM) This motherboard provides four 240-pin DDR3 (Double Data Rate 3) DIMM slots, and supports Dual Channel Memory Technology. 1. It...
User Manual
Page 27
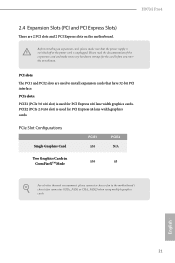
...is unplugged. PCI slots: The PCI1 and PCI2 slots are 2 PCI slots and 2 PCI Express slots on the motherboard. English 21 Before installing an expansion card, please make necessary hardware settings for PCI Express x16 lane width graphics cards. Please read the documentation of the expansion card...x16 x4 For a better thermal environment, please connect a chassis fan to install expansion cards that the power supply is switched off or the power cord is used for the card before you start the installation. H97M Pro4 2.4 Expansion Slots (PCI and PCI Express Slots) There are used to ...
...is unplugged. PCI slots: The PCI1 and PCI2 slots are 2 PCI slots and 2 PCI Express slots on the motherboard. English 21 Before installing an expansion card, please make necessary hardware settings for PCI Express x16 lane width graphics cards. Please read the documentation of the expansion card...x16 x4 For a better thermal environment, please connect a chassis fan to install expansion cards that the power supply is switched off or the power cord is used for the card before you start the installation. H97M Pro4 2.4 Expansion Slots (PCI and PCI Express Slots) There are used to ...

User Manual
Page 31
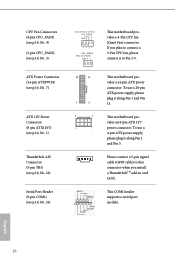
...front panel audio header by the steps below: A. If you use an AC'97 audio panel, please install it to the ground pin. Connect Audio_R (RIN) to OUT2_R and Audio_L (LIN) to install your system. 2. C. You don't need to the "FrontMic" Tab in our manual and chassis manual ...25 High Definition Audio supports Jack Sensing, but the panel wire on the chassis must support HDA to MIC2_L. B. Connect Mic_IN (MIC) to function correctly. H97M Pro4 1. Connect Ground (GND) to this header. Chassis Speaker Header (4-pin SPEAKER1) (see p.10, No. 15) Chassis and Power Fan Connectors (4-pin CHA_FAN1...
...front panel audio header by the steps below: A. If you use an AC'97 audio panel, please install it to the ground pin. Connect Audio_R (RIN) to OUT2_R and Audio_L (LIN) to install your system. 2. C. You don't need to the "FrontMic" Tab in our manual and chassis manual ...25 High Definition Audio supports Jack Sensing, but the panel wire on the chassis must support HDA to MIC2_L. B. Connect Mic_IN (MIC) to function correctly. H97M Pro4 1. Connect Ground (GND) to this header. Chassis Speaker Header (4-pin SPEAKER1) (see p.10, No. 15) Chassis and Power Fan Connectors (4-pin CHA_FAN1...
User Manual
Page 32
..., please plug it along Pin 1 and Pin 13. Please connect a 5-pin signal cable (GPIO cable) to this connector when you plan to Pin 1-3. If you install a ThunderboltTM add-in card (AIC). CPU Fan Connectors (4-pin CPU_FAN1) (see p.10, No. 4) (3-pin CPU_FAN2) (see p.10, No. 24) 12 24 1 13 8 5 4 1 This motherboard provides...
..., please plug it along Pin 1 and Pin 13. Please connect a 5-pin signal cable (GPIO cable) to this connector when you plan to Pin 1-3. If you install a ThunderboltTM add-in card (AIC). CPU Fan Connectors (4-pin CPU_FAN1) (see p.10, No. 4) (3-pin CPU_FAN2) (see p.10, No. 24) 12 24 1 13 8 5 4 1 This motherboard provides...
User Manual
Page 34
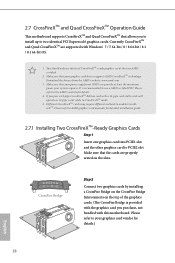
...cards. Make sure that your graphics card driver supports AMD CrossFireXTM technology. Please refer to the AMD's website for detailed installation guide. 2.7.1 Installing Two CrossFireXTM-Ready Graphics Cards Step 1 Insert one graphics card into PCIE1 slot and the other graphics card to use identical...vendor for details.) English 28 If you purchase, not bundled with this motherboard. CrossFire Bridge Step 2 Connect two graphics cards by installing a CrossFire Bridge on the CrossFire Bridge Interconnects on the slots. You should only use a AMD certified PSU. It is provided ...
...cards. Make sure that your graphics card driver supports AMD CrossFireXTM technology. Please refer to the AMD's website for detailed installation guide. 2.7.1 Installing Two CrossFireXTM-Ready Graphics Cards Step 1 Insert one graphics card into PCIE1 slot and the other graphics card to use identical...vendor for details.) English 28 If you purchase, not bundled with this motherboard. CrossFire Bridge Step 2 Connect two graphics cards by installing a CrossFire Bridge on the CrossFire Bridge Interconnects on the slots. You should only use a AMD certified PSU. It is provided ...

User Manual
Page 36
...download. We recommend using this utility to uninstall any VGA drivers installed in the Windows® system tray. Please check AMD's website for details. 2.7.2 Driver Installation and Setup Step 1 Power on your computer. Step 3 Install the required drivers and CATALYST Control Center then restart your computer ...and boot into OS. Select the GPU number according to installation. English 30 AMD Catalyst Control Center Step 4 Double-click the AMD Catalyst Control Center icon in your graphics card and ...
...download. We recommend using this utility to uninstall any VGA drivers installed in the Windows® system tray. Please check AMD's website for details. 2.7.2 Driver Installation and Setup Step 1 Power on your computer. Step 3 Install the required drivers and CATALYST Control Center then restart your computer ...and boot into OS. Select the GPU number according to installation. English 30 AMD Catalyst Control Center Step 4 Double-click the AMD Catalyst Control Center icon in your graphics card and ...
User Manual
Page 37
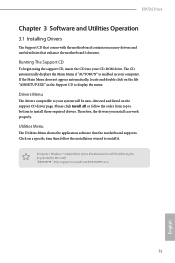
... CD-ROM drive. "KB2720599": http://support.microsoft.com/kb/2720599/en-us 31 English Drivers Menu The drivers compatible to install it. Utilities Menu The Utilities Menu shows the application software that enhance the motherboard's features. Click on a specific item then...the CD into your system will be auto-detected and listed on the file "ASRSETUP.EXE" in your computer. H97M Pro4 Chapter 3 Software and Utilities Operation 3.1 Installing Drivers The Support CD that comes with the motherboard contains necessary drivers and useful utilities that the motherboard supports. The...
... CD-ROM drive. "KB2720599": http://support.microsoft.com/kb/2720599/en-us 31 English Drivers Menu The drivers compatible to install it. Utilities Menu The Utilities Menu shows the application software that enhance the motherboard's features. Click on a specific item then...the CD into your system will be auto-detected and listed on the file "ASRSETUP.EXE" in your computer. H97M Pro4 Chapter 3 Software and Utilities Operation 3.1 Installing Drivers The Support CD that comes with the motherboard contains necessary drivers and useful utilities that the motherboard supports. The...
User Manual
Page 38
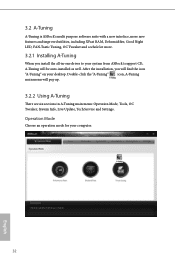
... A-Tuning A-Tuning is ASRock's multi purpose software suite with a new interface, more new features and improved utilities, including XFast RAM, Dehumidifier, Good Night LED, FAN-Tastic Tuning, OC Tweaker and a whole lot more. 3.2.1 Installing A-Tuning When you will be auto-installed as well. Operation Mode... Choose an operation mode for your desktop. After the installation, you install the all-in A-Tuning main menu: Operation Mode, Tools, OC Tweaker, ...
... A-Tuning A-Tuning is ASRock's multi purpose software suite with a new interface, more new features and improved utilities, including XFast RAM, Dehumidifier, Good Night LED, FAN-Tastic Tuning, OC Tweaker and a whole lot more. 3.2.1 Installing A-Tuning When you will be auto-installed as well. Operation Mode... Choose an operation mode for your desktop. After the installation, you install the all-in A-Tuning main menu: Operation Mode, Tools, OC Tweaker, ...

User Manual
Page 44
... booting. Feel secure to know that your system will resume to working condition even if an unexpected power loss happens while the PC is already installed under IDE mode, directly changing the SATA mode to AHCI may cause Windows 8/7 to wake up faster from 3 into the word box then click OK...
... booting. Feel secure to know that your system will resume to working condition even if an unexpected power loss happens while the PC is already installed under IDE mode, directly changing the SATA mode to AHCI may cause Windows 8/7 to wake up faster from 3 into the word box then click OK...
User Manual
Page 45
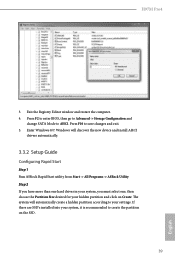
...will discover the new device and install AHCI drivers automatically. 3.3.2 Setup Guide Configuring Rapid Start Step 1 Run ASRock Rapid Start utility from Start -> All Programs -> ASRock Utility. Enter Windows 8/7. If there are SSD's installed into your hidden partition and ...click on the SSD. 39 English Windows will automatically create a hidden partition according to AHCI. Press F10 to create the partition on Create. H97M Pro4...
...will discover the new device and install AHCI drivers automatically. 3.3.2 Setup Guide Configuring Rapid Start Step 1 Run ASRock Rapid Start utility from Start -> All Programs -> ASRock Utility. Enter Windows 8/7. If there are SSD's installed into your hidden partition and ...click on the SSD. 39 English Windows will automatically create a hidden partition according to AHCI. Press F10 to create the partition on Create. H97M Pro4...
User Manual
Page 49
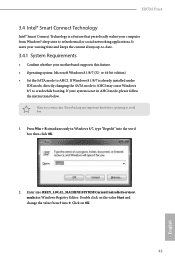
... then click OK. 2. There are certain risks. Enter into HKEY_LOCAL_MACHINE\SYSTEM\CurrentControlSet\services\ msahci in Windows 8/7, type "Regedit" into 0. H97M Pro4 3.4 Intel® Smart Connect Technology Intel® Smart Connect Technology is already installed under IDE mode, directly changing the SATA mode to AHCI may cause Windows 8/7 to crash while booting. Press Win...
... then click OK. 2. There are certain risks. Enter into HKEY_LOCAL_MACHINE\SYSTEM\CurrentControlSet\services\ msahci in Windows 8/7, type "Regedit" into 0. H97M Pro4 3.4 Intel® Smart Connect Technology Intel® Smart Connect Technology is already installed under IDE mode, directly changing the SATA mode to AHCI may cause Windows 8/7 to crash while booting. Press Win...
User Manual
Page 50
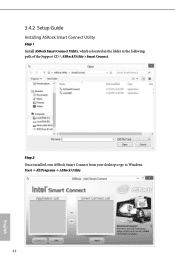
Step 2 Once installed, run ASRock Smart Connect from your desktop or go to Windows Start -> All Programs -> ASRock Utility. 44 English 3.4.2 Setup Guide Installing ASRock Smart Connect Utility Step 1 Install ASRock Smart Connect Utility, which is located in the folder at the following path of the Support CD: \ ASRock Utility > Smart Connect.
Step 2 Once installed, run ASRock Smart Connect from your desktop or go to Windows Start -> All Programs -> ASRock Utility. 44 English 3.4.2 Setup Guide Installing ASRock Smart Connect Utility Step 1 Install ASRock Smart Connect Utility, which is located in the folder at the following path of the Support CD: \ ASRock Utility > Smart Connect.

User Manual
Page 56
..., reboot the computer. On the Orbweb.ME Portal login page, click Sign Up to easily access and control the remote host installed with the Orbweb.ME Professional host software. Signing Up for Host Computer Registration Step 1 Double-click the Orbweb.ME Professional icon Step 2 on the Host ...
..., reboot the computer. On the Orbweb.ME Portal login page, click Sign Up to easily access and control the remote host installed with the Orbweb.ME Professional host software. Signing Up for Host Computer Registration Step 1 Double-click the Orbweb.ME Professional icon Step 2 on the Host ...


