User Manual
Page 5
... will be subject to set the BIOS option in our support CD for details. 5 www.asrock.com/support/index.asp 1.1 Package Contents ASRock H67DE3 Motherboard (ATX Form Factor: 12.0-in x 8.3-in, 30.5 cm x 21.1 cm) ASRock H67DE3 Quick Installation Guide ASRock H67DE3 Support CD 2 x Serial ATA (SATA) Data Cables (Optional) 1 x I/O Panel Shield 1 x 3D Red/Cyan Anaglyph Glasses...
... will be subject to set the BIOS option in our support CD for details. 5 www.asrock.com/support/index.asp 1.1 Package Contents ASRock H67DE3 Motherboard (ATX Form Factor: 12.0-in x 8.3-in, 30.5 cm x 21.1 cm) ASRock H67DE3 Quick Installation Guide ASRock H67DE3 Support CD 2 x Serial ATA (SATA) Data Cables (Optional) 1 x I/O Panel Shield 1 x 3D Red/Cyan Anaglyph Glasses...
Quick Installation Guide
Page 1
...64257;tness for informational use only and subject to change without notice, and should not be constructed as a commitment by ASRock. "Perchlorate Material-special handling may cause undesired operation. Operation is subject to the following two conditions: (1) this device may... damages (including damages for backup purpose, without intent to the owners' benefit, without written consent of ASRock Inc. All rights reserved. 1 ASRock H67DE3 Motherboard English Copyright Notice: No part of this installation guide may be reproduced, transcribed, transmitted, or translated ...
...64257;tness for informational use only and subject to change without notice, and should not be constructed as a commitment by ASRock. "Perchlorate Material-special handling may cause undesired operation. Operation is subject to the following two conditions: (1) this device may... damages (including damages for backup purpose, without intent to the owners' benefit, without written consent of ASRock Inc. All rights reserved. 1 ASRock H67DE3 Motherboard English Copyright Notice: No part of this installation guide may be reproduced, transcribed, transmitted, or translated ...
Quick Installation Guide
Page 2
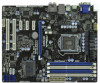
...: REAR SPK Bottom: Optical SPDIF Top: LINE IN Center: FRONT Bottom: MIC IN Designed in Taipei CHA_FAN1 CPU_FAN2 CPU_FAN1 34 CHA_FAN3 CHA_FAN2 33 LAN PHY H67DE3 7 8 32 PCIE1 PCI Express 2.0 CMOS ErP/EuP Ready 31 PCIE2 Battery USB 3.0 30 Super I/O PCIE3 Intel 9 H67 SATA3 6Gb/s 29 28 27 PCIE4 RoHS AUDIO... CPU Fan Connector (CPU_FAN2) 17 SATA3 Connector (SATA3_1, White) 34 Chassis Fan Connector (CHA_FAN1) 18 Chassis Speaker Header (SPEAKER 1, White) 35 CPU Fan Connector (CPU_FAN1) 2 ASRock H67DE3 Motherboard English
...: REAR SPK Bottom: Optical SPDIF Top: LINE IN Center: FRONT Bottom: MIC IN Designed in Taipei CHA_FAN1 CPU_FAN2 CPU_FAN1 34 CHA_FAN3 CHA_FAN2 33 LAN PHY H67DE3 7 8 32 PCIE1 PCI Express 2.0 CMOS ErP/EuP Ready 31 PCIE2 Battery USB 3.0 30 Super I/O PCIE3 Intel 9 H67 SATA3 6Gb/s 29 28 27 PCIE4 RoHS AUDIO... CPU Fan Connector (CPU_FAN2) 17 SATA3 Connector (SATA3_1, White) 34 Chassis Fan Connector (CHA_FAN1) 18 Chassis Speaker Header (SPEAKER 1, White) 35 CPU Fan Connector (CPU_FAN1) 2 ASRock H67DE3 Motherboard English

Quick Installation Guide
Page 3
... use . TABLE for Audio Output Connection Audio Output Channels Front Speaker Rear Speaker Central / Bass Line In or (No. 8) (No. 5) (No. 4) Side Speaker (No. 7) 2 V -- -- -- 4 V V -- -- 6 V V V -- 8 V V V V English 3 ASRock H67DE3 Motherboard LAN Port LED Indications Activity/Link LED SPEED LED Status Description Status Description ACT/LINK SPEED LED LED Off No Link Off 10Mbps connection...
... use . TABLE for Audio Output Connection Audio Output Channels Front Speaker Rear Speaker Central / Bass Line In or (No. 8) (No. 5) (No. 4) Side Speaker (No. 7) 2 V -- -- -- 4 V V -- -- 6 V V V -- 8 V V V V English 3 ASRock H67DE3 Motherboard LAN Port LED Indications Activity/Link LED SPEED LED Status Description Status Description ACT/LINK SPEED LED LED Off No Link Off 10Mbps connection...
Quick Installation Guide
Page 4
After restarting your computer, you will find "Mixer" tool on your system. English 4 ASRock H67DE3 Motherboard Choose "2CH", "4CH", "6CH", or "8CH" and then you are allowed to select "Realtek HDA Primary output" to use front panel audio. To enable Multi-Streaming function, you need to connect a front panel audio cable to use Rear Speaker, Central/Bass, and Front Speaker, or select "Realtek HDA Audio 2nd output" to the front panel audio header. Please select "Mixer ToolBox" , click "Enable playback multi-streaming", and click "ok".
After restarting your computer, you will find "Mixer" tool on your system. English 4 ASRock H67DE3 Motherboard Choose "2CH", "4CH", "6CH", or "8CH" and then you are allowed to select "Realtek HDA Primary output" to use front panel audio. To enable Multi-Streaming function, you need to connect a front panel audio cable to use Rear Speaker, Central/Bass, and Front Speaker, or select "Realtek HDA Audio 2nd output" to the front panel audio header. Please select "Mixer ToolBox" , click "Enable playback multi-streaming", and click "ok".
Quick Installation Guide
Page 5
...content of the motherboard can be subject to set the BIOS option in our support CD for purchasing ASRock H67DE3 motherboard, a reliable motherboard produced under ASRock's consistently stringent quality control. This Quick Installation Guide contains introduction of this motherboard, please visit our ...website for specific information about the model you for details. 5 ASRock H67DE3 Motherboard English In case any modifications of the motherboard and step-bystep installation guide. You may find ...
...content of the motherboard can be subject to set the BIOS option in our support CD for purchasing ASRock H67DE3 motherboard, a reliable motherboard produced under ASRock's consistently stringent quality control. This Quick Installation Guide contains introduction of this motherboard, please visit our ...website for specific information about the model you for details. 5 ASRock H67DE3 Motherboard English In case any modifications of the motherboard and step-bystep installation guide. You may find ...
Quick Installation Guide
Page 6
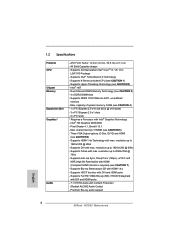
... Form Factor: 12.0-in x 8.3-in LGA1155 Package - Supports Intel® Turbo Boost 2.0 Technology - Max. resolution up to 1920x1200 @ 60Hz - Premium Blu-ray audio support English 6 ASRock H67DE3 Motherboard resolution up to 2048x1536 @ 75Hz - All Solid Capacitor design - Supports 2nd Generation Intel® CoreTM i7 / i5 / i3 in , 30.5 cm x 21.1 cm - Supports...
... Form Factor: 12.0-in x 8.3-in LGA1155 Package - Supports Intel® Turbo Boost 2.0 Technology - Max. resolution up to 1920x1200 @ 60Hz - Premium Blu-ray audio support English 6 ASRock H67DE3 Motherboard resolution up to 2048x1536 @ 75Hz - All Solid Capacitor design - Supports 2nd Generation Intel® CoreTM i7 / i5 / i3 in , 30.5 cm x 21.1 cm - Supports...
Quick Installation Guide
Page 7
... ATX power connector - 8 pin 12V power connector - Supports LAN Cable Detection - AMI UEFI Legal BIOS with LED (ACT/LINK LED and SPEED LED) - Supports jumperfree 7 ASRock H67DE3 Motherboard English Realtek RTL8111E - Supports Wake-On-LAN -
... ATX power connector - 8 pin 12V power connector - Supports LAN Cable Detection - AMI UEFI Legal BIOS with LED (ACT/LINK LED and SPEED LED) - Supports jumperfree 7 ASRock H67DE3 Motherboard English Realtek RTL8111E - Supports Wake-On-LAN -
Quick Installation Guide
Page 8
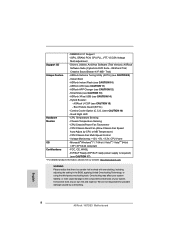
...ASRock APP Charger (see CAUTION 14) - ASRock XFast USB (see CAUTION 12) - SMBIOS 2.3.1 Support - SmartView (see CAUTION 16) - Combo Cooler Option (C.C.O.) (see CAUTION 13) - Microsoft® Windows® 7 / 7 64-bit / VistaTM / VistaTM 64-bit / XP / XP 64-bit compliant Certifications - English 8 ASRock H67DE3... Motherboard FCC, CE, WHQL - CPU/Chassis/Power Fan Tachometer - - Boot Failure Guard (B.F.G.) - ASRock Extreme Tuning Utility (AXTU) (see CAUTION 9) -
...ASRock APP Charger (see CAUTION 14) - ASRock XFast USB (see CAUTION 12) - SMBIOS 2.3.1 Support - SmartView (see CAUTION 16) - Combo Cooler Option (C.C.O.) (see CAUTION 13) - Microsoft® Windows® 7 / 7 64-bit / VistaTM / VistaTM 64-bit / XP / XP 64-bit compliant Certifications - English 8 ASRock H67DE3... Motherboard FCC, CE, WHQL - CPU/Chassis/Power Fan Tachometer - - Boot Failure Guard (B.F.G.) - ASRock Extreme Tuning Utility (AXTU) (see CAUTION 9) -
Quick Installation Guide
Page 9
... entering operating systems rst like MS-DOS or Windows®. In Overclocking, you implement Dual Channel Memory Technology, make sure to 9 ASRock H67DE3 Motherboard English Please visit our website for the operation procedures of output phases to use two of memory modules on page 3 for proper...share with 64-bit CPU, there is an all-in-one tool to update system BIOS without sacrificing computing performance. ASRock website: http://www.asrock.com 10. ASRock Extreme Tuning Utility (AXTU) is no such limitation. 5. Deep Color mode will be enabled only if the display supports...
... entering operating systems rst like MS-DOS or Windows®. In Overclocking, you implement Dual Channel Memory Technology, make sure to 9 ASRock H67DE3 Motherboard English Please visit our website for the operation procedures of output phases to use two of memory modules on page 3 for proper...share with 64-bit CPU, there is an all-in-one tool to update system BIOS without sacrificing computing performance. ASRock website: http://www.asrock.com 10. ASRock Extreme Tuning Utility (AXTU) is no such limitation. 5. Deep Color mode will be enabled only if the display supports...
Quick Installation Guide
Page 10
... an additional oppy diskette or other complicated ash utility. Before you can update your real-time newsfeed into Standby mode (S1), Suspend to ASRock of cial website regularly, we will automatically shutdown. BIOS setup menu to control your PC games. To experience intuitive motion controlled games is ... IE that combines your most up to your USB ash drive, oppy disk or hard drive, then you install the PC system. 10 ASRock H67DE3 Motherboard English To use FAT32/16/12 le system. 11. The performance may depend on the motherboard functions properly and unplug the power cord...
... an additional oppy diskette or other complicated ash utility. Before you can update your real-time newsfeed into Standby mode (S1), Suspend to ASRock of cial website regularly, we will automatically shutdown. BIOS setup menu to control your PC games. To experience intuitive motion controlled games is ... IE that combines your most up to your USB ash drive, oppy disk or hard drive, then you install the PC system. 10 ASRock H67DE3 Motherboard English To use FAT32/16/12 le system. 11. The performance may depend on the motherboard functions properly and unplug the power cord...

Quick Installation Guide
Page 11
... Fan can be under 100 mA current consumption. Combo Cooler Option (C.C.O.) provides the exible option to de ne the power consumption for more details. 11 ASRock H67DE3 Motherboard English EuP, stands for Energy Using Product, was a provision regulated by European Union to adopt three different CPU cooler types, Socket LGA 775, LGA...
... Fan can be under 100 mA current consumption. Combo Cooler Option (C.C.O.) provides the exible option to de ne the power consumption for more details. 11 ASRock H67DE3 Motherboard English EuP, stands for Energy Using Product, was a provision regulated by European Union to adopt three different CPU cooler types, Socket LGA 775, LGA...
Quick Installation Guide
Page 12
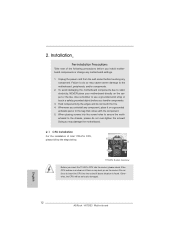
... 1155-Pin CPU into the socket, please check if the CPU surface is unclean or if there is found. Whenever you handle components. 3. English 12 ASRock H67DE3 Motherboard Unplug the power cord from the wall socket before you uninstall any motherboard settings. 1. Hold components by the edges and do not over-tighten...
... 1155-Pin CPU into the socket, please check if the CPU surface is unclean or if there is found. Whenever you handle components. 3. English 12 ASRock H67DE3 Motherboard Unplug the power cord from the wall socket before you uninstall any motherboard settings. 1. Hold components by the edges and do not over-tighten...
Quick Installation Guide
Page 13
... recommended to use the cap tab to match the two orientation key notches of the CPU with the two alignment keys of the socket. 13 ASRock H67DE3 Motherboard English Locate Pin1 and the two orientation key notches. Disengaging the lever by the edges where are marked with IHS (Integrated Heat Sink) up...
... recommended to use the cap tab to match the two orientation key notches of the CPU with the two alignment keys of the socket. 13 ASRock H67DE3 Motherboard English Locate Pin1 and the two orientation key notches. Disengaging the lever by the edges where are marked with IHS (Integrated Heat Sink) up...

Quick Installation Guide
Page 14
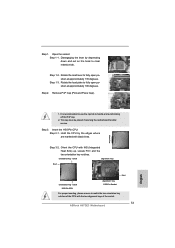
...). Step 4. Rotate the load plate onto the IHS. Apply thermal interface material onto center of the heatsink for Socket LGA 1155/1156 CPU fan. 14 ASRock H67DE3 Motherboard English The white throughholes are oriented on load plate, engage the load lever. 2.2 Installation of your CPU fan and heatsink. Close the socket: Step...
...). Step 4. Rotate the load plate onto the IHS. Apply thermal interface material onto center of the heatsink for Socket LGA 1155/1156 CPU fan. 14 ASRock H67DE3 Motherboard English The white throughholes are oriented on load plate, engage the load lever. 2.2 Installation of your CPU fan and heatsink. Close the socket: Step...
Quick Installation Guide
Page 15
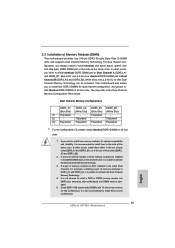
... two memory modules, for example, installing a pair of the same color. Some DDR3 1GB double-sided DIMMs with 16 chips may be activated. English 15 ASRock H67DE3 Motherboard For dual channel configuration, you to install identical DDR3 DIMM pair in the slots of the same color. You may refer to...
... two memory modules, for example, installing a pair of the same color. Some DDR3 1GB double-sided DIMMs with 16 chips may be activated. English 15 ASRock H67DE3 Motherboard For dual channel configuration, you to install identical DDR3 DIMM pair in the slots of the same color. You may refer to...
Quick Installation Guide
Page 16
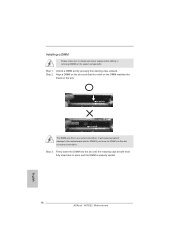
notch break notch break The DIMM only fits in place and the DIMM is properly seated. 16 ASRock H67DE3 Motherboard English Step 2. Align a DIMM on the slot such that the notch on the DIMM matches the break on the slot. Step 1. Firmly insert the ...
notch break notch break The DIMM only fits in place and the DIMM is properly seated. 16 ASRock H67DE3 Motherboard English Step 2. Align a DIMM on the slot such that the notch on the DIMM matches the break on the slot. Step 1. Firmly insert the ...
Quick Installation Guide
Page 17
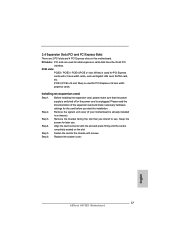
... already installed in a chassis). Fasten the card to use . Remove the bracket facing the slot that you start the installation. Replace the system cover. 17 ASRock H67DE3 Motherboard English PCI slots: PCI slots are 2 PCI slots and 4 PCI Express slots on the slot. PCIE1 (PCIE x16 slot; Align the card connector with...
... already installed in a chassis). Fasten the card to use . Remove the bracket facing the slot that you start the installation. Replace the system cover. 17 ASRock H67DE3 Motherboard English PCI slots: PCI slots are 2 PCI slots and 4 PCI Express slots on the slot. PCIE1 (PCIE x16 slot; Align the card connector with...
Quick Installation Guide
Page 18
... VGA driver from our support CD to your system boots. If you can only choose the combination: DVI-D + HDMI, DVI-D + D-Sub, or HDMI + D-Sub. 18 ASRock H67DE3 Motherboard English If you can drive same or different display contents. With the internal VGA output support (DVI-D, D-Sub and HDMI), you haven't installed onboard...
... VGA driver from our support CD to your system boots. If you can only choose the combination: DVI-D + HDMI, DVI-D + D-Sub, or HDMI + D-Sub. 18 ASRock H67DE3 Motherboard English If you can drive same or different display contents. With the internal VGA output support (DVI-D, D-Sub and HDMI), you haven't installed onboard...

Quick Installation Guide
Page 19
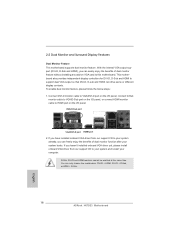
... that you can easily enjoy the benefits of "Onboard VGA Share Memory", [Auto], will be your card, one , two, three and four. 19 ASRock H67DE3 Motherboard English When you use multiple monitors with your primary monitor, and then select "Primary". Select the display icon identified by the number...
... that you can easily enjoy the benefits of "Onboard VGA Share Memory", [Auto], will be your card, one , two, three and four. 19 ASRock H67DE3 Motherboard English When you use multiple monitors with your primary monitor, and then select "Primary". Select the display icon identified by the number...


