
User Manual
Page 5
... 2.1 Installing the CPU 9 2.2 Installing the CPU Fan and Heatsink 12 2.3 Installing Memory Module (DIMM) 13 2.4 Expansion Slots (PCI Express Slots and Mining Ports) 15 2.5 Jumpers Setup 16 2.6 Onboard Headers and Connectors 17 2.7 Smart Switches 21 2.8 M.2_SSD (NGFF) Module Installation Guide 22 2.9 Installing the 4-pin PCIe Power Connectors 25 2.10 Special Features...26 2.10.1 Smart PCIe State Detection 26 2.10.2 Graphics Card Indicator LED 27 Chapter 3 Software and Utilities Operation 28 3.1 Installing Drivers 28 Chapter 4 UEFI SETUP UTILITY 29 4.1 Introduction 29
... 2.1 Installing the CPU 9 2.2 Installing the CPU Fan and Heatsink 12 2.3 Installing Memory Module (DIMM) 13 2.4 Expansion Slots (PCI Express Slots and Mining Ports) 15 2.5 Jumpers Setup 16 2.6 Onboard Headers and Connectors 17 2.7 Smart Switches 21 2.8 M.2_SSD (NGFF) Module Installation Guide 22 2.9 Installing the 4-pin PCIe Power Connectors 25 2.10 Special Features...26 2.10.1 Smart PCIe State Detection 26 2.10.2 Graphics Card Indicator LED 27 Chapter 3 Software and Utilities Operation 28 3.1 Installing Drivers 28 Chapter 4 UEFI SETUP UTILITY 29 4.1 Introduction 29
User Manual
Page 7
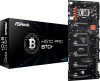
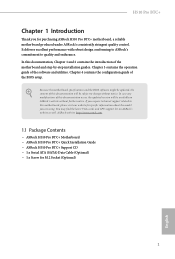
... and endurance. Chapter 3 contains the operation guide of the BIOS setup. ASRock website http://www.asrock.com. 1.1 Package Contents • ASRock H510 Pro BTC+ Motherboard • ASRock H510 Pro BTC+ Quick Installation Guide • ASRock H510 Pro BTC+ Support CD • 1 x Serial ATA (SATA) Data Cable (Optional) • 1 x Screw for purchasing ASRock H510 Pro BTC+ motherboard, a reliable motherboard produced under ASRock's consistently stringent quality control. In this documentation, Chapter 1 and...
... and endurance. Chapter 3 contains the operation guide of the BIOS setup. ASRock website http://www.asrock.com. 1.1 Package Contents • ASRock H510 Pro BTC+ Motherboard • ASRock H510 Pro BTC+ Quick Installation Guide • ASRock H510 Pro BTC+ Support CD • 1 x Serial ATA (SATA) Data Cable (Optional) • 1 x Screw for purchasing ASRock H510 Pro BTC+ motherboard, a reliable motherboard produced under ASRock's consistently stringent quality control. In this documentation, Chapter 1 and...

User Manual
Page 22
...noted that the password, date, time, and user default profile will be cleared only if the CMOS battery is "Open". 2.5 Jumpers Setup The illustration shows how jumpers are setup. If no jumper cap is placed on the pins, the jumper is removed. After waiting for 15 seconds, use a jumper cap to... 16 When the jumper cap is placed on CLRMOS1 for 5 seconds. Clear CMOS Jumper (CLRMOS1) (see p.5, No. 3) 2-pin Jumper CLRMOS1 allows you to default setup, please turn off the computer and unplug the power cord from the power supply. Please remember toremove the jumper cap after you do the clear...
...noted that the password, date, time, and user default profile will be cleared only if the CMOS battery is "Open". 2.5 Jumpers Setup The illustration shows how jumpers are setup. If no jumper cap is placed on the pins, the jumper is removed. After waiting for 15 seconds, use a jumper cap to... 16 When the jumper cap is placed on CLRMOS1 for 5 seconds. Clear CMOS Jumper (CLRMOS1) (see p.5, No. 3) 2-pin Jumper CLRMOS1 allows you to default setup, please turn off the computer and unplug the power cord from the power supply. Please remember toremove the jumper cap after you do the clear...
User Manual
Page 35
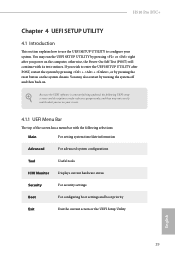
... or the UEFI Setup Utility English 29 If you wish to configure your screen. 4.1.1 UEFI Menu Bar The top of the screen has a menu bar with its test routines. You may not exactly match what you see on your system. H510 Pro BTC+ Chapter 4 UEFI SETUP UTILITY 4.1 Introduction ...This section explains how to use the UEFI SETUP UTILITY to enter the UEFI SETUP UTILITY after you power on the computer, otherwise, the Power-On-Self-Test (POST...
... or the UEFI Setup Utility English 29 If you wish to configure your screen. 4.1.1 UEFI Menu Bar The top of the screen has a menu bar with its test routines. You may not exactly match what you see on your system. H510 Pro BTC+ Chapter 4 UEFI SETUP UTILITY 4.1 Introduction ...This section explains how to use the UEFI SETUP UTILITY to enter the UEFI SETUP UTILITY after you power on the computer, otherwise, the Power-On-Self-Test (POST...

User Manual
Page 36
... down to select items, then press to click your required item. Please check the following table for all the settings Save changes and exit the SETUP UTILITY Print screen Jump to the bottom of the screen To display the General Help Screen Discard changes and exit the... SETUP UTILITY Load optimal default values for the descriptions of the screen Go to the Exit Screen or exit the current screen English 30 Navigation Key(s) ...
... down to select items, then press to click your required item. Please check the following table for all the settings Save changes and exit the SETUP UTILITY Print screen Jump to the bottom of the screen To display the General Help Screen Discard changes and exit the... SETUP UTILITY Load optimal default values for the descriptions of the screen Go to the Exit Screen or exit the current screen English 30 Navigation Key(s) ...
User Manual
Page 37
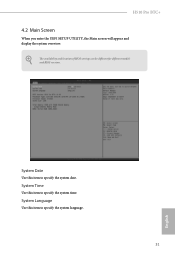
System Language Use this item to specify the system time. System Time Use this item to specify the system date. System Date Use this item to specify the system language. 31 English The availability and location of BIOS settings can be different for different models and BIOS versions. H510 Pro BTC+ 4.2 Main Screen When you enter the UEFI SETUP UTILITY, the Main screen will appear and display the system overview.
System Language Use this item to specify the system time. System Time Use this item to specify the system date. System Date Use this item to specify the system language. 31 English The availability and location of BIOS settings can be different for different models and BIOS versions. H510 Pro BTC+ 4.2 Main Screen When you enter the UEFI SETUP UTILITY, the Main screen will appear and display the system overview.

User Manual
Page 38
AVX is constantly being updated, the following UEFI setup screens and descriptions are for reference purpose only, and they may not exactly match what you can set up overclocking features. Because the UEFI software ...
AVX is constantly being updated, the following UEFI setup screens and descriptions are for reference purpose only, and they may not exactly match what you can set up overclocking features. Because the UEFI software ...

User Manual
Page 48
UEFI Configuration Active Page on Entry Select the default page when entering the UEFI setup utility. 42 English 4.4 Advanced Screen In this section may set the configurations for the following items: CPU Configuration, Chipset Configuration, Storage Configuration, Super IO Configuration, ACPI Configuration, USB Configuration and Trusted Computing. Setting wrong values in this section, you may cause the system to malfunction.
UEFI Configuration Active Page on Entry Select the default page when entering the UEFI setup utility. 42 English 4.4 Advanced Screen In this section may set the configurations for the following items: CPU Configuration, Chipset Configuration, Storage Configuration, Super IO Configuration, ACPI Configuration, USB Configuration and Trusted Computing. Setting wrong values in this section, you may cause the system to malfunction.

User Manual
Page 57
The XHCI ownership change should be claimed by XHCI driver. 51 English XHCI Hand-off This is recommended to support USB devices under the UEFI setup and Windows/Linux operating systems only. Select UEFI Setup Only to disable legacy USB support. 4.4.6 USB Configuration H510 Pro BTC+ Legacy USB Support Enable or disable Legacy OS Support for OSes without XHCI hand-off support. If you encounter USB compatibility issues it is a workaround for USB 2.0 devices.
The XHCI ownership change should be claimed by XHCI driver. 51 English XHCI Hand-off This is recommended to support USB devices under the UEFI setup and Windows/Linux operating systems only. Select UEFI Setup Only to disable legacy USB support. 4.4.6 USB Configuration H510 Pro BTC+ Legacy USB Support Enable or disable Legacy OS Support for OSes without XHCI hand-off support. If you encounter USB compatibility issues it is a workaround for USB 2.0 devices.
User Manual
Page 59
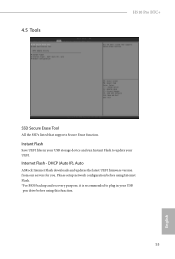
Please setup network configuration before using Internet Flash. *For BIOS backup and recovery purpose, it is recommended to update your USB pen drive before using this function. 53 English Instant Flash Save UEFI files in your USB storage device and run Instant Flash to plug in your UEFI. Internet Flash - 4.5 Tools H510 Pro BTC+ SSD Secure Erase Tool All the SSD's listed that supports Secure Erase function. DHCP (Auto IP), Auto ASRock Internet Flash downloads and updates the latest UEFI firmware version from our servers for you.
Please setup network configuration before using Internet Flash. *For BIOS backup and recovery purpose, it is recommended to update your USB pen drive before using this function. 53 English Instant Flash Save UEFI files in your USB storage device and run Instant Flash to plug in your UEFI. Internet Flash - 4.5 Tools H510 Pro BTC+ SSD Secure Erase Tool All the SSD's listed that supports Secure Erase function. DHCP (Auto IP), Auto ASRock Internet Flash downloads and updates the latest UEFI firmware version from our servers for you.

User Manual
Page 60
UEFI Download Server Select a server to configure internet connection settings for Internet Flash. Network Configuration Use this to download the UEFI firmware. 54 English Internet Setting Enable or disable sound effects in the setup utility.
UEFI Download Server Select a server to configure internet connection settings for Internet Flash. Network Configuration Use this to download the UEFI firmware. 54 English Internet Setting Enable or disable sound effects in the setup utility.

User Manual
Page 63
Leave it blank and press enter to change the settings in the UEFI Setup Utility. Secure Boot Use this item to use discrete TPM Module. 57 English Only the administrator has authority to remove the password. User Password Set ... Secure Boot. Leave it blank and press enter to change the settings in ME. Intel(R) Platform Trust Technology Enable/disable Intel PTT in the UEFI Setup Utility. H510 Pro BTC+ 4.7 Security Screen In this section you may also clear the user password. Users are unable to remove the password. Supervisor Password Set or change...
Leave it blank and press enter to change the settings in the UEFI Setup Utility. Secure Boot Use this item to use discrete TPM Module. 57 English Only the administrator has authority to remove the password. User Password Set ... Secure Boot. Leave it blank and press enter to change the settings in ME. Intel(R) Platform Trust Technology Enable/disable Intel PTT in the UEFI Setup Utility. H510 Pro BTC+ 4.7 Security Screen In this section you may also clear the user password. Users are unable to remove the password. Supervisor Password Set or change...

User Manual
Page 64
... should be turned on or off when the system boots up by the onboard LAN. Please note that the only way to enter this UEFI Setup Utility is needed. 58 English Please notice that Ultra Fast mode will boot so fast that a buzzer is to Clear CMOS or run the Restart... LAN Allow the system to UEFI utility in Windows. In fast mode you to wait for you may not boot from an USB storage device. Setup Prompt Timeout Configure the number of seconds to configure the boot settings and the boot priority. Boot Beep Select whether the Boot Beep should be...
... should be turned on or off when the system boots up by the onboard LAN. Please note that the only way to enter this UEFI Setup Utility is needed. 58 English Please notice that Ultra Fast mode will boot so fast that a buzzer is to Clear CMOS or run the Restart... LAN Allow the system to UEFI utility in Windows. In fast mode you to wait for you may not boot from an USB storage device. Setup Prompt Timeout Configure the number of seconds to configure the boot settings and the boot priority. Boot Beep Select whether the Boot Beep should be...

User Manual
Page 67
...] to save changes and exit the UEFI SETUP UTILITY. The F9 key can be used for all changes. Launch EFI Shell from filesystem device Copy shellx64.efi to the root directory to discard all options. will pop out. 4.9 Exit Screen H510 Pro BTC+ Save Changes and Exit When you select... this option the following message, "Discard changes and exit setup?" Discard Changes When you select this operation. will pop out. Load UEFI Defaults Load UEFI...
...] to save changes and exit the UEFI SETUP UTILITY. The F9 key can be used for all changes. Launch EFI Shell from filesystem device Copy shellx64.efi to the root directory to discard all options. will pop out. 4.9 Exit Screen H510 Pro BTC+ Save Changes and Exit When you select... this option the following message, "Discard changes and exit setup?" Discard Changes When you select this operation. will pop out. Load UEFI Defaults Load UEFI...


