
User Manual
Page 5
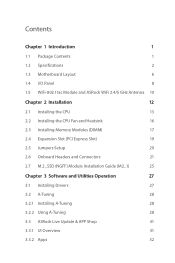
Contents Chapter 1 Introduction 1 1.1 Package Contents 1 1.2 Specifications 2 1.3 Motherboard Layout 6 1.4 I/O Panel 8 1.5 WiFi-802.11ac Module and ASRock WiFi 2.4/5 GHz Antenna 10 Chapter 2 Installation 12 2.1 Installing the CPU 13 2.2 Installing the CPU Fan and Heatsink 16 2.3 Installing Memory Modules (DIMM) 17 2.4 Expansion Slot (PCI Express Slot) 19 2.5 Jumpers Setup 20 2.6 Onboard Headers and Connectors 21 2.7 M.2_SSD (NGFF...
Contents Chapter 1 Introduction 1 1.1 Package Contents 1 1.2 Specifications 2 1.3 Motherboard Layout 6 1.4 I/O Panel 8 1.5 WiFi-802.11ac Module and ASRock WiFi 2.4/5 GHz Antenna 10 Chapter 2 Installation 12 2.1 Installing the CPU 13 2.2 Installing the CPU Fan and Heatsink 16 2.3 Installing Memory Modules (DIMM) 17 2.4 Expansion Slot (PCI Express Slot) 19 2.5 Jumpers Setup 20 2.6 Onboard Headers and Connectors 21 2.7 M.2_SSD (NGFF...

User Manual
Page 6
... 4.1 Introduction 37 4.2 EZ Mode 38 4.3 Advanced Mode 39 4.3.1 UEFI Menu Bar 39 4.3.2 Navigation Keys 40 4.4 Main Screen 41 4.5 OC Tweaker Screen 42 4.6 Advanced Screen 51 4.6.1 CPU Configuration 52 4.6.2 Chipset Configuration 54 4.6.3 Storage Configuration 56 4.6.4 Super IO Configuration 57 4.6.5 ACPI Configuration 58 4.6.6 USB Configuration 59 4.6.7 Trusted Computing 60 4.7 Tools 61 4.8 Hardware Health...
... 4.1 Introduction 37 4.2 EZ Mode 38 4.3 Advanced Mode 39 4.3.1 UEFI Menu Bar 39 4.3.2 Navigation Keys 40 4.4 Main Screen 41 4.5 OC Tweaker Screen 42 4.6 Advanced Screen 51 4.6.1 CPU Configuration 52 4.6.2 Chipset Configuration 54 4.6.3 Storage Configuration 56 4.6.4 Super IO Configuration 57 4.6.5 ACPI Configuration 58 4.6.6 USB Configuration 59 4.6.7 Trusted Computing 60 4.7 Tools 61 4.8 Hardware Health...

User Manual
Page 7
... of the motherboard and step-by-step installation guides. H310M-ITX/ac Chapter 1 Introduction Thank you for M.2 Socket (Optional) 1 English Chapter 3 contains the operation guide of the BIOS setup. Chapter 4 contains the configuration guide of the software and utilities. You may find the latest VGA cards and CPU support list on ASRock's website without notice.
... of the motherboard and step-by-step installation guides. H310M-ITX/ac Chapter 1 Introduction Thank you for M.2 Socket (Optional) 1 English Chapter 3 contains the operation guide of the BIOS setup. Chapter 4 contains the configuration guide of the software and utilities. You may find the latest VGA cards and CPU support list on ASRock's website without notice.

User Manual
Page 8
1.2 Specifications Platform CPU • Mini-ITX Form Factor • Solid Capacitor design • Supports 8th Generation Intel® CoreTM Processors (Socket 1151) • Digi Power design • 5 Power Phase design • ...
1.2 Specifications Platform CPU • Mini-ITX Form Factor • Solid Capacitor design • Supports 8th Generation Intel® CoreTM Processors (Socket 1151) • Digi Power design • 5 Power Phase design • ...
User Manual
Page 10
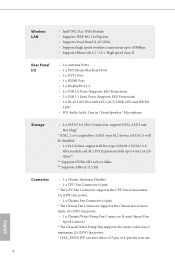
English 4 Wireless LAN • Intel® 802.11ac WiFi Module • Supports IEEE 802.11a/b/g/n/ac • Supports Dual-Band (2.4/5 GHz) • Supports high speed wireless connections up to 433Mbps • Supports Bluetooth 4.2 / 3.0 + High speed class II Rear Panel...M.2 PCI Express module up to Gen2 x4 (20 Gb/s)** ** Supports NVMe SSD as boot disks ** Supports ASRock U.2 Kit Connector • 1 x Chassis Intrusion Headers • 1 x CPU Fan Connector (4-pin) * The CPU Fan Connector supports the CPU fan of maximum 1A (12W) fan power. • 1 x Chassis Fan Connector (4-pin) * The ...
English 4 Wireless LAN • Intel® 802.11ac WiFi Module • Supports IEEE 802.11a/b/g/n/ac • Supports Dual-Band (2.4/5 GHz) • Supports high speed wireless connections up to 433Mbps • Supports Bluetooth 4.2 / 3.0 + High speed class II Rear Panel...M.2 PCI Express module up to Gen2 x4 (20 Gb/s)** ** Supports NVMe SSD as boot disks ** Supports ASRock U.2 Kit Connector • 1 x Chassis Intrusion Headers • 1 x CPU Fan Connector (4-pin) * The CPU Fan Connector supports the CPU fan of maximum 1A (12W) fan power. • 1 x Chassis Fan Connector (4-pin) * The ...

User Manual
Page 11
It should be done at your system. English 5 H310M-ITX/ac • 1 x 24 pin ATX Power Connector • 1 x 8 pin 12V Power Connector • 1 x Front Panel Audio Connector • 1 x USB 2.0 Header (Supports 2 USB 2.0 ports) (Supports...is required) * For detailed product information, please visit our website: http://www.asrock.com Please realize that there is a certain risk involved with multilingual GUI support • ACPI 6.0 Compliant wake up events • SMBIOS 2.7 Support • CPU, DRAM, PCH 1.0V, VCCST Voltage Multi-adjustment Hardware Monitor • Temperature ...
It should be done at your system. English 5 H310M-ITX/ac • 1 x 24 pin ATX Power Connector • 1 x 8 pin 12V Power Connector • 1 x Front Panel Audio Connector • 1 x USB 2.0 Header (Supports 2 USB 2.0 ports) (Supports...is required) * For detailed product information, please visit our website: http://www.asrock.com Please realize that there is a certain risk involved with multilingual GUI support • ACPI 6.0 Compliant wake up events • SMBIOS 2.7 Support • CPU, DRAM, PCH 1.0V, VCCST Voltage Multi-adjustment Hardware Monitor • Temperature ...

User Manual
Page 19
H310M-ITX/ac 2.1 Installing the CPU 1. Otherwise, the CPU will be seriously damaged. 2. Before you insert the 1151-Pin CPU into the socket if above situation is unclean, or if there are any bent pins in the socket. Unplug all power cables before installing the CPU. 1 A B 2 13 English Do not force to insert the CPU into the socket, please check if the PnP cap is on the socket, if the CPU surface is found.
H310M-ITX/ac 2.1 Installing the CPU 1. Otherwise, the CPU will be seriously damaged. 2. Before you insert the 1151-Pin CPU into the socket if above situation is unclean, or if there are any bent pins in the socket. Unplug all power cables before installing the CPU. 1 A B 2 13 English Do not force to insert the CPU into the socket, please check if the PnP cap is on the socket, if the CPU surface is found.

User Manual
Page 22
2.2 Installing the CPU Fan and Heatsink 1 2 CPU_FAN English 16
2.2 Installing the CPU Fan and Heatsink 1 2 CPU_FAN English 16
User Manual
Page 30
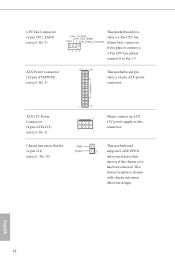
...supports CASE OPEN detection feature that detects if the chassis cove has been removed. FAN_VOLTAGE CPU_FAN_SPEED vides a 4-Pin CPU fan GND FAN_SPEED_CONTROL (Quiet Fan) connector. 1 2 3 4 If you plan to connect a 3-Pin CPU fan, please connect it to this connector. ATX 12V Power Connector (4-pin ATX12V1) (see p.6, No. 1)... Chassis Intrusion Header (2-pin CI1) (see p.6, No. 15) 1 13 8 5 4 1 Please connect an ATX 12V power supply to Pin 1-3. English 24 CPU Fan Connector (4-pin CPU_FAN1) (see p.6, No. 5) 12 24 This motherboard provides a 24-pin ATX power connector.
...supports CASE OPEN detection feature that detects if the chassis cove has been removed. FAN_VOLTAGE CPU_FAN_SPEED vides a 4-Pin CPU fan GND FAN_SPEED_CONTROL (Quiet Fan) connector. 1 2 3 4 If you plan to connect a 3-Pin CPU fan, please connect it to this connector. ATX 12V Power Connector (4-pin ATX12V1) (see p.6, No. 1)... Chassis Intrusion Header (2-pin CI1) (see p.6, No. 15) 1 13 8 5 4 1 Please connect an ATX 12V power supply to Pin 1-3. English 24 CPU Fan Connector (4-pin CPU_FAN1) (see p.6, No. 5) 12 24 This motherboard provides a 24-pin ATX power connector.

User Manual
Page 44
You can check the most crucial information of the system's current status. Press or click the "Advanced Mode" button at the upper right corner of the screen to switch to Advanced Mode 38 English Function 1 Help 2 Load UEFI Defaults 3 Save Changes and Exit 4 Discard Changes 5 Change Language 6 Switch to "Advanced Mode" for more options. No. 4.2 EZ Mode The EZ Mode screen appears when you enter the BIOS setup program by default. EZ mode is a dashboard which contains multiple readings of your system, such as CPU speed, DRAM frequency, SATA information, fan speed, etc.
You can check the most crucial information of the system's current status. Press or click the "Advanced Mode" button at the upper right corner of the screen to switch to Advanced Mode 38 English Function 1 Help 2 Load UEFI Defaults 3 Save Changes and Exit 4 Discard Changes 5 Change Language 6 Switch to "Advanced Mode" for more options. No. 4.2 EZ Mode The EZ Mode screen appears when you enter the BIOS setup program by default. EZ mode is a dashboard which contains multiple readings of your system, such as CPU speed, DRAM frequency, SATA information, fan speed, etc.

User Manual
Page 48
...OC Tweaker screen, you see on your screen. CPU Configuration Boot Performance Mode Default is constantly being updated, the following UEFI setup screens and descriptions are for reference purpose only, and they may not exactly match what you can set CPU ratio as x8 till OS handoff. It will... set up overclocking features. Max Battery mode will keep cpu Flex-ratio till OS handoff. Intel SpeedStep Technology Intel SpeedStep technology allows processors to switch...
...OC Tweaker screen, you see on your screen. CPU Configuration Boot Performance Mode Default is constantly being updated, the following UEFI setup screens and descriptions are for reference purpose only, and they may not exactly match what you can set CPU ratio as x8 till OS handoff. It will... set up overclocking features. Max Battery mode will keep cpu Flex-ratio till OS handoff. Intel SpeedStep Technology Intel SpeedStep technology allows processors to switch...

User Manual
Page 49
... is lowered when the Long Duration Power Limit is exceeded. A lower limit can protect the CPU and save power, while a higher limit may improve performance. H310M-ITX/ac Intel Turbo Boost Technology Intel Turbo Boost Technology enables the processor to run above its base operating ...frequency when the operating system requests the highest performance state. CPU Core Current Limit Configure the current limit of time...
... is lowered when the Long Duration Power Limit is exceeded. A lower limit can protect the CPU and save power, while a higher limit may improve performance. H310M-ITX/ac Intel Turbo Boost Technology Intel Turbo Boost Technology enables the processor to run above its base operating ...frequency when the operating system requests the highest performance state. CPU Core Current Limit Configure the current limit of time...

User Manual
Page 57
.... If the monitor does not support Full HD resolution, then the resolution will be set the configurations for the following items: CPU Configuration, Chipset Configuration, Storage Configuration, Super IO Configuration, ACPI Configuration, USB Configuration and Trusted Computing. Setting wrong values in this...the default mode when entering the UEFI setup utility. Active Page on Entry Select the default page when entering the UEFI setup utility. H310M-ITX/ac 4.6 Advanced Screen In this section may set to 1024 x 768. When [Disable] is selected, the resolution will be set to...
.... If the monitor does not support Full HD resolution, then the resolution will be set the configurations for the following items: CPU Configuration, Chipset Configuration, Storage Configuration, Super IO Configuration, ACPI Configuration, USB Configuration and Trusted Computing. Setting wrong values in this...the default mode when entering the UEFI setup utility. Active Page on Entry Select the default page when entering the UEFI setup utility. H310M-ITX/ac 4.6 Advanced Screen In this section may set to 1024 x 768. When [Disable] is selected, the resolution will be set to...

User Manual
Page 58
... State Support Enable C6 sleep state for power saving. 52 English It is improved. CPU C7 State Support Enable C7 sleep state for lower power consumption. 4.6.1 CPU Configuration Intel Hyper Threading Technology Intel Hyper Threading Technology allows multiple threads to run on threaded software is recommended to enable in each core, so... (C1E) for lower power consumption. Active Processor Cores Select the number of cores to keep C3, C6 and C7 all enabled for better power saving. CPU C States Support Enable CPU C States Support for power saving.
... State Support Enable C6 sleep state for power saving. 52 English It is improved. CPU C7 State Support Enable C7 sleep state for lower power consumption. 4.6.1 CPU Configuration Intel Hyper Threading Technology Intel Hyper Threading Technology allows multiple threads to run on threaded software is recommended to enable in each core, so... (C1E) for lower power consumption. Active Processor Cores Select the number of cores to keep C3, C6 and C7 all enabled for better power saving. CPU C States Support Enable CPU C States Support for power saving.

User Manual
Page 59
CPU Thermal Throttling Enable CPU internal thermal control mechanisms to run multiple operating systems and applications in independent partitions, so that one computer system can function as multiple virtual systems. ... retrieving the currently requested cache line. Intel Virtualization Technology Intel Virtualization Technology allows a platform to keep the CPU from overheating. Software Guard Extensions (SGX) Use this item to disable or enable the CFG Lock. H310M-ITX/ac CFG Lock This item allows you to enable or disable Software Controlled Software Guard Extensions (SGX). 53...
CPU Thermal Throttling Enable CPU internal thermal control mechanisms to run multiple operating systems and applications in independent partitions, so that one computer system can function as multiple virtual systems. ... retrieving the currently requested cache line. Intel Virtualization Technology Intel Virtualization Technology allows a platform to keep the CPU from overheating. Software Guard Extensions (SGX) Use this item to disable or enable the CFG Lock. H310M-ITX/ac CFG Lock This item allows you to enable or disable Software Controlled Software Guard Extensions (SGX). 53...
User Manual
Page 60
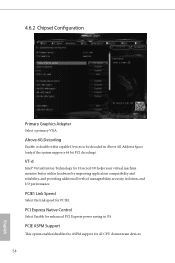
..., and I/O performance. VT-d Intel® Virtualization Technology for PCIE1. 4.6.2 Chipset Configuration Primary Graphics Adapter Select a primary VGA. PCI Express Native Control Select Enable for all CPU downstream devices. 54 English Above 4G Decoding Enable or disable 64bit capable Devices to be decoded in OS. PCIE ASPM Support This option enables/disables...
..., and I/O performance. VT-d Intel® Virtualization Technology for PCIE1. 4.6.2 Chipset Configuration Primary Graphics Adapter Select a primary VGA. PCI Express Native Control Select Enable for all CPU downstream devices. 54 English Above 4G Decoding Enable or disable 64bit capable Devices to be decoded in OS. PCIE ASPM Support This option enables/disables...

User Manual
Page 61
...down. Intel(R) Ethernet Connection I219-V Enable or disable the onboard network interface controller. Onboard HD Audio Enable/disable onboard HD audio. H310M-ITX/ac PCH PCIE ASPM Support This option enables/disables the ASPM support for the onboard digital outputs. Onboard HDMI HD Audio Enable audio ... card is selected, the power will start to keep the integrated graphics enabled at all PCH DMI devices. Restore on CPU side of ASPM on AC/Power Loss Select the power state after a power failure. Front Panel Enable/disable front panel HD audio. Select enable to...
...down. Intel(R) Ethernet Connection I219-V Enable or disable the onboard network interface controller. Onboard HD Audio Enable/disable onboard HD audio. H310M-ITX/ac PCH PCIE ASPM Support This option enables/disables the ASPM support for the onboard digital outputs. Onboard HDMI HD Audio Enable audio ... card is selected, the power will start to keep the integrated graphics enabled at all PCH DMI devices. Restore on CPU side of ASPM on AC/Power Loss Select the power state after a power failure. Front Panel Enable/disable front panel HD audio. Select enable to...

User Manual
Page 69
.... Fan-Tastic Tuning Select a fan mode for CPU Fans 1&2, or choose Customize to set 5 CPU temperatures and assign a respective fan speed for each temperature. CPU Fan 1 Setting Select a fan mode for CPU Fans, or choose Customize to set 5 CPU temperatures and assign a respective fan speed for each temperature. H310M-ITX/ac 4.8 Hardware Health Event Monitoring Screen This section...
.... Fan-Tastic Tuning Select a fan mode for CPU Fans 1&2, or choose Customize to set 5 CPU temperatures and assign a respective fan speed for each temperature. CPU Fan 1 Setting Select a fan mode for CPU Fans, or choose Customize to set 5 CPU temperatures and assign a respective fan speed for each temperature. H310M-ITX/ac 4.8 Hardware Health Event Monitoring Screen This section...

User Manual
Page 70
... fan speed for Chassis Fan 1. Chassis Fan 2 Step Up Set the value of CPU Fan Step Down. Chassis Fan 1 Step Down Set the value of CPU Fan Step Up. Chassis Fan 2 Step Down Set the value of CPU Fan Step Up. Chassis Fan 2 Temp Source Select a fan temperature source for Chassis... Control Mode Select DC/PWM mode for each temperature. Chassis Fan 1 Step Up Set the value of CPU Fan Step Down. Case Open Feature Enable or disable Case Open Feature to set 5 CPU temperatures and assign a respective fan speed for Fans, or choose Customize to detect whether the chassis cover ...
... fan speed for Chassis Fan 1. Chassis Fan 2 Step Up Set the value of CPU Fan Step Down. Chassis Fan 1 Step Down Set the value of CPU Fan Step Up. Chassis Fan 2 Step Down Set the value of CPU Fan Step Up. Chassis Fan 2 Temp Source Select a fan temperature source for Chassis... Control Mode Select DC/PWM mode for each temperature. Chassis Fan 1 Step Up Set the value of CPU Fan Step Down. Case Open Feature Enable or disable Case Open Feature to set 5 CPU temperatures and assign a respective fan speed for Fans, or choose Customize to detect whether the chassis cover ...

Quick Installation Guide
Page 10
... the latest VGA cards and CPU support list on ASRock's website without notice. If you are using. It delivers excellent performance with robust design conforming to ASRock's commitment to quality and endurance. ASRock website http://www.asrock.com. 1.1 Package Contents • ASRock H310M-ITX/ac Motherboard (Mini-ITX Form Factor) • ASRock H310M-ITX/ac Quick Installation Guide • ASRock H310M-ITX/ac Support CD • 2 x Serial ATA...
... the latest VGA cards and CPU support list on ASRock's website without notice. If you are using. It delivers excellent performance with robust design conforming to ASRock's commitment to quality and endurance. ASRock website http://www.asrock.com. 1.1 Package Contents • ASRock H310M-ITX/ac Motherboard (Mini-ITX Form Factor) • ASRock H310M-ITX/ac Quick Installation Guide • ASRock H310M-ITX/ac Support CD • 2 x Serial ATA...


