
RAID Installation Guide
Page 1
... Windows® 10 64-bit / 8.1 64-bit / 8 64-bit 7 / 7 64-bit With RAID Functions 7 2.4 Configuring a RAID array 8 2.4.1 Configuring a RAID array Using UEFI Setup Utility....... 9 2.4.2 Configuring a PCIE SSD RAID Array Using UEFI Setup Utility 13 2.4.3 Configuring a RAID array Using Intel RAID BIOS....... 18 3. Installing Windows® on a HDD larger than 2TB in RAID...
... Windows® 10 64-bit / 8.1 64-bit / 8 64-bit 7 / 7 64-bit With RAID Functions 7 2.4 Configuring a RAID array 8 2.4.1 Configuring a RAID array Using UEFI Setup Utility....... 9 2.4.2 Configuring a PCIE SSD RAID Array Using UEFI Setup Utility 13 2.4.3 Configuring a RAID array Using Intel RAID BIOS....... 18 3. Installing Windows® on a HDD larger than 2TB in RAID...

RAID Installation Guide
Page 6
... drives of different sizes, the smaller capacity hard disk will ask if you create RAID functions. If you use the Intel® Rapid Storage Technology UEFI drive option, Legacy OROM doesn't support PCIe storage function. 6 WARNING!! In the process you create RAID, the system will be the base storage size for...
... drives of different sizes, the smaller capacity hard disk will ask if you create RAID functions. If you use the Intel® Rapid Storage Technology UEFI drive option, Legacy OROM doesn't support PCIe storage function. 6 WARNING!! In the process you create RAID, the system will be the base storage size for...

RAID Installation Guide
Page 7
...please set SATA Mode Selection to [RAID]. Boot your USB storage device with RAID functions, please follow the procedures below. STEP 2: Use ASRock Easy RAID Installer Easy RAID Installer can copy the RAID driver from a support CD to your system, and press key to enter BIOS ...8.1 64-bit / 8 64-bit / 7 / 7 64-bit OS on your USB flash drive into a USB port B. Press to confirm the selection C. Plug in UEFI setup. Enter UEFI SETUP UTILITY Tool and highlight "Easy RAID Installer". 2.3 Installing Windows® 10 64-bit / 8.1 64-bit / 8 64bit / 7 / 7 64-bit With RAID ...
...please set SATA Mode Selection to [RAID]. Boot your USB storage device with RAID functions, please follow the procedures below. STEP 2: Use ASRock Easy RAID Installer Easy RAID Installer can copy the RAID driver from a support CD to your system, and press key to enter BIOS ...8.1 64-bit / 8 64-bit / 7 / 7 64-bit OS on your USB flash drive into a USB port B. Press to confirm the selection C. Plug in UEFI setup. Enter UEFI SETUP UTILITY Tool and highlight "Easy RAID Installer". 2.3 Installing Windows® 10 64-bit / 8.1 64-bit / 8 64bit / 7 / 7 64-bit With RAID ...

RAID Installation Guide
Page 8
...Over 2.2 TB Not supported Windows 7 Under 2.2 TB Not supported Option ROM Setting UEFI SETUP UTILITY\Boot\ CSM [Launch Storage n/a OpROM policy] = [UEFI only] Required RAID Utility UEFI Setup Utility Intel® RAID BIOS setup utility OS HDD Capacity Ultra Fast Boot ... Over 2.2 TB TB Over 2.2 TB Enabled Enabled Disabled Under 2.2 TB Disabled UEFI SETUP UTILITY\ Option ROM Boot\CSM [Launch n/a n/a n/a Setting Storage OpROM policy] = [UEFI only] Required UEFI Setup UEFI Setup UEFI Setup RAID Utility Utility Utility Utility Intel® RAID BIOS setup utility 8 2.4...
...Over 2.2 TB Not supported Windows 7 Under 2.2 TB Not supported Option ROM Setting UEFI SETUP UTILITY\Boot\ CSM [Launch Storage n/a OpROM policy] = [UEFI only] Required RAID Utility UEFI Setup Utility Intel® RAID BIOS setup utility OS HDD Capacity Ultra Fast Boot ... Over 2.2 TB TB Over 2.2 TB Enabled Enabled Disabled Under 2.2 TB Disabled UEFI SETUP UTILITY\ Option ROM Boot\CSM [Launch n/a n/a n/a Setting Storage OpROM policy] = [UEFI only] Required UEFI Setup UEFI Setup UEFI Setup RAID Utility Utility Utility Utility Intel® RAID BIOS setup utility 8 2.4...

RAID Installation Guide
Page 9
STEP 2: Go to Boot CSM and set SATA Mode Selection to [RAID], then press to [UEFI only]. STEP 3: Go to Advanced Storage Configuration and set Launch Storage OpROM policy to save the configuration changes and exit setup. 2.4.1 Configuring a RAID array Using UEFI Setup Utility STEP 1: Enter the UEFI Setup Utility by pressing or right after you power on the computer. STEP 4: Select the option Create RAID Volume and press . 9 Then Enter Intel(R) Rapid Storage Technology in Advanced page.
STEP 2: Go to Boot CSM and set SATA Mode Selection to [RAID], then press to [UEFI only]. STEP 3: Go to Advanced Storage Configuration and set Launch Storage OpROM policy to save the configuration changes and exit setup. 2.4.1 Configuring a RAID array Using UEFI Setup Utility STEP 1: Enter the UEFI Setup Utility by pressing or right after you power on the computer. STEP 4: Select the option Create RAID Volume and press . 9 Then Enter Intel(R) Rapid Storage Technology in Advanced page.

RAID Installation Guide
Page 12
If you want to start creating the RAID array. The actual screen may differ by model on the RAID volume info page and press . *Please note that the UEFI screenshots shown in this installation guide are for reference only. STEP 9: Select Create Volume and press to delete a RAID volume, select the option Delete on the RAID volume info page and press . 12
If you want to start creating the RAID array. The actual screen may differ by model on the RAID volume info page and press . *Please note that the UEFI screenshots shown in this installation guide are for reference only. STEP 9: Select Create Volume and press to delete a RAID volume, select the option Delete on the RAID volume info page and press . 12

RAID Installation Guide
Page 13
STEP 1: Enter the UEFI Setup Utility by pressing or right after you 've installed PCIE SSDs to save the configuration changes and exit setup. 13 STEP 2: Go to Advanced Storage Configuration and set SATA Mode Selection to [RAID] and set Launch Storage OpROM policy to [UEFI only], then adjust the M.2 slots that are the same type and volume. Press to [Enabled]. 2.4.2 Configuring a PCIE SSD RAID Array Using UEFI Setup Utility Caution: Please use identical PCIE SSDs that you power on the computer.
STEP 1: Enter the UEFI Setup Utility by pressing or right after you 've installed PCIE SSDs to save the configuration changes and exit setup. 13 STEP 2: Go to Advanced Storage Configuration and set SATA Mode Selection to [RAID] and set Launch Storage OpROM policy to [UEFI only], then adjust the M.2 slots that are the same type and volume. Press to [Enabled]. 2.4.2 Configuring a PCIE SSD RAID Array Using UEFI Setup Utility Caution: Please use identical PCIE SSDs that you power on the computer.

RAID Installation Guide
Page 17
STEP 9: Select Create Volume and press to delete a RAID volume, select the option Delete on the RAID volume info page and press . 17 If you want to start creating the RAID array. The actual screen may differ by model on the RAID volume info page and press . *Please note that the UEFI screenshots shown in this installation guide are for reference only.
STEP 9: Select Create Volume and press to delete a RAID volume, select the option Delete on the RAID volume info page and press . 17 If you want to start creating the RAID array. The actual screen may differ by model on the RAID volume info page and press . *Please note that the UEFI screenshots shown in this installation guide are for reference only.

RAID Installation Guide
Page 22
Installing Windows® on a HDD under 2TB in RAID mode After the UEFI and RAID BIOS setup you may start installing Windows® 10 64-bit / 8.1 64-bit / 8 64-bit / 7 / 7 64-bit OS as usual. 22 3.
Installing Windows® on a HDD under 2TB in RAID mode After the UEFI and RAID BIOS setup you may start installing Windows® 10 64-bit / 8.1 64-bit / 8 64-bit / 7 / 7 64-bit OS as usual. 22 3.

RAID Installation Guide
Page 23
STEP 1: Copy Intel® RAID drivers into a USB flash disk You can download the drivers from ASRock's website and unzip the files into a USB flash disk or copy the files from ASRock's motherboard support CD. (Please copy the files under the following directory: 32 bit: ..\i386\Win7_Intel.. 64-bit: ..\AMD64\Win7-64_Intel...2: Install Windows® 7 64-bit / 8 64-bit / 8.1 64bit / / 10 64-bit OS Press to launch boot menu at system POST and choose the item "UEFI:" to use Windows® 7 64-bit, Windows® 8 64-bit, Windows® 8.1 64-bit or Windows® 10 64-bit. Please make sure to boot...
STEP 1: Copy Intel® RAID drivers into a USB flash disk You can download the drivers from ASRock's website and unzip the files into a USB flash disk or copy the files from ASRock's motherboard support CD. (Please copy the files under the following directory: 32 bit: ..\i386\Win7_Intel.. 64-bit: ..\AMD64\Win7-64_Intel...2: Install Windows® 7 64-bit / 8 64-bit / 8.1 64bit / / 10 64-bit OS Press to launch boot menu at system POST and choose the item "UEFI:" to use Windows® 7 64-bit, Windows® 8 64-bit, Windows® 8.1 64-bit or Windows® 10 64-bit. Please make sure to boot...

User Manual
Page 5
3.3.1 UI Overview 35 3.3.2 Apps 36 3.3.3 BIOS & Drivers 39 3.3.4 Setting 40 3.4 Enabling USB Ports for Windows® 7 Installation 41 Chapter 4 UEFI SETUP UTILITY 44 4.1 Introduction 44 4.2 EZ Mode 45 4.3 Advanced Mode 46 4.3.1 UEFI Menu Bar 46 4.3.2 Navigation Keys 47 4.4 Main Screen 48 4.5 OC Tweaker Screen 49 4.6 Advanced Screen 56 4.6.1 CPU Configuration 57 4.6.2 Chipset Configuration...
3.3.1 UI Overview 35 3.3.2 Apps 36 3.3.3 BIOS & Drivers 39 3.3.4 Setting 40 3.4 Enabling USB Ports for Windows® 7 Installation 41 Chapter 4 UEFI SETUP UTILITY 44 4.1 Introduction 44 4.2 EZ Mode 45 4.3 Advanced Mode 46 4.3.1 UEFI Menu Bar 46 4.3.2 Navigation Keys 47 4.4 Main Screen 48 4.5 OC Tweaker Screen 49 4.6 Advanced Screen 56 4.6.1 CPU Configuration 57 4.6.2 Chipset Configuration...
User Manual
Page 11
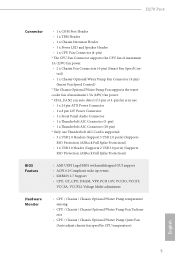
...Pump Fan supports the water cooler fan of maximum 1A (12W) fan power. • 2 x Chassis Fan Connectors (4-pin) (Smart Fan Speed Con- H270 Pro4 Connector • 1 x COM Port Header • 1 x TPM Header • 1 x Chassis Intrusion Header • 1 x Power LED and ... USB 2.0 Headers (Support 5 USB 2.0 ports) (Supports ESD Protection (ASRock Full Spike Protection)) • 1 x USB 3.0 Header (Supports 2 USB 3.0 ports) (Supports ESD Protection (ASRock Full Spike Protection)) BIOS Feature • AMI UEFI Legal BIOS with multilingual GUI support • ACPI 6.0 Compliant wake up events...
...Pump Fan supports the water cooler fan of maximum 1A (12W) fan power. • 2 x Chassis Fan Connectors (4-pin) (Smart Fan Speed Con- H270 Pro4 Connector • 1 x COM Port Header • 1 x TPM Header • 1 x Chassis Intrusion Header • 1 x Power LED and ... USB 2.0 Headers (Support 5 USB 2.0 ports) (Supports ESD Protection (ASRock Full Spike Protection)) • 1 x USB 3.0 Header (Supports 2 USB 3.0 ports) (Supports ESD Protection (ASRock Full Spike Protection)) BIOS Feature • AMI UEFI Legal BIOS with multilingual GUI support • ACPI 6.0 Compliant wake up events...

User Manual
Page 50
... see on the computer, otherwise, the Power-On-Self-Test (POST) will continue with its test routines. Chapter 4 UEFI SETUP UTILITY 4.1 Introduction This section explains how to use the UEFI SETUP UTILITY to enter the UEFI SETUP UTILITY after POST, restart the system by pressing + + , or by pressing the reset button on . You... may run the UEFI SETUP UTILITY by turning the system off and then back on the system chassis. If you power on your system. You may also restart by ...
... see on the computer, otherwise, the Power-On-Self-Test (POST) will continue with its test routines. Chapter 4 UEFI SETUP UTILITY 4.1 Introduction This section explains how to use the UEFI SETUP UTILITY to enter the UEFI SETUP UTILITY after POST, restart the system by pressing + + , or by pressing the reset button on . You... may run the UEFI SETUP UTILITY by turning the system off and then back on the system chassis. If you power on your system. You may also restart by ...
User Manual
Page 51
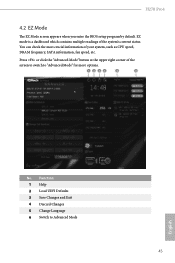
EZ mode is a dashboard which contains multiple readings of your system, such as CPU speed, DRAM frequency, SATA information, fan speed, etc. No. You can check the most crucial information of the system's current status. Press or click the "Advanced Mode" button at the upper right corner of the screen to switch to Advanced Mode 45 English Function 1 Help 2 Load UEFI Defaults 3 Save Changes and Exit 4 Discard Changes 5 Change Language 6 Switch to "Advanced Mode" for more options. H270 Pro4 4.2 EZ Mode The EZ Mode screen appears when you enter the BIOS setup program by default.
EZ mode is a dashboard which contains multiple readings of your system, such as CPU speed, DRAM frequency, SATA information, fan speed, etc. No. You can check the most crucial information of the system's current status. Press or click the "Advanced Mode" button at the upper right corner of the screen to switch to Advanced Mode 45 English Function 1 Help 2 Load UEFI Defaults 3 Save Changes and Exit 4 Discard Changes 5 Change Language 6 Switch to "Advanced Mode" for more options. H270 Pro4 4.2 EZ Mode The EZ Mode screen appears when you enter the BIOS setup program by default.

User Manual
Page 52
... tools H/W Monitor Displays current hardware status Security For security settings Boot For configuring boot settings and boot priority Exit Exit the current screen or the UEFI Setup Utility English 46 To access the EZ Mode, press or click the "EZ Mode" button at the upper right corner of the screen...
... tools H/W Monitor Displays current hardware status Security For security settings Boot For configuring boot settings and boot priority Exit Exit the current screen or the UEFI Setup Utility English 46 To access the EZ Mode, press or click the "EZ Mode" button at the upper right corner of the screen...

User Manual
Page 54
Favorite Display your collection of BIOS items. Press F5 to add/remove your favorite items. 48 English 4.4 Main Screen When you enter the UEFI SETUP UTILITY, the Main screen will appear and display the system overview.
Favorite Display your collection of BIOS items. Press F5 to add/remove your favorite items. 48 English 4.4 Main Screen When you enter the UEFI SETUP UTILITY, the Main screen will appear and display the system overview.
User Manual
Page 55
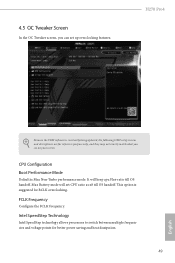
... set up overclocking features. 4.5 OC Tweaker Screen In the OC Tweaker screen, you see on your screen. H270 Pro4 Because the UEFI software is suggested for BCLK overclocking. This option is constantly being updated, the following UEFI setup screens and descriptions are for better power saving and heat dissipation. 49 English Intel SpeedStep Technology...
... set up overclocking features. 4.5 OC Tweaker Screen In the OC Tweaker screen, you see on your screen. H270 Pro4 Because the UEFI software is suggested for BCLK overclocking. This option is constantly being updated, the following UEFI setup screens and descriptions are for better power saving and heat dissipation. 49 English Intel SpeedStep Technology...

User Manual
Page 61
Save User Default Type a profile name and press enter to save your settings as an user default profile to disk. VCCSA Voltage Configure the voltage for the VCCSA. Load User Default Load previously saved user defaults. Load User UEFI Setup Profile to Disk Save current UEFI settings as user default. H270 Pro4 English 55 Save User UEFI Setup Profile to Disk Load previously saved user defaults from the disk.
Save User Default Type a profile name and press enter to save your settings as an user default profile to disk. VCCSA Voltage Configure the voltage for the VCCSA. Load User Default Load previously saved user defaults. Load User UEFI Setup Profile to Disk Save current UEFI settings as user default. H270 Pro4 English 55 Save User UEFI Setup Profile to Disk Load previously saved user defaults from the disk.

User Manual
Page 62
... monitor does not support Full HD resolution, then the resolution will be set to 1024 x 768. UEFI Configuration UEFI Setup Style Select the default mode when entering the UEFI setup utility. 4.6 Advanced Screen In this section may set the configurations for the following items: CPU ...Super IO Configuration, ACPI Configuration, USB Configuration and Trusted Computing. Active Page on Entry Select the default page when entering the UEFI setup utility. Full HD UEFI When [Auto] is selected, the resolution will be set to 1024 x 768 directly. 56 English Setting wrong values in...
... monitor does not support Full HD resolution, then the resolution will be set to 1024 x 768. UEFI Configuration UEFI Setup Style Select the default mode when entering the UEFI setup utility. 4.6 Advanced Screen In this section may set the configurations for the following items: CPU ...Super IO Configuration, ACPI Configuration, USB Configuration and Trusted Computing. Active Page on Entry Select the default page when entering the UEFI setup utility. Full HD UEFI When [Auto] is selected, the resolution will be set to 1024 x 768 directly. 56 English Setting wrong values in...

User Manual
Page 73
... for USB 2.0 devices. The XHCI ownership change should be claimed by XHCI driver. 67 English XHCI Hand-off support. If you install Windows 7. 4.6.7 USB Configuration H270 Pro4 Legacy USB Support Enable or disable Legacy OS Support for OSes without XHCI hand-off This is recommended to support USB devices under the...
... for USB 2.0 devices. The XHCI ownership change should be claimed by XHCI driver. 67 English XHCI Hand-off support. If you install Windows 7. 4.6.7 USB Configuration H270 Pro4 Legacy USB Support Enable or disable Legacy OS Support for OSes without XHCI hand-off This is recommended to support USB devices under the...

