
User Manual
Page 4
Contents Chapter 1 Introduction 1 1.1 Package Contents 1 1.2 Specifications 2 1.3 Motherboard Layout 7 1.4 I/O Panel 9 Chapter 2 Installation 11 2.1 Installing the CPU 12 2.2 Installing the CPU Fan and Heatsink 15 2.3 Installing Memory Modules (DIMM) 16 2.4 Expansion Slots (PCI and PCI Express Slots) 18 2.5 Jumpers Setup 19 2.6 Onboard Headers ... (NGFF) Module Installation Guide 28 Chapter 3 Software and Utilities Operation 31 3.1 Installing Drivers 31 3.2 A-Tuning 32 3.2.1 Installing A-Tuning 32 3.2.2 Using A-Tuning 32 3.3 ASRock Live Update & APP Shop 35
Contents Chapter 1 Introduction 1 1.1 Package Contents 1 1.2 Specifications 2 1.3 Motherboard Layout 7 1.4 I/O Panel 9 Chapter 2 Installation 11 2.1 Installing the CPU 12 2.2 Installing the CPU Fan and Heatsink 15 2.3 Installing Memory Modules (DIMM) 16 2.4 Expansion Slots (PCI and PCI Express Slots) 18 2.5 Jumpers Setup 19 2.6 Onboard Headers ... (NGFF) Module Installation Guide 28 Chapter 3 Software and Utilities Operation 31 3.1 Installing Drivers 31 3.2 A-Tuning 32 3.2.1 Installing A-Tuning 32 3.2.2 Using A-Tuning 32 3.3 ASRock Live Update & APP Shop 35

User Manual
Page 5
... 4.1 Introduction 44 4.2 EZ Mode 45 4.3 Advanced Mode 46 4.3.1 UEFI Menu Bar 46 4.3.2 Navigation Keys 47 4.4 Main Screen 48 4.5 OC Tweaker Screen 49 4.6 Advanced Screen 56 4.6.1 CPU Configuration 57 4.6.2 Chipset Configuration 59 4.6.3 Storage Configuration 62 4.6.4 Intel® Thunderbolt 63 4.6.5 Super IO Configuration 64 4.6.6 ACPI Configuration 65 4.6.7 USB Configuration 67 4.6.8 Trusted Computing 68...
... 4.1 Introduction 44 4.2 EZ Mode 45 4.3 Advanced Mode 46 4.3.1 UEFI Menu Bar 46 4.3.2 Navigation Keys 47 4.4 Main Screen 48 4.5 OC Tweaker Screen 49 4.6 Advanced Screen 56 4.6.1 CPU Configuration 57 4.6.2 Chipset Configuration 59 4.6.3 Storage Configuration 62 4.6.4 Intel® Thunderbolt 63 4.6.5 Super IO Configuration 64 4.6.6 ACPI Configuration 65 4.6.7 USB Configuration 67 4.6.8 Trusted Computing 68...
User Manual
Page 7
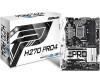
...technical support related to change without further notice. You may find the latest VGA cards and CPU support list on ASRock's website without notice. H270 Pro4 Chapter 1 Introduction Thank you for M.2 Socket (Optional) 1 English Chapter 4 contains the ..., please visit our website for specific information about the model you are using. ASRock website http://www.asrock.com. 1.1 Package Contents • ASRock H270 Pro4 Motherboard (ATX Form Factor) • ASRock H270 Pro4 Quick Installation Guide • ASRock H270 Pro4 Support CD • 2 x Serial ATA (SATA) Data Cables (Optional) ...
...technical support related to change without further notice. You may find the latest VGA cards and CPU support list on ASRock's website without notice. H270 Pro4 Chapter 1 Introduction Thank you for M.2 Socket (Optional) 1 English Chapter 4 contains the ..., please visit our website for specific information about the model you are using. ASRock website http://www.asrock.com. 1.1 Package Contents • ASRock H270 Pro4 Motherboard (ATX Form Factor) • ASRock H270 Pro4 Quick Installation Guide • ASRock H270 Pro4 Support CD • 2 x Serial ATA (SATA) Data Cables (Optional) ...

User Manual
Page 8
...system memory: 64GB • Supports Intel® Extreme Memory Profile (XMP) 2.0 • 15μ Gold Contact in non- 1.2 Specifications Platform CPU Chipset • ATX Form Factor • Supports 7th and 6th Generation Intel® CoreTM i7/i5/i3/ Pentium®/Celeron® Processors (Socket... 1151) • Digi Power design • 8 Power Phase design • Supports Intel® Turbo Boost 2.0 Technology • Intel® H270 Memory • Dual Channel DDR4 Memory Technology • 4 x DDR4 DIMM Slots • Supports DDR4 2400/2133 non-ECC, un-buffered memory* * ...
...system memory: 64GB • Supports Intel® Extreme Memory Profile (XMP) 2.0 • 15μ Gold Contact in non- 1.2 Specifications Platform CPU Chipset • ATX Form Factor • Supports 7th and 6th Generation Intel® CoreTM i7/i5/i3/ Pentium®/Celeron® Processors (Socket... 1151) • Digi Power design • 8 Power Phase design • Supports Intel® Turbo Boost 2.0 Technology • Intel® H270 Memory • Dual Channel DDR4 Memory Technology • 4 x DDR4 DIMM Slots • Supports DDR4 2400/2133 non-ECC, un-buffered memory* * ...
User Manual
Page 9
GPU/SWEncode/ Decode: VP9, HEVC 10b (For 6th Gen Intel® CPU) • Max. shared memory 1024MB * The size of maximum shared ... the multi-channel audio feature through the audio driver. • Premium Blu-ray Audio support • Supports Surge Protection (ASRock Full Spike Protection) • ELNA Audio Caps English 3 resolution up to 4K x 2K (4096x2160) @ 24Hz / (3840x2160...1080p Blu-ray (BD) playback with DVI-D and HDMI Ports • 7.1 CH HD Audio with max. H270 Pro4 Graphics Audio • Intel® HD Graphics Built-in Visuals and the VGA outputs can be supported only with...
GPU/SWEncode/ Decode: VP9, HEVC 10b (For 6th Gen Intel® CPU) • Max. shared memory 1024MB * The size of maximum shared ... the multi-channel audio feature through the audio driver. • Premium Blu-ray Audio support • Supports Surge Protection (ASRock Full Spike Protection) • ELNA Audio Caps English 3 resolution up to 4K x 2K (4096x2160) @ 24Hz / (3840x2160...1080p Blu-ray (BD) playback with DVI-D and HDMI Ports • 7.1 CH HD Audio with max. H270 Pro4 Graphics Audio • Intel® HD Graphics Built-in Visuals and the VGA outputs can be supported only with...
User Manual
Page 11
H270 Pro4 Connector • 1 x COM Port Header • 1 x TPM Header • 1 x Chassis Intrusion Header • 1 x Power LED and Speaker Header • 1 x CPU Fan Connector (4-pin) * The CPU Fan Connector supports the CPU fan of maximum 1.5A (18W) fan power. * CHA_FAN2 can auto detect ... • 3 x USB 2.0 Headers (Support 5 USB 2.0 ports) (Supports ESD Protection (ASRock Full Spike Protection)) • 1 x USB 3.0 Header (Supports 2 USB 3.0 ports) (Supports ESD Protection (ASRock Full Spike Protection)) BIOS Feature • AMI UEFI Legal BIOS with multilingual GUI support •...
H270 Pro4 Connector • 1 x COM Port Header • 1 x TPM Header • 1 x Chassis Intrusion Header • 1 x Power LED and Speaker Header • 1 x CPU Fan Connector (4-pin) * The CPU Fan Connector supports the CPU fan of maximum 1.5A (18W) fan power. * CHA_FAN2 can auto detect ... • 3 x USB 2.0 Headers (Support 5 USB 2.0 ports) (Supports ESD Protection (ASRock Full Spike Protection)) • 1 x USB 3.0 Header (Supports 2 USB 3.0 ports) (Supports ESD Protection (ASRock Full Spike Protection)) BIOS Feature • AMI UEFI Legal BIOS with multilingual GUI support •...

User Manual
Page 12
... system's stability, or even cause damage to page 41 for more detailed instructions. * For the updated Windows® 10 driver, please visit ASRock's website for possible damage caused by overclocking. OS Certifications • CPU / Chassis / Chassis Optional/Water Pump Fan multispeed control • CASE OPEN detection • Voltage monitoring: +12V, +5V, +3.3V...
... system's stability, or even cause damage to page 41 for more detailed instructions. * For the updated Windows® 10 driver, please visit ASRock's website for possible damage caused by overclocking. OS Certifications • CPU / Chassis / Chassis Optional/Water Pump Fan multispeed control • CASE OPEN detection • Voltage monitoring: +12V, +5V, +3.3V...

User Manual
Page 14
No. Description 1 ATX 12V Power Connector (ATX12V1) 2 Chassis Fan Connector (CHA_FAN2) 3 2 x 288-pin DDR4 DIMM Slots (DDR4_A1, DDR4_B1) 4 2 x 288-pin DDR4 DIMM Slots (DDR4_A2, DDR4_B2) 5 CPU Fan Connector (CPU_FAN1) 6 ATX Power Connector (ATXPWR1) 7 USB 3.0 Header (USB3_3_4) 8 SATA3 Connector (SATA3_5) 9 SATA3 Connector (SATA3_4) 10 SATA3 Connector (SATA3_3) 11 SATA3 Connector (SATA3_2) 12 ...
No. Description 1 ATX 12V Power Connector (ATX12V1) 2 Chassis Fan Connector (CHA_FAN2) 3 2 x 288-pin DDR4 DIMM Slots (DDR4_A1, DDR4_B1) 4 2 x 288-pin DDR4 DIMM Slots (DDR4_A2, DDR4_B2) 5 CPU Fan Connector (CPU_FAN1) 6 ATX Power Connector (ATXPWR1) 7 USB 3.0 Header (USB3_3_4) 8 SATA3 Connector (SATA3_5) 9 SATA3 Connector (SATA3_4) 10 SATA3 Connector (SATA3_3) 11 SATA3 Connector (SATA3_2) 12 ...

User Manual
Page 18
2.1 Installing the CPU 1. Before you insert the 1151-Pin CPU into the socket if above situation is unclean, or if there are any bent pins in the socket. Otherwise, the CPU will be seriously damaged. 2. Unplug all power cables before installing the CPU. 1 A B 2 12 English Do not force to insert the CPU into the socket, please check if the PnP cap is on the socket, if the CPU surface is found.
2.1 Installing the CPU 1. Before you insert the 1151-Pin CPU into the socket if above situation is unclean, or if there are any bent pins in the socket. Otherwise, the CPU will be seriously damaged. 2. Unplug all power cables before installing the CPU. 1 A B 2 12 English Do not force to insert the CPU into the socket, please check if the PnP cap is on the socket, if the CPU surface is found.

User Manual
Page 21
2.2 Installing the CPU Fan and Heatsink H270 Pro4 1 2 CPU_FAN English 15
2.2 Installing the CPU Fan and Heatsink H270 Pro4 1 2 CPU_FAN English 15

User Manual
Page 29
... 23 CPU Fan Connector (4-pin CPU_FAN1) (see p.7, No. 5) ATX Power Connector (24-pin ATXPWR1) (see p.7, No. 24) 8 5 4 1 RRXD1 DDTR#1 DDSR#1 CCTS#1 1 RRI#1 RRTS#1 GND TTXD1 DDCD#1 This motherboard provides an 8-pin ATX 12V power connector. To use a 20-pin ATX power supply, please plug it along Pin 1 and Pin 5. H270 Pro4 Chassis Fan...
... 23 CPU Fan Connector (4-pin CPU_FAN1) (see p.7, No. 5) ATX Power Connector (24-pin ATXPWR1) (see p.7, No. 24) 8 5 4 1 RRXD1 DDTR#1 DDSR#1 CCTS#1 1 RRI#1 RRTS#1 GND TTXD1 DDCD#1 This motherboard provides an 8-pin ATX 12V power connector. To use a 20-pin ATX power supply, please plug it along Pin 1 and Pin 5. H270 Pro4 Chassis Fan...
User Manual
Page 51
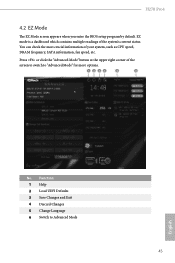
You can check the most crucial information of the system's current status. EZ mode is a dashboard which contains multiple readings of your system, such as CPU speed, DRAM frequency, SATA information, fan speed, etc. Function 1 Help 2 Load UEFI Defaults 3 Save Changes and Exit 4 Discard Changes 5 Change Language 6 Switch to "Advanced Mode" for more options. Press or click the "Advanced Mode" button at the upper right corner of the screen to switch to Advanced Mode 45 English No. H270 Pro4 4.2 EZ Mode The EZ Mode screen appears when you enter the BIOS setup program by default.
You can check the most crucial information of the system's current status. EZ mode is a dashboard which contains multiple readings of your system, such as CPU speed, DRAM frequency, SATA information, fan speed, etc. Function 1 Help 2 Load UEFI Defaults 3 Save Changes and Exit 4 Discard Changes 5 Change Language 6 Switch to "Advanced Mode" for more options. Press or click the "Advanced Mode" button at the upper right corner of the screen to switch to Advanced Mode 45 English No. H270 Pro4 4.2 EZ Mode The EZ Mode screen appears when you enter the BIOS setup program by default.
User Manual
Page 55
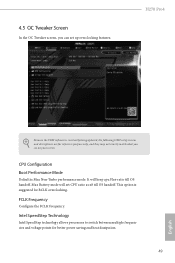
... Boot Performance Mode Default is suggested for BCLK overclocking. Max Battery mode will keep cpu Flex-ratio till OS handoff. FCLK Frequency Configure the FCLK Frequency. This option is Max Non-Turbo performance mode. H270 Pro4 Because the UEFI software is constantly being updated, the following UEFI setup screens and descriptions are for... technology allows processors to switch between multiple frequencies and voltage points for reference purpose only, and they may not exactly match what you can set CPU ratio as x8 till OS handoff.
... Boot Performance Mode Default is suggested for BCLK overclocking. Max Battery mode will keep cpu Flex-ratio till OS handoff. FCLK Frequency Configure the FCLK Frequency. This option is Max Non-Turbo performance mode. H270 Pro4 Because the UEFI software is constantly being updated, the following UEFI setup screens and descriptions are for... technology allows processors to switch between multiple frequencies and voltage points for reference purpose only, and they may not exactly match what you can set CPU ratio as x8 till OS handoff.

User Manual
Page 56
...Power Limit Configure Package Power Limit 2 in watts. GT Slice Current Limit Configure the current limit of the CPU core. When the limit is exceeded, the CPU ratio will expose the CPPC v2 interface to run above its base operating frequency when the operating system requests... a higher limit may improve performance. Intel Speed Shift Technology Enable/Disable Intel Speed Shift Technology support. A lower limit can protect the CPU and save power, while a higher limit may improve performance. System Agent Current Limit Configure the current limit of the integrated GPU. 50...
...Power Limit Configure Package Power Limit 2 in watts. GT Slice Current Limit Configure the current limit of the CPU core. When the limit is exceeded, the CPU ratio will expose the CPPC v2 interface to run above its base operating frequency when the operating system requests... a higher limit may improve performance. Intel Speed Shift Technology Enable/Disable Intel Speed Shift Technology support. A lower limit can protect the CPU and save power, while a higher limit may improve performance. System Agent Current Limit Configure the current limit of the integrated GPU. 50...

User Manual
Page 60
... Boot to configure DRAM Voltage. VCCIO Voltage Configure the voltage for the VCCST. 54 English Voltage Configuration CPU Vcore Voltage Configure the voltage for the integrated GPU. GT Voltage Configure the voltage for the CPU Vcore. DRAM Voltage Use this to skip DRAM memory training for the DRAM Activating Power Supply. The...
... Boot to configure DRAM Voltage. VCCIO Voltage Configure the voltage for the VCCST. 54 English Voltage Configuration CPU Vcore Voltage Configure the voltage for the integrated GPU. GT Voltage Configure the voltage for the CPU Vcore. DRAM Voltage Use this to skip DRAM memory training for the DRAM Activating Power Supply. The...

User Manual
Page 62
... may cause the system to 1024 x 768. Full HD UEFI When [Auto] is selected, the resolution will be set the configurations for the following items: CPU Configuration, Chipset Configuration, Storage Configuration, Intel(R) Thunderbolt, Super IO Configuration, ACPI Configuration, USB Configuration and Trusted Computing. When [Disable] is selected, the resolution will be...
... may cause the system to 1024 x 768. Full HD UEFI When [Auto] is selected, the resolution will be set the configurations for the following items: CPU Configuration, Chipset Configuration, Storage Configuration, Intel(R) Thunderbolt, Super IO Configuration, ACPI Configuration, USB Configuration and Trusted Computing. When [Disable] is selected, the resolution will be...

User Manual
Page 63
... power saving. It is recommended to enable in each processor package. Enhanced Halt State (C1E) Enable Enhanced Halt State (C1E) for power saving. 57 English 4.6.1 CPU Configuration H270 Pro4 Active Processor Cores Select the number of cores to keep C3, C6 and C7 all enabled for lower power consumption. Package C State Support Enable...
... power saving. It is recommended to enable in each processor package. Enhanced Halt State (C1E) Enable Enhanced Halt State (C1E) for power saving. 57 English 4.6.1 CPU Configuration H270 Pro4 Active Processor Cores Select the number of cores to keep C3, C6 and C7 all enabled for lower power consumption. Package C State Support Enable...

User Manual
Page 64
... prefetch the subsequent cache line while retrieving the currently requested cache line. Software Guard Extensions (SGX) Use this item to keep the CPU from overheating. CPU Thermal Throttling Enable CPU internal thermal control mechanisms to enable or disable Software Controlled Software Guard Extensions (SGX). 58 English Intel Virtualization Technology Intel Virtualization Technology allows...
... prefetch the subsequent cache line while retrieving the currently requested cache line. Software Guard Extensions (SGX) Use this item to keep the CPU from overheating. CPU Thermal Throttling Enable CPU internal thermal control mechanisms to enable or disable Software Controlled Software Guard Extensions (SGX). 58 English Intel Virtualization Technology Intel Virtualization Technology allows...

User Manual
Page 66
... PCI Express Native Control Select Enable for all PCH DMI devices. PCH PCIE ASPM Support This option enables/disables the ASPM support for all CPU downstream devices. IRQ24-119 may cause certain devices failure. Select enable to enable onboard HD audio and automatically disable it when a sound card...24-119 Entries. Onboard HD Audio Enable/disable onboard HD audio. DMI ASPM Support This option enables/disables the control of ASPM on CPU side of memory that is allocated to disable the integrated graphics when an external graphics card is installed. 60 English PCH DMI ASPM ...
... PCI Express Native Control Select Enable for all PCH DMI devices. PCH PCIE ASPM Support This option enables/disables the ASPM support for all CPU downstream devices. IRQ24-119 may cause certain devices failure. Select enable to enable onboard HD audio and automatically disable it when a sound card...24-119 Entries. Onboard HD Audio Enable/disable onboard HD audio. DMI ASPM Support This option enables/disables the control of ASPM on CPU side of memory that is allocated to disable the integrated graphics when an external graphics card is installed. 60 English PCH DMI ASPM ...

User Manual
Page 78
... a respective fan speed for each temperature. CPU Fan 1 Setting Select a fan mode for CPU Fans, or choose Customize to set 5 CPU temperatures and assign a respective fan speed for each temperature. CPU Fan Step Up The Vaule of CPU Fan Step Up CPU Fan Step Down The Vaule of the CPU temperature, motherboard temperature, fan speed and voltage...
... a respective fan speed for each temperature. CPU Fan 1 Setting Select a fan mode for CPU Fans, or choose Customize to set 5 CPU temperatures and assign a respective fan speed for each temperature. CPU Fan Step Up The Vaule of CPU Fan Step Up CPU Fan Step Down The Vaule of the CPU temperature, motherboard temperature, fan speed and voltage...


