User Manual
Page 1
G Pro / GV Pro User Manual Published October 2002 Copyright©2002 ASRock INC. All rights reserved. 1
G Pro / GV Pro User Manual Published October 2002 Copyright©2002 ASRock INC. All rights reserved. 1
User Manual
Page 3
Exit Menu 24 3 Power Menu 23 4. Boot Menu 24 5. Advanced Menu 20 2. Security Menu 22 3. Contents 1 Introduction 4 1.1 Package Contents 4 1.2 Specifications 4 1.3 Motherboard Layout (G Pro 6 1.4 Motherboard Layout (GV Pro 7 1.5 ASRock I/OTM (G Pro / GV Pro 8 2 Installation 9 2.1 Screw Holes 9 2.2 Pre-installation Precautions 9 2.3 CPU Installation 9 2.4 Installation of Heatsink and CPU fan 10 2.5 Installation of Memory Modules (DIMM 10 2.6 Expansion Slots 11...
Exit Menu 24 3 Power Menu 23 4. Boot Menu 24 5. Advanced Menu 20 2. Security Menu 22 3. Contents 1 Introduction 4 1.1 Package Contents 4 1.2 Specifications 4 1.3 Motherboard Layout (G Pro 6 1.4 Motherboard Layout (GV Pro 7 1.5 ASRock I/OTM (G Pro / GV Pro 8 2 Installation 9 2.1 Screw Holes 9 2.2 Pre-installation Precautions 9 2.3 CPU Installation 9 2.4 Installation of Heatsink and CPU fan 10 2.5 Installation of Memory Modules (DIMM 10 2.6 Expansion Slots 11...
User Manual
Page 4
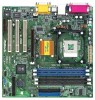
.../ PC2100), Max. 2GB 2 slots for purchasing ASRock G Pro / GV Pro motherboard, a reliable motherboard produced under ASRock's consistently stringent quality control. For advanced users' reference, the Appendix offers more advanced BIOS setup information. 1.1 Package Contents ASRock G Pro or GV Pro motherboard (Micro ATX form factor: 9.6" x 9.6", 24.4 x 24.4 cm) ASRock G Pro / GV Pro Quick Installation Guide ASRock Intel-SiS Support CD 1 cable for...
.../ PC2100), Max. 2GB 2 slots for purchasing ASRock G Pro / GV Pro motherboard, a reliable motherboard produced under ASRock's consistently stringent quality control. For advanced users' reference, the Appendix offers more advanced BIOS setup information. 1.1 Package Contents ASRock G Pro or GV Pro motherboard (Micro ATX form factor: 9.6" x 9.6", 24.4 x 24.4 cm) ASRock G Pro / GV Pro Quick Installation Guide ASRock Intel-SiS Support CD 1 cable for...
User Manual
Page 5
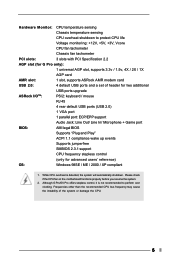
... compliance wake up events Supports jumperfree SMBIOS 2.3.1 support CPU frequency stepless control (only for G Pro only): 1 universal AGP slot, supports 3.3v / 1.5v, 4X / 2X / 1X AGP card AMR slot: 1 slot, supports ASRock AMR modem card USB 2.0: 4 default USB ports and a set of the system or damage ...the CPU. 5 Although G Pro/GV Pro offers stepless control, it is detected, the system will automatically shutdown. Please check if the...
... compliance wake up events Supports jumperfree SMBIOS 2.3.1 support CPU frequency stepless control (only for G Pro only): 1 universal AGP slot, supports 3.3v / 1.5v, 4X / 2X / 1X AGP card AMR slot: 1 slot, supports ASRock AMR modem card USB 2.0: 4 default USB ports and a set of the system or damage ...the CPU. 5 Although G Pro/GV Pro offers stepless control, it is detected, the system will automatically shutdown. Please check if the...

User Manual
Page 11
...install a graphics card. Step 5. Replace the system cover. 11 PCI slots: PCI slots are 3 PCI slots and 1 AMR slot on G Pro. Before installing the expansion card, read the documentation of the expansion card and make necessary hardware settings for later use . Keep the screw for ...the system unit cover (if your motherboard is already installed in place and the DIMM is one AGP slot on both G Pro and GV Pro motherboards. Step 2. The ASRock AGP slot has a special locking mechanism which can securely fasten the graphics card inserted. Step 3. Fasten the card to install...
...install a graphics card. Step 5. Replace the system cover. 11 PCI slots: PCI slots are 3 PCI slots and 1 AMR slot on G Pro. Before installing the expansion card, read the documentation of the expansion card and make necessary hardware settings for later use . Keep the screw for ...the system unit cover (if your motherboard is already installed in place and the DIMM is one AGP slot on both G Pro and GV Pro motherboards. Step 2. The ASRock AGP slot has a special locking mechanism which can securely fasten the graphics card inserted. Step 3. Fasten the card to install...


