
Intel Rapid Storage Guide
Page 13
... says, Press F6 if you need to create a floppy disk with a screen asking you to install the Intel Rapid Storage Technology driver during text-mode phase). Use the Floppy Configuration Utility to install a third party SCSI or RAID driver. You will then be visible. 6. Press Enter to confirm your controller and continue. Install the RAID Driver Using the F6 Installation Method Perform the following files: IAAHCI.INF, IAAHCI.CAT, IASTOR.INF, IASTOR.CAT...
... says, Press F6 if you need to create a floppy disk with a screen asking you to install the Intel Rapid Storage Technology driver during text-mode phase). Use the Floppy Configuration Utility to install a third party SCSI or RAID driver. You will then be visible. 6. Press Enter to confirm your controller and continue. Install the RAID Driver Using the F6 Installation Method Perform the following files: IAAHCI.INF, IAAHCI.CAT, IASTOR.INF, IASTOR.CAT...
User Manual
Page 11
...;. This convenient BIOS update tool allows you can then load the OC profile in a user-friendly interface, which currently includes Hardware Monitor, Fan Control, Overclocking, OC DNA, Mouse Polling and IES. With this tool and save your system. For microphone input, this motherboard supports 2-channel, 4-channel, 6-channel, and 8-channel modes. For audio output, this motherboard supports both stereo and mono modes. In Overclocking Control mode, F-Stream allows you implement Dual Channel Memory Technology, make sure...
...;. This convenient BIOS update tool allows you can then load the OC profile in a user-friendly interface, which currently includes Hardware Monitor, Fan Control, Overclocking, OC DNA, Mouse Polling and IES. With this tool and save your system. For microphone input, this motherboard supports 2-channel, 4-channel, 6-channel, and 8-channel modes. For audio output, this motherboard supports both stereo and mono modes. In Overclocking Control mode, F-Stream allows you implement Dual Channel Memory Technology, make sure...
User Manual
Page 16
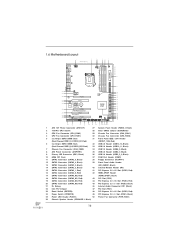
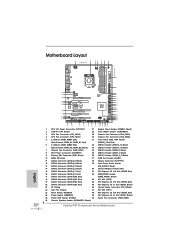
... Socket 28 Clear CMOS Jumper (CLRCMOS1) 3 CPU Fan Connector (CPU_FAN2) 29 Chassis Fan Connector (CHA_FAN1) 4 CPU Fan Connector (CPU_FAN1) 30 Chassis Fan Connector (CHA_FAN2) 5 2 x 240-pin DDR3 DIMM Slots 31 Front Panel IEEE 1394 Header (Dual Channel: DDR3_A1, DDR3_B1, Red) (FRONT_1394, Red) 6 2 x 240-pin DDR3 DIMM Slots 32 USB 2.0 Header (USB12_13, Black) (Dual Channel: DDR3_A2, DDR3_B2, Black) 33 USB 2.0 Header (USB10_11, Black) 7 Chassis Fan Connector (CHA_FAN3) 34 USB 2.0 Header (USB8_9, Black) 8 ATX Power Connector (ATXPWR1) 35 USB 2.0 Header (USB6_7, Black) 9 Primary IDE...
... Socket 28 Clear CMOS Jumper (CLRCMOS1) 3 CPU Fan Connector (CPU_FAN2) 29 Chassis Fan Connector (CHA_FAN1) 4 CPU Fan Connector (CPU_FAN1) 30 Chassis Fan Connector (CHA_FAN2) 5 2 x 240-pin DDR3 DIMM Slots 31 Front Panel IEEE 1394 Header (Dual Channel: DDR3_A1, DDR3_B1, Red) (FRONT_1394, Red) 6 2 x 240-pin DDR3 DIMM Slots 32 USB 2.0 Header (USB12_13, Black) (Dual Channel: DDR3_A2, DDR3_B2, Black) 33 USB 2.0 Header (USB10_11, Black) 7 Chassis Fan Connector (CHA_FAN3) 34 USB 2.0 Header (USB8_9, Black) 8 ATX Power Connector (ATXPWR1) 35 USB 2.0 Header (USB6_7, Black) 9 Primary IDE...
User Manual
Page 17
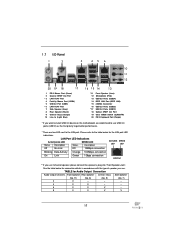
... Connector 16 USB 2.0 Ports (USB23) * 17 USB 3.0 Ports (USB12) 18 Optical SPDIF Out Port 19 Clear CMOS Switch (CLRCBTN) 20 PS/2 Keyboard Port (Purple) * If you use 2-channel speaker, please connect the speaker's plug into "Front Speaker Jack". TABLE for connection details in accordance with the type of speaker you use USB 3.0 ports (USB12) as the first priority to get better performance. * There are two LED next to the table below for Audio Output Connection Audio Output Channels Front Speaker...
... Connector 16 USB 2.0 Ports (USB23) * 17 USB 3.0 Ports (USB12) 18 Optical SPDIF Out Port 19 Clear CMOS Switch (CLRCBTN) 20 PS/2 Keyboard Port (Purple) * If you use 2-channel speaker, please connect the speaker's plug into "Front Speaker Jack". TABLE for connection details in accordance with the type of speaker you use USB 3.0 ports (USB12) as the first priority to get better performance. * There are two LED next to the table below for Audio Output Connection Audio Output Channels Front Speaker...

User Manual
Page 34
... Control Center. Select "3 GPUs" and click "OK" (if you install two Radeon graphics cards). We recommend using this utility to your system, and restart your system, there is an optional download. Step 5. Install the VGA card drivers to uninstall any VGA driver installed in your computer. For Windows® XP OS: A. 2.8.2 Driver Installation and Setup Step 1. Power on your computer. The Catalyst Uninstaller is no need to your computer and boot...
... Control Center. Select "3 GPUs" and click "OK" (if you install two Radeon graphics cards). We recommend using this utility to your system, and restart your system, there is an optional download. Step 5. Install the VGA card drivers to uninstall any VGA driver installed in your computer. For Windows® XP OS: A. 2.8.2 Driver Installation and Setup Step 1. Power on your computer. The Catalyst Uninstaller is no need to your computer and boot...
User Manual
Page 45
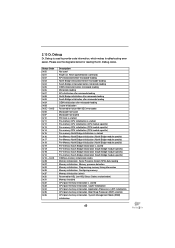
... pre-memory initialization codes Memory initialization. Configuring memory Memory initialization (other) Reserved for ASL (see the diagrams below ) Memory Installed CPU post-memory initialization is used Power on. Please see ASL Status Codes section below for future AMI SEC error codes Microcode not found Microcode not loaded PEI Core is started Pre-memory CPU initialization is started Pre-memory CPU initialization (CPU module specific) Pre-memory CPU initialization (CPU module specific) Pre-memory CPU initialization (CPU module...
... pre-memory initialization codes Memory initialization. Configuring memory Memory initialization (other) Reserved for ASL (see the diagrams below ) Memory Installed CPU post-memory initialization is used Power on. Please see ASL Status Codes section below for future AMI SEC error codes Microcode not found Microcode not loaded PEI Core is started Pre-memory CPU initialization is started Pre-memory CPU initialization (CPU module specific) Pre-memory CPU initialization (CPU module specific) Pre-memory CPU initialization (CPU module...
User Manual
Page 48
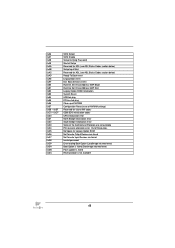
... 0xDA 0xDB 0xDC SCSI Detect SCSI Enable Setup Verifying Password Start of Setup Reserved for ASL (see ASL Status Codes section below) Setup Input Wait Reserved for ASL (see ASL Status Codes section below) Ready To Boot event Legacy Boot event Exit Boot Services event Runtime Set Virtual Address MAP Begin Runtime Set Virtual Address MAP End Legacy Option ROM Initialization System Reset USB hot plug PCI bus hot plug Clean-up of NVRAM Confi...
... 0xDA 0xDB 0xDC SCSI Detect SCSI Enable Setup Verifying Password Start of Setup Reserved for ASL (see ASL Status Codes section below) Setup Input Wait Reserved for ASL (see ASL Status Codes section below) Ready To Boot event Legacy Boot event Exit Boot Services event Runtime Set Virtual Address MAP Begin Runtime Set Virtual Address MAP End Legacy Option ROM Initialization System Reset USB hot plug PCI bus hot plug Clean-up of NVRAM Confi...
User Manual
Page 54
STEP 1: Set up , press key, and then a window for boot devices selection appears. Set the option "SATA Mode" to format and copy files [YN]? D. Therefore, the drivers you install can be auto-detected and listed on the support CD driver page. Enter UEFI SETUP UTILITY Advanced screen Storage Configuration. A. During POST at the beginning of system boot-up UEFI. Please select CD-ROM as the boot device. WARNING! Formatting the floppy diskette will see...
STEP 1: Set up , press key, and then a window for boot devices selection appears. Set the option "SATA Mode" to format and copy files [YN]? D. Therefore, the drivers you install can be auto-detected and listed on the support CD driver page. Enter UEFI SETUP UTILITY Advanced screen Storage Configuration. A. During POST at the beginning of system boot-up UEFI. Please select CD-ROM as the boot device. WARNING! Formatting the floppy diskette will see...
User Manual
Page 55
... presented. STEP 3: Use "RAID Installation Guide" to set up system UEFI as step 2 of page 54. After making a SATA / SATAII / SATA3 driver diskette and using RAID migration feature of Windows setup, press F6 to RAID 0, RAID 1 or RAID 5 at the following path: .. \ RAID Installation Guide STEP 4: Install Windows® XP / XP 64-bit OS on your system. Assemble the system and attach a single SATA / SATAII / SATA3 hard drive. 2. Begin Windows® setup by using "RAID Installation Guide" to set RAID confi...
... presented. STEP 3: Use "RAID Installation Guide" to set up system UEFI as step 2 of page 54. After making a SATA / SATAII / SATA3 driver diskette and using RAID migration feature of Windows setup, press F6 to RAID 0, RAID 1 or RAID 5 at the following path: .. \ RAID Installation Guide STEP 4: Install Windows® XP / XP 64-bit OS on your system. Assemble the system and attach a single SATA / SATAII / SATA3 hard drive. 2. Begin Windows® setup by using "RAID Installation Guide" to set RAID confi...
User Manual
Page 57
... RAID configuration. STEP 1: Set up UEFI. STEP 2: Use "RAID Installation Guide" to [RAID]. After the installation of Windows® 7 / 7 64-bit / VistaTM / VistaTM 64-bit OS, if you want to manage RAID functions, you want to install Windows® 7 / 7 64-bit / VistaTM / VistaTM 64-bit on your system as well. 57 Enter UEFI SETUP UTILITY Advanced screen Storage Configuration. Please refer to the document in the Support CD, "Guide to SATA Hard Disks Installation and RAID...
... RAID configuration. STEP 1: Set up UEFI. STEP 2: Use "RAID Installation Guide" to [RAID]. After the installation of Windows® 7 / 7 64-bit / VistaTM / VistaTM 64-bit OS, if you want to manage RAID functions, you want to install Windows® 7 / 7 64-bit / VistaTM / VistaTM 64-bit on your system as well. 57 Enter UEFI SETUP UTILITY Advanced screen Storage Configuration. Please refer to the document in the Support CD, "Guide to SATA Hard Disks Installation and RAID...
User Manual
Page 70
... the installed CPU does not support Hyper-Threading technology. The default value is [All]. 3.4.1 CPU Configuration Intel Hyper Threading Technology To enable this feature, it requires a computer system with an Intel processor that supports Hyper-Threading technology and an operating system that includes optimization for this to enable or disable CPU C3 (ACPI C2) report to OS. Configuration options: [All], [1] and [2]. The default value is [Auto]. 70 CPU...
... the installed CPU does not support Hyper-Threading technology. The default value is [All]. 3.4.1 CPU Configuration Intel Hyper Threading Technology To enable this feature, it requires a computer system with an Intel processor that supports Hyper-Threading technology and an operating system that includes optimization for this to enable or disable CPU C3 (ACPI C2) report to OS. Configuration options: [All], [1] and [2]. The default value is [Auto]. 70 CPU...

User Manual
Page 75
... S.M.A.R.T. (Self-Monitoring, Analysis, and Reporting Technology) feature. Serial Port Address Use this item to set the address for the onboard serial port. Infrared Port Use this item to enable or disable the onboard infrared port. Infrared Port Address Use this item to set the address for the onboard infrared port. Serial Port Use this item to enable or disable the onboard serial port. SATA Controller 1 Please select [Compatible] when you install legacy OS. If native OS (Windows® XP / VistaTM / 7) is installed, please select [Enhanced]. Hard Disk S.M.A.R.T.
... S.M.A.R.T. (Self-Monitoring, Analysis, and Reporting Technology) feature. Serial Port Address Use this item to set the address for the onboard serial port. Infrared Port Use this item to enable or disable the onboard infrared port. Infrared Port Address Use this item to set the address for the onboard infrared port. Serial Port Use this item to enable or disable the onboard serial port. SATA Controller 1 Please select [Compatible] when you install legacy OS. If native OS (Windows® XP / VistaTM / 7) is installed, please select [Enhanced]. Hard Disk S.M.A.R.T.

User Manual
Page 77
... to select [Disabled] to enter OS. [UEFI Setup Only] - Please refer to below descriptions for legacy USB. [Auto] - If you have USB compatibility issue, it is [Enabled]. USB devices are allowed to use of these four options: [Enabled] - The default value is selected. Legacy USB 3.0 Support Use this item to enable or disable the use under UEFI setup and Windows / Linux OS. 3.4.7 USB Configuration USB 2.0 Controller Use this option to enable or disable legacy support for USB 3.0 devices. Enables support for the details of USB 3.0 controller. USB devices are not allowed...
... to select [Disabled] to enter OS. [UEFI Setup Only] - Please refer to below descriptions for legacy USB. [Auto] - If you have USB compatibility issue, it is [Enabled]. USB devices are allowed to use of these four options: [Enabled] - The default value is selected. Legacy USB 3.0 Support Use this item to enable or disable the use under UEFI setup and Windows / Linux OS. 3.4.7 USB Configuration USB 2.0 Controller Use this option to enable or disable legacy support for USB 3.0 devices. Enables support for the details of USB 3.0 controller. USB devices are not allowed...
User Manual
Page 82
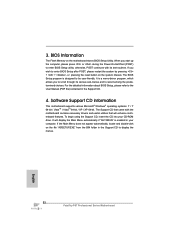
...-ROM drive. or you need to contact us or want to know more information. 4.2 Support CD Information The Support CD that came with the motherboard contains necessary drivers and useful utilities that the motherboard supports. Chapter 4: Software Support 4.1 Install Operating System This motherboard supports various Microsoft® Windows® operating systems: 7 / 7 64-bit / VistaTM / VistaTM 64-bit / XP / XP 64-bit. Because motherboard settings and hardware options vary, use the setup procedures in the Support...
...-ROM drive. or you need to contact us or want to know more information. 4.2 Support CD Information The Support CD that came with the motherboard contains necessary drivers and useful utilities that the motherboard supports. Chapter 4: Software Support 4.1 Install Operating System This motherboard supports various Microsoft® Windows® operating systems: 7 / 7 64-bit / VistaTM / VistaTM 64-bit / XP / XP 64-bit. Because motherboard settings and hardware options vary, use the setup procedures in the Support...
Quick Installation Guide
Page 4
...) 48 Power Switch (PWRBTN) 49 Power LED Header (PLED1) 50 Chassis Speaker Header (SPEAKER 1, Black) System Panel Header (PANEL1, Black) Clear CMOS Jumper (CLRCMOS1) Chassis Fan Connector (CHA_FAN1) Chassis Fan Connector (CHA_FAN2) Front Panel IEEE 1394 Header (FRONT_1394, Red) USB 2.0 Header (USB12_13, Black) USB 2.0 Header (USB10_11, Black) USB 2.0 Header (USB8_9, Black) USB 2.0 Header (USB6_7, Black) USB 3.0 Header (USB3_2_3, Black) COM Port Header (COM1) Floppy Connector (FLOPPY1) Front Panel Audio Header (HD_AUDIO1, Black) Infrared Module Header (IR1) PCI Express 2.0 x16 Slot (PCIE5...
...) 48 Power Switch (PWRBTN) 49 Power LED Header (PLED1) 50 Chassis Speaker Header (SPEAKER 1, Black) System Panel Header (PANEL1, Black) Clear CMOS Jumper (CLRCMOS1) Chassis Fan Connector (CHA_FAN1) Chassis Fan Connector (CHA_FAN2) Front Panel IEEE 1394 Header (FRONT_1394, Red) USB 2.0 Header (USB12_13, Black) USB 2.0 Header (USB10_11, Black) USB 2.0 Header (USB8_9, Black) USB 2.0 Header (USB6_7, Black) USB 3.0 Header (USB3_2_3, Black) COM Port Header (COM1) Floppy Connector (FLOPPY1) Front Panel Audio Header (HD_AUDIO1, Black) Infrared Module Header (IR1) PCI Express 2.0 x16 Slot (PCIE5...
Quick Installation Guide
Page 5
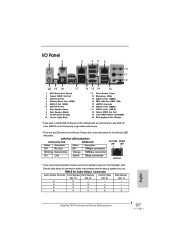
... want to install USB 3.0 device on this motherboard, we recommend to the LAN port. See the table below for connection details in accordance with the type of speaker you use USB 3.0 ports (USB12) as the first priority to get better performance. * There are two LED next to use . TABLE for Audio Output Connection Audio Output Channels Front Speaker Rear Speaker Central / Bass Side Speaker (No. 11) (No. 8) (No. 9) (No. 7) 2 V -- -- -- 4 V V -- -- 6 V V V -- 8 V V V V English 5 Fatal1ty P67 Professional Series Motherboard
... want to install USB 3.0 device on this motherboard, we recommend to the LAN port. See the table below for connection details in accordance with the type of speaker you use USB 3.0 ports (USB12) as the first priority to get better performance. * There are two LED next to use . TABLE for Audio Output Connection Audio Output Channels Front Speaker Rear Speaker Central / Bass Side Speaker (No. 11) (No. 8) (No. 9) (No. 7) 2 V -- -- -- 4 V V -- -- 6 V V V -- 8 V V V V English 5 Fatal1ty P67 Professional Series Motherboard
Quick Installation Guide
Page 11
... key to BIOS setup menu to your BIOS only in -one tool to the operating system limitation, the actual memory size may depend on page 5 for proper installation. 3. CAUTION! 1. DDR3 frequency options may be noted that the USB flash drive or hard drive must use FAT32/16/12 file system. 11 Fatal1ty P67 Professional Series Motherboard English For Windows® OS with your system. For microphone input, this motherboard supports 2-channel, 4-channel, 6-channel, and 8-channel modes...
... key to BIOS setup menu to your BIOS only in -one tool to the operating system limitation, the actual memory size may depend on page 5 for proper installation. 3. CAUTION! 1. DDR3 frequency options may be noted that the USB flash drive or hard drive must use FAT32/16/12 file system. 11 Fatal1ty P67 Professional Series Motherboard English For Windows® OS with your system. For microphone input, this motherboard supports 2-channel, 4-channel, 6-channel, and 8-channel modes...
Quick Installation Guide
Page 30
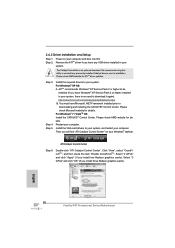
... 30 Fatal1ty P67 Professional Series Motherboard 2.6.2 Driver Installation and Setup Step 1. ATITM recommends Windows® XP Service Pack 2 or higher to be installed (If you have any previously installed Catalyst drivers prior to your computer. Install the VGA card drivers to uninstall any VGA driver installed in your Windows® taskbar. Power on your system, there is an optional download. You must have Windows® XP Service Pack 2 or higher installed in your system. Remove the ATITM driver if...
... 30 Fatal1ty P67 Professional Series Motherboard 2.6.2 Driver Installation and Setup Step 1. ATITM recommends Windows® XP Service Pack 2 or higher to be installed (If you have any previously installed Catalyst drivers prior to your computer. Install the VGA card drivers to uninstall any VGA driver installed in your Windows® taskbar. Power on your system, there is an optional download. You must have Windows® XP Service Pack 2 or higher installed in your system. Remove the ATITM driver if...
Quick Installation Guide
Page 52
...-bit. To begin using the Support CD, insert the CD into your computer. otherwise, POST continues with the motherboard contains necessary drivers and useful utilities that will display the Main Menu automatically if "AUTORUN" is a menu-driven program, which allows you start up the computer, please press or during the Power-On-Self-Test (POST) to the User Manual (PDF file) contained in your CD-ROM drive. If the Main Menu...
...-bit. To begin using the Support CD, insert the CD into your computer. otherwise, POST continues with the motherboard contains necessary drivers and useful utilities that will display the Main Menu automatically if "AUTORUN" is a menu-driven program, which allows you start up the computer, please press or during the Power-On-Self-Test (POST) to the User Manual (PDF file) contained in your CD-ROM drive. If the Main Menu...
RAID Installation Guide
Page 7
... the mode you choose and the OS you want to install Windows® XP / XP 64-bit on your system. A "RAID Ready" system can be installed to your system as well. 2.3.2 Setting Up a "RAID Ready" System You can start to use both "RAID Installation Guide" and "Intel Rapid Storage Information" for RAID configuration. Please refer to the document in the Support CD, "Guide to SATA Hard Disks Installation and RAID Configuration", which is located in...
... the mode you choose and the OS you want to install Windows® XP / XP 64-bit on your system. A "RAID Ready" system can be installed to your system as well. 2.3.2 Setting Up a "RAID Ready" System You can start to use both "RAID Installation Guide" and "Intel Rapid Storage Information" for RAID configuration. Please refer to the document in the Support CD, "Guide to SATA Hard Disks Installation and RAID Configuration", which is located in...


