User Manual
Page 3
...; Read and follow all power, modem, and network cables from the power outlets before you follow the operating instructions. • The system was dropped or the cabinet is turned OFF, a small amount of electrical current still flows. Do not block or cover these openings. No disassembly NOTE: The warranty does not apply to products (including HDD, ODD, memory and warranty seal...
...; Read and follow all power, modem, and network cables from the power outlets before you follow the operating instructions. • The system was dropped or the cabinet is turned OFF, a small amount of electrical current still flows. Do not block or cover these openings. No disassembly NOTE: The warranty does not apply to products (including HDD, ODD, memory and warranty seal...
User Manual
Page 7
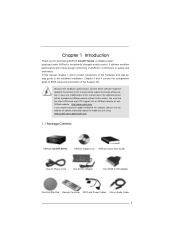
... the hardware installation. Because the hardware specifications and the BIOS software might be updated, the content of this manual, chapter 1 and 2 contain introduction of the hardware and step-bystep guide to change without further notice. In case any modifications of the Support CD. Chapter 3 and 4 contain the configuration guide to DVI Adapter One Anti-Slip Pad Remote Controller SATA and Power Cables 3.5mm Audio Cable 7 ASRock...
... the hardware installation. Because the hardware specifications and the BIOS software might be updated, the content of this manual, chapter 1 and 2 contain introduction of the hardware and step-bystep guide to change without further notice. In case any modifications of the Support CD. Chapter 3 and 4 contain the configuration guide to DVI Adapter One Anti-Slip Pad Remote Controller SATA and Power Cables 3.5mm Audio Cable 7 ASRock...

User Manual
Page 8
... overclocking. 8 1.2 Specifications * For barebone system, it may affect your system stability, or even cause damage to 16GB Mobile Intel® HD Graphics 3000 HDD Supports 2.5" SATA HDD ODD Front I/O Rear I/O Sound BD Combo or DVD SuperMulti 2 x USB 3.0, 1 x MIC, 1 x Head Phone 1 x HDMI, 1 x D-Sub, 4 x USB 2.0, 5 Audio Jack with 1 x S/PDIF, 1 x eSATA3.0*2, 2 x USB 3.0 7.1 Ch HD Audio with THX TruStudio ProTM LAN Gigabit LAN WiFi Remote Controller 2T2R 802.11b/g/n wireless LAN Support MCE function Power 90W/19V Adapter Dimension...
... overclocking. 8 1.2 Specifications * For barebone system, it may affect your system stability, or even cause damage to 16GB Mobile Intel® HD Graphics 3000 HDD Supports 2.5" SATA HDD ODD Front I/O Rear I/O Sound BD Combo or DVD SuperMulti 2 x USB 3.0, 1 x MIC, 1 x Head Phone 1 x HDMI, 1 x D-Sub, 4 x USB 2.0, 5 Audio Jack with 1 x S/PDIF, 1 x eSATA3.0*2, 2 x USB 3.0 7.1 Ch HD Audio with THX TruStudio ProTM LAN Gigabit LAN WiFi Remote Controller 2T2R 802.11b/g/n wireless LAN Support MCE function Power 90W/19V Adapter Dimension...

User Manual
Page 10
Fan Connection Fan connector Ground +12V Rotation Fan connector Ground +5V Rotation item 4 item 6 10 SATA and Power Connections SATA & Power Connections HDD ODD Connect to ODD Connect to HDD Connect to SATA Connector (11) Connect to ATX5V Power Connector (12) Connect to SATA Connector (13) 2. NOTE. 1.
Fan Connection Fan connector Ground +12V Rotation Fan connector Ground +5V Rotation item 4 item 6 10 SATA and Power Connections SATA & Power Connections HDD ODD Connect to ODD Connect to HDD Connect to SATA Connector (11) Connect to ATX5V Power Connector (12) Connect to SATA Connector (13) 2. NOTE. 1.
User Manual
Page 22
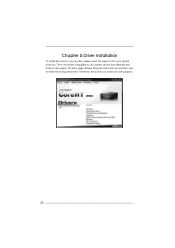
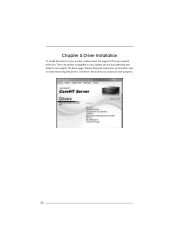
Please follow the order from up to bottom side to install those required drivers. Therefore, the drivers you install can be auto-detected and listed on the support CD driver page. Then, the drivers compatible to your optical drive first. Chapter 5 Driver Installation To install the drivers to your system, please insert the support CD to your system can work properly. 22
Please follow the order from up to bottom side to install those required drivers. Therefore, the drivers you install can be auto-detected and listed on the support CD driver page. Then, the drivers compatible to your optical drive first. Chapter 5 Driver Installation To install the drivers to your system, please insert the support CD to your system can work properly. 22
User Manual
Page 24
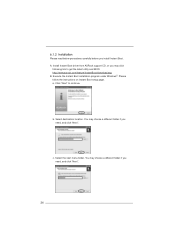
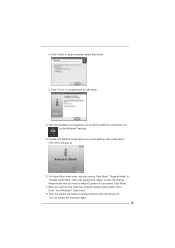
... may choose a different folder if you need , and click "Next". 24 Execute the Instant Boot installation program under Windows®. b. Select destination location. c. a. 6.1.2 Installation Please read below procedures carefully before you may click following link to continue. Click "Next" to get the latest utility and BIOS: http://www.asrock.com/feature/InstantBoot/download.asp B. Install Instant Boot driver from ASRock support CD, or you install Instant Boot.
... may choose a different folder if you need , and click "Next". 24 Execute the Instant Boot installation program under Windows®. b. Select destination location. c. a. 6.1.2 Installation Please read below procedures carefully before you may click following link to continue. Click "Next" to get the latest utility and BIOS: http://www.asrock.com/feature/InstantBoot/download.asp B. Install Instant Boot driver from ASRock support CD, or you install Instant Boot.
User Manual
Page 25
... Windows® "Start menu". C. D. After that you need to keep AC power on if you want to complete and exit the setup. G. When you select "Fast Mode". e. Double click ASRock Instant Boot icon on the Windows® desktop. After reentering into OS, the system will restart once automatically. d. F. Now, the system will shutdown again. 25 Click "Install" to save the change. On Instant Boot...
... Windows® "Start menu". C. D. After that you need to keep AC power on if you want to complete and exit the setup. G. When you select "Fast Mode". e. Double click ASRock Instant Boot icon on the Windows® desktop. After reentering into OS, the system will restart once automatically. d. F. Now, the system will shutdown again. 25 Click "Install" to save the change. On Instant Boot...
User Manual
Page 27
... functions in a user-friendly interface, which is a button "Auto run when windows start AXTU. If you click this button, every time you install all -in AXTU main menu: Hardware Monitor, Fan Control, Overclocking and OC DNA. Your friends then can save your desktop. In Voltage, there are CPU speed and CPU ratio. Hardware Monitor In the Hardware Monitor section, it shows the major readings of your system and enter Windows®, the...
... functions in a user-friendly interface, which is a button "Auto run when windows start AXTU. If you click this button, every time you install all -in AXTU main menu: Hardware Monitor, Fan Control, Overclocking and OC DNA. Your friends then can save your desktop. In Voltage, there are CPU speed and CPU ratio. Hardware Monitor In the Hardware Monitor section, it shows the major readings of your system and enter Windows®, the...

User Manual
Page 33
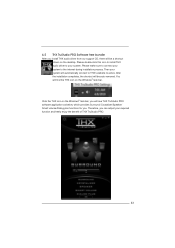
... be a shortcut shown on the Windows® task bar. Please double-click this icon to install THX audio driver to active. Then your system will automatically connect to THX's website to your system. 6.5 THX TruStudio PRO Software free bundle After you install THX audio driver from our support CD, there will be auto-removed. Please make sure to connect your required function and freely...
... be a shortcut shown on the Windows® task bar. Please double-click this icon to install THX audio driver to active. Then your system will automatically connect to THX's website to your system. 6.5 THX TruStudio PRO Software free bundle After you install THX audio driver from our support CD, there will be auto-removed. Please make sure to connect your required function and freely...
User Manual
Page 46
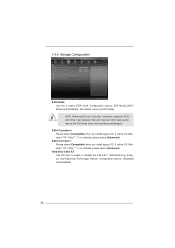
... install legacy OS. Hard Disk S.M.A.R.T. Use this to enable or disable the S.M.A.R.T. (Self-Monitoring, Analysis, and Reporting Technology) feature. Configuration options: [Disabled] and [Enabled]. 46 Configuration options: [IDE Mode], [AHCI Mode] and [Disabled]. AHCI (Advanced Host Controller Interface) supports NCQ and other new features that will improve SATA disk performance but IDE mode does not have these advantages. 7.4.4 Storage Configuration SATA Mode Use this item to select SATA mode. If native OS (Windows...
... install legacy OS. Hard Disk S.M.A.R.T. Use this to enable or disable the S.M.A.R.T. (Self-Monitoring, Analysis, and Reporting Technology) feature. Configuration options: [Disabled] and [Enabled]. 46 Configuration options: [IDE Mode], [AHCI Mode] and [Disabled]. AHCI (Advanced Host Controller Interface) supports NCQ and other new features that will improve SATA disk performance but IDE mode does not have these advantages. 7.4.4 Storage Configuration SATA Mode Use this item to select SATA mode. If native OS (Windows...
User Manual
Page 54
... drivers and useful utilities that the system supports. or you need to contact ASRock or want to visit ASRock's website at http://www.asrock.com; Refer to activate the devices. 8.2.3 Utilities Menu The Utilities Menu shows the applications software that enhance the system features. 8.2.1 Running The Support CD To begin using the support CD, insert the CD into your computer. Chapter 8 Software Support 8.1 Install Operating System This system supports various Microsoft® Windows® operating...
... drivers and useful utilities that the system supports. or you need to contact ASRock or want to visit ASRock's website at http://www.asrock.com; Refer to activate the devices. 8.2.3 Utilities Menu The Utilities Menu shows the applications software that enhance the system features. 8.2.1 Running The Support CD To begin using the support CD, insert the CD into your computer. Chapter 8 Software Support 8.1 Install Operating System This system supports various Microsoft® Windows® operating...

User Manual (CoreHT Server Series)
Page 3
... encounter the following technical problems with ambient temperatures between 0o C and 40o C. • If you read the following safety instructions. No disassembly NOTE: The warranty does not apply to disassemble/reassemble the system or modifying the hardware configuration. 3 Do not block or cover these openings. However, to ensure your retailer. • The power cord or plug is damaged...
... encounter the following technical problems with ambient temperatures between 0o C and 40o C. • If you read the following safety instructions. No disassembly NOTE: The warranty does not apply to disassemble/reassemble the system or modifying the hardware configuration. 3 Do not block or cover these openings. However, to ensure your retailer. • The power cord or plug is damaged...

User Manual (CoreHT Server Series)
Page 10
Fan Connection Fan connector Ground +12V Rotation Fan connector Ground +5V Rotation item 4 item 6 10 SATA and Power Connections SATA & Power Connections HDD ODD Connect to ODD Connect to HDD Connect to SATA Connector (11) Connect to ATX5V Power Connector (12) Connect to SATA Connector (13) 2. NOTE. 1.
Fan Connection Fan connector Ground +12V Rotation Fan connector Ground +5V Rotation item 4 item 6 10 SATA and Power Connections SATA & Power Connections HDD ODD Connect to ODD Connect to HDD Connect to SATA Connector (11) Connect to ATX5V Power Connector (12) Connect to SATA Connector (13) 2. NOTE. 1.
User Manual (CoreHT Server Series)
Page 22
Therefore, the drivers you install can be auto-detected and listed on the support CD driver page. Chapter 5 Driver Installation To install the drivers to your system, please insert the support CD to your system can work properly. 22 Please follow the order from up to bottom side to your optical drive first. Then, the drivers compatible to install those required drivers.
Therefore, the drivers you install can be auto-detected and listed on the support CD driver page. Chapter 5 Driver Installation To install the drivers to your system, please insert the support CD to your system can work properly. 22 Please follow the order from up to bottom side to your optical drive first. Then, the drivers compatible to install those required drivers.

User Manual (CoreHT Server Series)
Page 24
... instructions on Instant Boot setup page. b. Select destination location. You may choose a different folder if you need , and click "Next". 24 You may choose a different folder if you need , and click "Next". c. Execute the Instant Boot installation program under Windows®. Click "Next" to get the latest utility and BIOS: http://www.asrock.com/feature/InstantBoot/download.asp B. Select the start menu folder. Install Instant Boot driver from ASRock support...
... instructions on Instant Boot setup page. b. Select destination location. You may choose a different folder if you need , and click "Next". 24 You may choose a different folder if you need , and click "Next". c. Execute the Instant Boot installation program under Windows®. Click "Next" to get the latest utility and BIOS: http://www.asrock.com/feature/InstantBoot/download.asp B. Select the start menu folder. Install Instant Boot driver from ASRock support...

User Manual (CoreHT Server Series)
Page 25
... Down" from Windows® "Start menu". Click "Finish" to keep AC power on if you will find an ASRock Instant Boot icon on the desktop, then Instant Boot main menu will pop up. Double click ASRock Instant Boot icon on the Windows® desktop. Please notice that , please click "Apply" to begin installing Instant Boot driver. D. When you can choose "Fast Mode", "Regular Mode" or "Disable Instant Boot". Now...
... Down" from Windows® "Start menu". Click "Finish" to keep AC power on if you will find an ASRock Instant Boot icon on the desktop, then Instant Boot main menu will pop up. Double click ASRock Instant Boot icon on the Windows® desktop. Please notice that , please click "Apply" to begin installing Instant Boot driver. D. When you can choose "Fast Mode", "Regular Mode" or "Disable Instant Boot". Now...

User Manual (CoreHT Server Series)
Page 27
... run when windows start" on your system and enter Windows®, the system will find the icon "ASRock eXtreme Tuner" on your system. If you click this button, every time you are many respective voltages. 27 In Clock, there are four sections in AXTU main menu: Hardware Monitor, Fan Control, Overclocking and OC DNA. There are CPU speed and CPU ratio. In Overclocking, you turn...
... run when windows start" on your system and enter Windows®, the system will find the icon "ASRock eXtreme Tuner" on your system. If you click this button, every time you are many respective voltages. 27 In Clock, there are four sections in AXTU main menu: Hardware Monitor, Fan Control, Overclocking and OC DNA. There are CPU speed and CPU ratio. In Overclocking, you turn...
User Manual (CoreHT Server Series)
Page 33
... icon on the Windows® task bar, you will see THX TruStudio PRO software application as below, which provides Surround /Crystalizer/Speaker/ Smart volume/Dialog plus functions for you can adjust your system will find the THX icon on the desktop. 6.5 THX TruStudio PRO Software free bundle After you install THX audio driver from our support CD, there will...
... icon on the Windows® task bar, you will see THX TruStudio PRO software application as below, which provides Surround /Crystalizer/Speaker/ Smart volume/Dialog plus functions for you can adjust your system will find the THX icon on the desktop. 6.5 THX TruStudio PRO Software free bundle After you install THX audio driver from our support CD, there will...

User Manual (CoreHT Server Series)
Page 49
... OS (Windows® XP / VistaTM / 7) is installed, please select [Enhanced]. 7.4.4 Storage Configuration SATA Mode Use this item to select SATA mode. Configuration options: [Disabled] and [Enabled]. 49 AHCI (Advanced Host Controller Interface) supports NCQ and other new features that will improve SATA disk performance but IDE mode does not have these advantages. Hard Disk S.M.A.R.T. SATA Controller 1 Please select [Compatible] when you install legacy OS. Use this to enable or disable the S.M.A.R.T. (Self-Monitoring, Analysis...
... OS (Windows® XP / VistaTM / 7) is installed, please select [Enhanced]. 7.4.4 Storage Configuration SATA Mode Use this item to select SATA mode. Configuration options: [Disabled] and [Enabled]. 49 AHCI (Advanced Host Controller Interface) supports NCQ and other new features that will improve SATA disk performance but IDE mode does not have these advantages. Hard Disk S.M.A.R.T. SATA Controller 1 Please select [Compatible] when you install legacy OS. Use this to enable or disable the S.M.A.R.T. (Self-Monitoring, Analysis...

User Manual (CoreHT Server Series)
Page 57
... the devices. 8.2.3 Utilities Menu The Utilities Menu shows the applications software that enhance the system features. 8.2.1 Running The Support CD To begin using the support CD, insert the CD into your OS documentation for further information. 57 The CD automatically displays the Main Menu if "AUTORUN" is enabled in the Support CD to display the menus. 8.2.2 Drivers Menu The Drivers Menu shows the available devices drivers if the system detects installed devices. If...
... the devices. 8.2.3 Utilities Menu The Utilities Menu shows the applications software that enhance the system features. 8.2.1 Running The Support CD To begin using the support CD, insert the CD into your OS documentation for further information. 57 The CD automatically displays the Main Menu if "AUTORUN" is enabled in the Support CD to display the menus. 8.2.2 Drivers Menu The Drivers Menu shows the available devices drivers if the system detects installed devices. If...

