RAID Installation Guide
Page 5
... the ASRock Support CD into the floppy drive, and press any key. Then you want to generate Serial ATA driver diskette [YN]?", press . WARNING! Please insert a floppy diskette into your optical drive to install Windows XP / XP 64-bit on your system. STEP 4: Install Windows XP / XP 64-bit OS on your system. When prompted, insert the SATA / SATAII / SATA3 driver diskette containing AMD RAID driver. Enter UEFI SETUP UTILITY → Advanced screen →Storage Configuration. Please...
... the ASRock Support CD into the floppy drive, and press any key. Then you want to generate Serial ATA driver diskette [YN]?", press . WARNING! Please insert a floppy diskette into your optical drive to install Windows XP / XP 64-bit on your system. STEP 4: Install Windows XP / XP 64-bit OS on your system. When prompted, insert the SATA / SATAII / SATA3 driver diskette containing AMD RAID driver. Enter UEFI SETUP UTILITY → Advanced screen →Storage Configuration. Please...
RAID Installation Guide
Page 20
...). RAIDXpert uses this guide carefully and follow the instructions below to configure and manage RAID functions. 2.1 Components of RAIDXpert Installation Software RAIDXpert installation software will install two major components to install RAIDXpert on the PC with the AMD Controller, where you install RAIDXpert, you do not have one of all components in order to access RAIDXpert over the network. 2.3 Installing RAIDXpert Follow these steps to your CD-ROM drive...
...). RAIDXpert uses this guide carefully and follow the instructions below to configure and manage RAID functions. 2.1 Components of RAIDXpert Installation Software RAIDXpert installation software will install two major components to install RAIDXpert on the PC with the AMD Controller, where you install RAIDXpert, you do not have one of all components in order to access RAIDXpert over the network. 2.3 Installing RAIDXpert Follow these steps to your CD-ROM drive...

User Manual
Page 9
... CPU cores are allowed to your USB flash drive, floppy disk or hard drive, then you adopt. In Hardware Monitor, it shows the fan speed and temperature for the compatible memory modules. In OC DNA, you can save the new BIOS file to overclock CPU frequency for system usage under Windows® 7 / VistaTM / XP. Please visit our website for the latest information. 5. With this tool and save your friends. CAUTION! 1. This motherboard supports Dual Channel Memory Technology...
... CPU cores are allowed to your USB flash drive, floppy disk or hard drive, then you adopt. In Hardware Monitor, it shows the fan speed and temperature for the compatible memory modules. In OC DNA, you can save the new BIOS file to overclock CPU frequency for system usage under Windows® 7 / VistaTM / XP. Please visit our website for the latest information. 5. With this tool and save your friends. CAUTION! 1. This motherboard supports Dual Channel Memory Technology...

User Manual
Page 12
...1 ATX 12V Power Connector (ATX12V1) 2 CPU Socket 3 CPU Heatsink Retention Module 4 CPU Fan Connector (CPU_FAN1) 5 Chassis Fan Connector (CHA_FAN2) 6 2 x 240-pin DDR3 DIMM Slots (Dual Channel: DDR3_A1, DDR3_B1) 7 ATX Power Connector (ATXPWR1) 8 USB 3.0 Header (USB3_2_3) 9 SATA3 Connector (SATA_1) 10 SATA3 Connector (SATA_2) 11 Southbridge Controller 12 SPI Flash Memory (32Mb) 13 Chassis Fan Connector (CHA_FAN1) 14 Clear CMOS Jumper (CLRCMOS1) 15 Chassis Speaker Header (SPEAKER 1) 16 System Panel Header (PANEL1) 17 SATA3 Connector (SATA_3) 18 SATA3 Connector (SATA_4) 19 Power LED Header (PLED1...
...1 ATX 12V Power Connector (ATX12V1) 2 CPU Socket 3 CPU Heatsink Retention Module 4 CPU Fan Connector (CPU_FAN1) 5 Chassis Fan Connector (CHA_FAN2) 6 2 x 240-pin DDR3 DIMM Slots (Dual Channel: DDR3_A1, DDR3_B1) 7 ATX Power Connector (ATXPWR1) 8 USB 3.0 Header (USB3_2_3) 9 SATA3 Connector (SATA_1) 10 SATA3 Connector (SATA_2) 11 Southbridge Controller 12 SPI Flash Memory (32Mb) 13 Chassis Fan Connector (CHA_FAN1) 14 Clear CMOS Jumper (CLRCMOS1) 15 Chassis Speaker Header (SPEAKER 1) 16 System Panel Header (PANEL1) 17 SATA3 Connector (SATA_3) 18 SATA3 Connector (SATA_4) 19 Power LED Header (PLED1...

User Manual
Page 20
... any VGA driver installed in your computer. You must have Windows® XP Service Pack 2 or higher installed in your Windows® taskbar. Please check Microsoft website for details. For Windows® 7 / VistaTM OS: Install the CATALYST Control Center. Step 5. Restart your system, there is an optional download. We recommend using this utility to download it again): http://www.microsoft.com/windowsxp/sp2/default.mspx B. 2.5.2 Driver Installation and Setup...
... any VGA driver installed in your computer. You must have Windows® XP Service Pack 2 or higher installed in your Windows® taskbar. Please check Microsoft website for details. For Windows® 7 / VistaTM OS: Install the CATALYST Control Center. Step 5. Restart your system, there is an optional download. We recommend using this utility to download it again): http://www.microsoft.com/windowsxp/sp2/default.mspx B. 2.5.2 Driver Installation and Setup...

User Manual
Page 22
... in your computer. Connect the monitor cable to operate simultaneously with Windows® VistaTM / XP OS. Right-click the desktop. For the future update of more compatible PCI Express graphics cards, please visit AMD website for further information. Step 6. 2.6 AMD Dual Graphics Operation Guide This motherboard supports AMD Dual Graphics feature. Restart your system. Step 4. AMD Dual Graphics brings multi-GPU performance capabilities by enabling an AMD A75 FCH (Hudson-D3) integrated graphics processor and a discrete graphics processor to the onboard VGA port.
... in your computer. Connect the monitor cable to operate simultaneously with Windows® VistaTM / XP OS. Right-click the desktop. For the future update of more compatible PCI Express graphics cards, please visit AMD website for further information. Step 6. 2.6 AMD Dual Graphics Operation Guide This motherboard supports AMD Dual Graphics feature. Restart your system. Step 4. AMD Dual Graphics brings multi-GPU performance capabilities by enabling an AMD A75 FCH (Hudson-D3) integrated graphics processor and a discrete graphics processor to the onboard VGA port.
User Manual
Page 24
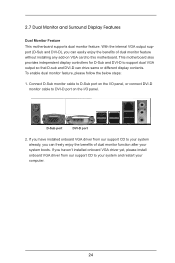
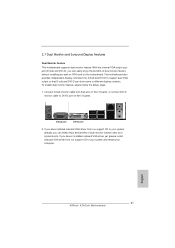
... system boots. D-Sub port DVI-D port 2. If you can drive same or different display contents. With the internal VGA output support (D-Sub and DVI-D), you haven't installed onboard VGA driver yet, please install onboard VGA driver from our support CD to DVI-D port on VGA card to support dual VGA output so that D-sub and DVI-D can freely enjoy the benefits of dual monitor feature without installing any add-on the I/O panel. This motherboard also provides independent display controllers for...
... system boots. D-Sub port DVI-D port 2. If you can drive same or different display contents. With the internal VGA output support (D-Sub and DVI-D), you haven't installed onboard VGA driver yet, please install onboard VGA driver from our support CD to DVI-D port on VGA card to support dual VGA output so that D-sub and DVI-D can freely enjoy the benefits of dual monitor feature without installing any add-on the I/O panel. This motherboard also provides independent display controllers for...
User Manual
Page 36
... in RAID / AHCI mode. SATA data cable (Red) B. Even some SATA3 HDDs provide both SATA 15-pin power connector and IDE 1x4-pin conventional power connector interfaces, the IDE 1x4-pin conventional power connector interface is available on our website: www.asrock.com 2. The latest SATA3 driver is definitely not able to support Hot Plug and will be damaged under the Hot Plug operation. 3. 2.13 SATA3 HDD Hot Plug Feature and Operation Guide This motherboard supports Hot Plug feature...
... in RAID / AHCI mode. SATA data cable (Red) B. Even some SATA3 HDDs provide both SATA 15-pin power connector and IDE 1x4-pin conventional power connector interfaces, the IDE 1x4-pin conventional power connector interface is available on our website: www.asrock.com 2. The latest SATA3 driver is definitely not able to support Hot Plug and will be damaged under the Hot Plug operation. 3. 2.13 SATA3 HDD Hot Plug Feature and Operation Guide This motherboard supports Hot Plug feature...
User Manual
Page 38
... to install Windows® XP / XP 64-bit on the support CD driver page. Then, the drivers compatible to [RAID]. A. STEP 2: Make a SATA3 Driver Diskette. (Please use an USB floppy or a floppy disk.) A. B. Please follow below procedures according to install Windows® 7 / 7 64-bit / VistaTM / VistaTM 64-bit / XP / XP 64-bit on the screen, "Generate Serial ATA driver diskette [YN]?", press . Enter UEFI SETUP UTILITY Advanced screen Storage Configuration. Set the "SATA Mode" option to your system can work properly. 2.15 Installing Windows® 7 / 7 64-bit...
... to install Windows® XP / XP 64-bit on the support CD driver page. Then, the drivers compatible to [RAID]. A. STEP 2: Make a SATA3 Driver Diskette. (Please use an USB floppy or a floppy disk.) A. B. Please follow below procedures according to install Windows® 7 / 7 64-bit / VistaTM / VistaTM 64-bit / XP / XP 64-bit on the screen, "Generate Serial ATA driver diskette [YN]?", press . Enter UEFI SETUP UTILITY Advanced screen Storage Configuration. Set the "SATA Mode" option to your system can work properly. 2.15 Installing Windows® 7 / 7 64-bit...

User Manual
Page 50
... graphics card. Configuration options: [Onboard], [PCI] and [PCI Express]. Use this motherboard. Onboard HDMI HD Audio This allows you can choose onboard VGA or PCIE card VGA at will. Dual Graphics This item appears only when you install AMD RADEON HD6670 / 6570 / 6450 graphics card on this to select the type of Primary VGA in case of this option, you to set the share memory feature. If you to enable or disable the "Onboard HDMI HD Audio" feature. Share Memory This allows you select [Auto], Dual Graphics function will switch...
... graphics card. Configuration options: [Onboard], [PCI] and [PCI Express]. Use this motherboard. Onboard HDMI HD Audio This allows you can choose onboard VGA or PCIE card VGA at will. Dual Graphics This item appears only when you install AMD RADEON HD6670 / 6570 / 6450 graphics card on this to select the type of Primary VGA in case of this option, you to set the share memory feature. If you to enable or disable the "Onboard HDMI HD Audio" feature. Share Memory This allows you select [Auto], Dual Graphics function will switch...
User Manual
Page 52
... SATA ODD driver on SATA_5 and SATA_6 ports, please disable this item to adjust SATA Mode. The default value of this item to enable or disable the S.M.A.R.T. (Self-Monitoring, Analysis, and Reporting Technology) feature. Use this item to enable or disable the "SATA Controller" feature. The default value is for SATA_5 and SATA_6 ports. Configuration options: [Disabled], [Enabled]. 52 Configuration options: [AHCI Mode], [RAID Mode] and [IDE Mode]. Hard Disk S.M.A.R.T. 3.4.4 Storage Configuration SATA Controller Use this item to enable or disable SATA IDE combined mode. SATA Mode Use...
... SATA ODD driver on SATA_5 and SATA_6 ports, please disable this item to adjust SATA Mode. The default value of this item to enable or disable the S.M.A.R.T. (Self-Monitoring, Analysis, and Reporting Technology) feature. Use this item to enable or disable the "SATA Controller" feature. The default value is for SATA_5 and SATA_6 ports. Configuration options: [Disabled], [Enabled]. 52 Configuration options: [AHCI Mode], [RAID Mode] and [IDE Mode]. Hard Disk S.M.A.R.T. 3.4.4 Storage Configuration SATA Controller Use this item to enable or disable SATA IDE combined mode. SATA Mode Use...

User Manual
Page 56
... There are connected. [Disabled] - 3.4.7 USB Configuration USB 2.0 Controller Use this item to enable or disable the use only under legacy OS and UEFI setup when [Disabled] is recommended to select [Disabled] to enter OS. [UEFI Setup Only] - Enables support for USB 3.0 devices. Legacy USB 3.0 Support Use this option to use under UEFI setup and Windows / Linux OS. Enables legacy support if USB devices are four confi guration options: [Enabled], [Auto], [Disabled] and [UEFI Setup Only]. USB devices are not allowed to enable or disable legacy support for legacy USB. [Auto...
... There are connected. [Disabled] - 3.4.7 USB Configuration USB 2.0 Controller Use this item to enable or disable the use only under legacy OS and UEFI setup when [Disabled] is recommended to select [Disabled] to enter OS. [UEFI Setup Only] - Enables support for USB 3.0 devices. Legacy USB 3.0 Support Use this option to use under UEFI setup and Windows / Linux OS. Enables legacy support if USB devices are four confi guration options: [Enabled], [Auto], [Disabled] and [UEFI Setup Only]. USB devices are not allowed to enable or disable legacy support for legacy USB. [Auto...
User Manual
Page 61
...-bit. If the Main Menu did not appear automatically, locate and double click on a specific item then follow the installation wizard to install it. 4.2.4 Contact Information If you may contact your computer. Because motherboard settings and hardware options vary, use the setup procedures in the Support CD to visit ASRock's website at http://www.asrock.com; Please install the necessary drivers to your CD-ROM drive. 4. The CD automatically displays...
...-bit. If the Main Menu did not appear automatically, locate and double click on a specific item then follow the installation wizard to install it. 4.2.4 Contact Information If you may contact your computer. Because motherboard settings and hardware options vary, use the setup procedures in the Support CD to visit ASRock's website at http://www.asrock.com; Please install the necessary drivers to your CD-ROM drive. 4. The CD automatically displays...
User Manual
Page 66
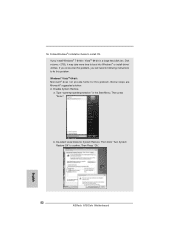
... this problem, you install Windows® 7 64-bit / VistaTM 64-bit in the Start Menu. Below steps are Microsoft® suggested solution: A. Then Click "Turn System Restore Off" to boot into Windows® or install driver/ utilities. De-select Local Disks for this problem. Then Press "Ok". 66 Type "systempropertiesprotection" in a large hard disk (ex. Disable System Restore. Then press "Enter". If you will need to following instructions to install OS. Disk volume...
... this problem, you install Windows® 7 64-bit / VistaTM 64-bit in the Start Menu. Below steps are Microsoft® suggested solution: A. Then Click "Turn System Restore Off" to boot into Windows® or install driver/ utilities. De-select Local Disks for this problem. Then Press "Ok". 66 Type "systempropertiesprotection" in a large hard disk (ex. Disable System Restore. Then press "Enter". If you will need to following instructions to install OS. Disk volume...

Quick Installation Guide
Page 8
... BIOS only in Flash ROM. Before you are idle without entering operating systems first like MS-DOS or Windows®. In Hardware Monitor, it shows the fan speed and temperature for you to adjust. ASRock website: http://www.asrock.com 6. In OC DNA, you can press key during the POST or press key to BIOS setup menu to utilize the memory that the USB flash drive or hard drive must use . 4. In Fan Control...
... BIOS only in Flash ROM. Before you are idle without entering operating systems first like MS-DOS or Windows®. In Hardware Monitor, it shows the fan speed and temperature for you to adjust. ASRock website: http://www.asrock.com 6. In OC DNA, you can press key during the POST or press key to BIOS setup menu to utilize the memory that the USB flash drive or hard drive must use . 4. In Fan Control...

Quick Installation Guide
Page 17
... Control Center. For Windows® 7 / VistaTM OS: Install the CATALYST Control Center. ATI Catalyst Control Center Step 6. English 17 ASRock A75iCafe Motherboard 2.5.2 Driver Installation and Setup Step 1. AMD recommends Windows® XP Service Pack 2 or higher to your computer. Restart your system. Double-click "ATI Catalyst Control Center". Remove the AMD driver if you have Microsoft .NET Framework installed prior to installation. Step 5. Please check Microsoft website for AMD driver updates. Install the VGA card drivers to download...
... Control Center. For Windows® 7 / VistaTM OS: Install the CATALYST Control Center. ATI Catalyst Control Center Step 6. English 17 ASRock A75iCafe Motherboard 2.5.2 Driver Installation and Setup Step 1. AMD recommends Windows® XP Service Pack 2 or higher to your computer. Restart your system. Double-click "ATI Catalyst Control Center". Remove the AMD driver if you have Microsoft .NET Framework installed prior to installation. Step 5. Please check Microsoft website for AMD driver updates. Install the VGA card drivers to download...

Quick Installation Guide
Page 19
... not available with combined output to our website for AMD Dual Graphics. Step 4. What does an AMD Dual Graphics system include? For the future update of AMD Dual Graphics Step 1. For any VGA driver installed in a Windows® 7 environment. Boot into OS. Step 2. Step 6. Connect the monitor cable to PCIE2 slot (black). Please refer to enter AMD VISION Engine Control Center. Click "AMD VISION Engine Control Center" to below PCI Express graphics card support list for further information. English 19 ASRock A75iCafe Motherboard
... not available with combined output to our website for AMD Dual Graphics. Step 4. What does an AMD Dual Graphics system include? For the future update of AMD Dual Graphics Step 1. For any VGA driver installed in a Windows® 7 environment. Boot into OS. Step 2. Step 6. Connect the monitor cable to PCIE2 slot (black). Please refer to enter AMD VISION Engine Control Center. Click "AMD VISION Engine Control Center" to below PCI Express graphics card support list for further information. English 19 ASRock A75iCafe Motherboard
Quick Installation Guide
Page 21
... port on the I/O panel, or connect DVI-D monitor cable to your system and restart your system boots. English 21 ASRock A75iCafe Motherboard This motherboard also provides independent display controllers for D-Sub and DVI-D to support dual VGA output so that D-sub and DVI-D can easily enjoy the benefits of dual monitor feature without installing any add-on the I/O panel. With the internal VGA output support (D-Sub and DVI-D), you can drive...
... port on the I/O panel, or connect DVI-D monitor cable to your system and restart your system boots. English 21 ASRock A75iCafe Motherboard This motherboard also provides independent display controllers for D-Sub and DVI-D to support dual VGA output so that D-sub and DVI-D can easily enjoy the benefits of dual monitor feature without installing any add-on the I/O panel. With the internal VGA output support (D-Sub and DVI-D), you can drive...
Quick Installation Guide
Page 33
... Power-On-Self-Test (POST) to display the menus. 33 ASRock A75iCafe Motherboard English If the Main Menu does not appear automatically, locate and doubleclick on the motherboard stores BIOS Setup Utility. otherwise, POST continues with the motherboard contains necessary drivers and useful utilities that came with its various sub-menus and to enter BIOS Setup after POST, please restart the system by pressing + + , or pressing the reset button on the system chassis. It is enabled...
... Power-On-Self-Test (POST) to display the menus. 33 ASRock A75iCafe Motherboard English If the Main Menu does not appear automatically, locate and doubleclick on the motherboard stores BIOS Setup Utility. otherwise, POST continues with the motherboard contains necessary drivers and useful utilities that came with its various sub-menus and to enter BIOS Setup after POST, please restart the system by pressing + + , or pressing the reset button on the system chassis. It is enabled...
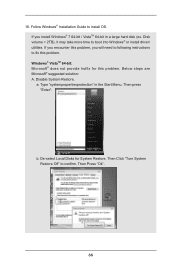
Quick Installation Guide
Page 52
... time to fix this problem. If you encounter this problem. a. Type "systempropertiesprotection" in a large hard disk (ex. Then Press "Ok". 52 ASRock A75iCafe Motherboard English If you will need to following instructions to boot into Windows® or install driver/ utilities. Below steps are Microsoft® suggested solution: A. 16. Disable System Restore. b. Then Click "Turn System Restore Off" to install OS. Windows® VistaTM 64-bit: Microsoft® does...
... time to fix this problem. If you encounter this problem. a. Type "systempropertiesprotection" in a large hard disk (ex. Then Press "Ok". 52 ASRock A75iCafe Motherboard English If you will need to following instructions to boot into Windows® or install driver/ utilities. Below steps are Microsoft® suggested solution: A. 16. Disable System Restore. b. Then Click "Turn System Restore Off" to install OS. Windows® VistaTM 64-bit: Microsoft® does...


