
User Manual
Page 4
... 68 4.1 Install Operating System 68 4.2 Support CD Information 68 4.2.1 Running Support CD 68 4.2.2 Drivers Menu 68 4.2.3 Utilities Menu 68 4.2.4 Contact Information 68 4 UEFI SETUP UTILITY 50 3.1 Introduction 50 3.1.1 UEFI Menu Bar 50 3.1.2 Navigation Keys 51 3.2 Main Screen 51 3.3 OC Tweaker Screen 52 3.4 Advanced Screen 56 3.4.1 CPU Configuration 57 3.4.2 North Bridge Configuration 58...
... 68 4.1 Install Operating System 68 4.2 Support CD Information 68 4.2.1 Running Support CD 68 4.2.2 Drivers Menu 68 4.2.3 Utilities Menu 68 4.2.4 Contact Information 68 4 UEFI SETUP UTILITY 50 3.1 Introduction 50 3.1.1 UEFI Menu Bar 50 3.1.2 Navigation Keys 51 3.2 Main Screen 51 3.3 OC Tweaker Screen 52 3.4 Advanced Screen 56 3.4.1 CPU Configuration 57 3.4.2 North Bridge Configuration 58...

User Manual
Page 8
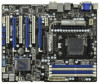
...with LED - 1 x Power Switch with LED - 1 x Reset Switch with LED BIOS Feature - 32Mb AMI UEFI Legal BIOS with GUI support - Supports "Plug and Play" - Supports jumperfree - ASRock Instant Flash (see CAUTION 14) - CPU Frequency Stepless Control (see CAUTION 9) - CPU Temperature Sensing Monitor - ... Feature - Microsoft® Windows® 7 / 7 64-bit / VistaTM / VistaTM 64-bit / XP / XP 64-bit compliant Certifications - ASRock U-COP (see CAUTION 8) - Turbo 25 / Turbo 30 GPU Overclocking - CPU/Chassis Fan Multi-Speed Control - CPU, VCCM, NB, SB Voltage...
...with LED - 1 x Power Switch with LED - 1 x Reset Switch with LED BIOS Feature - 32Mb AMI UEFI Legal BIOS with GUI support - Supports "Plug and Play" - Supports jumperfree - ASRock Instant Flash (see CAUTION 14) - CPU Frequency Stepless Control (see CAUTION 9) - CPU Temperature Sensing Monitor - ... Feature - Microsoft® Windows® 7 / 7 64-bit / VistaTM / VistaTM 64-bit / XP / XP 64-bit compliant Certifications - ASRock U-COP (see CAUTION 8) - Turbo 25 / Turbo 30 GPU Overclocking - CPU/Chassis Fan Multi-Speed Control - CPU, VCCM, NB, SB Voltage...
User Manual
Page 9
...CPU, including quad-core CPU, can also increase L3 cache size up to adjust. ASRock website http://www.asrock.com 5. In Fan Control, it shows the major readings of the UEFI option "ASRock UCC", you can enjoy the upgrade CPU performance with a better price. This motherboard ... Please read the installation guide of memory modules on our website for details. 3. The maximum shared memory size is defined by overclocking. ASRock UCC (Unlock CPU Core) feature simplifies AMD CPU activation. Whether 1866/1800/1600MHz memory speed is no such limitation. 6. For audio...
...CPU, including quad-core CPU, can also increase L3 cache size up to adjust. ASRock website http://www.asrock.com 5. In Fan Control, it shows the major readings of the UEFI option "ASRock UCC", you can enjoy the upgrade CPU performance with a better price. This motherboard ... Please read the installation guide of memory modules on our website for details. 3. The maximum shared memory size is defined by overclocking. ASRock UCC (Unlock CPU Core) feature simplifies AMD CPU activation. Whether 1866/1800/1600MHz memory speed is no such limitation. 6. For audio...

User Manual
Page 21
... primary monitor, and then select "Primary". If you can adjust the parameters of the system memory. When you do not adjust the UEFI setup, the default value of VGA/D-sub. C. Select the display icon identified by the number one monitor will always be your card... Quality" as Secondary. G. B. D. Repeat steps C through E for details. 2. Please refer to HDMI port on PCI Express VGA card driver to enter UEFI setup. Set up a surround display environment: 1. Press to your system. Connect DVI-D monitor cable to VGA/DVI-D port on the I/O panel, connect D-...
... primary monitor, and then select "Primary". If you can adjust the parameters of the system memory. When you do not adjust the UEFI setup, the default value of VGA/D-sub. C. Select the display icon identified by the number one monitor will always be your card... Quality" as Secondary. G. B. D. Repeat steps C through E for details. 2. Please refer to HDMI port on PCI Express VGA card driver to enter UEFI setup. Set up a surround display environment: 1. Press to your system. Connect DVI-D monitor cable to VGA/DVI-D port on the I/O panel, connect D-...

User Manual
Page 35
... black wire to the ground pin. Though this motherboard provides 4-Pin CPU fan (Quiet Fan) support, the 3-Pin CPU fan still can be controlled through UEFI or AXTU. (3-pin CHA_FAN3) (see p.12 No. 43) (3-pin PWR_FAN1) (see p.12 No. 1) CPU Fan Connectors (4-pin CPU_FAN1) (see p.12 No. 42) Please connect the...
... black wire to the ground pin. Though this motherboard provides 4-Pin CPU fan (Quiet Fan) support, the 3-Pin CPU fan still can be controlled through UEFI or AXTU. (3-pin CHA_FAN3) (see p.12 No. 43) (3-pin PWR_FAN1) (see p.12 No. 1) CPU Fan Connectors (4-pin CPU_FAN1) (see p.12 No. 42) Please connect the...

User Manual
Page 46
...SATA3 drivers into your system. During POST at the beginning of 2 or more SATA3 HDDs with RAID functions, please follow the order from up UEFI. When you will see the message on a RAID disk composed of system boot-up, press key, and then a window for boot devices .... STEP 1: Set up to bottom side to boot your optical drive to install those required drivers. Insert the ASRock Support CD into the floppy diskette. 46 B. D. E. Enter UEFI SETUP UTILITY Advanced screen Storage Configuration. ROM as the boot device. Please follow below procedures according to the OS ...
...SATA3 drivers into your system. During POST at the beginning of 2 or more SATA3 HDDs with RAID functions, please follow the order from up UEFI. When you will see the message on a RAID disk composed of system boot-up, press key, and then a window for boot devices .... STEP 1: Set up to bottom side to boot your optical drive to install those required drivers. Insert the ASRock Support CD into the floppy diskette. 46 B. D. E. Enter UEFI SETUP UTILITY Advanced screen Storage Configuration. ROM as the boot device. Please follow below procedures according to the OS ...

User Manual
Page 47
...]. When prompted, insert the SATA3 driver diskette containing the AMD RAID driver. After reading the floppy disk, the driver will be presented. STEP 1: Set up UEFI. Before you start to check the RAID installation guide in the Support CD for proper configuration. At the beginning of Windows® setup, press F6... the Support CD: .. \ RAID Installation Guide STEP 4: Install Windows® XP / XP 64-bit OS on your system. B. Please refer to set RAID configuration. Enter UEFI SETUP UTILITY Advanced screen Storage Configuration.
...]. When prompted, insert the SATA3 driver diskette containing the AMD RAID driver. After reading the floppy disk, the driver will be presented. STEP 1: Set up UEFI. Before you start to check the RAID installation guide in the Support CD for proper configuration. At the beginning of Windows® setup, press F6... the Support CD: .. \ RAID Installation Guide STEP 4: Install Windows® XP / XP 64-bit OS on your system. B. Please refer to set RAID configuration. Enter UEFI SETUP UTILITY Advanced screen Storage Configuration.

User Manual
Page 48
... XP 64-bit on your SATA3 HDDs without NCQ and Hot Plug functions (IDE mode) STEP 1: Set up UEFI. A. B. At the beginning of Windows® setup, press F6 to [IDE]. Enter UEFI SETUP UTILITY Advanced screen Storage Configuration. B. STEP 2: Install Windows® XP / XP 64-bit OS on .... 48 STEP 2: Make a SATA3 Driver Diskette. You can start to [AHCI]. After reading the floppy disk, the driver will be presented. Enter UEFI SETUP UTILITY Advanced screen Storage Configuration. STEP 3: Install Windows® XP / XP 64-bit OS on your system. Set the "SATA Mode" option...
... XP 64-bit on your SATA3 HDDs without NCQ and Hot Plug functions (IDE mode) STEP 1: Set up UEFI. A. B. At the beginning of Windows® setup, press F6 to [IDE]. Enter UEFI SETUP UTILITY Advanced screen Storage Configuration. B. STEP 2: Install Windows® XP / XP 64-bit OS on .... 48 STEP 2: Make a SATA3 Driver Diskette. You can start to [AHCI]. After reading the floppy disk, the driver will be presented. Enter UEFI SETUP UTILITY Advanced screen Storage Configuration. STEP 3: Install Windows® XP / XP 64-bit OS on your system. Set the "SATA Mode" option...

User Manual
Page 49
...® 7 / 7 64-bit / VistaTM / VistaTM 64-bit on your SATA3 HDDs without NCQ and Hot Plug functions (IDE mode) STEP 1: Set up UEFI. STEP 2: Install Windows® 7 / 7 64-bit / VistaTM / VistaTM 64-bit OS on page 9 for the possible overclocking risk before you enable Untied... Overclocking function, please enter "Overclock Mode" option of UEFI setup to set the selection from [Auto] to [AHCI]. Please refer to the warning on your system. 2.18 Untied Overclocking Technology This motherboard...
...® 7 / 7 64-bit / VistaTM / VistaTM 64-bit on your SATA3 HDDs without NCQ and Hot Plug functions (IDE mode) STEP 1: Set up UEFI. STEP 2: Install Windows® 7 / 7 64-bit / VistaTM / VistaTM 64-bit OS on page 9 for the possible overclocking risk before you enable Untied... Overclocking function, please enter "Overclock Mode" option of UEFI setup to set the selection from [Auto] to [AHCI]. Please refer to the warning on your system. 2.18 Untied Overclocking Technology This motherboard...

User Manual
Page 50
... restart by pressing the reset button on the motherboard stores the UEFI SETUP UTILITY. UEFI SETUP UTILITY 3.1 Introduction This section explains how to use the UEFI SETUP UTILITY to choose among the selections on . Because the UEFI software is constantly being updated, the following selections: Main To set... up the system time/date information OC Tweaker To set up overclocking features Advanced To set up the advanced UEFI features H/W Monitor To display current hardware status Boot To set up the computer. You may not exactly match what you start up...
... restart by pressing the reset button on the motherboard stores the UEFI SETUP UTILITY. UEFI SETUP UTILITY 3.1 Introduction This section explains how to use the UEFI SETUP UTILITY to choose among the selections on . Because the UEFI software is constantly being updated, the following selections: Main To set... up the system time/date information OC Tweaker To set up overclocking features Advanced To set up the advanced UEFI features H/W Monitor To display current hardware status Boot To set up the computer. You may not exactly match what you start up...

User Manual
Page 51
...] Use this item to specify the system time. 3.1.2 Navigation Keys Please check the following table for all the settings To save changes and exit the UEFI SETUP UTILITY To jump to specify the system date. 51 Navigation Key(s) / / + / Function Description Moves cursor left or right to select Screens Moves cursor up... navigation key. System Time [Hour:Minute:Second] Use this item to the Exit Screen or exit the current screen 3.2 Main Screen When you enter the UEFI SETUP UTILITY, the Main screen will appear and display the system overview.
...] Use this item to specify the system time. 3.1.2 Navigation Keys Please check the following table for all the settings To save changes and exit the UEFI SETUP UTILITY To jump to specify the system date. 51 Navigation Key(s) / / + / Function Description Moves cursor left or right to select Screens Moves cursor up... navigation key. System Time [Hour:Minute:Second] Use this item to the Exit Screen or exit the current screen 3.2 Main Screen When you enter the UEFI SETUP UTILITY, the Main screen will appear and display the system overview.
User Manual
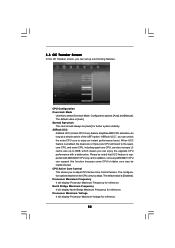
Page 52
... Processor Maximum Frequency for better system stability. Configuration options: [Auto] and [Manual]. The default value is [Auto]. As long as a simple switch of the UEFI option "ASRock UCC", you can unlock the extra CPU core to select Overclock Mode. 3.3 OC Tweaker Screen In the OC Tweaker screen, you can set up to... Control feature. CPU Configuration Overclock Mode Use this function because some CPU, including quad-core CPU, can also increase L3 cache size up overclocking features. ASRock UCC ASRock UCC (Unlock CPU Core) feature simplifies AMD CPU activation.
... Processor Maximum Frequency for better system stability. Configuration options: [Auto] and [Manual]. The default value is [Auto]. As long as a simple switch of the UEFI option "ASRock UCC", you can unlock the extra CPU core to select Overclock Mode. 3.3 OC Tweaker Screen In the OC Tweaker screen, you can set up to... Control feature. CPU Configuration Overclock Mode Use this function because some CPU, including quad-core CPU, can also increase L3 cache size up overclocking features. ASRock UCC ASRock UCC (Unlock CPU Core) feature simplifies AMD CPU activation.

User Manual
Page 56
.../16/ 12 file system. This convenient UEFI update tool allows you can update your system after UEFI update process completes. 56 3.4 Advanced Screen In this section, you execute ASRock Instant Flash utility, the utility will show the UEFI files and their respective information. ASRock Instant Flash ASRock Instant Flash is a UEFI flash utility embedded in a few clicks...
.../16/ 12 file system. This convenient UEFI update tool allows you can update your system after UEFI update process completes. 56 3.4 Advanced Screen In this section, you execute ASRock Instant Flash utility, the utility will show the UEFI files and their respective information. ASRock Instant Flash ASRock Instant Flash is a UEFI flash utility embedded in a few clicks...

User Manual
Page 63
... USB 3.0 Controller Use this item to enable or disable the use of USB 2.0 controller. There are allowed to use only under legacy OS and UEFI setup when [Disabled] is recommended to select [Disabled] to below descriptions for USB devices. If you have USB compatibility issue, it is selected....devices. Legacy USB Support Use this option to select legacy support for the details of these four options: [Enabled] - Please refer to enter OS. [UEFI Setup Only] - Legacy USB 3.0 Support Use this option to enable or disable legacy support for legacy USB. [Auto] - USB devices are four ...
... USB 3.0 Controller Use this item to enable or disable the use of USB 2.0 controller. There are allowed to use only under legacy OS and UEFI setup when [Disabled] is recommended to select [Disabled] to below descriptions for USB devices. If you have USB compatibility issue, it is selected....devices. Legacy USB Support Use this option to select legacy support for the details of these four options: [Enabled] - Please refer to enter OS. [UEFI Setup Only] - Legacy USB 3.0 Support Use this option to enable or disable legacy support for legacy USB. [Auto] - USB devices are four ...

User Manual
Page 67
...changes and exit setup?" Select [OK] to Launch EFI Shell application (Shell64.efi) from one of the available filesystem devices. 67 Load UEFI Defaults Load UEFI default values for this option, it will pop-out the following message, "Discard changes?" Select [OK] to save the changes and ...exit the UEFI SETUP UTILITY. Select [OK] to exit the UEFI SETUP UTILITY without saving any changes. Launch EFI Shell from filesystem device Attempts to discard all the setup questions. ...
...changes and exit setup?" Select [OK] to Launch EFI Shell application (Shell64.efi) from one of the available filesystem devices. 67 Load UEFI Defaults Load UEFI default values for this option, it will pop-out the following message, "Discard changes?" Select [OK] to save the changes and ...exit the UEFI SETUP UTILITY. Select [OK] to exit the UEFI SETUP UTILITY without saving any changes. Launch EFI Shell from filesystem device Attempts to discard all the setup questions. ...

User Manual
Page 69
... Windows® 7 64-bit. 2. Please make sure to launch boot menu at system POST. 4. Choose the item "UEFI:xxx" to install the operating system. 1. Start Windows® installation. 69 Normally it is adopting UEFI BIOS that allows Windows® OS to be installed on a large size HDD (>2TB). Please follow below procedure... which contains your Windows® installation fi les. Installing OS on a HDD Larger Than 2TB This motherboard is an optical drive.) 5. Set AHCI Mode in UEFI Setup Utility > Advanced > Storage Configuration > SATA Mode. 3.
... Windows® 7 64-bit. 2. Please make sure to launch boot menu at system POST. 4. Choose the item "UEFI:xxx" to install the operating system. 1. Start Windows® installation. 69 Normally it is adopting UEFI BIOS that allows Windows® OS to be installed on a large size HDD (>2TB). Please follow below procedure... which contains your Windows® installation fi les. Installing OS on a HDD Larger Than 2TB This motherboard is an optical drive.) 5. Set AHCI Mode in UEFI Setup Utility > Advanced > Storage Configuration > SATA Mode. 3.

Quick Installation Guide
Page 7
... Reset Switch with LED BIOS Feature - 32Mb AMI UEFI Legal BIOS with GUI support - SMBIOS 2.3.1 Support - SmartView (see CAUTION 11) - Explorer, AMD Fusion, ASRock Software Suite (CyberLink DVD Suite - ASRock APP Charger (see CAUTION 12) - CPU Frequency...Voltage Multi-adjustment Support CD - Supports "Plug and Play" - ASRock Extreme Tuning Utility (AXTU) (see CAUTION 16) * For detailed product information, please visit our website: http://www.asrock.com English 7 ASRock 890GX Extreme4 Motherboard Hybrid Booster: - Microsoft® Windows® 7 / ...
... Reset Switch with LED BIOS Feature - 32Mb AMI UEFI Legal BIOS with GUI support - SMBIOS 2.3.1 Support - SmartView (see CAUTION 11) - Explorer, AMD Fusion, ASRock Software Suite (CyberLink DVD Suite - ASRock APP Charger (see CAUTION 12) - CPU Frequency...Voltage Multi-adjustment Support CD - Supports "Plug and Play" - ASRock Extreme Tuning Utility (AXTU) (see CAUTION 16) * For detailed product information, please visit our website: http://www.asrock.com English 7 ASRock 890GX Extreme4 Motherboard Hybrid Booster: - Microsoft® Windows® 7 / ...
Quick Installation Guide
Page 8
ASRock UCC (Unlock ... core to 6MB, which is an all-in-one tool to their 8 ASRock 890GX Extreme4 Motherboard English Overclocking may affect your own risk and expense. When UCC feature is... thirdparty overclocking tools. The maximum shared memory size is defined by overclocking. ASRock website http://www.asrock.com 5. For audio output, this motherboard supports both stereo and mono modes... including quad-core CPU, can enjoy the upgrade CPU performance with a better price. ASRock Extreme Tuning Utility (AXTU) is including Hardware Monitor, Fan Control, Overclocking, OC DNA...
ASRock UCC (Unlock ... core to 6MB, which is an all-in-one tool to their 8 ASRock 890GX Extreme4 Motherboard English Overclocking may affect your own risk and expense. When UCC feature is... thirdparty overclocking tools. The maximum shared memory size is defined by overclocking. ASRock website http://www.asrock.com 5. For audio output, this motherboard supports both stereo and mono modes... including quad-core CPU, can enjoy the upgrade CPU performance with a better price. ASRock Extreme Tuning Utility (AXTU) is including Hardware Monitor, Fan Control, Overclocking, OC DNA...

Quick Installation Guide
Page 17
... [128MB] [256MB] or [512MB] to the corresponding connectors of "Share Memory", [Auto], will be your system. If you do not adjust the UEFI setup, the default value of the add-on PCI Express VGA cards on VGA card is inserted to set up a multi-monitor display. Set the...Quality" as Secondary. Press to apply these new values. Click "Apply" or "OK" to enter UEFI setup. Boot your card, one , two, three, four, five, six, seven and eight. 17 ASRock 890GX Extreme4 Motherboard English If you have installed the drivers already, there is less than the total capability of ...
... [128MB] [256MB] or [512MB] to the corresponding connectors of "Share Memory", [Auto], will be your system. If you do not adjust the UEFI setup, the default value of the add-on PCI Express VGA cards on VGA card is inserted to set up a multi-monitor display. Set the...Quality" as Secondary. Press to apply these new values. Click "Apply" or "OK" to enter UEFI setup. Boot your card, one , two, three, four, five, six, seven and eight. 17 ASRock 890GX Extreme4 Motherboard English If you have installed the drivers already, there is less than the total capability of ...

Quick Installation Guide
Page 38
... Installing Windows® XP / XP 64-bit Without RAID Functions If you want to install those required drivers. A. Enter UEFI SETUP UTILITY Advanced screen Storage Configuration. English 38 ASRock 890GX Extreme4 Motherboard B. Then, the drivers compatible to your system can work properly. 2.13 Installing Windows® 7 / 7 64-... Install Windows® XP / XP 64-bit OS on your SATA3 HDDs without RAID functions, please follow the order from up UEFI. 2.12 Driver Installation Guide To install the drivers to your system, please insert the support CD to [IDE]. Therefore, the ...
... Installing Windows® XP / XP 64-bit Without RAID Functions If you want to install those required drivers. A. Enter UEFI SETUP UTILITY Advanced screen Storage Configuration. English 38 ASRock 890GX Extreme4 Motherboard B. Then, the drivers compatible to your system can work properly. 2.13 Installing Windows® 7 / 7 64-... Install Windows® XP / XP 64-bit OS on your SATA3 HDDs without RAID functions, please follow the order from up UEFI. 2.12 Driver Installation Guide To install the drivers to your system, please insert the support CD to [IDE]. Therefore, the ...

