User Manual
Page 28
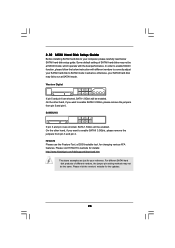
....com/hdd/support/download.htm The above examples are shorted, SATA 1.5Gb/s will be at SATAII mode. Please visit the vendors' website for changing various ATA features. On the other hand, if you want to enable SATAII 3.0Gb/s, please remove the jumpers from pin 5 and pin 6. 2.10 SATAII Hard Disk Setup Guide Before installing SATAII hard disk to your computer, please carefully read below instruction with the best performance. Some default setting...
....com/hdd/support/download.htm The above examples are shorted, SATA 1.5Gb/s will be at SATAII mode. Please visit the vendors' website for changing various ATA features. On the other hand, if you want to enable SATAII 3.0Gb/s, please remove the jumpers from pin 5 and pin 6. 2.10 SATAII Hard Disk Setup Guide Before installing SATAII hard disk to your computer, please carefully read below instruction with the best performance. Some default setting...

User Manual
Page 32
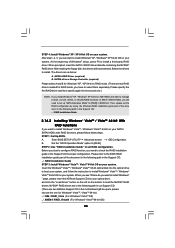
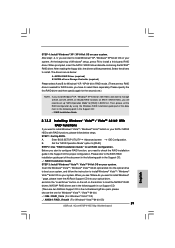
Using SATA / SATAII HDDs with NCQ and Hot Plug functions STEP 1: Set Up BIOS. Enter BIOS SETUP UTILITY Advanced screen IDE Configuration. Set the "SATA Operation Mode" option to continue 32 Please select CD-ROM as the boot device. D. Generate AHCI Driver diskette for WindowsXP 2. STEP 2: Make a SATA / SATAII driver diskette. Exit Reboot system now Press any key to [AHCI]. Please follow below procedures according to the OS you install. 2.15.1 Installing Windows® XP / XP 64-bit Without RAID Functions If...
Using SATA / SATAII HDDs with NCQ and Hot Plug functions STEP 1: Set Up BIOS. Enter BIOS SETUP UTILITY Advanced screen IDE Configuration. Set the "SATA Operation Mode" option to continue 32 Please select CD-ROM as the boot device. D. Generate AHCI Driver diskette for WindowsXP 2. STEP 2: Make a SATA / SATAII driver diskette. Exit Reboot system now Press any key to [AHCI]. Please follow below procedures according to the OS you install. 2.15.1 Installing Windows® XP / XP 64-bit Without RAID Functions If...
User Manual
Page 35
... presented. Enter BIOS SETUP UTILITY Advanced screen IDE Configuration. Before you start to install Windows® XP / Windows® XP 64-bit OS on your system. The drivers are as below steps. Then, please set the RAID configuration by using the Windows RAID installation guide part of the docu ment in the following path in BIOS first. Insert the Windows® VistaTM / Windows® VistaTM 64-bit optical disk into your system. A. B. " page, please insert the ASRock Support CD...
... presented. Enter BIOS SETUP UTILITY Advanced screen IDE Configuration. Before you start to install Windows® XP / Windows® XP 64-bit OS on your system. The drivers are as below steps. Then, please set the RAID configuration by using the Windows RAID installation guide part of the docu ment in the following path in BIOS first. Insert the Windows® VistaTM / Windows® VistaTM 64-bit optical disk into your system. A. B. " page, please insert the ASRock Support CD...
User Manual
Page 39
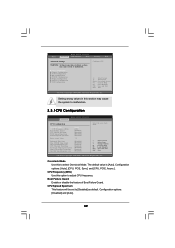
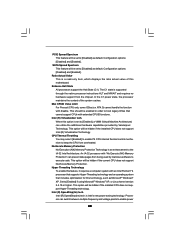
... adjust CPU frequency. CPU Frequency (MHz) Use this to malfunction. 3.3.1CPU Configuration BIOS SETUP UTILITY Advanced CPU Configuration Overclock Mode CPU Frequency (MHz) Boot Failure Guard CPU Spread Spectrum PCIE Spread Spectrum SATAII Spread Spectrum Ratio Actual Value Enhanced Halt State Max CPUID Value Limit Intel Virtualization tech. CPU Configuration Chipset Configuration ACPI Configuration IDE Configuration PCIPnP Configuration Floppy Configuration SuperIO Configuration USB Configuration Configure CPU Select Screen Select Item Enter Go to [Disabled] as default. Setting wrong...
... adjust CPU frequency. CPU Frequency (MHz) Use this to malfunction. 3.3.1CPU Configuration BIOS SETUP UTILITY Advanced CPU Configuration Overclock Mode CPU Frequency (MHz) Boot Failure Guard CPU Spread Spectrum PCIE Spread Spectrum SATAII Spread Spectrum Ratio Actual Value Enhanced Halt State Max CPUID Value Limit Intel Virtualization tech. CPU Configuration Chipset Configuration ACPI Configuration IDE Configuration PCIPnP Configuration Floppy Configuration SuperIO Configuration USB Configuration Configure CPU Select Screen Select Item Enter Go to [Disabled] as default. Setting wrong...
User Manual
Page 40
... select [Enabled] to enable P4 CPU internal thermal control mechanism to [Enabled] if using Microsoft® Windows® XP, or Linux kernel version 2.4.18 or higher. An IA-32 processor with an Intel Pentium® 4 processor that supports Hyper-Threading technology and an operating system that cannot support CPUs with disable. This option will be set to [Disabled] as default. Configuration options: [Disabled] and [Enabled]. The C1 state is supported through the native processor instructions HLT...
... select [Enabled] to enable P4 CPU internal thermal control mechanism to [Enabled] if using Microsoft® Windows® XP, or Linux kernel version 2.4.18 or higher. An IA-32 processor with an Intel Pentium® 4 processor that supports Hyper-Threading technology and an operating system that cannot support CPUs with disable. This option will be set to [Disabled] as default. Configuration options: [Disabled] and [Enabled]. The C1 state is supported through the native processor instructions HLT...
User Manual
Page 41
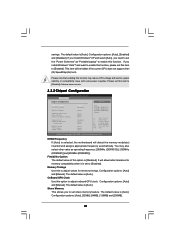
... as "Portable/Laptop" to [Disable] if above issue occurs. 3.3.2 Chipset Configuration BIOS SETUP UTILITY Advanced Chipset Configuration DRAM Frequency Flexibility Option Memory Timings OnBoard GPU Clock Share Memory Primary Graphics Adapter Onboard LAN OnBoard HD Audio Front Panel DRAM Voltage VTT Voltage VDDQ Voltage [Auto] [Disabled] [Auto] [Auto] [Auto] [PCI] [Enabled] [Auto] [Auto] [Auto] [Auto] [Auto] Options Auto 266MHz (DDRII533) 333MHz (DDRII667) 400MHz (DDRII800) Manual +F1 F9 F10 ESC Select Screen Select Item Change Option General Help Load Defaults Save and Exit Exit v02...
... as "Portable/Laptop" to [Disable] if above issue occurs. 3.3.2 Chipset Configuration BIOS SETUP UTILITY Advanced Chipset Configuration DRAM Frequency Flexibility Option Memory Timings OnBoard GPU Clock Share Memory Primary Graphics Adapter Onboard LAN OnBoard HD Audio Front Panel DRAM Voltage VTT Voltage VDDQ Voltage [Auto] [Disabled] [Auto] [Auto] [Auto] [PCI] [Enabled] [Auto] [Auto] [Auto] [Auto] [Auto] Options Auto 266MHz (DDRII533) 333MHz (DDRII667) 400MHz (DDRII800) Manual +F1 F9 F10 ESC Select Screen Select Item Change Option General Help Load Defaults Save and Exit Exit v02...
User Manual
Page 44
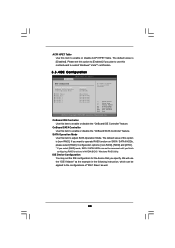
...]. Configuration options: [non-RAID], [RAID] and [AHCI]. * If you select [RAID] mode, SATA / SATAII HDDs can be accessed until you specify. The default value is [non-RAID]. If you plan to use the "IDE1 Master" as the example in NVIDIA BIOS / Windows RAID Utility. We will use this item to submit Windows® VistaTM certification. 3.3.4IDE Configuration BIOS SETUP UTILITY Advanced IDE Configuration OnBoard IDE Controller OnBoard SATA Controller SATA Operation Mode IDE1 Master IDE1 Slave SATAII_1 SATAII_2 SATAII_3 SATAII_4 [Enabled] [Enabled] [non-RAID] [Hard Disk...
...]. Configuration options: [non-RAID], [RAID] and [AHCI]. * If you select [RAID] mode, SATA / SATAII HDDs can be accessed until you specify. The default value is [non-RAID]. If you plan to use the "IDE1 Master" as the example in NVIDIA BIOS / Windows RAID Utility. We will use this item to submit Windows® VistaTM certification. 3.3.4IDE Configuration BIOS SETUP UTILITY Advanced IDE Configuration OnBoard IDE Controller OnBoard SATA Controller SATA Operation Mode IDE1 Master IDE1 Slave SATAII_1 SATAII_2 SATAII_3 SATAII_4 [Enabled] [Enabled] [non-RAID] [Hard Disk...
User Manual
Page 46
... Reporting Technology) feature. Configuration options: [Disabled], [Auto], [Enabled]. 32-Bit Data Transfer Use this item to maximize the IDE hard disk data transfer rate. 3.3.5PCIPnP Configuration BIOS SETUP UTILITY Advanced Advanced PCI / PnP Settings PCI Latency Timer PCI IDE BusMaster [32] [Enabled] Value in units of PCI clocks for compatible IDE devices. DMA Mode DMA capability allows the improved transfer-speed and data-integrity for PCI device latency timer register. +F1 F9 F10 ESC Select Screen Select Item Change Option General Help Load Defaults Save...
... Reporting Technology) feature. Configuration options: [Disabled], [Auto], [Enabled]. 32-Bit Data Transfer Use this item to maximize the IDE hard disk data transfer rate. 3.3.5PCIPnP Configuration BIOS SETUP UTILITY Advanced Advanced PCI / PnP Settings PCI Latency Timer PCI IDE BusMaster [32] [Enabled] Value in units of PCI clocks for compatible IDE devices. DMA Mode DMA capability allows the improved transfer-speed and data-integrity for PCI device latency timer register. +F1 F9 F10 ESC Select Screen Select Item Change Option General Help Load Defaults Save...
User Manual
Page 47
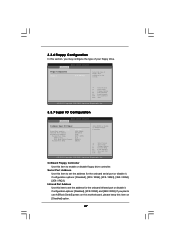
... enable or disable floppy drive controller. OnBoard Floppy Controller Use this section, you plan to use ASRock DeskExpress on this motherboard, please keep this item to set the address for the onboard serial port or disable it . BIOS SETUP UTILITY Advanced Floppy Configuration Floppy A [1.44 MB 312"] Select the type of your floppy drive. Configuration options: [Disabled], [2F8 / IRQ3], and [2E8 / IRQ3]. If you may configure the type of floppy drive connected to the system. +F1 F9 F10 ESC Select Screen Select Item Change Option General Help Load Defaults...
... enable or disable floppy drive controller. OnBoard Floppy Controller Use this section, you plan to use ASRock DeskExpress on this motherboard, please keep this item to set the address for the onboard serial port or disable it . BIOS SETUP UTILITY Advanced Floppy Configuration Floppy A [1.44 MB 312"] Select the type of your floppy drive. Configuration options: [Disabled], [2F8 / IRQ3], and [2E8 / IRQ3]. If you may configure the type of floppy drive connected to the system. +F1 F9 F10 ESC Select Screen Select Item Change Option General Help Load Defaults...
User Manual
Page 49
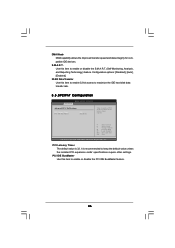
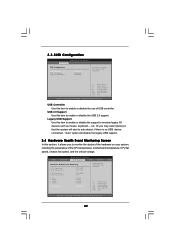
... to auto-detect; etc. 3.3.8USB Configuration BIOS SETUP UTILITY Advanced USB Configuration USB Controller USB 2.0 Support Legacy USB Support [Enabled] [Enabled] [Disabled] To enable or disable the onboard USB controllers. +F1 F9 F10 ESC Select Screen Select Item Change Option General Help Load Defaults Save and Exit Exit v02.54 (C) Copyright 1985-2005, American Megatrends, Inc. if there is no USB device connected, "Auto" option will start to enable or disable the use of the CPU temperature, motherboard temperature, CPU fan speed, chassis fan speed, and the critical voltage.
... to auto-detect; etc. 3.3.8USB Configuration BIOS SETUP UTILITY Advanced USB Configuration USB Controller USB 2.0 Support Legacy USB Support [Enabled] [Enabled] [Disabled] To enable or disable the onboard USB controllers. +F1 F9 F10 ESC Select Screen Select Item Change Option General Help Load Defaults Save and Exit Exit v02.54 (C) Copyright 1985-2005, American Megatrends, Inc. if there is no USB device connected, "Auto" option will start to enable or disable the use of the CPU temperature, motherboard temperature, CPU fan speed, chassis fan speed, and the critical voltage.
User Manual
Page 51
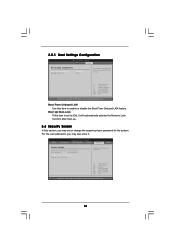
... . Boot From Onboard LAN Use this section, you may set or change the supervisor/user password for the system. 3.5.1 Boot Settings Configuration BIOS SETUP UTILITY Boot Boot Settings Configuration Boot From Onboard LAN Bootup Num-Lock [Disabled] [On] To enable or disable the boot from onboard LAN feature. +F1 F9 F10 ESC Select Screen Select Item Change Option General Help Load Defaults Save and Exit Exit v02.54 (C) Copyright 1985-2005, American Megatrends, Inc. Select Screen Select Item Enter Change F1 General Help F9 Load Defaults F10...
... . Boot From Onboard LAN Use this section, you may set or change the supervisor/user password for the system. 3.5.1 Boot Settings Configuration BIOS SETUP UTILITY Boot Boot Settings Configuration Boot From Onboard LAN Bootup Num-Lock [Disabled] [On] To enable or disable the boot from onboard LAN feature. +F1 F9 F10 ESC Select Screen Select Item Change Option General Help Load Defaults Save and Exit Exit v02.54 (C) Copyright 1985-2005, American Megatrends, Inc. Select Screen Select Item Enter Change F1 General Help F9 Load Defaults F10...
User Manual
Page 53
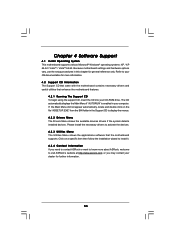
...-ROM drive. Refer to display the menus. 4.2.2 Drivers Menu The Drivers Menu shows the available devices drivers if the system detects installed devices. or you need to contact ASRock or want to know more information. 4.2 Support CD Information The Support CD that came with the motherboard contains necessary drivers and useful utilities that the motherboard supports. Please install the necessary drivers to visit ASRock's website at http://www.asrock.com; Because motherboard settings and hardware options vary, use...
...-ROM drive. Refer to display the menus. 4.2.2 Drivers Menu The Drivers Menu shows the available devices drivers if the system detects installed devices. or you need to contact ASRock or want to know more information. 4.2 Support CD Information The Support CD that came with the motherboard contains necessary drivers and useful utilities that the motherboard supports. Please install the necessary drivers to visit ASRock's website at http://www.asrock.com; Because motherboard settings and hardware options vary, use...
Quick Installation Guide
Page 7
... system usage under Microsoft® Windows® VistaTM 64-bit / VistaTM / XP 64-bit / XP SP1 or SP2. 10. You can also connect SATA hard disk to -use wireless local area network (WLAN) adapter. WiFi/E header supports WiFi+AP function with 64-bit CPU, there is not recommended to SATAII mode. Before you install the PC system. 6. Please read the "SATAII Hard Disk Setup Guide" on page 30 for...
... system usage under Microsoft® Windows® VistaTM 64-bit / VistaTM / XP 64-bit / XP SP1 or SP2. 10. You can also connect SATA hard disk to -use wireless local area network (WLAN) adapter. WiFi/E header supports WiFi+AP function with 64-bit CPU, there is not recommended to SATAII mode. Before you install the PC system. 6. Please read the "SATAII Hard Disk Setup Guide" on page 30 for...
Quick Installation Guide
Page 16
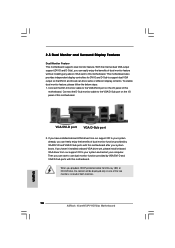
... monitors. 16 ASRock 4CoreN73PV-HD720p Motherboard English Connect the D-Sub monitor cable to the VGA/D-Sub port on the I/O panel of dual monitor feature without installing any add-on VGA card to the VGA/DVI-D port on the I/O panel of dual monitor function provided by VGA/DVI-D and VGA/D-Sub ports with this motherboard. Connect the DVI-D monitor cable to this motherboard after your system already, you can drive same or different display contents. If you have installed onboard VGA driver from our support CD to use dual monitor...
... monitors. 16 ASRock 4CoreN73PV-HD720p Motherboard English Connect the D-Sub monitor cable to the VGA/D-Sub port on the I/O panel of dual monitor feature without installing any add-on VGA card to the VGA/DVI-D port on the I/O panel of dual monitor function provided by VGA/DVI-D and VGA/D-Sub ports with this motherboard. Connect the DVI-D monitor cable to this motherboard after your system already, you can drive same or different display contents. If you have installed onboard VGA driver from our support CD to use dual monitor...
Quick Installation Guide
Page 17
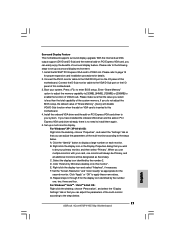
... can adjust the parameters of this motherboard. Surround Display Feature This motherboard supports surround display upgrade. Press to apply these new values. Install the onboard VGA driver and the add-on the I /O panel of "Share Memory", [Auto], will be designated as appropriate for the second monitor. E. Boot your system. Click "Apply" or "OK" to enter BIOS setup. Connect the D-Sub monitor cable to the VGA/D-Sub port on PCI Express VGA card driver to the steps below . Select...
... can adjust the parameters of this motherboard. Surround Display Feature This motherboard supports surround display upgrade. Press to apply these new values. Install the onboard VGA driver and the add-on the I /O panel of "Share Memory", [Auto], will be designated as appropriate for the second monitor. E. Boot your system. Click "Apply" or "OK" to enter BIOS setup. Connect the D-Sub monitor cable to the VGA/D-Sub port on PCI Express VGA card driver to the steps below . Select...
Quick Installation Guide
Page 26
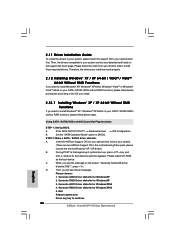
... the support CD driver page. A. Enter BIOS SETUP UTILITY Advanced screen IDE Configuration. Please select CD-ROM as the boot device. C. Exit Reboot system now Press any key to [AHCI]. Using SATA / SATAII HDDs with NCQ and Hot Plug functions STEP 1: Set Up BIOS. B. A. Insert the ASRock Support CD into your optical drive to boot your SATA / SATAII HDDs without RAID functions, please follow below procedures according to the OS you install. 2.12.1 Installing Windows® XP / XP 64-bit Without RAID...
... the support CD driver page. A. Enter BIOS SETUP UTILITY Advanced screen IDE Configuration. Please select CD-ROM as the boot device. C. Exit Reboot system now Press any key to [AHCI]. Using SATA / SATAII HDDs with NCQ and Hot Plug functions STEP 1: Set Up BIOS. B. A. Insert the ASRock Support CD into your optical drive to boot your SATA / SATAII HDDs without RAID functions, please follow below procedures according to the OS you install. 2.12.1 Installing Windows® XP / XP 64-bit Without RAID...
Quick Installation Guide
Page 29
... steps. Enter BIOS SETUP UTILITY Advanced screen IDE Configuration. NVIDIA® RAID drivers are in the following path in BIOS first. STEP 4: Install Windows® XP / XP 64-bit OS on your SATA / SATAII HDDs with RAID functions, please follow the instruction to install Windows® VistaTM / Windows® VistaTM 64-bit OS on your system. After reading the floppy disk, the drivers will be presented. Then, please set the RAID configuration by using the Windows RAID installation guide part of Windows® setup, press...
... steps. Enter BIOS SETUP UTILITY Advanced screen IDE Configuration. NVIDIA® RAID drivers are in the following path in BIOS first. STEP 4: Install Windows® XP / XP 64-bit OS on your SATA / SATAII HDDs with RAID functions, please follow the instruction to install Windows® VistaTM / Windows® VistaTM 64-bit OS on your system. After reading the floppy disk, the drivers will be presented. Then, please set the RAID configuration by using the Windows RAID installation guide part of Windows® setup, press...
Quick Installation Guide
Page 31
... BIN folder in the Support CD to enter BIOS Setup utility; The Support CD that will display the Main Menu automatically if "AUTORUN" is a menu-driven program, which allows you start up the computer, please press during the Power-On-Self-Test (POST) to display the menus. 31 ASRock 4CoreN73PV-HD720p Motherboard English BIOS Information The Flash Memory on the motherboard stores BIOS Setup Utility. otherwise, POST continues with the motherboard contains necessary drivers and useful utilities that came with...
... BIN folder in the Support CD to enter BIOS Setup utility; The Support CD that will display the Main Menu automatically if "AUTORUN" is a menu-driven program, which allows you start up the computer, please press during the Power-On-Self-Test (POST) to display the menus. 31 ASRock 4CoreN73PV-HD720p Motherboard English BIOS Information The Flash Memory on the motherboard stores BIOS Setup Utility. otherwise, POST continues with the motherboard contains necessary drivers and useful utilities that came with...

RAID Installation Guide
Page 7
... steps. Enter BIOS SETUP UTILITY Advanced screen IDE Configuration. STEP 2: Use "RAID Installation Guide" to install Windows?" Set the "SATA Operation Mode" option to continue the installation. If you install Windows® VistaTM / Windows® VistaTM 64-bit on IDE HDDs and want to manage (create, convert, delete, or rebuild) RAID functions on SATA / SATAII HDDs, you need to set the RAID configuration by using the Windows RAID installation guide in the following path in our Support CD: (There are two ASRock Support CD in the motherboard gift box...
... steps. Enter BIOS SETUP UTILITY Advanced screen IDE Configuration. STEP 2: Use "RAID Installation Guide" to install Windows?" Set the "SATA Operation Mode" option to continue the installation. If you install Windows® VistaTM / Windows® VistaTM 64-bit on IDE HDDs and want to manage (create, convert, delete, or rebuild) RAID functions on SATA / SATAII HDDs, you need to set the RAID configuration by using the Windows RAID installation guide in the following path in our Support CD: (There are two ASRock Support CD in the motherboard gift box...
RAID Installation Guide
Page 11
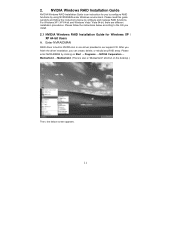
...; Mediashield. (There is also a "Mediashield" shortcut on the desktop.) Then, the below to configure and manage RAID functions. 2. Please enter NVRAIDMAN by using NVIDIAMAN under Windows environment. NVIDIA Windows RAID Installation Guide NVIDIA Windows RAID Installation Guide is built in NVIDIA ALL in one driver provided in our support CD. After you finish the driver installation, you install. 2.1 NVIDIA Windows RAID Installation Guide for Windows XP / XP 64-bit Users A. Please follow the instructions below screen appears. 11
...; Mediashield. (There is also a "Mediashield" shortcut on the desktop.) Then, the below to configure and manage RAID functions. 2. Please enter NVRAIDMAN by using NVIDIAMAN under Windows environment. NVIDIA Windows RAID Installation Guide NVIDIA Windows RAID Installation Guide is built in NVIDIA ALL in one driver provided in our support CD. After you finish the driver installation, you install. 2.1 NVIDIA Windows RAID Installation Guide for Windows XP / XP 64-bit Users A. Please follow the instructions below screen appears. 11


