User Manual
Page 8
... and devices of memory modules on this motherboard supports 2-channel, 4-channel, 6-channel, and 8-channel modes. Please read "Untied Overclocking Technology" on this DVI-D port to HDMI interface. Although this motherboard supports both stereo and mono modes. Before installing SATAII hard disk to SATAII connector, please read the installation guide of your own risk and expense. For Windows® XP 64-bit and Windows® VistaTM 64bit with overclocking, including adjusting the setting in the BIOS, applying Untied Overclocking Technology, or using...
... and devices of memory modules on this motherboard supports 2-channel, 4-channel, 6-channel, and 8-channel modes. Please read "Untied Overclocking Technology" on this DVI-D port to HDMI interface. Although this motherboard supports both stereo and mono modes. Before installing SATAII hard disk to SATAII connector, please read the installation guide of your own risk and expense. For Windows® XP 64-bit and Windows® VistaTM 64bit with overclocking, including adjusting the setting in the BIOS, applying Untied Overclocking Technology, or using...
User Manual
Page 9
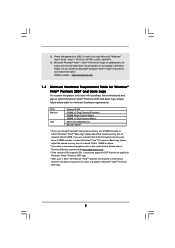
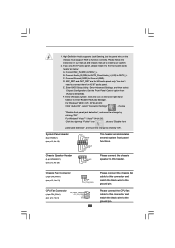
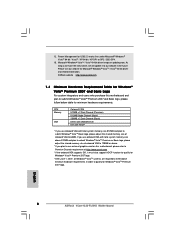
... motherboard, please refer to Premium Discrete requirement at http://www.asrock.com * If the onboard VGA supports DVI, it to qualify for minimum hardware requirements. Please visit our website for USB 2.0 works fine under Microsoft® Windows® VistaTM 64-bit / VistaTM / XP 64-bit / XP SP1 or SP2 / 2000 SP4. 13. CPU Memory VGA Celeron D 326 512MB x 2 Dual Channel (Premium) 512MB Single Channel (Basic) 256MB x 2 Dual Channel...
... motherboard, please refer to Premium Discrete requirement at http://www.asrock.com * If the onboard VGA supports DVI, it to qualify for minimum hardware requirements. Please visit our website for USB 2.0 works fine under Microsoft® Windows® VistaTM 64-bit / VistaTM / XP 64-bit / XP SP1 or SP2 / 2000 SP4. 13. CPU Memory VGA Celeron D 326 512MB x 2 Dual Channel (Premium) 512MB Single Channel (Basic) 256MB x 2 Dual Channel...
User Manual
Page 24
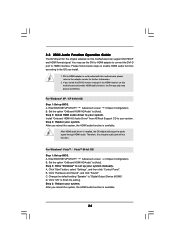
... setting. For Windows® VistaTM / VistaTM 64-bit OS Step 1:Set up BIOS. A. Click "OK" to [Auto]. 2.8 HDMI Audio Function Operation Guide The DVI-D port for further information. 2. Set the option "OnBoard HDMI HD Audio" to HDMI interface. You may pause sometimes. Step 2: Enter Windows® to "Digital Output Device (HDMI)". Enter BIOS SETUP UTILITY Advanced screen Chipset Configuration. B. Step 3: Reboot your system. Step 3: Reboot your system. B. D. Change the default setting "Speaker" to set up your system. Step 2: Install HDMI audio driver...
... setting. For Windows® VistaTM / VistaTM 64-bit OS Step 1:Set up BIOS. A. Click "OK" to [Auto]. 2.8 HDMI Audio Function Operation Guide The DVI-D port for further information. 2. Set the option "OnBoard HDMI HD Audio" to HDMI interface. You may pause sometimes. Step 2: Enter Windows® to "Digital Output Device (HDMI)". Enter BIOS SETUP UTILITY Advanced screen Chipset Configuration. B. Step 3: Reboot your system. Step 3: Reboot your system. B. D. Change the default setting "Speaker" to set up your system. Step 2: Install HDMI audio driver...
User Manual
Page 28
...". High Definition Audio supports Jack Sensing, but the panel wire on the lower right hand taskbar to OUT2_L. You don't need to function correctly. Set the Front Panel Control option from [Auto] to MIC2_L. F. MIC_RET and OUT_RET are for AC'97 audio panel. Enter BIOS Setup Utility. Connect Mic_IN (MIC) to [Enabled]. B. Enter Windows system. Please connect the chassis speaker to the front panel audio header as below: A. 1. If you use AC'97 audio panel, please install it to this header. D. Chassis Fan Connector (3-pin...
...". High Definition Audio supports Jack Sensing, but the panel wire on the lower right hand taskbar to OUT2_L. You don't need to function correctly. Set the Front Panel Control option from [Auto] to MIC2_L. F. MIC_RET and OUT_RET are for AC'97 audio panel. Enter BIOS Setup Utility. Connect Mic_IN (MIC) to [Enabled]. B. Enter Windows system. Please connect the chassis speaker to the front panel audio header as below: A. 1. If you use AC'97 audio panel, please install it to this header. D. Chassis Fan Connector (3-pin...

User Manual
Page 30
...; Please visit the vendors' website for changing various ATA features. otherwise, your reference. Please visit HITACHI's website for details: http://www.hitachigst.com/hdd/support/download.htm The above examples are just for your SATAII hard disk may not be enabled. Some default setting of different vendors, the jumper pin setting methods may fail to enable SATAII function, please follow the below SATAII hard disk setup guide.
...; Please visit the vendors' website for changing various ATA features. otherwise, your reference. Please visit HITACHI's website for details: http://www.hitachigst.com/hdd/support/download.htm The above examples are just for your SATAII hard disk may not be enabled. Some default setting of different vendors, the jumper pin setting methods may fail to enable SATAII function, please follow the below SATAII hard disk setup guide.
User Manual
Page 35
... more SATA / SATAII HDDs with RAID functions, please follow below procedures according to the OS you plan to use HDMR card function on this motherboard. Please make sure that the HDMR card is completely seated on updating now. Reboot your system. htm#the_integrated_installation_fmay 2.17.1 Installing Windows® 2000 / XP / XP 64-bit With RAID Functions If you install can be auto-detected and listed on a RAID disk...
... more SATA / SATAII HDDs with RAID functions, please follow below procedures according to the OS you plan to use HDMR card function on this motherboard. Please make sure that the HDMR card is completely seated on updating now. Reboot your system. htm#the_integrated_installation_fmay 2.17.1 Installing Windows® 2000 / XP / XP 64-bit With RAID Functions If you install can be auto-detected and listed on a RAID disk...
User Manual
Page 36
... to set up "SATA Operation Mode" to format the floppy diskette and copy SATA / SATAII drivers into the floppy drive, and press any key. Enter BIOS SETUP UTILITY Advanced screen IDE Configuration. Before you start to [RAID] first. When prompted, insert the SATA / SATAII driver diskette containing the ATITM RAID driver. If you install Windows® 2000 / Windows® XP / Windows® XP 64-bit on IDE HDDs and want to install a third-party RAID driver. STEP 1: Set up , press key, and then a window for boot devices...
... to set up "SATA Operation Mode" to format the floppy diskette and copy SATA / SATAII drivers into the floppy drive, and press any key. Enter BIOS SETUP UTILITY Advanced screen IDE Configuration. Before you start to [RAID] first. When prompted, insert the SATA / SATAII driver diskette containing the ATITM RAID driver. If you install Windows® 2000 / Windows® XP / Windows® XP 64-bit on IDE HDDs and want to install a third-party RAID driver. STEP 1: Set up , press key, and then a window for boot devices...
User Manual
Page 37
... please set RAID configuration. Enter BIOS SETUP UTILITY Advanced screen IDE Configuration. STEP 2: Use "RAID Installation Guide" to set the RAID configuration by using the Windows RAID installation guide in the following path in the motherboard gift box pack, please choose the one for proper configuration. When you see "Where do you want to [RAID]. Set the "SATA Operation Mode" option to install Windows?" ATITM RAID drivers are in the following path in the Support CD: .. \ RAID Installation Guide STEP 3: Install Windows® VistaTM / VistaTM 64-bit OS on a RAID disk...
... please set RAID configuration. Enter BIOS SETUP UTILITY Advanced screen IDE Configuration. STEP 2: Use "RAID Installation Guide" to set the RAID configuration by using the Windows RAID installation guide in the following path in the motherboard gift box pack, please choose the one for proper configuration. When you see "Where do you want to [RAID]. Set the "SATA Operation Mode" option to install Windows?" ATITM RAID drivers are in the following path in the Support CD: .. \ RAID Installation Guide STEP 3: Install Windows® VistaTM / VistaTM 64-bit OS on a RAID disk...
User Manual
Page 43
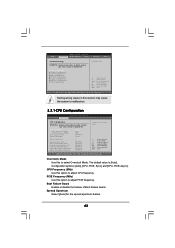
...43 BIOS SETUP UTILITY Main Advanced H/W Monitor Boot Security Exit Advanced Settings WARNING : Setting wrong values in below sections may cause system to malfunction. Overclock Mode CPU Frequency (MHz) PCIE Frequency (MHz) Boot Failure Guard Spread Spectrum Ratio Actual Value Enhanced Halt State Max CPUID Value Limit Intel (R) Virtualization tech. The default value is [Auto]. CPU Configuration Chipset Configuration ACPI Configuration IDE Configuration PCIPnP Configuration Floppy Configuration SuperIO Configuration USB Configuration Configure CPU Select Screen Select Item Enter Go...
...43 BIOS SETUP UTILITY Main Advanced H/W Monitor Boot Security Exit Advanced Settings WARNING : Setting wrong values in below sections may cause system to malfunction. Overclock Mode CPU Frequency (MHz) PCIE Frequency (MHz) Boot Failure Guard Spread Spectrum Ratio Actual Value Enhanced Halt State Max CPUID Value Limit Intel (R) Virtualization tech. The default value is [Auto]. CPU Configuration Chipset Configuration ACPI Configuration IDE Configuration PCIPnP Configuration Floppy Configuration SuperIO Configuration USB Configuration Configure CPU Select Screen Select Item Enter Go...
User Manual
Page 47
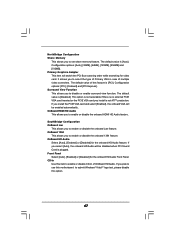
...-In Use this feature is [PCI]. The default value is [Disabled]. This option is not selectable if there is no external PCIE VGA card inserted or the PCIE VGA card you install the PCIE VGA card and select [Enabled], the onboard VGA will be disabled when PCI Sound Card is not ATITM production. If you install is plugged. It allows you select [Auto], the onboard HD Audio will switch the PCI Bus scanning order while searching for video card. SouthBridge Configuration OnBoard Lan This allows...
...-In Use this feature is [PCI]. The default value is [Disabled]. This option is not selectable if there is no external PCIE VGA card inserted or the PCIE VGA card you install the PCIE VGA card and select [Enabled], the onboard VGA will be disabled when PCI Sound Card is not ATITM production. If you install is plugged. It allows you select [Auto], the onboard HD Audio will switch the PCI Bus scanning order while searching for video card. SouthBridge Configuration OnBoard Lan This allows...

User Manual
Page 49
... the system. +F1 F9 F10 ESC Select Screen Select Item Change Option General Help Load Defaults Save and Exit Exit v02.54 (C) Copyright 1985-2003, American Megatrends, Inc. 49 The default value of "Primary IDE Slave" as well. BIOS SETUP UTILITY Advanced Primary IDE Master Device Vendor Size LBA Mode Block Mode PIO Mode Async DMA Ultra DMA S.M.A.R.T. 3.3.4 IDE Configuration BIOS SETUP UTILITY Advanced IDE Configuration Onboard SATA Controller SATA Operation Mode [Enabled] [non-RAID] Configure onboard serial ATA Controller. Configuration options: [RAID], [non-RAID], [AHCI].
... the system. +F1 F9 F10 ESC Select Screen Select Item Change Option General Help Load Defaults Save and Exit Exit v02.54 (C) Copyright 1985-2003, American Megatrends, Inc. 49 The default value of "Primary IDE Slave" as well. BIOS SETUP UTILITY Advanced Primary IDE Master Device Vendor Size LBA Mode Block Mode PIO Mode Async DMA Ultra DMA S.M.A.R.T. 3.3.4 IDE Configuration BIOS SETUP UTILITY Advanced IDE Configuration Onboard SATA Controller SATA Operation Mode [Enabled] [non-RAID] Configure onboard serial ATA Controller. Configuration options: [RAID], [non-RAID], [AHCI].
User Manual
Page 50
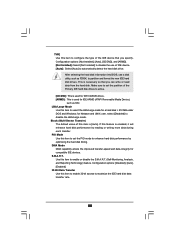
... into BIOS, use of IDE device. [Auto]: Select [Auto] to automatically detect the hard disk drive. Configuration options: [Not Installed], [Auto], [CD/DVD], and [ARMD]. [Not Installed]: Select [Not Installed] to disable the use a disk utility, such as MO. for IDE ARMD (ATAPI Removable Media Device), such as FDISK, to partition and format the new IDE hard disk drives. Block (Multi-Sector Transfer) The default value of this item to enable or disable the S.M.A.R.T. (Self-Monitoring, Analysis, and Reporting Technology) feature. DMA Mode...
... into BIOS, use of IDE device. [Auto]: Select [Auto] to automatically detect the hard disk drive. Configuration options: [Not Installed], [Auto], [CD/DVD], and [ARMD]. [Not Installed]: Select [Not Installed] to disable the use a disk utility, such as MO. for IDE ARMD (ATAPI Removable Media Device), such as FDISK, to partition and format the new IDE hard disk drives. Block (Multi-Sector Transfer) The default value of this item to enable or disable the S.M.A.R.T. (Self-Monitoring, Analysis, and Reporting Technology) feature. DMA Mode...
User Manual
Page 56
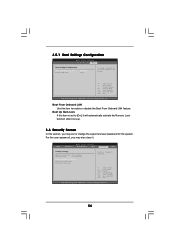
... Screen Select Item Enter Change F1 General Help F9 Load Defaults F10 Save and Exit ESC Exit v02.54 (C) Copyright 1985-2003, American Megatrends, Inc. 56 Boot From Onboard LAN Use this section, you may set to enable or disable the Boot From Onboard LAN feature. 3.5.1 Boot Settings Configuration BIOS SETUP UTILITY Boot Boot Settings Configuration Boot From Onboard LAN Bootup Num-Lock [Disabled] [On] To enable or disable the boot from onboard LAN feature. +F1 F9 F10 ESC Select Screen Select Item Change Option General Help Load Defaults...
... Screen Select Item Enter Change F1 General Help F9 Load Defaults F10 Save and Exit ESC Exit v02.54 (C) Copyright 1985-2003, American Megatrends, Inc. 56 Boot From Onboard LAN Use this section, you may set to enable or disable the Boot From Onboard LAN feature. 3.5.1 Boot Settings Configuration BIOS SETUP UTILITY Boot Boot Settings Configuration Boot From Onboard LAN Bootup Num-Lock [Disabled] [On] To enable or disable the boot from onboard LAN feature. +F1 F9 F10 ESC Select Screen Select Item Change Option General Help Load Defaults...
User Manual
Page 58
... the Main Menu did not appear automatically, locate and double click on a specific item then follow the installation wizard to visit ASRock's website at http://www.asrock.com; Chapter 4 Software Support 4.1 Install Operating System This motherboard supports various Microsoft® Windows® operating systems: 2000 / XP / XP 64-bit / VistaTM / VistaTM 64-bit. Because motherboard settings and hardware options vary, use the setup procedures in this chapter for more about ASRock...
... the Main Menu did not appear automatically, locate and double click on a specific item then follow the installation wizard to visit ASRock's website at http://www.asrock.com; Chapter 4 Software Support 4.1 Install Operating System This motherboard supports various Microsoft® Windows® operating systems: 2000 / XP / XP 64-bit / VistaTM / VistaTM 64-bit. Because motherboard settings and hardware options vary, use the setup procedures in this chapter for more about ASRock...

Quick Installation Guide
Page 7
...; XP 64-bit and Windows® VistaTM 64bit with 64-bit CPU, there is no such limitation. 6. DVI to HDMI adapter is not bundled with our product, please refer to read the installation guide of your system. For audio output, this motherboard supports both stereo and mono modes. Please read the "SATAII Hard Disk Setup Guide" on this DVI-D port to SATAII connector directly. 7 ASRock 4Core1333-FullHD Motherboard English Frequencies other than...
...; XP 64-bit and Windows® VistaTM 64bit with 64-bit CPU, there is no such limitation. 6. DVI to HDMI adapter is not bundled with our product, please refer to read the installation guide of your system. For audio output, this motherboard supports both stereo and mono modes. Please read the "SATAII Hard Disk Setup Guide" on this DVI-D port to SATAII connector directly. 7 ASRock 4Core1333-FullHD Motherboard English Frequencies other than...
Quick Installation Guide
Page 8
If you use external graphics card on updating now. English 8 ASRock 4Core1333-FullHD Motherboard Power Management for Microsoft® Windows® VistaTM / VistaTM 64-bit driver and related information. Microsoft® Windows® VistaTM / VistaTM 64-bit driver keeps on this motherboard and plan to 128MB or above minimum hardware requirements in the future. CPU Memory VGA Celeron D 326 512MB x 2 Dual Channel (Premium) 512MB Single Channel (Basic) 256MB x 2 Dual Channel (Basic) DX9.0 with WDDM Driver DVI...
If you use external graphics card on updating now. English 8 ASRock 4Core1333-FullHD Motherboard Power Management for Microsoft® Windows® VistaTM / VistaTM 64-bit driver and related information. Microsoft® Windows® VistaTM / VistaTM 64-bit driver keeps on this motherboard and plan to 128MB or above minimum hardware requirements in the future. CPU Memory VGA Celeron D 326 512MB x 2 Dual Channel (Premium) 512MB Single Channel (Basic) 256MB x 2 Dual Channel (Basic) DX9.0 with WDDM Driver DVI...

Quick Installation Guide
Page 20
.... For Windows® XP / XP 64-bit OS Step 1:Set up BIOS. Set the option "OnBoard HDMI HD Audio" to your system manually. After you play may use the DVI to HDMI adapter to convert the DVI-D port to your system. DVI to HDMI adapter is available. 20 ASRock 4Core1333-FullHD Motherboard English Install "Onboard HDMI HD Audio Driver" from ASRock Support CD to [Auto]. A. A. B. Change the default setting "Speaker" to finish the setting. D. Click "OK" to "Digital Output Device (HDMI)". Enter BIOS SETUP UTILITY Advanced screen Chipset Configuration. Step...
.... For Windows® XP / XP 64-bit OS Step 1:Set up BIOS. Set the option "OnBoard HDMI HD Audio" to your system manually. After you play may use the DVI to HDMI adapter to convert the DVI-D port to your system. DVI to HDMI adapter is available. 20 ASRock 4Core1333-FullHD Motherboard English Install "Onboard HDMI HD Audio Driver" from ASRock Support CD to [Auto]. A. A. B. Change the default setting "Speaker" to finish the setting. D. Click "OK" to "Digital Output Device (HDMI)". Enter BIOS SETUP UTILITY Advanced screen Chipset Configuration. Step...

Quick Installation Guide
Page 29
... SATA / SATAII HDDs with RAID functions, please follow below steps. 29 ASRock 4Core1333-FullHD Motherboard English htm#the_integrated_installation_fmay 2.14.1 Installing Windows® 2000 / XP / XP 64-bit With RAID Functions If you want to include SP4. Reboot your optical drive first. Therefore, the drivers you install can be auto-detected and listed on updating now. For Windows® VistaTM / VistaTM 64-bit OS, the SATA / SATAII RAID driver keeps on the support CD driver...
... SATA / SATAII HDDs with RAID functions, please follow below steps. 29 ASRock 4Core1333-FullHD Motherboard English htm#the_integrated_installation_fmay 2.14.1 Installing Windows® 2000 / XP / XP 64-bit With RAID Functions If you want to include SP4. Reboot your optical drive first. Therefore, the drivers you install can be auto-detected and listed on updating now. For Windows® VistaTM / VistaTM 64-bit OS, the SATA / SATAII RAID driver keeps on the support CD driver...

Quick Installation Guide
Page 31
...[RAID]. STEP 1: Set up "SATA Operation Mode" to the BIOS RAID installation guide part of 2 or more SATA / SATAII HDDs with RAID functions, please follow the instruction to load the ATITM RAID drivers. Set the "SATA Operation Mode" option to check the RAID installation guide in the Support CD: .. \ RAID Installation Guide English 31 ASRock 4Core1333-FullHD Motherboard Before you start to configure RAID function, you need to set the RAID configuration by using the Windows RAID installation guide in the following path in the Support CD for Windows® VistaTM / VistaTM 64-bit...
...[RAID]. STEP 1: Set up "SATA Operation Mode" to the BIOS RAID installation guide part of 2 or more SATA / SATAII HDDs with RAID functions, please follow the instruction to load the ATITM RAID drivers. Set the "SATA Operation Mode" option to check the RAID installation guide in the Support CD: .. \ RAID Installation Guide English 31 ASRock 4Core1333-FullHD Motherboard Before you start to configure RAID function, you need to set the RAID configuration by using the Windows RAID installation guide in the following path in the Support CD for Windows® VistaTM / VistaTM 64-bit...

Quick Installation Guide
Page 35
... to enter BIOS Setup utility; It is a menu-driven program, which allows you start up the computer, please press during the Power-On-Self-Test (POST) to enter BIOS Setup after POST, please restart the system by pressing + + , or pressing the reset button on the file "ASSETUP. To begin using the Support CD, insert the CD into your computer. When you to display the menus. 35 ASRock 4Core1333-FullHD Motherboard English Software Support CD...
... to enter BIOS Setup utility; It is a menu-driven program, which allows you start up the computer, please press during the Power-On-Self-Test (POST) to enter BIOS Setup after POST, please restart the system by pressing + + , or pressing the reset button on the file "ASSETUP. To begin using the Support CD, insert the CD into your computer. When you to display the menus. 35 ASRock 4Core1333-FullHD Motherboard English Software Support CD...


